はじめに
ブラウザに打ち込んだ英文をChatGPTに翻訳してもらいたいことがよくあるのですが、別タブでChatGPTを開くのが面倒なため、Chromeプラグインを作成することにしました。プロンプトは普段使っているものをベースにし、自分の好みの結果を返してくれるようにします。
※OpenAIのAPI Keyを使う関係で公開はしておらず、ローカルに置いたものをChromeから使用します。
作成したもの
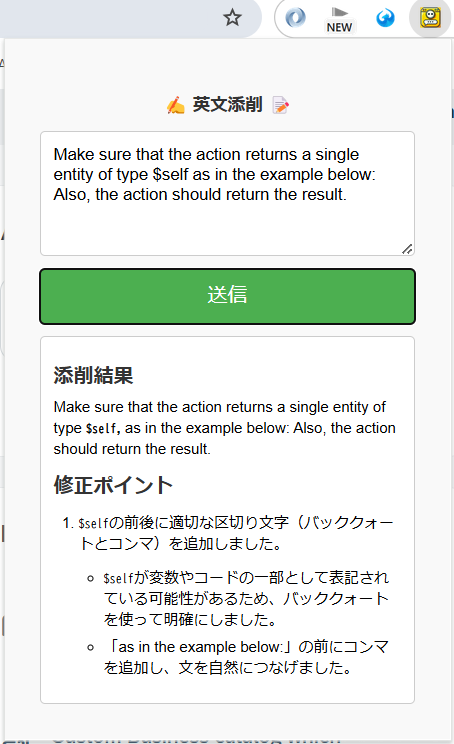
拡張のアイコンをクリックすると起動します。画像だとわかりづらいですが、修正箇所を太字で表示してくれるところがポイントです。
作成手順
- プロジェクトフォルダの作成
- ソースコード
- Chromeに追加
1. プロジェクトフォルダの作成
以下の構成でchrome-extensionフォルダを作成します。
.
├── icon.png //ブラウザに表示されるアイコン
├── libs
│   └── marked.min.js
├── manifest.json
├── popup.html
└── popup.js
libs/marked.min.jsはChatGPTが返してきたマークダウン形式の回答をHTML形式に変換するためのライブラリです。以下からダウンロードしました。
https://cdn.jsdelivr.net/npm/marked/marked.min.js
2. ソースコード
2.1. mainfest.json
{
    "manifest_version": 3,
    "name": "English Proofreading with ChatGPT",
    "version": "1.0",
    "description": "ChatGPTによる英文添削",
    "permissions": [],
    "action": {
      "default_popup": "popup.html",
      "default_icon": {
        "16": "icon.png",
        "48": "icon.png",
        "128": "icon.png"
      }
    },
    "icons": {
        "16": "icon.png",
        "48": "icon.png",
        "128": "icon.png"
    }
  }
2.2. popup.html
<!DOCTYPE html>
<html lang="ja">
<head>
    <meta charset="UTF-8">
    <meta name="viewport" content="width=device-width, initial-scale=1.0">
    <title>ChatGPT Helper</title>
    <style>
        body {
            width: 300px;
            padding: 20px;
            font-family: Arial, sans-serif;
            background-color: #f9f9f9;
        }
        .container {
            display: flex;
            flex-direction: column;
            align-items: center;
        }
        h3 {
            margin-bottom: 10px;
            color: #333;
        }
        textarea {
            width: 100%; /* テキストエリアの幅を100%に */
            height: 100px;
            padding: 10px;
            border: 1px solid #ccc;
            border-radius: 4px;
            box-sizing: border-box;
            margin-bottom: 10px;
            font-family: inherit; /* フォントを親要素のフォントに合わせる */
        }
        button {
            width: 100%;
            padding: 10px;
            background-color: #4CAF50;
            color: white;
            border: none;
            border-radius: 4px;
            cursor: pointer;
            font-size: 16px;
            margin-bottom: 10px; /* Add margin to create gap */
        }
        button:hover {
            background-color: #45a049;
        }
        #result-container {
            width: 100%;
            padding: 10px;
            border: 1px solid #ccc;
            border-radius: 4px;
            background-color: #fff;
            display: none;
            box-sizing: border-box;
            font-family: inherit; /* フォントを親要素のフォントに合わせる */
        }
        #result-container h3 {
            font-size: 16px;
            font-weight: bold;
            margin-top: 10px;
            margin-bottom: 5px; /* 下の余白を縮小 */
            color: #333;
        }
        #result-container p {
            margin: 5px 0; /* 上下の余白を縮小 */
            line-height: 1.4; /* 行間を調整 */
        }
        #result-container ol, #result-container ul {
            margin: 10px 0; /* 上下の余白を縮小 */
            padding-left: 20px; /* インデントを調整 */
        }
        #result-container li {
            margin-bottom: 5px; /* リスト項目間の余白を縮小 */
            line-height: 1.4; /* リストの行間を調整 */
        }
        #result-container strong {
            font-weight: bold;
            color: #000;
        }
        #spinner {
            border: 4px solid #f3f3f3;
            border-top: 4px solid #4CAF50;
            border-radius: 50%;
            width: 30px;
            height: 30px;
            animation: spin 1s linear infinite;
            margin: 10px auto; /* センター配置 */
        }

        @keyframes spin {
            0% {
                transform: rotate(0deg);
            }
            100% {
                transform: rotate(360deg);
            }
        }
    </style>
    <script src="libs/marked.min.js"></script>
</head>
<body>
    <div class="container">
        <h3>✍️ 英文添削 📝</h3>
        <textarea id="input-text"></textarea>
        <button id="send-button">送信</button>
        <div id="spinner" style="display: none;"></div>
        <div id="result-container">
            <p id="result-text"></p>
        </div>
    </div>
    <script src="popup.js"></script>
</body>
</html>
3. popup.js
①プロンプトをOpenAIのAPIに渡す、②返ってきた回答をHTML形式にパースして画面に表示する、といことをしています。
marked.setOptions({
    gfm: true,
    breaks: true,
    sanitize: true,
});

document.addEventListener("DOMContentLoaded", function() {
    const sendButton = document.getElementById('send-button');
    const inputText = document.getElementById('input-text');
    const resultContainer = document.getElementById('result-container');
    const resultText = document.getElementById('result-text');
    const spinner = document.getElementById('spinner');

    const API_KEY = 'sk-xxxx';
    const prompt = `
        あなたは英語の先生です。提示された英文を添削してください。

        ## 添削の観点
        - 文法的な正しさ
        - 表現の自然さ
        - 意味が正確に伝わるかどうか
        - 乱暴、ぶっきらぼうな表現になっていないか

        ## アウトプット
        元の英文に問題がないとき
        - 「添削の必要はありません」

        添削が必要なとき
        - はじめに修正した文章の全文を提示する(修正箇所は必ず太字にする)
        - 修正したすべてのポイントを箇条書きで列挙する
        - 解説は日本語とする(簡潔に)

        ## サンプル
        input:
        I have a apple.

        output:
        ### 添削結果
        I have **an** apple.

        ### 修正ポイント
        1. appleの前に冠詞"a"ではなく"an"を使う
        2. "a"の後には子音が続くときは"a"を使い、母音が続くときは"an"を使う

        次に渡されるユーザーの英文に対してこのガイドラインを適用してください。
    `;

    sendButton.addEventListener('click', async function() {
        const userText = inputText.value.trim();

        if (!userText) {
            alert('英文を入力してください');
            return;
        }

        // reset the result
        resultContainer.style.display = 'none';
        resultText.innerHTML = '';
        spinner.style.display = 'block';

        try {
            const response = await fetch('https://api.openai.com/v1/chat/completions', {
                method: 'POST',
                headers: {
                    'Content-Type': 'application/json',
                    'Authorization': `Bearer ${API_KEY}`,
                },
                body: JSON.stringify({
                    model: 'gpt-4o',
                    messages: [
                        {
                            role: 'system',
                            content: prompt,
                        },
                        {
                            role: 'user',
                            content: userText,
                        },
                    ],
                    max_tokens: 500,
                    temperature: 0.7
                }),
            });

            if (!response.ok) {
                throw new Error(`APIの呼び出しに失敗しました: ${response.statusText}`);
            }

            const data = await response.json();
            const markdownText = data.choices[0].message.content;

            // マークダウンをHTMLに変換
            const htmlContent = marked.parse(markdownText);

            // 添削結果を表示
            resultText.innerHTML = htmlContent;
            resultContainer.style.display = 'block';

        } catch (error) {
            console.error(error);
            alert('APIの呼び出しに失敗しました。コンソールを確認してください');
        } finally {
            spinner.style.display = 'none'; // スピナーを非表示
        }
    });
});
3. Chromeに追加
ローカルのソースをChrome拡張として追加するため、以下の手順で設定を行います。
3.1. Developer modeを有効化
chrome://extensionsを開き、Developer modeを有効にします。

3.2. 拡張を追加
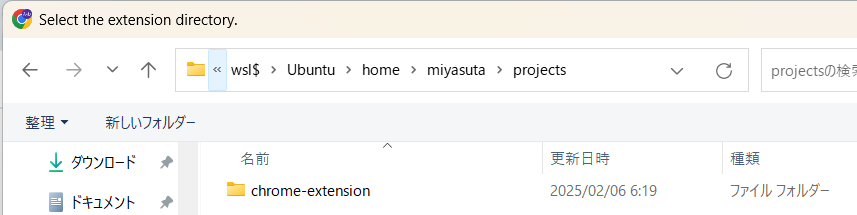
Load unpackedをクリックし、作成したフォルダ(chrome-extension)を選択します。
※WSLで開発しているため、エクスプローラのアドレスバーに\\wsl$\Ubuntu\home\path-to-projectのように指定して、作成したフォルダを選択しました
拡張が追加されます。

おわりに
Chromeの拡張を開発するのは初めてだったため、ChatGPTに聞きながら進めました。4時間弱くらいで意図したものができてとても嬉しかったです!
今回作成したソースのプロンプトを変えることでさまざまな用途の「ちょこっとGPT」を作れるので、みなさんの参考になれば幸いです。