はじめに
この記事は、Node.jsとPostgreSQLでシンプルなアプリケーションを作成するシリーズの4回目です。
この記事のゴール
以下のようなアプリを作成します。このアプリには前回の記事で作成したApprouter経由でアクセスします。
- 一覧画面
- 行をクリックすると詳細画面に遷移
- +ボタンをクリックすると登録画面(=詳細画面)に遷移
- 行を選択してDeleteボタンを押すと削除

- 詳細画面
- 新規Productの登録、変更、削除が可能

- 新規Productの登録、変更、削除が可能
技術的には、以下のようなポイントがあります。
- SAPUI5からREST APIを呼ぶ
- バックエンドのサービス、Approuter、UI5モジュールを一つのMTAプロジェクトでデプロイする
- ローカル環境からCloud Foundryのサービスに接続する
ステップ
- UI用のプロジェクトを生成
- Cloud Fondryにデプロイするための設定を追加
- ローカル実行用の設定を追加
- List Viewを作成
- Detail Viewを作成
- Cloud Foundryにデプロイ
※以下では主要なステップ、処理について説明します。ソースコードの全体はGitHubをご参照ください。
1. UI用のプロジェクトを生成
generator-easy-ui5を使用してUI5プロジェクトを作成します。プロジェクトのルートに移動して以下のコマンドを実行します。
yo easy-ui5 project
デプロイ先として、Static webserverを選択します。

プロジェクトの構成は以下のようになります。
node-postgres-sample
  |- approuter
  |- demo.manageproducts
 |- srv
 └ mta.yaml
2. Cloud Fondryにデプロイするための設定を追加
2.1. ui5-task-zipperをインストール
ui5-task-zipperはビルドしたUI5アプリをzipにまとめるためのモジュールです。
npm install ui5-task-zipper --save-dev
package.jsonのui5.dependenciesにも追加します。
  "ui5": {
    "dependencies": [
      "ui5-middleware-livereload",
      "ui5-task-zipper"
    ]
  }
2.2. ui5.yamlの設定
builderセクションを追加します。これにより、ビルドの後にzipが行われます。
builder:
  customTasks:
    -  name: ui5-task-zipper
       afterTask: uglify
       configuration:
         includeDependencies: false
         archiveName: uimodule
2.3. xs-app.jsonを追加
webappフォルダ配下にxs-app.jsonを追加します。
{
    "welcomeFile": "/index.html",
    "routes": [
      {
        "source": "^(.*)",
        "target": "$1",
        "authenticationType": "xsuaa",
        "service": "html5-apps-repo-rt"
      }
    ]
  }
2.4. ApprouterのwelcomeFileを変更
ApprouterのURLにアクセスした際に、UI5アプリのindex.htmlが開くようにwelcomeFileを変更します。ここに設定するのはUI5アプリのnamespace + プロジェクト名です。
{
    "welcomeFile": "/demomanageproducts",
2.5. deployerフォルダを追加
プロジェクト直下にdeployerフォルダを追加します。ここには、UIモジュールをzipした結果が格納されます。
node-postgres-sample
  |- approuter
  |- demo.manageproducts
  |- deployer
 |- srv
 └ mta.yaml
2.6. mta.yamlに設定を追加
mta.yamlにUIをデプロイするための設定を追加します。
2.6.1 html5_repo_host、html5_repo_runtimeを追加
resourcesセクションに以下を追加します。
  - name: manageproducts_html5_repo_host
    type: org.cloudfoundry.managed-service
    parameters:
      service-plan: app-host
      service: html5-apps-repo
      config:
        sizeLimit: 2
  - name: manageproducts_html5_repo_runtime
    type: org.cloudfoundry.managed-service
    parameters:
      service-plan: app-runtime
      service: html5-apps-repo
2.6.2. deployerモジュールを追加
ここでは、UIモジュール(uimodule)のビルド結果をdeployer/resources/に格納するという設定をしています。
 - name: manageproducts_deployer
   type: com.sap.application.content
   path: deployer
   requires:
     - name: manageproducts_html5_repo_host
       parameters:
         content-target: true
   build-parameters:
     build-result: resources
     requires:
       - name: uimodule
         artifacts:
           - dist/uimodule.zip
         target-path: resources/
2.6.3. UIモジュールを追加
 - name: uimodule
   type: html5
   path: demo.manageproducts/uimodule
   build-parameters:
     builder: custom
     commands:
       - npm install
       - npm run build:uimodule --prefix ..
     supported-platforms: []
2.6.4. approuterモジュールにhtml5_repo_runtimeを追加
ApprouterからUI5アプリにアクセスできるように、 requiresセクションにhtml5_repo_runtimeサービスを追加します。
 - name: node-postgres-sample-approuter
   type: approuter.nodejs
   path: approuter
   parameters:
     disk-quota: 512M
     memory: 512M
   requires:
     - name: manageproducts_html5_repo_runtime   #追加
     - name: node-postgres-sample-uaa
     - name: srv-api
       group: destinations
       properties:
         name: srv-api
         url: "~{srv-url}"
         forwardAuthToken: true
最終的なmta.yamlファイルはこちらをご参照ください。
2.7. ビルド、デプロイ
ここまでで一旦ビルド、デプロイしてApprouterからアクセスできることを確認します。
mbt build
cf deploy mta_archives/node-postgres-sample_1.0.0.mtar
結果は以下のようになります。

3. ローカル実行用の設定を追加
UIを開発するにあたり、ローカル(VS Code)環境からバックエンドのサービスにアクセスできると便利です。バックエンドにアクセスするのに認証が必要な設定にしているため、ローカル実行でもApprouterを経由してUIにアクセスするようにします。
3.1 Approuterにローカル実行用のルートを追加
Approuterのxs-app.jsonにローカル実行用のルートを追加します。なお、このルートはデプロイ時には削除するようにしてください(削除しないとエラーになります)。
        {
            "source": "^/test/",
            "target": "/",
            "authenticationType": "xsuaa",
            "localDir": "../demo.manageproducts/uimodule/webapp"
        }
3.2. default-env.jsonを作成
approuter配下にdefault-env.jsonを作成します。
{
    "destinations": [
        {
            "name": "srv-api",
            "url": "Cloud Foundryに登録されたサービスのURL",
            "forwardAuthToken": true
        }
    ]
}
サービスのURLは、例えばhttps://b736177ctrial-dev-node-postgres-sample-srv.cfapps.eu10.hana.ondemand.comとなります。
3.3. default-services.jsonを作成
ローカル環境からXSUAAのサービスインスタンスに接続するための認証情報を設定します。
この情報はApprouterのEnvironemnt Variablesから取得できます。xsuaa.credentialsの中身の部分をコピーして貼り付けます。
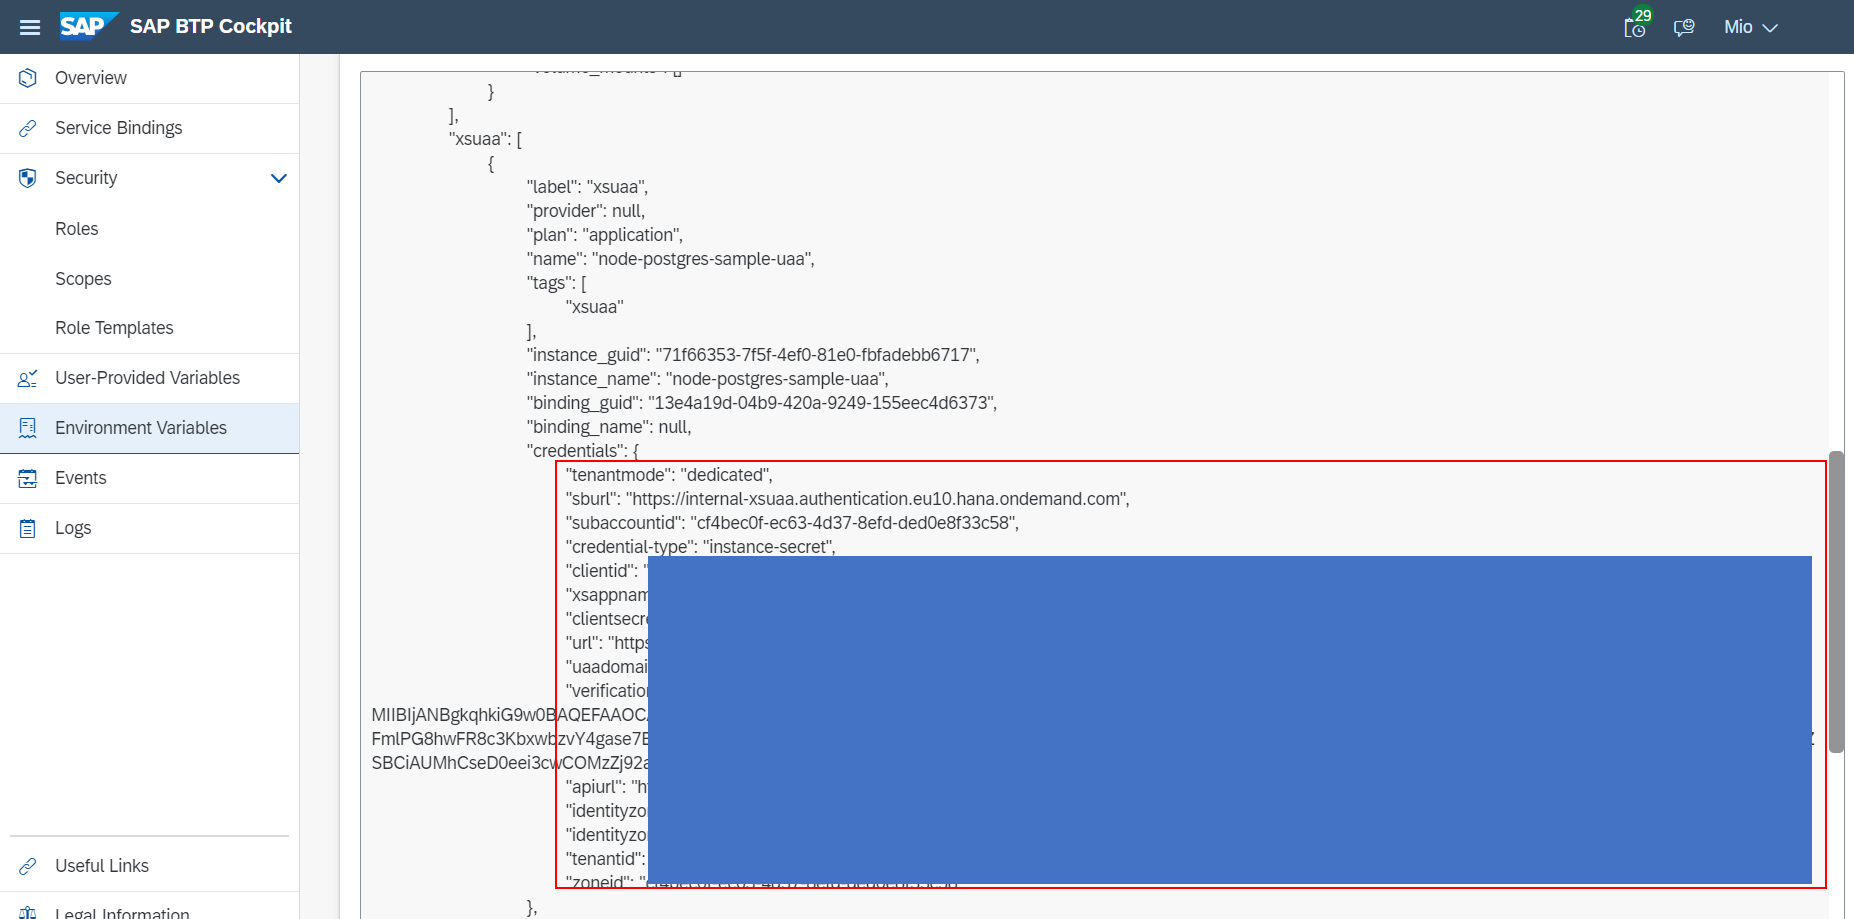
{
    "uaa":  {
        "tenantmode": "dedicated",
        "sburl": "https://internal-xsuaa.authentication.eu10.hana.ondemand.com",
        "subaccountid": "cf4bec0f-ec63-4d37-8efd-ded0e8f33c58",
        "credential-type": "instance-secret",
        "clientid": "xxxxxxxxxxxxxxxxxxxxxxxxxxxx",
        "xsappname": "node-postgres-sample!t54386",
        "clientsecret": "xxxxxxxxxxxxxxxxxxxxxxxxxxxx",
        "url": "https://b736177ctrial.authentication.eu10.hana.ondemand.com",
        "uaadomain": "authentication.eu10.hana.ondemand.com",
        "verificationkey": "-----BEGIN PUBLIC KEY-----xxxxxxxxxxxxxxxxxxxxxxxxxxxx-----END PUBLIC KEY-----",
        "apiurl": "https://api.authentication.eu10.hana.ondemand.com",
        "identityzone": "b736177ctrial",
        "identityzoneid": "cf4bec0f-ec63-4d37-8efd-ded0e8f33c58",
        "tenantid": "cf4bec0f-ec63-4d37-8efd-ded0e8f33c58",
        "zoneid": "cf4bec0f-ec63-4d37-8efd-ded0e8f33c58"
    }
}
4. List Viewを作成
Productの一覧を表示するList Viewを作成します。
4.1. Viewの作成
以下のコマンドでビューおよびコントローラーを生成します。
yo easy-ui5 project newview

ビューのソースは以下のようになります。
 <mvc:View controllerName="demo.manageproducts.controller.List"
  displayBlock="true"
  xmlns="sap.m"
  xmlns:mvc="sap.ui.core.mvc">
  <Table id="table"
    items="{path: '/'}" mode="MultiSelect" selectionChange="onSelectionChange" busy="{viewModel>/busy}">
    <headerToolbar>
      <OverflowToolbar>
        <content>
          <Title text="Products" />
          <ToolbarSpacer/>
          <Button icon="sap-icon://add" press="onAdd" />
          <Button text="Delete" press="onDelete" enabled="{viewModel>/deleteEnabled}" />
        </content>
      </OverflowToolbar>
    </headerToolbar>
    <columns>
      <Column>
        <Text text="Product ID"/>
      </Column>
      <Column>
        <Text text="Product Name"/>
      </Column>
      <Column>
        <Text text="Price"/>
      </Column>
    </columns>
    <items>
        <ColumnListItem type="Navigation" press="onDetailPress">
            <Text text="{id}"/>
            <Text text="{name}"/>
            <Text text="{price}"/>
	</ColumnListItem>
    </items>
  </Table>
</mvc:View>
もともとあったMainViewを以下のように変更します。
 <mvc:View controllerName="demo.manageproducts.controller.MainView"
  displayBlock="true"
  xmlns="sap.m"
  xmlns:mvc="sap.ui.core.mvc">
  <App id="idAppControl" >
  </App>
</mvc:View>
manifest.jsonのルートを以下のように変更します。
    "routing": {
      "config": {...},
      "routes": [
        {
          "name": "List",
          "pattern": "",
          "target": [
            "TargetList"
          ]
        }
      ],
      "targets": {
        "TargetList": {
          "viewType": "XML",
          "viewId": "List",
          "viewName": "List"
        }
      }
    }
  }
4.2. リストを表示
今回はバックエンドがODataではなくREST APIなので、XMLHttpRequestを使用してデータを取得後、JSONモデルを作成して画面にバインドします。
このために、バックエンドに接続するための共通処理をBaseControllerに作成します。
            sendXMLHttpRequest: function (method, url, oData) {
                return new Promise((resolve, reject) => {
                    var xhr = new XMLHttpRequest()
                    xhr.open(method, url)
                    if (method === 'POST' || method === 'PUT') {
                        xhr.setRequestHeader("content-type", "application/json")
                    }
                    if (oData) {
                        xhr.send(JSON.stringify(oData))
                    } else {
                        xhr.send()
                    }
                    xhr.onload = function () {
                        if (xhr.status === 200 || xhr.status === 201) {
                            resolve(xhr.response)
                        } else {
                            reject(xhr.statusText)
                        }
                    }
                })
            }
ListViewのコントローラーの中でバックエンドからデータを取得してJSONモデルを作成し、ビューに設定します。
        onInit: function () {
            this.getRouter().getRoute("List").attachMatched(this._onRouteMatched, this);
            var oModel = new JSONModel({
                deleteEnabled: false,
                busy: false
            });
            this.setModel(oModel, "viewModel");
        },

        _onRouteMatched: function () {
            this._doRefresh()
        },

        _doRefresh: function () {
            this.setProperty("viewModel", "busy", true);
            //バックエンドからデータを取得
            this.sendXMLHttpRequest('GET', '/node-pg/products')
            .then((response)=> {
                //JSONモデルを作成してビューにセット
                var products = JSON.parse(response)
                this.getView().setModel(new JSONModel(products))
                //idでソート
                var oSorter = new Sorter("id")
                oSorter.fnCompare = function(value1, value2) {
                    if (value1 < value2) return -1;
                    if (value1 == value2) return 0;
                    if (value1 > value2) return 1;
                }
                this.byId("table").getBinding("items").sort(oSorter)
                this.setProperty("viewModel", "busy", false);
            })
            .catch(error => {
                this.handleError(error)
            })
        }
4.3. ローカル実行
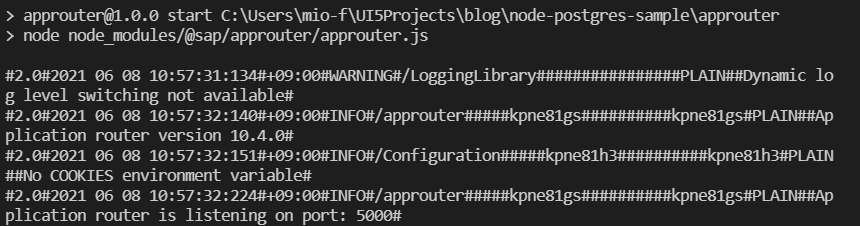
approuterのフォルダに移動し、npm startでApprouterを起動します。Approuterがポート5000で立ち上がります。
ブラウザにlocalhost:5000/test/index.htmlと入力します。認証を求める画面のあと、以下の画面が表示されるはずです。(※前提として、Cloud Foundryでバックエンドのサービスが起動していること)

4.4. 削除処理
行を選択してDeleteボタンを押したときの処理を実装します。
        onDelete: function () {
            MessageBox.confirm("Delete selected product(s)?", {
				actions: ["Delete", MessageBox.Action.CLOSE],
				emphasizedAction: "Delete",
                onClose: this._deleteItems.bind(this)
            });
        },

        _deleteItems: function (oAction) {
            if (oAction === MessageBox.Action.CLOSE) {
                return
            }
            var oTable = this.byId("table")
            var aContexts = oTable.getSelectedContexts()
            this.setProperty("viewModel", "busy", true);
            var aDeletePromises = aContexts.map(oContext => {
                var id = oContext.getProperty("id")
                return this.sendXMLHttpRequest('DELETE', `/node-pg/products/${id}`)
            })

            Promise.all(aDeletePromises)
            .then(() => {
                this._doRefresh();
                MessageToast.show('Selected product(s) have been deleted');
            })
            .catch(error => {
                this.handleError(error)
            });
        }
※登録、更新、削除処理を行うためにApprouterのrouteで"csrfProtection": falseの設定を追加しました。この設定がない場合、POST, PUT, DELETEのリクエストの際にCSRFトークンの設定が必要になります。
    "routes": [
        {
            "source": "^/node-pg/products(.*)$",
            "target": "/products$1",
            "authenticationType": "xsuaa",
            "destination": "srv-api",
            "scope": {
                "GET": ["$XSAPPNAME.Display", "$XSAPPNAME.Update"],
                "default": "$XSAPPNAME.Update"
            },
            "csrfProtection": false
        },
        {
            "source": "^/node-pg/",
            "target": "/",
            "authenticationType": "xsuaa",
            "destination": "srv-api",
            "csrfProtection": false
        },
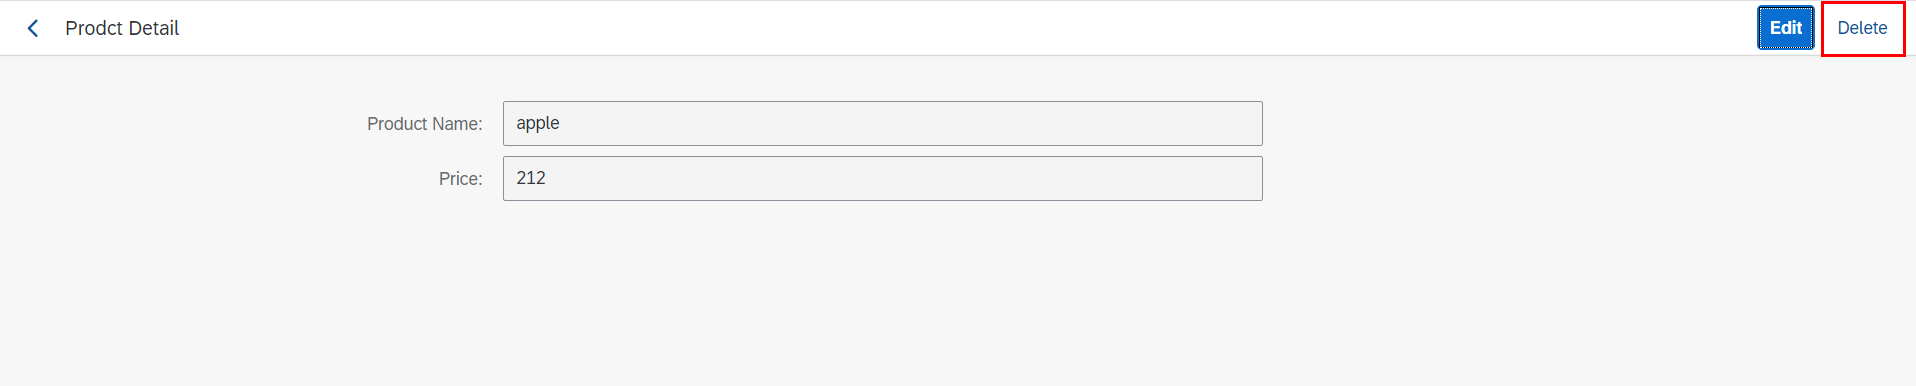
5. Detail Viewを作成
行を選択したとき、または登録(+)ボタンを押したときに遷移する先の画面を作成します。
5.1. Viewの作成
4.1.と同じ要領でDetail Viewを作成します。
 <mvc:View controllerName="demo.manageproducts.controller.Detail"
  displayBlock="true"
  xmlns="sap.m"
	xmlns:l="sap.ui.layout"
	xmlns:f="sap.ui.layout.form"
  xmlns:mvc="sap.ui.core.mvc">
  <Page title="Prodct Detail" floatingFooter="true" showFooter="{viewModel>/editable}"
    showNavButton="true" navButtonPress="onNavButtonPress">
    <headerContent>
			<OverflowToolbar>
				<ToolbarSpacer/>
				<Button text="Edit" type="Emphasized" press="onEdit" visible="{= !${viewModel>/editable}}"/>
        <Button text="Delete" type="Default" press="onDelete" visible="{= !${viewModel>/editable}}"/>
			</OverflowToolbar>
    </headerContent>
    <VBox class="sapUiSmallMargin">
      <f:SimpleForm id="simpleForm"
        editable="true"
        layout="ResponsiveGridLayout"
        labelSpanXL="3"
        labelSpanL="3"
        labelSpanM="3"
        labelSpanS="12"
        adjustLabelSpan="false"
        emptySpanXL="4"
        emptySpanL="4"
        emptySpanM="4"
        emptySpanS="0"
        columnsXL="1"
        columnsL="1"
        columnsM="1"
        singleContainerFullSize="false" >
        <f:content>
          <Label text="Product Name"/>
          <Input id="productName" value="{name}" editable="{viewModel>/editable}" />
          <Label text="Price" />
          <Input id="price" value="{price}" editable="{viewModel>/editable}"/>
        </f:content>
      </f:SimpleForm>
    </VBox>
		<footer>
			<OverflowToolbar>
				<ToolbarSpacer/>
				<Button type="Emphasized" text="Save" press="onSave"/>
			</OverflowToolbar>
		</footer>
  </Page>
</mvc:View>
manifest.jsonのルートを以下のように設定します。
    "routing": {
      "config": {...},
      "routes": [
        {
          "name": "List",
          "pattern": "",
          "target": [
            "TargetList"
          ]
        },
        {
          "name": "Detail",
          "pattern": "RouteDetail/:id:",
          "target": [
            "TargetDetail"
          ]
        }
      ],
      "targets": {
        "TargetList": {
          "viewType": "XML",
          "viewId": "List",
          "viewName": "List"
        },
        "TargetDetail": {
          "viewType": "XML",
          "viewId": "Detail",
          "viewName": "Detail"
        }
      }
    }
5.2. List Viewからの遷移
List View側の画面遷移の処理は以下のようになります。
        //登録ボタンを押したとき
        onAdd: function () {
            this.getRouter().navTo("Detail", {});
        },

        //行選択したとき
        onDetailPress: function (oEvent) {
            var id = oEvent.getSource().getBindingContext().getProperty("id");
            this.getRouter().navTo("Detail", {
                id: id
            });
        },
Detail View側の画面遷移後の処理は以下のようになります。
        onInit: function () {
            this.getRouter().getRoute("Detail").attachMatched(this._onRouteMatched, this);

            var oModel = new JSONModel({
                isStatusVisible: false,
                deleteEnabled: false,
                editable: false,
                busy: false
            });
            this.setModel(oModel, "viewModel");
        },

        _onRouteMatched: function (oEvent) {
            var oArgs = oEvent.getParameter("arguments");
            var id = oArgs.id;
            //登録の場合
            if (id === undefined) {
                this._handleCreate();
            //照会の場合
            } else {
                this._handleDisplay(id);
            }
        },

        _handleCreate: function () {
            var oProduct = new JSONModel({
                name: "",
                price: 0
            })
            this.getView().setModel(oProduct)
            this.getView().bindObject("/")
            this._setEditable(true)
        },

        _handleDisplay: function (id) {
            this.setProperty("viewModel", "busy", true);
            //バックエンドからデータを取得
            this.sendXMLHttpRequest('GET', `/node-pg/products/${id}`)
            .then((response)=> {
                //JSONモデルを作成してビューにセット
                var product = JSON.parse(response)
                this.getView().setModel(new JSONModel(product))
                this.getView().bindObject("/")
                this._setEditable(false)
                this.setProperty("viewModel", "busy", false);
            })
            .catch(error => {
                this.handleError(error)
            })
        },
5.3. 登録・更新処理
Saveボタンを押したときの処理を追加します。

登録のパターンと更新のパターンがありますが、idの有無で判断しています。(登録時にはidがまだない)
        onSave: function () {
            var oProduct = this.getModel().getData()
            var id = oProduct.id
            var url = id ? `/node-pg/products/${id}`: '/node-pg/products'
            var method = id ? 'PUT': 'POST'
            this.setProperty("viewModel", "busy", true);
            this.sendXMLHttpRequest(method, url, oProduct)
            .then((response)=> {
                var newId = JSON.parse(response).id
                MessageToast.show(`Product ${newId} has been created/updated`, {
                    closeOnBrowserNavigation: false
                })
                this.setProperty("viewModel", "busy", false);
                var oRouter = this.getRouter();
                oRouter.navTo("List");
            })
            .catch(error => {
                this.handleError(error)
            })
        }
5.4. 削除処理
照会画面でDeleteボタンを押したときの処理を追加します。
        onDelete: function () {
            MessageBox.confirm("Delete this product?", {
				actions: ["Delete", MessageBox.Action.CLOSE],
				emphasizedAction: "Delete",
                onClose: this._deleteItem.bind(this)
            });
        },

        _deleteItem: function (oAction) {
            if (oAction === MessageBox.Action.CLOSE) {
                return
            }
            var id = this.getView().getBindingContext().getProperty("id")
            this.setProperty("viewModel", "busy", true);
            this.sendXMLHttpRequest('DELETE', `/node-pg/products/${id}`)
            .then(()=> {
                MessageToast.show(`Product ${id} has been deleted`, {
                    closeOnBrowserNavigation: false
                })
                this.setProperty("viewModel", "busy", false);
                var oRouter = this.getRouter();
                oRouter.navTo("List");
            })
            .catch(error => {
                this.handleError(error)
            })
        }
6. Cloud Foundryにデプロイ
最後に、Cloud Foundryにデプロイします。
ビルドの前に、Approuterの以下のルートは削除しておきます。
        {
            "source": "^/test/",
            "target": "/",
            "authenticationType": "xsuaa",
            "localDir": "../demo.manageproducts/uimodule/webapp"
        }
ApprouterのURLにアクセスし、以下の画面が表示されれば成功です。

まとめ
今回の記事のポイントは以下でした。
- SAPUI5からREST APIを呼ぶ
- バックエンドのサービス、Approuter、UI5モジュールを一つのMTAプロジェクトでデプロイする
- ローカル環境からCloud Foundryのサービスに接続する
これで、「Node.jsとPostgreSQLでシンプルなアプリケーションを作成」するシリーズは終了です。お読みいただきありがとうございました。