社内でfastlane布教のためSnapshotから紹介したので
その内容をまとめてみました。
fastlaneとは?
簡単に言うとiOSアプリのCI支援ツール及びそのツール群
ビルド・デプロイ・テスト・リリースなどの工程における自動化をサポートします。
https://fastlane.tools
https://github.com/fastlane/fastlane
snapshotとは?
fastlaneのスクリーンショット作成支援ツールです。
Xcode7以前はUI Automationを利用していましたが現在はXCUITextを利用する形になっています。
私はUIAutomationを利用してた頃に触っていたのですが、XCUITestに移行したようなので改めてまとめてみる事にしました。
まずXCUITestを動かしてみよう
Snapshotについて話を始める前に利用されるXCUITestで簡単なUIテストを書いてみましょう。
今回使うサンプルプログラムにはApple公式のサンプルであるUIKitCatalogを使用しました。
https://developer.apple.com/library/ios/samplecode/UICatalog/Introduction/Intro.html
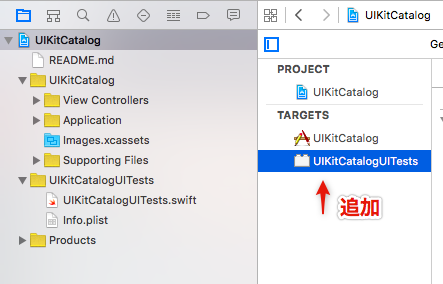
1. テストターゲットの追加
UIKitCatalogにはUIテストのターゲットが入ってないので追加してください。
2. テストコードの実装
ターゲットにテストを追加すると*UITests.swfitがあるのでその内容を変更します。
今回はレコード機能を使って簡単に画面遷移を行うようにしてみましょう。
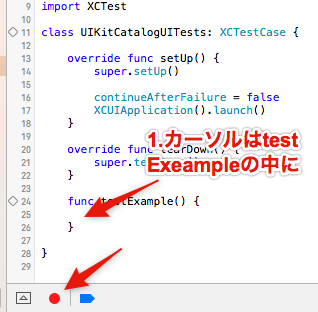
レコードボタンを押した後はSimulatorでアプリを操作して画面遷移させます。
そうすると操作内容がUIテストのコードとして生成されます。
例えば以下のようなコードになります。
    func testExample() {

        let app = XCUIApplication()
        app.navigationBars["UIView"].buttons["UIKitCatalog"].tap()

        let tablesQuery2 = app.tables
        let tablesQuery = tablesQuery2
        tablesQuery.staticTexts["ActivityIndicatorViewController"].tap()
        app.navigationBars.matchingIdentifier("Activity Indicators").buttons["UIKitCatalog"].tap()
        tablesQuery.staticTexts["Alert Controller"].tap()
        tablesQuery2.childrenMatchingType(.Cell).elementBoundByIndex(1).staticTexts["Okay / Cancel"].tap()
        app.alerts["A Short Title is Best"].collectionViews.buttons["OK"].tap()
        tablesQuery2.childrenMatchingType(.Cell).elementBoundByIndex(5).staticTexts["Okay / Cancel"].tap()
        app.sheets.collectionViews.buttons["OK"].tap()
        app.navigationBars.matchingIdentifier("Alert Controllers").buttons["UIKitCatalog"].tap()

    }
実際にUIテストする場合はXCAssertなどが必要になりますが、
今回は画面遷移ができれば良いので、自動生成されたコードのみにしてあります。
3.UIテスト実行
⌘+Uでテストを実行し、自分がレコードした操作が実行されればOKです。
4.テスト結果確認
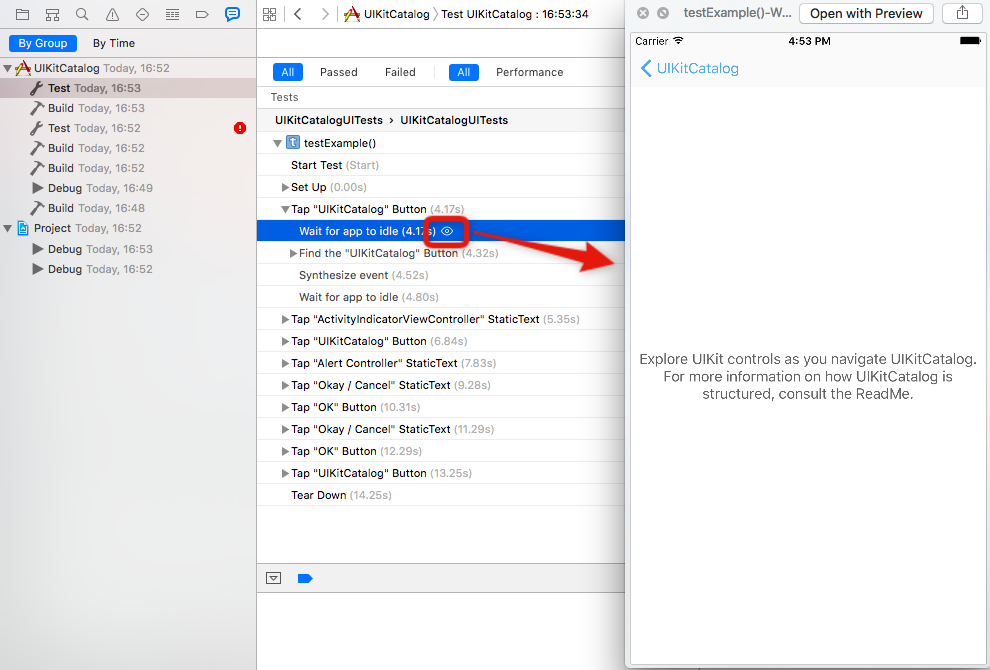
⌘+8でテスト結果のペイン(正式名称なんだっけ...)を開き実行結果を確認してみましょう。XCodeのUITestingでは画面遷移などのイベント時に自動でスクリーンショットが保存されており、これをXcode上のテスト結果画面から確認する事ができます。
テスト結果でQuickLookの目のようなアイコンをクリックするとスクリーンショットが確認できます。
XCUITestの話はひとまずここまでにして、いよいよSnapshotを使い始めてみましょう。
Snapshotを使ってみよう
1. インストール
以下のコマンドでfastlaneのツールが一通りインストールされます。
sudo gem update
sudo gem install fastlane
本稿投稿時のsnapshotのバージョン
snapshot -v
snapshot 1.4.4
2. 初期化処理(Snapfile生成)
UIKitCatalog.xcodeprojと同じディレクトリで以下のコマンドを実行します。
snapshot init
実行結果
Successfully created SnapshotHelper.swift './SnapshotHelper.swift'
Successfully created new Snapfile at './Snapfile'
-------------------------------------------------------
Open your Xcode project and make sure to do the following:
1) Add the ./SnapshotHelper.swift to your UI Test target
   You can move the file anywhere you want
2) Call `setupSnapshot(app)` when launching your app

  let app = XCUIApplication()
  setupSnapshot(app)
  app.launch()

3) Add `snapshot("0Launch")` to wherever you want to create the screenshots

More information on GitHub: https://github.com/fastlane/snapshot
実行結果に書いてある通りにプロジェクトを変更していきましょう。
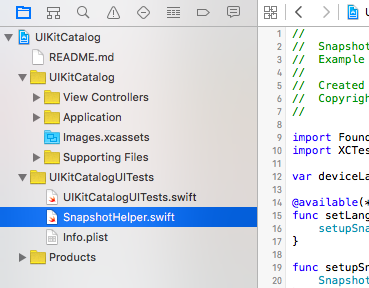
3. SnapshotHelper.swiftの追加
SnapshotHeler.swiftを追加したテストのターゲットに追加します。
4. テストコードでsnapshotの関数呼出を追加
-
setupSnapshotをsetupで実行します。 -
snapshot(スクリーンショットに付けたいファイル名)をUIテストの好きなタイミングに追加する事でその時点のスナップショットを指定したファイル名で追加します。
    override func setUp() {
        super.setUp()

        continueAfterFailure = false
//        XCUIApplication().launch()
        let app = XCUIApplication()
        setupSnapshot(app) // <- 追加
        app.launch()
    }

    override func tearDown() {
        super.tearDown()
    }

    func testExample() {

        let app = XCUIApplication()
        app.navigationBars["UIView"].buttons["UIKitCatalog"].tap()
        snapshot("launch")// <- 追加

        let tablesQuery2 = app.tables
        let tablesQuery = tablesQuery2
        tablesQuery.staticTexts["ActivityIndicatorViewController"].tap()
        snapshot("ActivityIndicatorViewController")// <- 追加

        app.navigationBars.matchingIdentifier("Activity Indicators").buttons["UIKitCatalog"].tap()
        tablesQuery.staticTexts["Alert Controller"].tap()
        snapshot("Alert Controller")// <- 追加

        tablesQuery2.childrenMatchingType(.Cell).elementBoundByIndex(1).staticTexts["Okay / Cancel"].tap()
        snapshot("alert ok/cancel")// <- 追加
        app.alerts["A Short Title is Best"].collectionViews.buttons["OK"].tap()
        tablesQuery2.childrenMatchingType(.Cell).elementBoundByIndex(5).staticTexts["Okay / Cancel"].tap()
        snapshot("action sheet")// <- 追加
        app.sheets.collectionViews.buttons["OK"].tap()
        app.navigationBars.matchingIdentifier("Alert Controllers").buttons["UIKitCatalog"].tap()

    }
5. Snapfileの編集
devicesやlanguagesに定義した端末x言語の組み合わせでスナップショットが作成されることになります。
今回はパターンを絞るつもりなので以下のような設定にしました。
# A list of devices you want to take the screenshots from
devices([
  "iPhone 6s",
  "iPhone 6s Plus",
])

languages([
  "ja-JP",
  "en-US"
])
devicesに設定する名前はxcrun simctl listを実行して確認しながら編集すると良いでしょう。
6. 実行
実行してみましょう。XcodeでUIテストを実行した時と同様にテストが実行されるはずです。
snapshot run
実行後はscreenshotsディレクトリが生成され、screenshots/screenshots.htmlがブラウザで開かれ、生成したスクリーンショットの一覧が出来るようになったかと思います。
以上がsnapshotの簡単な説明になります。
疑問 スクリーンショットの画像をどうやって作ってるのか?
はじめに触れたように、snapshotはXcode6時代まではUIAutomationが使われていました。そのためスクリーンショットをどうやって生成してるかは明確なものでした。
以下のようにUIAutomationにスクリーンショット用のメソッドがあったからです。
UIATarget.localTarget().captureScreenWithName("hoge");
前述した通り、XCUITestを使うと、スクリーンショットは自動で撮られており、
それは以下のようなディレクトリにスクリーンショットが保存されています。***はアプリ名+IDのような形のディレクトリが作られているかと思います。
~/Library/Developer/Xcode/DerivedData/***/Logs/Test/Attachments
XCUITestを利用するようになった事を知った時、
Snapshotは独自にスクリーンショットを用意しているのか?
それともXCUITest実行時に作成されるスクリーンショットを利用しているのか?
という点が気になったので調べてみました。
SwiftHelper.swiftのsnapshot(name:)を見てみましょう。
    class func snapshot(name: String, waitForLoadingIndicator: Bool = false) {
        if waitForLoadingIndicator {
            waitForLoadingIndicatorToDisappear()
        }

        print("snapshot: \(name)") // more information about this, check out https://github.com/fastlane/snapshot

        sleep(1) // Waiting for the animation to be finished (kind of)
        XCUIDevice.sharedDevice().orientation = .Unknown
    }
動作に影響を出さずスクリーンショットのトリガを作るためにXCUIDevice.sharedDevice().orientation = .Unknownを実行しているようでです。そんな手が...。
これについてはソースコメントの通り、https://github.com/fastlane/snapshotのHow does it work?に説明されています。
Xcode上でsnapshot対応前と後でテスト結果を比較してみます。
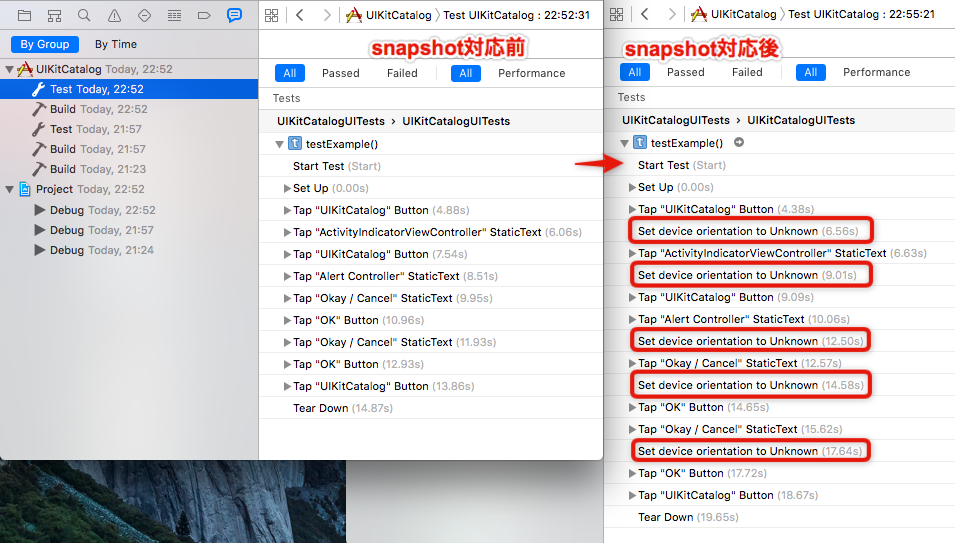
snapshot(name:)で行ったorientationの設定が増えてるのがわかります。
これで狙ったタイミングでスクリーンショットが生成されているだろう事がわかりました。
じゃあ次はそのスクリーンショットのファイル名の抽出するために何を参照したらいいのか?という話になりますね。
テスト実行後に~/Library/Developer/Xcode/DerivedData/***/Logs/Test/に*_TestSummaries.plistが作成されます。これが先ほどXcode上で確認したテスト結果のデータ元となっています。plistを検索しSet device orientation to Unknown時のpngファイルを~/Library/Developer/Xcode/DerivedData/***/Logs/Test/Attachmentsから/tmp/snapshot_derived/Logs/Test/Atttachments/にコピーし、最終的に
snapshotsディレクトリにコピーされます。
以下snapshot run --verboseのログの一部抜粋
Copying file '/tmp/snapshot_derived/Logs/Test/Attachments/Screenshot_19373C9B-27D8-4067-8F89-2F8E288ACA97.png' to 'fastlane/screenshots/en-US/iPhone6sPlus-launch.png'...
おまけ
snapshotをfastlaneで実行する
fastlane init
出来上がったFastfileを確認してみます。
Snapshotだけを実行するtestが用意されてるので実行してみましょう。
fastlane test