概要
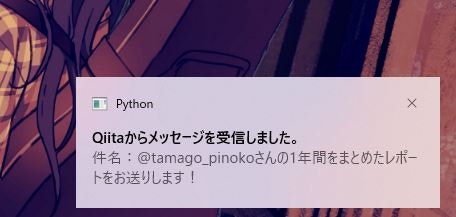
pythonで特定の宛先からメールが来たらWindowsの通知に件名を出す処理を作ってみました。
前提条件
Pythonが既にインストールされていること。
Google Cloud PlatformのAPIライブラリにアクセスしてgmail APIを有効にしていること。
(詳しくはGoogle Spread Sheets に Pythonを用いてアクセスしてみたを参考にしてください)
oauth2clientとplyerの導入
コンソールを開いて下記のコマンドを実行して「oauth2client」と「plyer」をインストールする。
pip install oauth2client
pip install plyer
特定の宛先からメールが来たらWindowsの通知に件名を出す処理の実装
特定の宛先からメールが来たらWindowsの通知に件名を出す処理のプログラムは下記になります。
今回は宛先が「noreply@qiita.com」の場合に通知を出すようにしてます。
下記の記事を参考にして実装しています。
【GAS】PythonでGmail APIを使って、メール内容を取得する流れ【スクリプト作成編】
import imaplib
import email
from oauth2client.service_account import ServiceAccountCredentials
from email.message import EmailMessage
from email.header import decode_header
from plyer import notification

host = 'imap.gmail.com'
username = 'XXXXXXXX(メールアドレス)'
password = 'XXXXXXXX(パスワード)'

# ヘッダを取得
def get_header(msg, name):
    header = ''
    if msg[name]:
        for tup in decode_header(str(msg[name])):
            if type(tup[0]) is bytes:
                charset = tup[1]
                if charset:
                    header += tup[0].decode(tup[1])
                else:
                    header += tup[0].decode()
            elif type(tup[0]) is str:
                header += tup[0]
    return header

def get_inbox():
    mail = imaplib.IMAP4_SSL(host)
    mail.login(username, password)
    mail.select('inbox')
    _, search_data = mail.search(None, 'UNSEEN')
    my_message = []

    for num in search_data[0].split():
        email_data = {}
        _, data = mail.fetch(num, '(RFC822)')
        _, b = data[0]
        email_message = email.message_from_bytes(b)

        # From ヘッダ(差出人)
        from_ = get_header(email_message, 'From')
        # Date ヘッダ(送信日時)
        date = get_header(email_message, 'Date')
        # Subject ヘッダ(件名)
        subject = get_header(email_message, 'Subject')

        #差出先が「noreply@qiita.com」だった場合通知する
        if 'noreply@qiita.com' in from_:
            notification.notify(
            title= 'Qiitaからメッセージを受信しました。',
            message="件名:" + subject,
            app_name="アプリ名",
            app_icon="",
            timeout=10
            )

    return

if __name__ == '__main__':
    my_inbox = get_inbox()
■処理内容
・「username」と「password」について
username = 'XXXXXXXX(メールアドレス)'
password = 'XXXXXXXX(パスワード)'
対象のGmailアドレスとそのアドレスに使っているパスワードを設定してください。
その時に、下記のエラーが出た場合は2段階認証による認証エラーなので別途パスワードの設定を行う必要があります。
「imaplib.IMAP4.error: b'[ALERT] Application-specific password required: https://support.google.com/accounts/answer/185833 (Failure)'」
パスワードの設定は下記のURLを参考にしてください。
【GAS】2段階認証時のパスワード設定|Pythonのimaplib.error: b'[ALERT] Application-specific password requiredの対処法
・get_headerについて
今回の場合、件名が日本語だとデコードができないままとなっていたため追加しています。
下記の内容を参考にしているので詳しくはこちらを確認してください。
Python の標準ライブラリでメールをデコードする
実行結果
追記
今回は実行後1回のみになりますが、sleepなどで実行間隔を調整してループ処理を入れると1分間ごとに特定メールの監視ができるんじゃないかと思いました。(そこまで実装するのがめんどくさいので今回はやりませんでした)
また、明日から実家に帰省するため今年はこれで最後になります。
また来年も実装したい処理が思いついたら記事にしていこうと思います。
