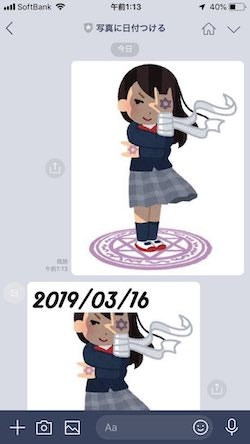
写真に日付を付けてくれるやつほしい!
ということで、学習も兼ねて作ってみた!
今回はFlaskとline-bot-sdkとherokuとPillowを使って実装した
なんとか動くところまでいったから、記事にしてみた
初めて使うものが多かったので、間違っていたり、こう書いたほうがいいよ!とかあったらコメントお願いします!
動作環境
$ pipenv graph
(省略)
Flask==1.0.2
line-bot-sdk==1.8.0
Pillow==5.4.1

$ pipenv run python --version
Python 3.7.1
この記事で書かないこと
- LINEBotのチャンネル作成
- ngrokを使ったローカルでの確認
- herokuへのデプロイ
他の方がわかりやすく書いているので、そちらを参考にしてみてください
作ったもの
画像を送信すると日付を入れて返してくれる
ソースコードは https://github.com/tamago324/date_the_image においた
この画像、どこかで見たことあると思ったら、Vim, Me and Community - Google スライドのやつだ!
ソースコードの說明
画像の取得、保存
@handler.add(MessageEvent, message=ImageMessage)
def handle_image(event):
    message_id = event.message.id

    # message_idから画像のバイナリデータを取得
    message_content = line_bot_api.get_message_content(message_id)

    with open(Path(f"static/images/{message_id}.jpg").absolute(), "wb") as f:
        # バイナリを1024バイトずつ書き込む
        for chunk in message_content.iter_content():
            f.write(chunk)
handler.add(MessageEvent, message=ImageMessage)のようにmessageにImageMessageを指定すると、画像が送信されたときの処理が記述できる
line_bot_api.get_message_content(message_id)で画像データの取得ができる。実際には/v2/bot/message/{message_id}/contentを呼び出して、データを取得している
message_content.iter_content()でバイナリデータを1024バイトずつファイルに書き込んでいる
画像の処理
ソースコード
from PIL import Image, ImageDraw, ImageFont

im = Image.open("apple.png")
draw = ImageDraw.Draw(im)

size = 800
if im.width > size:
    proportion = size / im.width
    im = im.resize((int(im.width * proportion), int(im.height * proportion)))

text = "apple!"

# フォントの読み込み
font = ImageFont.truetype("./fonts/Harlow Solid Regular.ttf", 60)

# テキストの周りの5pxずつに余白を作る
x = 10
y = 10
margin = 5
text_width = draw.textsize(text, font=font)[0] + margin
text_height = draw.textsize(text, font=font)[1] + margin
draw.rectangle(
    (x - margin, y - margin, x + text_width, y + text_height), fill=(255, 255, 255)
)
# テキスト描画
draw.text((x, y), text, fill=(0, 0, 0), font=font)

im.save("apple_apple.png")
画像読み込み、オブジェクト生成
im = Image.open("apple.jpg")
draw = ImageDraw.Draw(im)
Image.open()で処理対象の画像を読み込む。ImageDraw.Draw(im)で画像オブジェクトを編集するためのオブジェクトを生成する
サイズ変更
size = 800

proportion = size / im.width
im = im.resize((int(im.width * proportion), int(im.height * proportion)))
LINE Botで送信できる画像の最大が 1024 x 1024 のため、少し小さめの 800 x ? にサイズ変更する
画像の幅はim.width、高さはim.heightで取得。画像のサイズ変更はim.resize(x, y)でできる
テキストの後ろに四角形を描画
text = "apple!"

# フォントの読み込み
font = ImageFont.truetype("./fonts/Harlow Solid Regular.ttf", 60)

# テキストの周りの5pxずつに余白を作る
x = 10
y = 10
margin = 5
text_width = draw.textsize(text, font=font)[0] + margin
text_height = draw.textsize(text, font=font)[1] + margin
draw.rectangle(
    (x - margin, y - margin, x + text_width, y + text_height), fill=(255, 255, 255)
)
テキストが黒、背景が白がシンプルで見やすいため、四角形を描画する
ImageFont.truetype(フォントのパス, フォントサイズ)でHarlow Solid Regularというちょっとおしゃれなフォントのオブジェクトを生成する
draw.textsize(text, font)を使い、textをfontで描画したときのサイズ((x, y)のタプル)を取得し、余白を計算する。draw.rectangle(左上のx座標, 左上のy座標, 右下のx座標, 右下のy座標, fill=色)で四角形を描画
draw.textsize()でテキストのサイズを取得できるの便利
テキストの描画
text = "apple!"
x = 10
y = 10

draw.text((x, y), text, fill=(0, 0, 0), font=font)
そして、draw.text()でテキストを描画
画像の保存
im.save("保存先のパス")
画像の送信
@handler.add(MessageEvent, message=ImageMessage)
def handle_image(event):
    ...
    main_image_path = f"static/images/{message_id}_main.jpg"
    preview_image_path = f"static/images/{message_id}_preview.jpg"

    # 画像の送信
    image_message = ImageSendMessage(
        original_content_url=f"https://date-the-image.herokuapp.com/{main_image_path}",
        preview_image_url=f"https://date-the-image.herokuapp.com/{preview_image_path}",
    )

    line_bot_api.reply_message(event.reply_token, image_message)
ImageMessageを生成し、line_bot_api.reply_message()で返すだけ
全体のソースコード
$ tree
.
├── Pipfile
├── Pipfile.lock
├── Procfile
├── README.md
├── app.py
├── date_the_image.py
├── fonts
│   └── Harlow\ Solid\ Regular.ttf
├── fruit_apple_date.png
└── static
    └── images
app.py
# app.py

import os
from pathlib import Path

from flask import Flask, abort, request
from linebot import LineBotApi, WebhookHandler
from linebot.exceptions import InvalidSignatureError
from linebot.models import (ImageMessage, ImageSendMessage, MessageEvent,
                            TextMessage, TextSendMessage)

from date_the_image import date_the_image

app = Flask(__name__)

line_bot_api = LineBotApi(os.environ["CHANNEL_ACCESS_TOKEN"])
handler = WebhookHandler(os.environ["CAHNNEL_SECRET"])

SRC_IMAGE_PATH = "static/images/{}.jpg"
MAIN_IMAGE_PATH = "static/images/{}_main.jpg"
PREVIEW_IMAGE_PATH = "static/images/{}_preview.jpg"


@app.route("/")
def hello_world():
    return "hello world!"


@app.route("/callback", methods=["POST"])
def callback():
    # get X-Line-Signature header value
    signature = request.headers["X-Line-Signature"]

    # get request body as text
    body = request.get_data(as_text=True)
    app.logger.info("Request body: " + body)

    # handle webhook body
    try:
        handler.handle(body, signature)
    except InvalidSignatureError:
        abort(400)
    return "OK"


@handler.add(MessageEvent, message=TextMessage)
def handle_message(event):
    line_bot_api.reply_message(
        event.reply_token, TextSendMessage(text=event.message.text)
    )


@handler.add(MessageEvent, message=ImageMessage)
def handle_image(event):
    message_id = event.message.id

    src_image_path = Path(SRC_IMAGE_PATH.format(message_id)).absolute()
    main_image_path = MAIN_IMAGE_PATH.format(message_id)
    preview_image_path = PREVIEW_IMAGE_PATH.format(message_id)

    # 画像を保存
    save_image(message_id, src_image_path)

    # 画像の加工、保存
    date_the_image(src=src_image_path, desc=Path(main_image_path).absolute())
    date_the_image(src=src_image_path, desc=Path(preview_image_path).absolute())

    # 画像の送信
    image_message = ImageSendMessage(
        original_content_url=f"https://date-the-image.herokuapp.com/{main_image_path}",
        preview_image_url=f"https://date-the-image.herokuapp.com/{preview_image_path}",
    )

    app.logger.info(f"https://date-the-image.herokuapp.com/{main_image_path}")
    line_bot_api.reply_message(event.reply_token, image_message)

    # 画像を削除する
    src_image_path.unlink()


def save_image(message_id: str, save_path: str) -> None:
    """保存"""
    message_content = line_bot_api.get_message_content(message_id)
    with open(save_path, "wb") as f:
        for chunk in message_content.iter_content():
            f.write(chunk)


if __name__ == "__main__":
    port = int(os.environ.get("PORT", 5000))
    app.run(host="0.0.0.0", port=port)
date_the_image.py
from datetime import datetime

from PIL import Image, ImageDraw, ImageFont


def date_the_image(src: str, desc: str, size=800) -> None:
    """日付を付けて、保存する

    :params src: 読み込む画像のパス
    :params desc:
        保存先のパス
    :params size:
        変換後の画像のサイズ
    """
    # 開く
    im = Image.open(src)

    # 800 x Height の比率にする
    if im.width > size:
        proportion = size / im.width
        im = im.resize((int(im.width * proportion), int(im.height * proportion)))

    draw = ImageDraw.Draw(im)

    font = ImageFont.truetype("./fonts/Harlow Solid Regular.ttf", 60)
    text = datetime.now().strftime("%Y/%m/%d")

    # 図形を描画
    x = 10
    y = 10
    margin = 5
    text_width = draw.textsize(text, font=font)[0] + margin
    text_height = draw.textsize(text, font=font)[1] + margin
    draw.rectangle(
        (x - margin, y - margin, x + text_width, y + text_height), fill=(255, 255, 255)
    )

    draw.text((x, y), text, fill=(0, 0, 0), font=font)

    # 保存
    im.save(desc)
.env
CAHNNEL_SECRET={Channel Secret}
CHANNEL_ACCESS_TOKEN={アクセストークン(ロングターム)}
FLASK_APP=app
FLASK_DEBUG=1
LANG=ja_JP.UTF-8
TZ=Asia/Tokyo
躓いたところ
.envに記述した環境変数をherokuに適用する
Pipenvで環境変数を.envに記述していて、そのままHerokuの環境にも適用したかったので、調べてみた。
heroku-configというherokuのpluginを使うと実現できる
インストール
$ heroku plugins:install heroku-config
使い方
-
heroku config:push:.envの記述をherokuの環境変数に反映する -
heroku config:pull: herokuの設定を取得する(.envの記述を上書き)- デフォルトでは
"で値が囲まれる(KEY=)
- デフォルトでは
.envの記述をherokuの環境に反映させる
$ cat .env
KEY=hioea90r12jiofeaj

$ heroku config:push
Successfully wrote settings to Heroku!

$ heroku config
=== date-the-image Config Vars
KEY: hioea90r12jiofeaj
LINE DeveloppersのWebhook URLの接続確認でエラーは無視する
Herokuにデプロイして、正常に動作しているのに接続確認でエラーになってしまう。
GAEでLINE Message API(line-bot-sdk-python)を試してみた - Qiitaにも、そんなことが書いてあるから、気にしなくてもいいのかも
Webhook送信が有効にする
LINEから画像を送信しても、何も起きなかった。調べたところ、Webhook送信の設定が正しくなかった。
Webhook送信が「利用する」にすることで、Webhook送信が使えるようになった
送信する画像の置き場所がわからなかった
Flaskはstatic/ディレクトリ以下に静的ファイルを置くことで、Flask側が処理してくれる。今回は、送信したい画像をstatic/images/{image_name}に保存するようにした
少し考えればわかることだった...
日本の日付になっていない
深夜1時頃に画像を送信してみても前日の日付になっていた。
Herokuの環境変数を変えたらうまくいった。
# .env
TZ=Asia/Tokyo
LANG=ja_JP.UTF-8
static/images/image_name.jpgをが作成できない
送信された画像を保存するときに、static/images/に保存しようとするけど、Herokuの環境にはstatic/images/が存在しなかったため、エラーになってしまった
対応としては、ローカルにstatic/images/hogeのようなファイルを作成し、commit push することでHeroku側にも作成された
まとめ
line-bot-sdkを使うとすごい簡単にLINE APIが使える。line-bot-sdkに感謝しまくりです。
original_content_urlとpreview_image_urlを固定にしてしまっているため、ngrokが使えない...環境変数から取得すればいいのか!!ってこの記事書いてから気づいた...(いつかやろう、いつか...)
懸念点としては、送信した画像がサーバー内に溜まってしまうこと。これはしょうがないのかな...解決方法を知ってる方いましたら、コメントやTwitterで教えていただけると嬉しいです!!!
参考文献
- FlaskでLINE botを実装し,herokuにdeployするまで - Qiita
- Messaging APIリファレンス
- Pillow の ImageDraw#textsize() が間違った値を返している件 - Hack like a rolling stone
- Python, Pillowで画像を一括リサイズ(拡大・縮小) | note.nkmk.me
- Herokuで本番環境の環境変数(config vars)を.envファイルで設定する - dackdive's blog
- Heroku + Node.js アプリの環境変数の管理に heroku-config と dotenv を使う - Corredor
- GAEでLINE Message API(line-bot-sdk-python)を試してみた - Qiita
- ImageDraw Module — Pillow (PIL Fork) 5.1.0 documentation


