はじめに
RailsでApiを簡単に作成してみました。
解説はそこそこにソースコードを載せてます。
Rails APIとは
ActionController::Baseの代わりにActionController::APIをコンローラで継承することによって、JSON APIサーバー用の軽量なRailsアプリケーションを構築できます。
完全にAPIのみのRailsアプリケーションを作成する場合は、rails newで--apiオプションを指定します。
この場合、以下のことが行われます。
- APIサーバーを動かすのに最低限のミドルウェアがロードされます。
- ApplicationControllerは、ActionController::APIを継承するようになります。
- ジェネレータでの、ビューやアセットの生成が行われません。
上の説明は下記記事から引用させて頂きました。
今から知っておきたいRails 5の新機能・変更点
今回は--apiオプションでAPIのみのRailsアプリケーションを作成するとします。
軽量API作成の流れ
プロジェクト始動
データベースはmysqlを指定し、apiモードでプロジェクトを開始します。
(データベースはデフォルトでsqliteとなっています)
$ rails new myarticles -d mysql --api
下記はお馴染みの流れですので、解説は省略します。
$ cd myarticles
$ rails db:create
$ rails g model Articles title:string body:text
$ rails db:migrate
初期データ挿入
データベースに初期データを挿入します。ここでは、Fakerというライブラリを利用します。
こちらでFakerの利用方法を確認できます。
Gemfileを下記のように編集します。
group :development do
  .
  .
  gem 'faker'
end
ライブラリをインストールします。
$ bundle install
seeds.rbを次のように書き換えます。
5.times do
  Article.create({
    title: Faker::Book.title,
    body: Faker::Lorem.sentence
  })
end
データを挿入します。
$ rails db:seed
apiフォルダーを作成
app/controllers/配下にapi/v1/フォルダを作成し、articles_controller.rbファイルを作成します。
コントローラにコードを記述
ベーシックなコードを記述しました。必要に応じて書き換えてください。
module Api
  module V1
    class ArticlesController < ApplicationController
      def index
        articles = Article.order('created_at desc')
        render json: {status: 'SUCCESS', message: 'Loaded articles', data: articles}, status: :ok
      end

      def show
        article = Article.find(params[:id])
        render json: {status: 'SUCCESS', message: 'Loaded article', data: article}, status: :ok
      end

      def create
        article = Article.new(article_params)

        if article.save
          render json: {status: 'SUCCESS', message: 'Saved article', data: article}, status: :ok
        else
          render json: {status: 'ERROR', message: 'Article not saved', data: article.errors}, status: :unprocessable_entity
        end
      end

      def destroy
        article = Article.find(params[:id])
        article.destroy
        render json: {status: 'SECCESS', message: 'Deleted article', data: article}, status: :ok
      end

      def update
        article = Article.find(params[:id])

        if article.update_attributes(article_params)
          render json: {status: 'SUCCESS', message: 'Updated article', data: article}, status: :ok
        else
          render json: {status: 'ERROR', message: 'Article not updated', data: article.errors}, status: :unprocessable_entity
        end
      end

      private

      def article_params
        params.permit(:title, :body)
      end
    end
  end
end
ルートを定義
routes.rbファイルにルーティングを記述します。
Rails.application.routes.draw do
  namespace 'api' do
    namespace 'v1' do
      resources :articles
    end
  end
end
API実装テスト
まずはサーバーを起動します。
$ rails s
ここまで完了したらPostmanでテストしてみましょう。
Postmanとは..
Postman makes API development faster, easier, and better.
API機能の開発をより速く、簡単にしてくれるものです。
こちらがイメージ図になります。
データをリクエストに乗せて送信し、それによりどういったデータがレスポンスとして受信できるのかを確認できます。
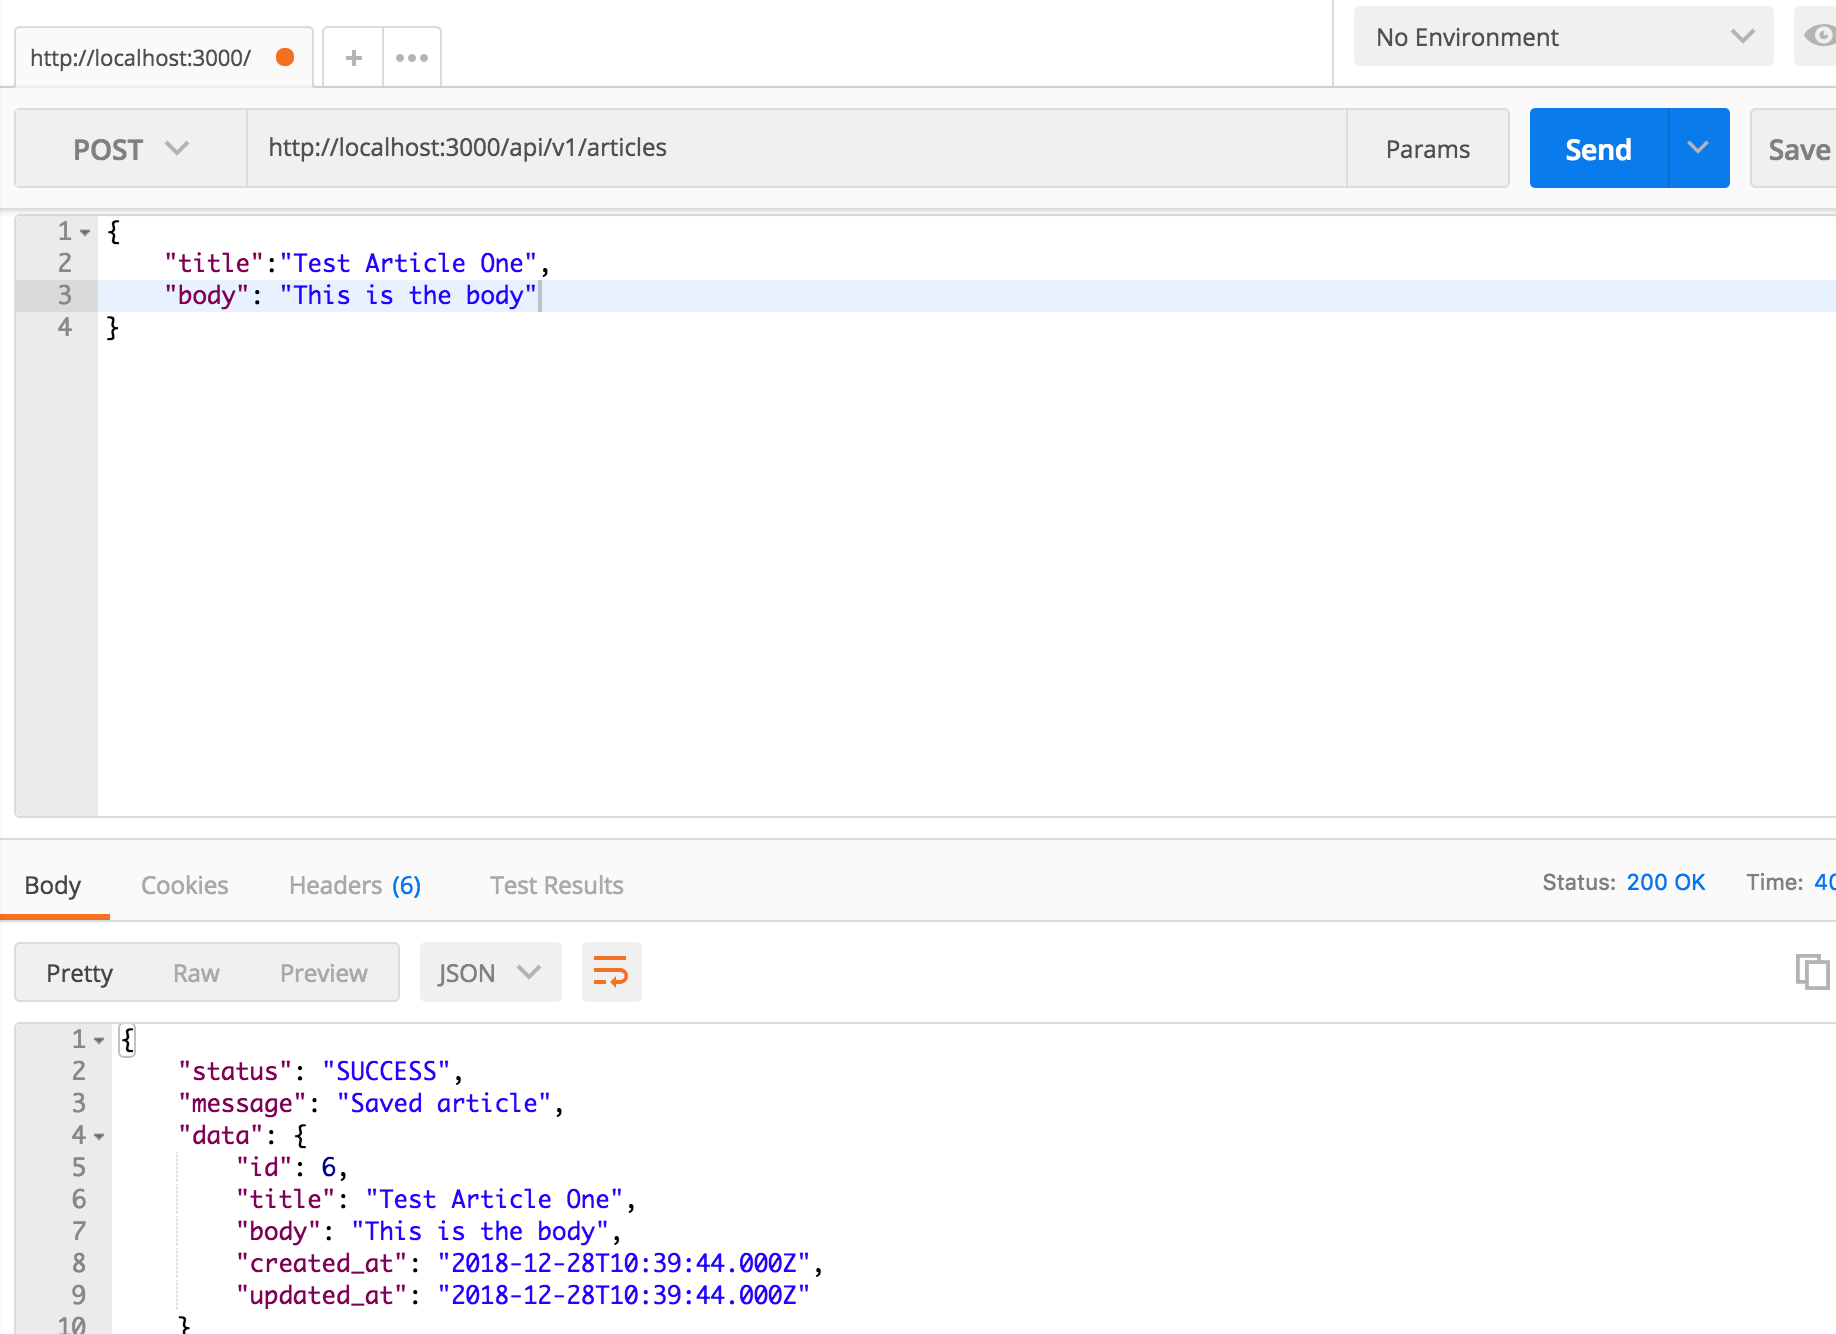
GET, POST, PUT, DELETE全てうまくいっていれば完成ですね。
ちなみに、curlコマンドでも確認することができます。
$ curl http://localhost:3000/api/v1/articles/2
{"status":"SUCCESS","message":"Loaded article","data":{"id":2,"title":"Now Sleeps the Crimson Petal","body":"Beatae temporibus ullam cupiditate.","created_at":"2018-12-28T10:17:58.000Z","updated_at":"2018-12-28T10:17:58.000Z"}}
curlコマンドについてはこちらの記事にまとめてあります。
curlコマンド超入門(GET/POST/PUT/DELETEでリクエスト)[LINUX]
おわりに
以上で軽量RailsAPIが作成できました。
こちらの記事が役に立ったという方は、いいね、よろしくお願いします(^^)
また、takuyaninのマイページにRails, Rubyに関していくつか記事をまとめてますので、よければご参考ください。