Spring Boot 2.0 と Kotlin でシンプルなトークン認証の REST API サーバーを実装してみたのでメモっとく。
GitHub: takuya0301/token-auth-rest-api-server
Demo プロジェクトを作成する
curl コマンドを使用して Demo プロジェクトを作成する。
$ curl https://start.spring.io/starter.tgz \
    -d type=gradle-project \
    -d language=kotlin \
    -d baseDir=demo \
    -d dependencies=web \
| tar xz
なお、curl コマンドで利用したときの start.spring.io のヘルプは下記のコマンドで確認できる。
$ curl start.spring.io
GET /hello エンドポイントを実装する
Hello, world! という文字列をレスポンスする GET /hello エンドポイントを実装する。
@SpringBootApplication
@RestController
class DemoApplication {
    @GetMapping("/hello")
    fun hello() = "Hello, world!"
}

fun main(args: Array<String>) {
    runApplication<DemoApplication>(*args)
}
起動して curl コマンドでアクセスすると Hello, world! が表示される。
$ curl -X GET localhost:8080/hello
Hello, world!
Basic 認証を追加する
Spring Security を導入して Basic 認証を追加する。
今回は build.gradle をコマンドで上書きして Spring Security を導入する。
$ cd demo
$ curl start.spring.io/build.gradle \
    -d language=kotlin \
    -d dependencies=web,security \
> build.gradle
手作業で build.gradle に下記の差分を追記するのと同じ。
--- a/build.gradle
+++ b/build.gradle
@@ -41,9 +41,11 @@ repositories {


 dependencies {
+       compile('org.springframework.boot:spring-boot-starter-security')
        compile('org.springframework.boot:spring-boot-starter-web')
        compile('com.fasterxml.jackson.module:jackson-module-kotlin')
        compile("org.jetbrains.kotlin:kotlin-stdlib-jdk8")
        compile("org.jetbrains.kotlin:kotlin-reflect")
        testCompile('org.springframework.boot:spring-boot-starter-test')
+       testCompile('org.springframework.security:spring-security-test')
 }
起動すると Basic 認証用に生成されたパスワードが表示される。このパスワードは起動ごとに異なるものが生成される。
$ ./gradlew bootRun
...
2018-07-01 13:28:26.977  INFO 6754 --- [           main] .s.s.UserDetailsServiceAutoConfiguration :

Using generated security password: e846f86a-00fd-417a-ad8a-5f91270b6ffb

...
curl コマンドでアクセスすると Hello, world! が表示される。認証情報を付与するのがポイントだ。
$ curl -X GET localhost:8080/hello -u user:e846f86a-00fd-417a-ad8a-5f91270b6ffb
Hello, world!
トークン認証を追加する
Spring Session と Redis を導入してトークン認証を追加する。
同様に build.gradle をコマンドで上書きして Spring Session と Redis を導入する。セッションストアとして Redis を使用するので、macOS に Redis を Homebrew でインストールして brew services で起動するを参考に Redis サーバーをローカルで起動しておくこと。
$ curl start.spring.io/build.gradle \
    -d language=kotlin \
    -d dependencies=web,security,session,data-redis \
> build.gradle
手作業で build.gradle に下記の差分を追記するのと同じ。
--- a/build.gradle
+++ b/build.gradle
@@ -41,9 +41,11 @@ repositories {


 dependencies {
+       compile('org.springframework.boot:spring-boot-starter-data-redis')
        compile('org.springframework.boot:spring-boot-starter-security')
        compile('org.springframework.boot:spring-boot-starter-web')
        compile('com.fasterxml.jackson.module:jackson-module-kotlin')
+       compile('org.springframework.session:spring-session-data-redis')
        compile("org.jetbrains.kotlin:kotlin-stdlib-jdk8")
        compile("org.jetbrains.kotlin:kotlin-reflect")
        testCompile('org.springframework.boot:spring-boot-starter-test')
Spring Session を有効にするために application.properties に Redis をセッションストアとして使用することを追記する。
spring.session.store-type=redis
トークン認証するための Bean を定義する。HttpSession & RESTful APIs を参考にした。
@Configuration
class SessionConfig {
    @Bean
    fun httpSessionIdResolver(): HttpSessionIdResolver =
            HeaderHttpSessionIdResolver.xAuthToken()
}
起動して curl でアクセスすると Hello, world! が表示される。認証のパスワードは起動のたびに変化するので修正を忘れないようにする。今回はレスポンスヘッダーに記載される X-Auth-Token ヘッダーの内容を確認するので、curl コマンドに -i オプションを付与している。
$ curl -X GET localhost:8080/hello -i -u user:190eb4a2-1a11-4baa-8b39-cab0b557b9cd
HTTP/1.1 200
X-Content-Type-Options: nosniff
X-XSS-Protection: 1; mode=block
Cache-Control: no-cache, no-store, max-age=0, must-revalidate
Pragma: no-cache
Expires: 0
X-Frame-Options: DENY
X-Auth-Token: bf03b658-88c9-4de4-9682-f0520a4d12f0
Content-Type: text/plain;charset=UTF-8
Content-Length: 14
Date: Sun, 01 Jul 2018 08:18:27 GMT

Hello, world!
Basic 認証できたので X-Auth-Token ヘッダーのトークンを利用して認証できるようになる。curl でトークン認証してみよう。
$ curl -X GET localhost:8080/hello -H "X-Auth-Token: bf03b658-88c9-4de4-9682-f0520a4d12f0"
Hello, world!
データベースに保存されている認証情報で認証する
Spring JDBC と H2 Database を導入してデータベースに保存されている認証情報に基づいて認証する。
同様に build.gradle をコマンドで上書きして Spring JDBC と H2 Database を導入する。
$ curl start.spring.io/build.gradle \
    -d language=kotlin \
    -d dependencies=web,security,session,data-redis,jdbc,h2 \
> build.gradle
手作業で build.gradle に下記の差分を追記するのと同じ。
--- a/build.gradle
+++ b/build.gradle
@@ -42,12 +42,15 @@ repositories {

 dependencies {
        compile('org.springframework.boot:spring-boot-starter-data-redis')
+       compile('org.springframework.boot:spring-boot-starter-jdbc')
        compile('org.springframework.boot:spring-boot-starter-security')
        compile('org.springframework.boot:spring-boot-starter-web')
        compile('com.fasterxml.jackson.module:jackson-module-kotlin')
        compile('org.springframework.session:spring-session-data-redis')
+       compile('org.springframework.session:spring-session-jdbc')
        compile("org.jetbrains.kotlin:kotlin-stdlib-jdk8")
        compile("org.jetbrains.kotlin:kotlin-reflect")
+       runtime('com.h2database:h2')
        testCompile('org.springframework.boot:spring-boot-starter-test')
        testCompile('org.springframework.security:spring-security-test')
 }
データベースから認証情報を取得するための Bean を定義する。JdbcDaoImpl を参考にした。JdbcUserDetailsManager は JdbcDaoImpl のサブクラス。Spring Boot のサンプル spring-boot-sample-web-secure-jdbc も参考になる。
@Configuration
class SecurityConfig {
    @Bean
    fun jdbcUserDetailsManager(dataSource: DataSource): JdbcUserDetailsManager {
        val jdbcUserDetailsManager = JdbcUserDetailsManager()
        jdbcUserDetailsManager.setDataSource(dataSource)
        return jdbcUserDetailsManager
    }
}
起動時にデータベースのスキーマを作成するように schema.sql を追加する。User Schema を参考にした。
create table users(
	username varchar_ignorecase(50) not null primary key,
	password varchar_ignorecase(50) not null,
	enabled boolean not null
);

create table authorities (
	username varchar_ignorecase(50) not null,
	authority varchar_ignorecase(50) not null,
	constraint fk_authorities_users foreign key(username) references users(username)
);
create unique index ix_auth_username on authorities (username,authority);
また、起動時にデータベースにユーザーを登録するように data.sql を追加する。{noop} の付いたパスワード表記は DelegatingPasswordEncoder を参考にした。DelegatingPasswordEncoder がデフォルトで使用される PasswordEncoder になっている。
insert into users values ('user', '{noop}password', true);
insert into authorities values ('user', 'ROLE_USER');
起動して curl でアクセスすると Hello, world! が表示される。認証情報はデータベースに登録されているユーザーのものを使用する。
$ curl -i -X GET localhost:8080/hello -u user:password
HTTP/1.1 200
X-Content-Type-Options: nosniff
X-XSS-Protection: 1; mode=block
Cache-Control: no-cache, no-store, max-age=0, must-revalidate
Pragma: no-cache
Expires: 0
X-Frame-Options: DENY
X-Auth-Token: f2c57a09-7ff6-4dd1-b322-bfb0759821cb
Content-Type: text/plain;charset=UTF-8
Content-Length: 14
Date: Tue, 03 Jul 2018 10:17:54 GMT

Hello, world!
データベースに保存されている認証情報で認証できたので X-Auth-Token ヘッダーのトークンを利用しても認証できるようになる。curl でトークン認証してみよう。
$ curl -X GET localhost:8080/hello -H "X-Auth-Token: f2c57a09-7ff6-4dd1-b322-bfb0759821cb"
Hello, world!
CORS に対応する
Spring Security の機能を利用して CORS に対応する。
CORS に対応するために HttpSecurity を設定し、Bean を定義する。CORS を参考にした。
ここでは Example Domain からのリクエストに対応する。HTTP メソッドと HTTP リクエストヘッダーはすべて許可するようにワイルドカードを指定する。X-Auth-Token レスポンスヘッダーを JavaScript から取得できるようにエクスポーズドヘッダーに指定する。
@Configuration
class SecurityConfig : WebSecurityConfigurerAdapter() {
    override fun configure(http: HttpSecurity) {
        http.authorizeRequests()
                .anyRequest().authenticated()
        http.cors()
        http.httpBasic()
    }

    @Bean
    fun corsConfigurationSource(): CorsConfigurationSource {
        val configuration = CorsConfiguration()
        configuration.allowedOrigins = Arrays.asList("http://example.com")
        configuration.allowedMethods = Arrays.asList("*")
        configuration.allowedHeaders = Arrays.asList("*")
        configuration.exposedHeaders = Arrays.asList("X-Auth-Token")
        val source = UrlBasedCorsConfigurationSource()
        source.registerCorsConfiguration("/**", configuration)
        return source
    }

    @Bean
    fun jdbcUserDetailsManager(dataSource: DataSource): JdbcUserDetailsManager {
        val jdbcUserDetailsManager = JdbcUserDetailsManager()
        jdbcUserDetailsManager.setDataSource(dataSource)
        return jdbcUserDetailsManager
    }
}
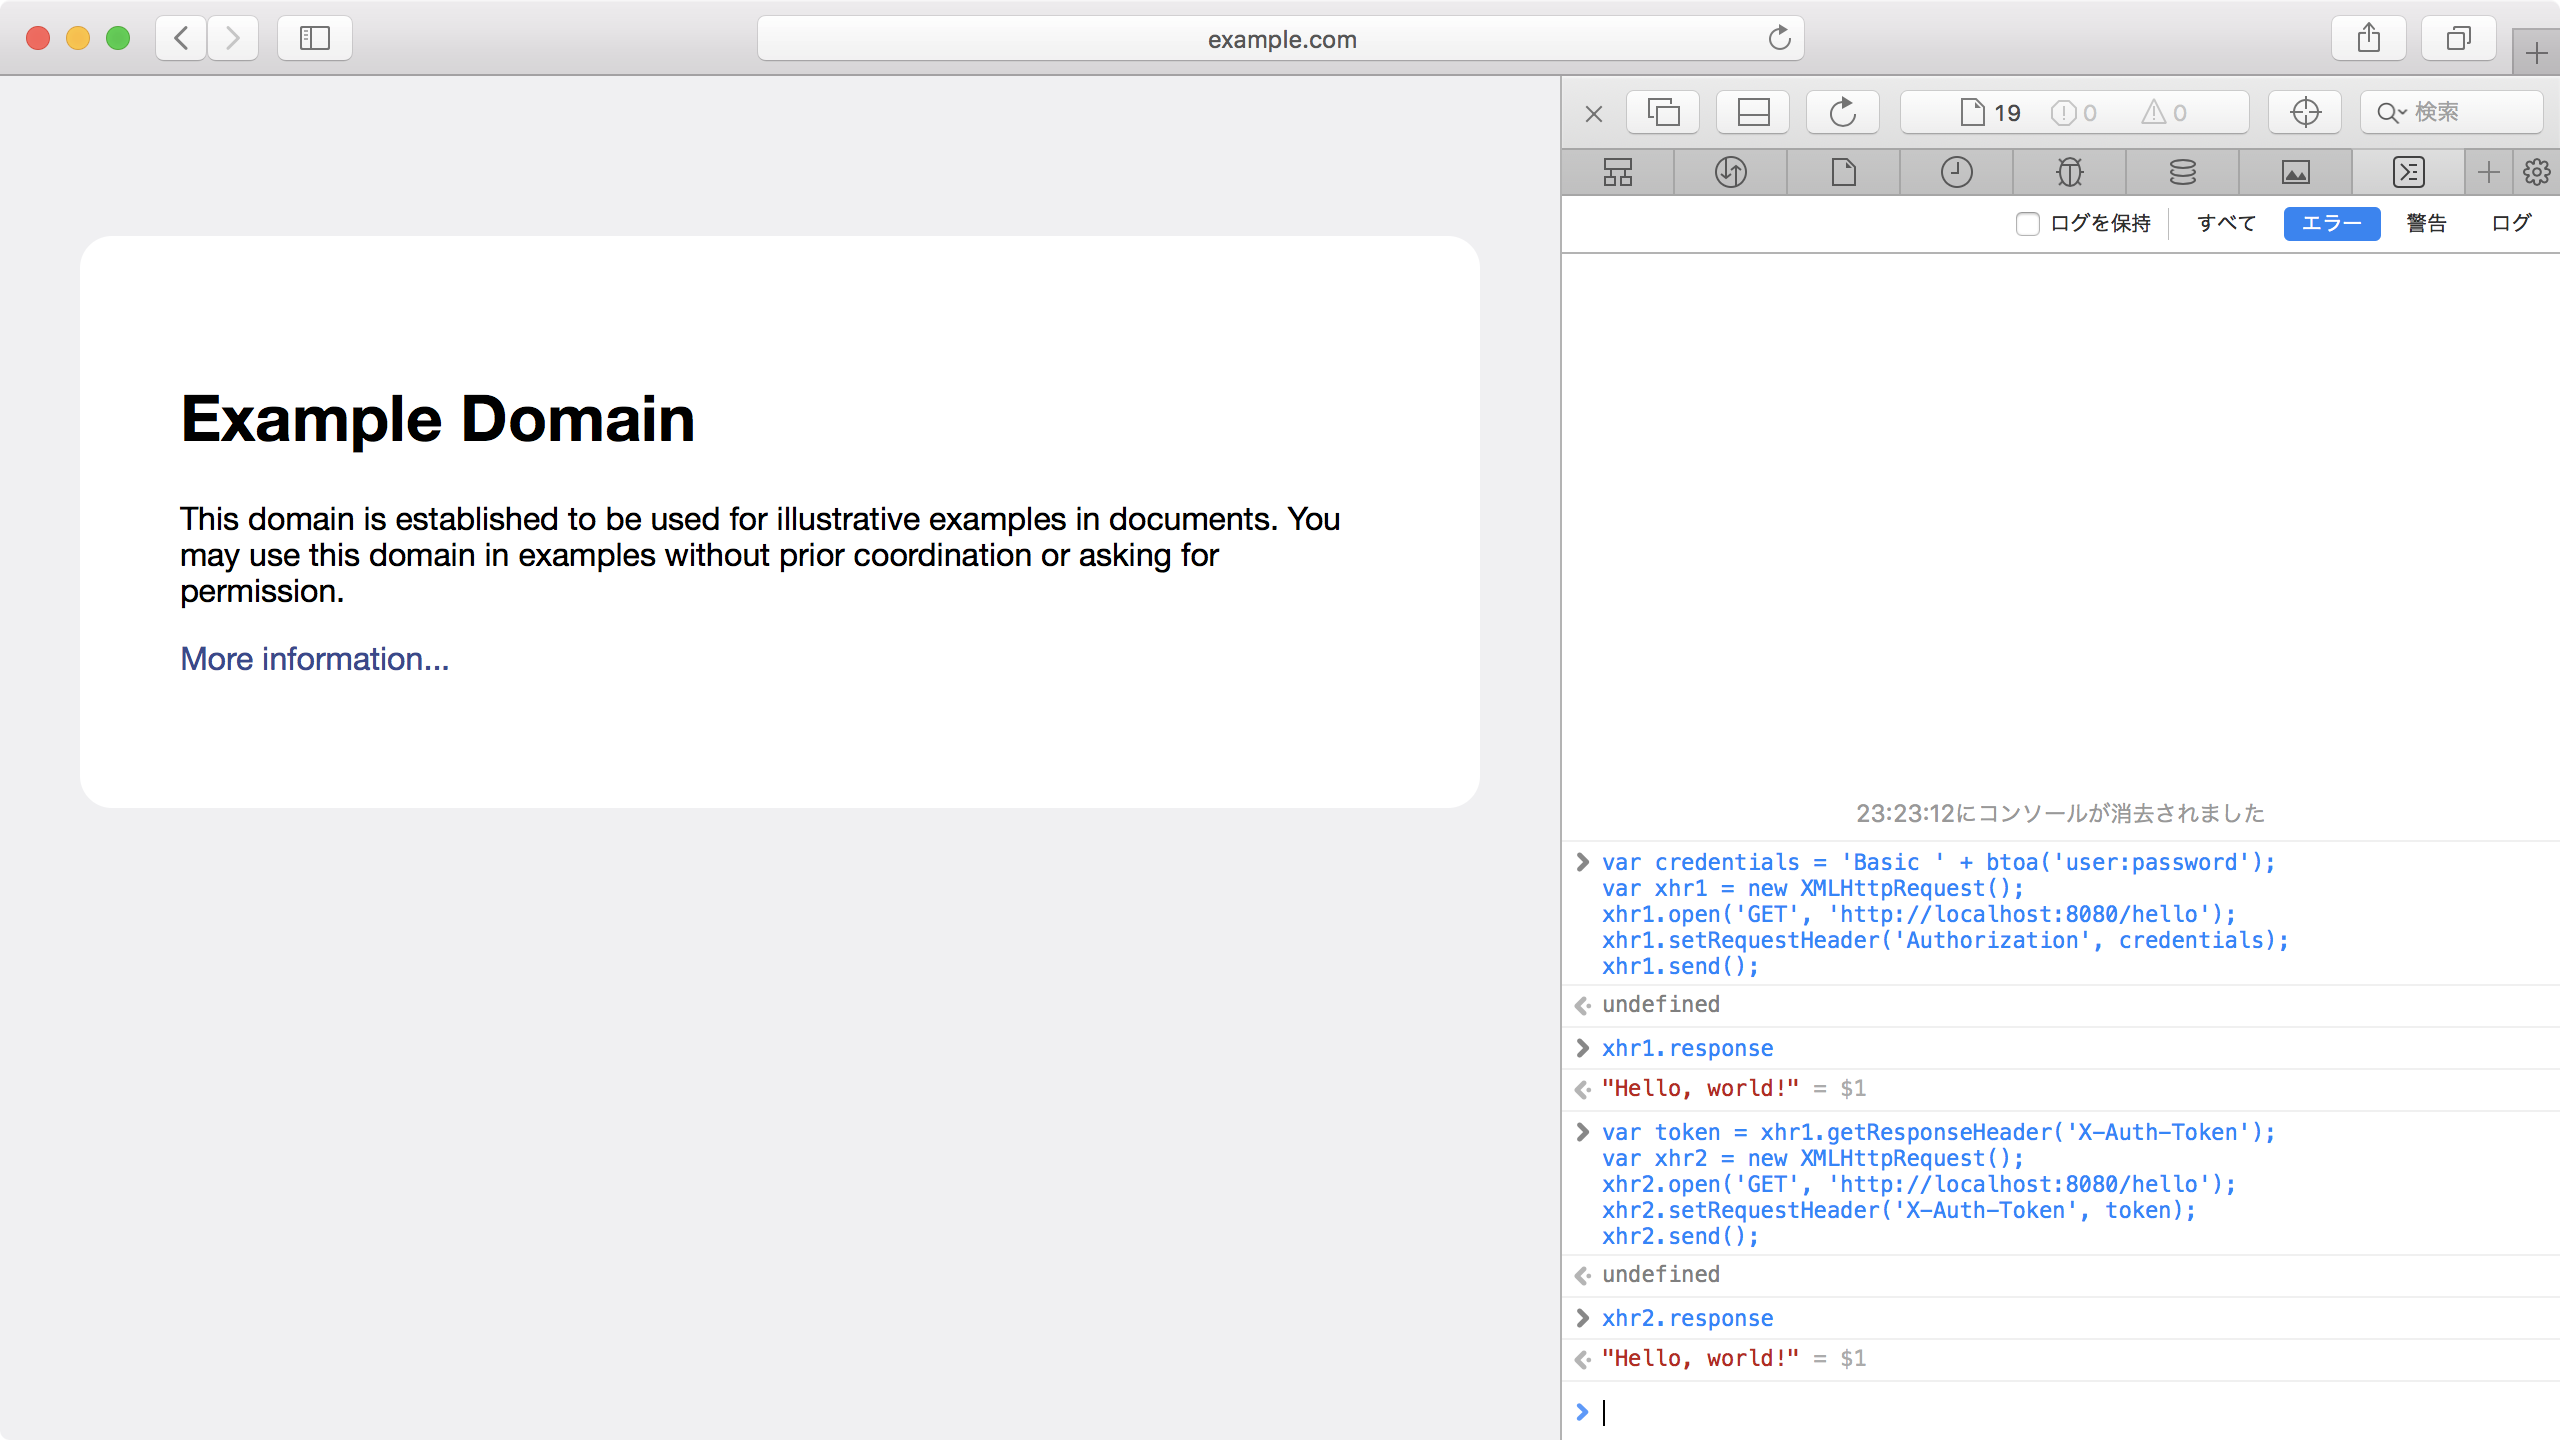
Example Domain にアクセスし、JavaScript コンソールから Basic 認証のリクエストを送信する。
var credentials = 'Basic ' + btoa('user:password');
var xhr1 = new XMLHttpRequest();
xhr1.open('GET', 'http://localhost:8080/hello');
xhr1.setRequestHeader('Authorization', credentials);
xhr1.send();
X-Auth-Token レスポンスヘッダーの値を利用してトークン認証のリクエストを送信する。
var token = xhr1.getResponseHeader('X-Auth-Token');
var xhr2 = new XMLHttpRequest();
xhr2.open('GET', 'http://localhost:8080/hello');
xhr2.setRequestHeader('X-Auth-Token', token);
xhr2.send();
POST /hello エンドポイントを実装する
Hello, <name>! という文字列をレスポンスする POST /hello エンドポイントを実装する。
@SpringBootApplication
@RestController
class DemoApplication {
    @GetMapping("/hello")
    fun hello() = "Hello, world!"

    @PostMapping("/hello")
    fun helloWithName(@RequestBody name: String) = "Hello, $name!"
}

fun main(args: Array<String>) {
    runApplication<DemoApplication>(*args)
}
Spring Security はデフォルトで CSRF プロテクションが有効だ。POST リクエストの場合は CSRF トークンを要求されるが、CORS によって Origin をチェックすることで CSRF プロテクションを実施しているので、デフォルトの CSRF プロテクションは無効にする。Configure CSRF Protection と CSRF Prevention Cheat Sheet を参考にした。
@Configuration
class SecurityConfig : WebSecurityConfigurerAdapter() {
    override fun configure(http: HttpSecurity) {
        http.authorizeRequests()
                .anyRequest().authenticated()
        http.cors()
        http.csrf().disable()
        http.httpBasic()
    }

    @Bean
    fun corsConfigurationSource(): CorsConfigurationSource {
        val configuration = CorsConfiguration()
        configuration.allowedOrigins = Arrays.asList("http://example.com")
        configuration.allowedMethods = Arrays.asList("*")
        configuration.allowedHeaders = Arrays.asList("*")
        configuration.exposedHeaders = Arrays.asList("X-Auth-Token")
        val source = UrlBasedCorsConfigurationSource()
        source.registerCorsConfiguration("/**", configuration)
        return source
    }

    @Bean
    fun jdbcUserDetailsManager(dataSource: DataSource): JdbcUserDetailsManager {
        val jdbcUserDetailsManager = JdbcUserDetailsManager()
        jdbcUserDetailsManager.setDataSource(dataSource)
        return jdbcUserDetailsManager
    }
}
Example Domain にアクセスし、JavaScript コンソールから Basic 認証のリクエストを送信する。
var credentials = 'Basic ' + btoa('user:password');
var xhr1 = new XMLHttpRequest();
xhr1.open('POST', 'http://localhost:8080/hello');
xhr1.setRequestHeader('Authorization', credentials);
xhr1.send('takuya');
X-Auth-Token レスポンスヘッダーの値を利用してトークン認証のリクエストを送信する。
var token = xhr1.getResponseHeader('X-Auth-Token');
var xhr2 = new XMLHttpRequest();
xhr2.open('POST', 'http://localhost:8080/hello');
xhr2.setRequestHeader('X-Auth-Token', token);
xhr2.send('takuya');

セッションの生成を抑制する
未認証状態でトークンが発行されないようにセッションの生成を抑制する。
未認証状態でセッションが生成される理由は、リクエストされた URL をセッションに保存して認証後にリダイレクトできるようにする機能のためらしい。
その機能は HttpSessionRequestCache で実現されているので、NullRequestCache を設定することで無効化できる。
@Configuration
class SecurityConfig : WebSecurityConfigurerAdapter() {
    override fun configure(http: HttpSecurity) {
        http.authorizeRequests()
                .anyRequest().authenticated()
        http.cors()
        http.csrf().disable()
        http.httpBasic()
        http.requestCache().requestCache(NullRequestCache())
    }

    @Bean
    fun corsConfigurationSource(): CorsConfigurationSource {
        val configuration = CorsConfiguration()
        configuration.allowedOrigins = Arrays.asList("http://example.com")
        configuration.allowedMethods = Arrays.asList("*")
        configuration.allowedHeaders = Arrays.asList("*")
        configuration.exposedHeaders = Arrays.asList("X-Auth-Token")
        val source = UrlBasedCorsConfigurationSource()
        source.registerCorsConfiguration("/**", configuration)
        return source
    }

    @Bean
    fun jdbcUserDetailsManager(dataSource: DataSource): JdbcUserDetailsManager {
        val jdbcUserDetailsManager = JdbcUserDetailsManager()
        jdbcUserDetailsManager.setDataSource(dataSource)
        return jdbcUserDetailsManager
    }
}
認証が失敗するリクエストを curl で送信すると X-Auth-Token レスポンスヘッダーがなくなることが確認できる。
$ curl -i -X GET localhost:8080/hello
HTTP/1.1 401
WWW-Authenticate: Basic realm="Realm"
X-Content-Type-Options: nosniff
X-XSS-Protection: 1; mode=block
Cache-Control: no-cache, no-store, max-age=0, must-revalidate
Pragma: no-cache
Expires: 0
X-Frame-Options: DENY
Content-Type: application/json;charset=UTF-8
Transfer-Encoding: chunked
Date: Sat, 14 Jul 2018 10:05:29 GMT

{"timestamp":"2018-07-14T10:05:29.720+0000","status":401,"error":"Unauthorized","message":"Unauthorized","path":"/hello"}
今回は Spring Boot 2.0 と Kotlin でシンプルなトークン認証の REST API サーバーを実装する手順を説明した。次回はユーザー登録を実装してみようと思っている。
参考文献
https://docs.spring.io/spring-boot/docs/2.0.3.RELEASE/reference/htmlsingle/
https://docs.spring.io/spring-security/site/docs/5.0.6.RELEASE/reference/htmlsingle/
https://docs.spring.io/spring-session/docs/2.0.4.RELEASE/reference/htmlsingle/
https://www.owasp.org/index.php/CSRF_Prevention_Cheat_Sheet