概要
データ拡張の一つであるRandom Erasingの処理を説明する記事
論文の内容は以下の記事で別にまとめています。
https://takuroooooo.hatenablog.com/entry/2019/07/14/Random_Erasing_Data_Augmentation
Random Erasingとは
2017年に発表されたデータ拡張。
Random Erasing Data Augmentation
画像上に矩形を重畳することでデータの水増しを行う。
- 実装が簡単で。
- 他のデータ拡張と併用可能で。
-
Occlusionに対して強いモデルを作れる。
という特徴がある。
基本的なデータ拡張にどんなものがあるかは以下の記事を参照
Kerasでデータ拡張(Data Augmentation)後の画像を表示する
アルゴリズム
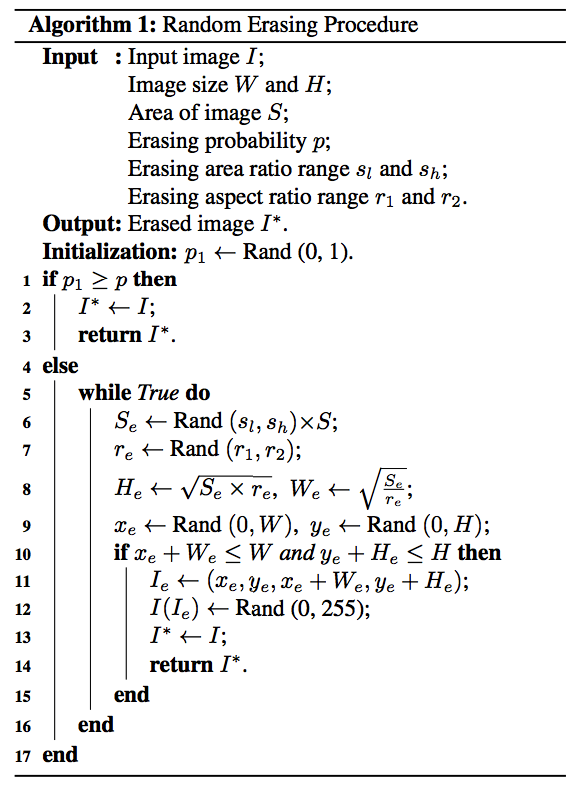
こちらは論文に書いてあるRandomErasingのアルゴリズム。

論文のアルゴリズムをPythonで実装すると以下のようになる。
変数名は論文の中の記号と合わせている。
def random_erasing(img, p=0.5, sl=0.02, sh=0.4, r1=0.3, r2=3.3):
    target_img = img.copy()

    if p < np.random.rand():
        # RandomErasingを実行しない
        return target_img

    H, W, _ = target_img.shape
    S = H * W

    while True:
        Se = np.random.uniform(sl, sh) * S # 画像に重畳する矩形の面積
        re = np.random.uniform(r1, r2) # 画像に重畳する矩形のアスペクト比

        He = int(np.sqrt(Se * re)) # 画像に重畳する矩形のHeight
        We = int(np.sqrt(Se / re)) # 画像に重畳する矩形のWidth

        xe = np.random.randint(0, W) # 画像に重畳する矩形のx座標
        ye = np.random.randint(0, H) # 画像に重畳する矩形のy座標

        if xe + We <= W and ye + He <= H:
            # 画像に重畳する矩形が画像からはみ出していなければbreak
            break

    mask = np.random.randint(0, 255, (He, We, 3)) # 矩形がを生成 矩形内の値はランダム値
    target_img[ye:ye + He, xe:xe + We, :] = mask # 画像に矩形を重畳

    return target_img
| 記号 | 意味 |
|---|---|
| p | Random Erasingを実行する確率 |
| S | 入力画像の面積 |
| H, W | 入力画像の高さと幅 |
| sl, sh | 入力画像面積に対する矩形面積の比率のレンジ |
| r1, r2 | 画像上に描画される矩形のアスペクト比のレンジ |
| Se | 画像上に描画される矩形の面積 |
| He, We | 画像上に描画される矩形の高さと幅 |
| re | 画像上に描画される矩形のアスペクト比 He/We |
| xe, ye | 画像上に描画される矩形のxy座標 |
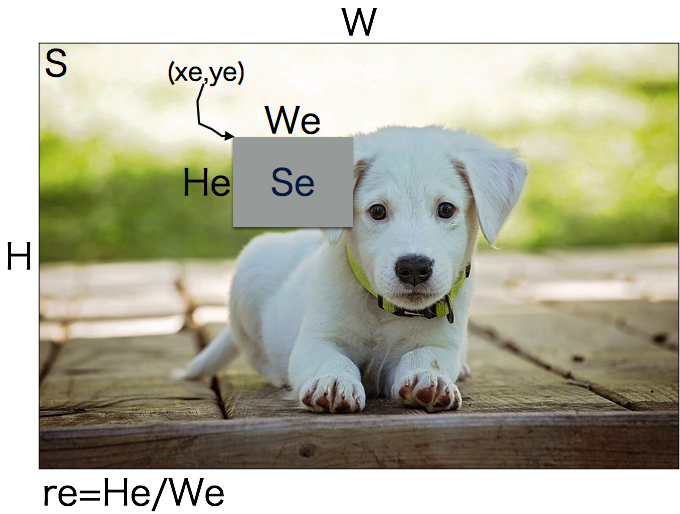
各記号を図形上で表すと以下のようになる。
アルゴリズムの流れ
- 確率
pを使ってRandomErasingを実行するかを判定する。 -
slとshから矩形の面積Seを求める。 -
r1とr2から矩形のアスペクト比reを求める。 -
Seとreから矩形の縦幅Heと矩形の横幅Weを求める。 -
矩形を重畳する位置
xeとyeを求める。 - (
xe,ye,We,He)を使って画像上に矩形を重畳したときに矩形が画像からはみ出していれば1からやり直し。 - 矩形内を埋める値をランダムに生成し、矩形を画像に重畳する。
- 終わり。
論文では以下の設定が一番性能が良かったとしている。
- p=0.5
- sl=0.02, sh=0.4
- r1=1/r2=0.3, r2=3.3
また
- 矩形内はランダム値で埋めるのが性能が良い。(ImageNetの平均値や全て0 or 255と比較して)
- ObjectDetectionの場合は、矩形の生成位置を各BoundingBoxの中+画像全体からランダムで決めると性能が良い。
- RandomCropやRandomFlipと併用しても性能が良くなる。(他のデータ拡張手法と補完的な関係になっている。)
ということが論文の中で述べられている。
RandomErasingのパラメータをいじって結果の変化を可視化する
RandomErasingを使う際にユーザーは以下のパラメータを決めなければいけない。
| 記号 | 意味 |
|---|---|
| p | Random Erasingを実行する確率 |
| sl, sh | 入力画像面積に対する矩形面積の比率のレンジ |
| r1, r2 | 画像上に描画される矩形のアスペクト比のレンジ |
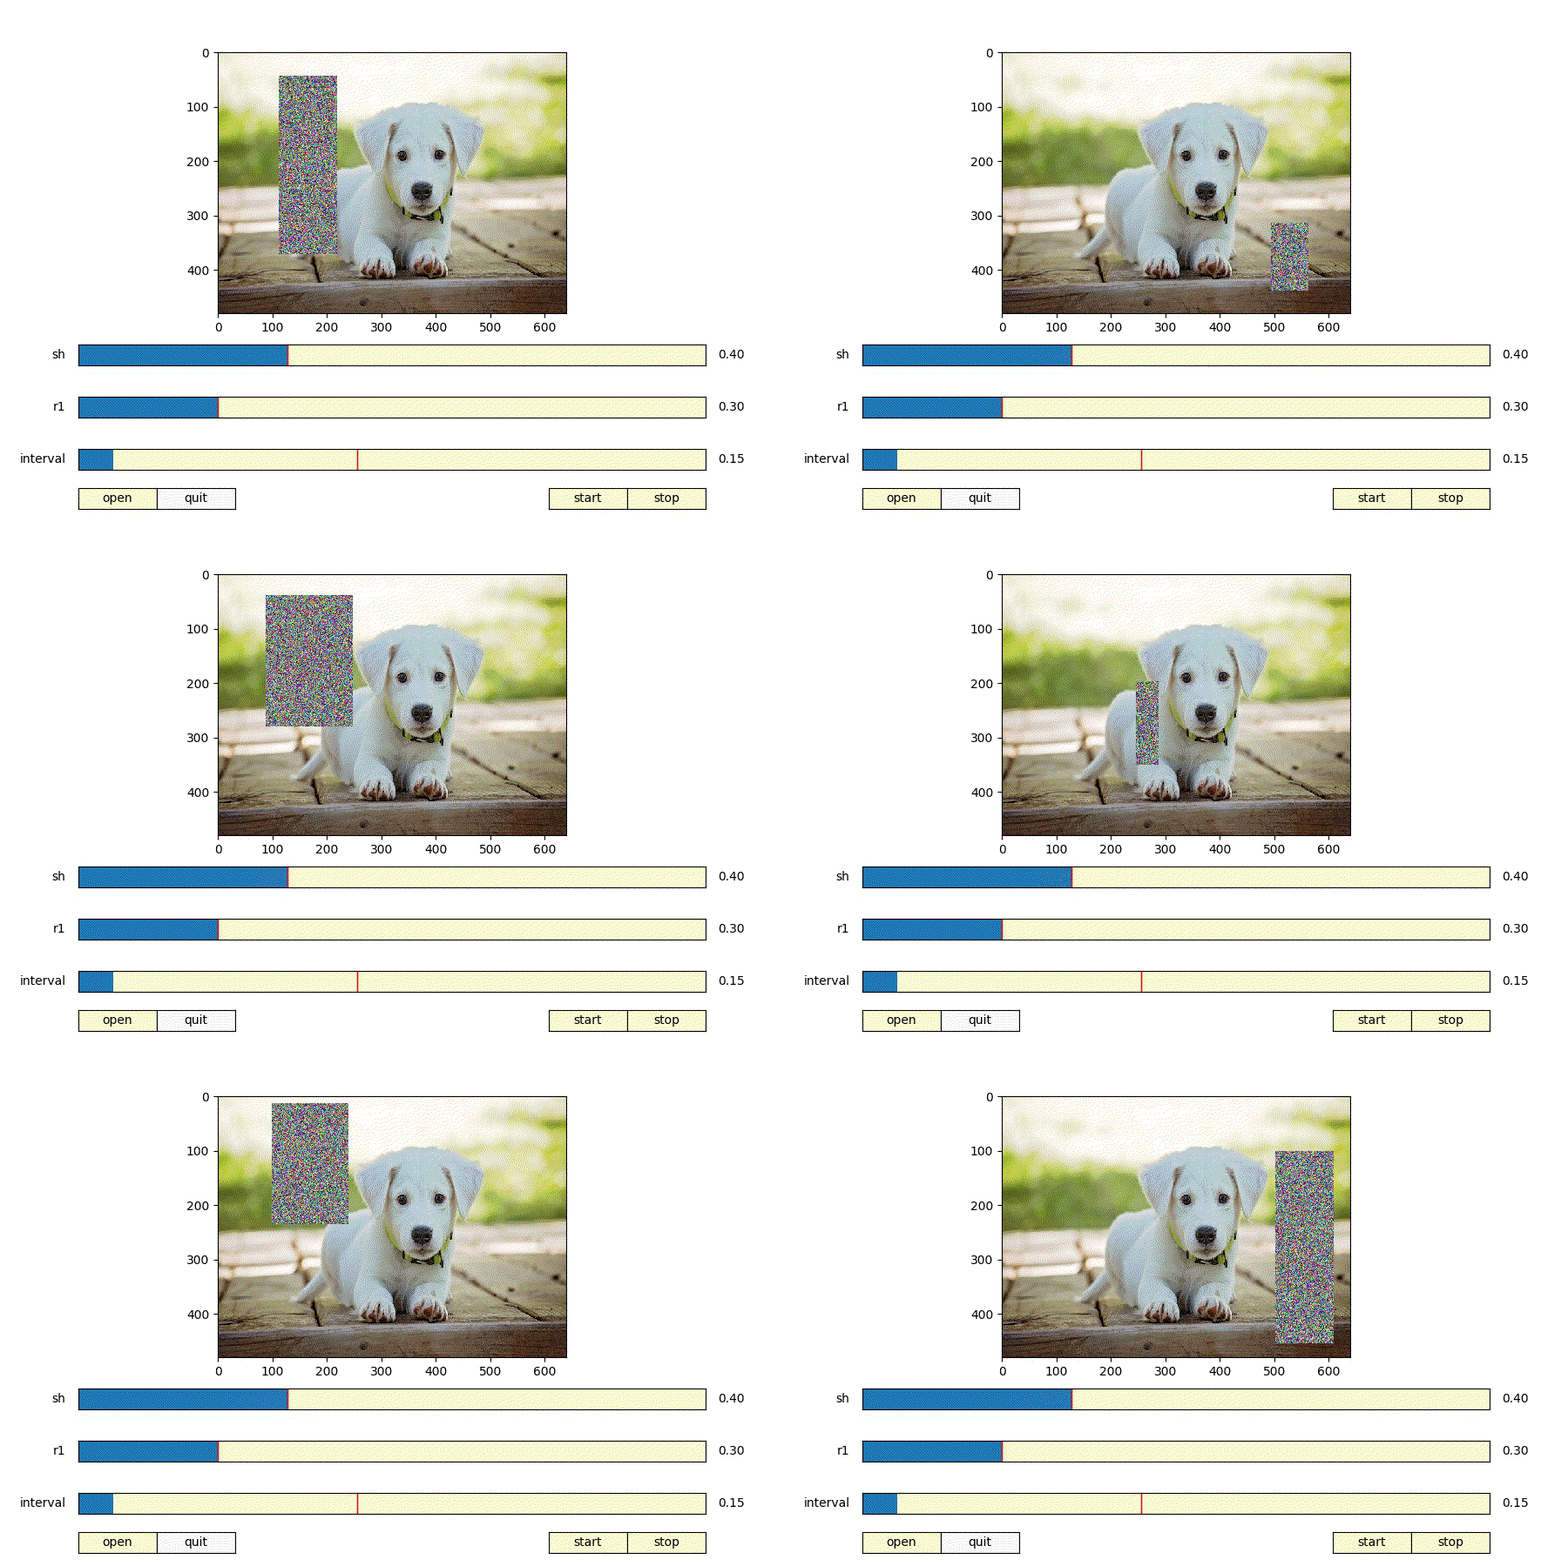
上記パラメータを決める際に、パラメータを変えるとどんな矩形が生成されるのか可視化できたら便利だと思いmatplotlibでRandomErasingの可視化ツールを作った。

https://github.com/takurooo/Python_RandomErasingSimulator
このツールを使用すると
- shを大きくする = 画像に対して大きい矩形が生成される
- shを小さくする = 画像に対して小さい矩形が生成される
- r1を大きくする = 正方形に近いの矩形が生成される
- r1を小さくする = 細長い矩形が生成される
ということが分かる。
ちなみに
- sl=0.02
- r2=1/r1
- p = 1.0
に固定している。
