OpenAI GPT-4VのAPIが利用可能になったとのことなので早速使ってみた。
2023/11/10 : Google colabを利用した動作方法を追記しました
2023/11/10 : requestsのinstallをしていない場合のエラー対応について追記しました
2023/11/07 : 最初の記事を投稿しました
入力画像の準備
今回は、ChatGPTのDALLE-3で作成した以下のねこの画像を使用した。
ファイル名: cat.png

ソースコード
ソースコード等は、GitHubにあげました。
フォルダ構成等はこれを参考にしてください!!
コード全容
import argparse

import base64
import requests

from settings.setting import API_KEY


def parse_args():
    parser = argparse.ArgumentParser()

    parser.add_argument('-i', '--image', type=str,)
    parser.add_argument('-p', '--prompt', type=str)
    return parser.parse_args()

# Function to encode the image
def encode_image(image_path):
    with open(image_path, "rb") as image_file:
        return base64.b64encode(image_file.read()).decode('utf-8')


def main(args: argparse.Namespace):
    # Getting the base64 string
    base64_image = encode_image(args.image)

    headers = {
        "Content-Type": "application/json",
        "Authorization": f"Bearer {API_KEY}"
    }

    payload = {
        "model": "gpt-4-vision-preview",
        "messages": [
          {
            "role": "user",
            "content": [
              {
                "type": "text",
                "text": args.prompt,
              },
              {
                "type": "image_url",
                "image_url": {
                  "url": f"data:image/jpeg;base64,{base64_image}"
                }
              }
            ]
          }
        ],
        "max_tokens": 300
    }

    response = requests.post("https://api.openai.com/v1/chat/completions", headers=headers, json=payload)

    # print(response.json())
    print("*"*50)
    print(response['choices'][0]['message']['content'])
    print("*"*50)

if __name__ == "__main__":
    main(parse_args())
実行方法
python run.py -i Images/cat.png -p "What's in this image?"
出力
The image features a fluffy cat comfortably sleeping, nestled among what appears to be cozy knit blankets or sweaters. The setting suggests a tranquil and warm environment, possibly with sunlight filtering in to add to the peaceful ambiance. The overall composition evokes a sense of comfort and serenity.
The image features a fluffy cat comfortably sleeping, nestled among what appears to be cozy knit blankets or sweaters. The setting suggests a tranquil and warm environment, possibly with sunlight filtering in to add to the peaceful ambiance. The overall composition evokes a sense of comfort and serenity.
(和訳)
ふわふわの猫が、肌触りのよさそうなニットの毛布やセーターに囲まれて気持ちよさそうに眠っている。静かで暖かな環境であることがうかがえ、陽の光が差し込んで穏やかな雰囲気が増しているのかもしれない。全体的な構図は、安らぎと静けさを感じさせる。
ふわふわの猫が、肌触りのよさそうなニットの毛布やセーターに囲まれて気持ちよさそうに眠っている。静かで暖かな環境であることがうかがえ、陽の光が差し込んで穏やかな雰囲気が増しているのかもしれない。全体的な構図は、安らぎと静けさを感じさせる。
実行方法詳細
(後でGitHubを更新します。。。)
(1) レポジトリのclone
git clone https://github.com/taku-mikan/GPT
(2) 好きな画像をImages/ に移す (以下はcat.pngとして進める)
(3) settings/setting.pyのAPI_KEYを自分のAPIに変更する
API_KEY = "your_api_key"
の"your_api_key"の部分を自分のapiに置き換える
(4) 実行
-i の後に画像へのpath, -pの後に好きなプロンプトを入力し、実行
python run.py -i Images/cat.png -p "What's in this image?"
エラー対応 (1)
APIアクセスに関するサイトによると、(現在は?)1ドル以上の支払いをした人のみが使用可能である。とのこと。
これまでAPIをあまり使ったことない人の場合は、以下のようなエラーが生じる可能性がある。
{'error': {'message': 'The model `gpt-4-vision-preview` does not exist or you do not have access to it. Learn more: https://help.openai.com/en/articles/7102672-how-can-i-access-gpt-4.', 'type': 'invalid_request_error', 'param': None, 'code': 'model_not_found'}}
この場合は、APIアクセスに記載の通り、prepaid請求(使用料の事前購入)を行えば使用可能になるとのこと。
prepaid請求に関する説明はこちら
上記記事の手順を簡単に以下に示す。
-
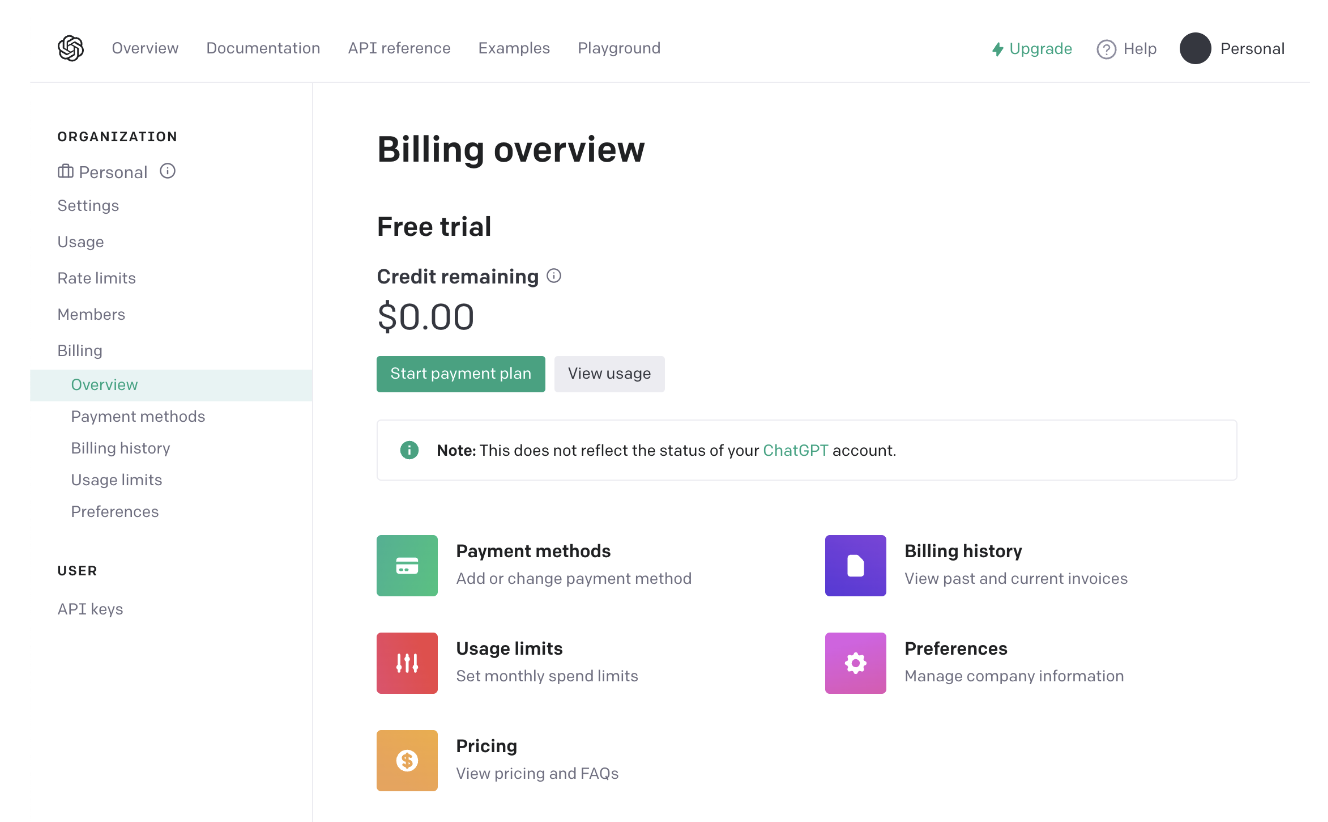
アカウント設定の請求概要に移動
以下のようなページが出てくる

-
支払いを行う
- 画像中の緑色のボタン(Start Payment plan)をクリック
- 購入するクレジットの量を確定する。現在は、最低5ドル、最高50ドルまで選択可能
- 5ドルでもOK
- 購入ドルを確認し、購入
購入後、少し時間が経った後(請求のメールが送られてくるくらい)再度実行するとエラーを生じることなく動かすことができた...!!
※ クレジットは、支払いが生じた際、クレジットが残っていればクレジットから優先に使われるらしい。また、1年後に消えてしまい、返金されない点に注意が必要とのこと。詳細は確認してください。
エラー対応 (2)
requestsというパッケージをpip installする必要があります。
したがって、実行環境によっては以下のエラーが生じる可能性があります。
Traceback (most recent call last):
  File "run.py", line 4, in <module>
    import requests
ModuleNotFoundError: No module named 'requests
このエラーが生じた場合は、以下を実行してみてください。
pip install requests
これで解消すると思います!!
Google Colabを利用した使い方
前提
API KEYが含まれるため、もしかしたらめんどくさいやり方を書いてるかもしれませんが、
ご容赦ください....。
動かし方
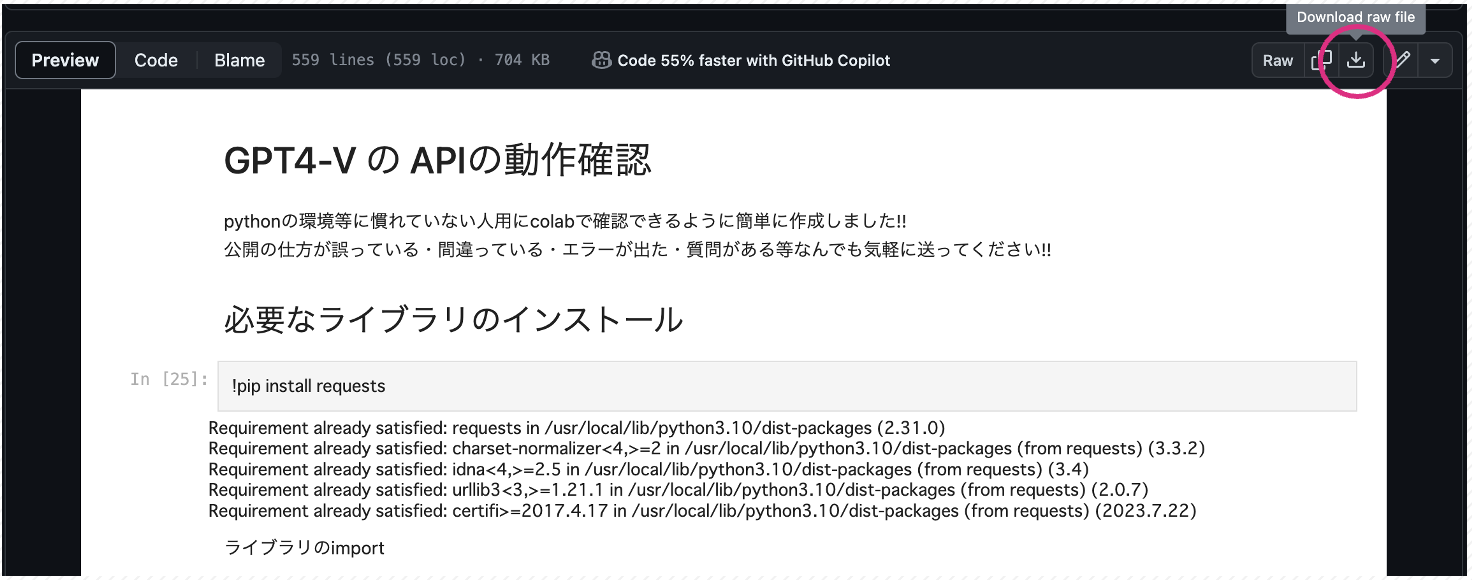
(1) ファイルのダウンロード
GitHubからGPT_4V.ipynbをDownloadしてください(写真右上のボタンからDownload可能です)
(2) 自身のgoogle driveにDownloadしたファイルをuploadする
自身のGoogle DriveにDownloadしたファイルをアップロードする。ドライブを開いた後、ドラッグ&ドロップでアップロードできます!!
(3) uploadしたGPT_4V.ipynbをクリックして開く
自分の環境だと自動でcolabが開かれるのですが、人によっては、「colabで開く」が表示されたり、 そもそもcolabが表示されなくて変な記号の羅列が出るかもしれません。
「colabで開く」が出た方はそのまま開いてもらえれば大丈夫です。
変な記号の羅列が出た方は、colabをinstallする必要があります。
(以下開けたと仮定して進めます)
(4) colabの指示通り上から実行する
途中でAPI KEYを設定する部分があり、これを設定しないとエラーが出るため注意してください。
以上!!とりあえず公開されたGPT-4Vに関して使ってみたという内容でした!!
何か間違い等あればお気軽に教えていただけると幸いです😭


