この記事はTakumi Akashiro ひとり Advent Calendar 2020の20日目の記事です。
始めに
この記事は既にQiita内に既出の内容が幾らかあります。
シンプルな内容をお求めの方は以下の記事がお勧めです。
自分もこの記事を書くにあたり参考にいたしました。この場を借りて感謝を申し上げます。
エクステンションとは?
これです。

[ウィンドウ > エクステンション] から起動できるユーザーが作成できるパネルのことです。
CEP(Common Extensibility Platform)によって構築されます。使用言語はHTMLとJavaScriptです。
CEP(Common Extensibility Platform)を使用すると、Photoshop、Illustrator、InDesign、After EffectsなどのAdobe Creative Cloudアプリケーションに拡張機能を構築することができます。
CEPで構築された拡張機能を使用すると、ユーザーは独自のワークフローに合わせてCreative Cloudのエクスペリエンスをカスタマイズできます。
Adobe-CEP/Getting-Started-guides: Getting Started guides and samples for CEP extensions より
作ってみる
もしあなたがVSCodeを既にインストールしていれば、
エクステンションの初期構築を作るためのVSCODE用Extension1があるので簡単に構築できます。
まずは以下のプラグインを導入してみましょう。
CC Extension Builder - Visual Studio Marketplace
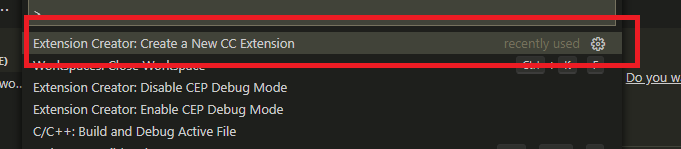
そしてVSCodeのコマンドパレット(Ctrl+Shift+P)でExtension Creator: Create a new CC Extensionを実行してみます。
エクステンション名が求められるので、適当に入力します。

テンプレートを選択します。

テンプレートを選択すると必要なファイルが生成され、
新しいVSCodeがエクステンションのディレクトリを開きます。
テンプレートについて
topcoat
topcoatはAdobe製品っぽいUIフレームワークとCSInterfaceを組み込んだテンプレートです。一番基本ですね。
UIフレームワークのドキュメント: Topcoat
こんな感じのがすぐに作れます。
spectrum
spectrumはTopcoatの構成からStyleの部分だけSpectrum UIフレームワークに変えたものです。
Spectrumは最近のAdobeが推し進めているUIフレームワークのようですね。
UIフレームワークのドキュメント: Spectrum CSS
……でも調べた感じ、上記ドキュメントのコンポーネントも出せないですし、
そもそも読み込むファイルが全く足りてないんですよね。
古いのか、あくまでSpectrum風ってことなんだろうか……?
theme
TopcoatからTopcoatのCSS部分だけ抜いたものです。
つまりCSInterfaceだけあって、StyleSheetは自分で作ってねって奴です。
basic
最小構成です。CSInterfaceすらありません。
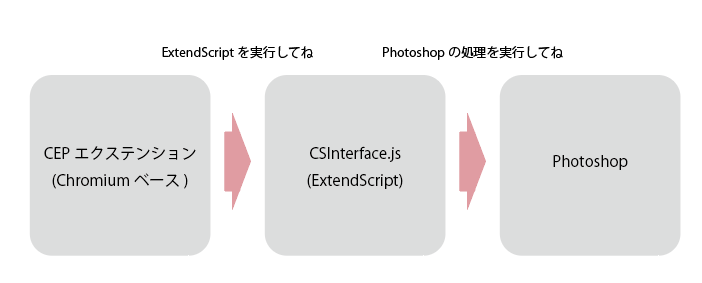
CSInterface
さっきからCSInterfaceってなんだよ!って思ってらっしゃる方もいると思うので捕捉しときます。
CEPはCEF(Chromium Embedded Framework)、すなわちChromium上で動いてます。
CEP上ではPhotoshopを操作するExtendScriptは使えません。
そのため、CSInterfaceを通してExtendScriptを呼び出しPhotoshopを操作します。
イメージとしてはこんな感じです。
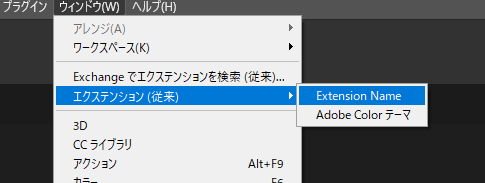
エクステンションを起動してみる
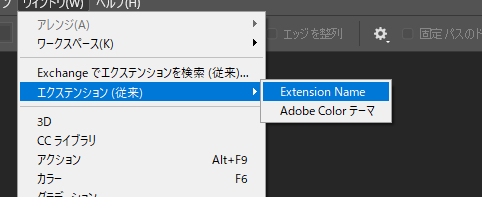
テンプレートを選択して、エクステンションの構成が作成出来たら、Photoshopを起動してみましょう。
見慣れないエクステンションがありますね。叩いてみましょう。
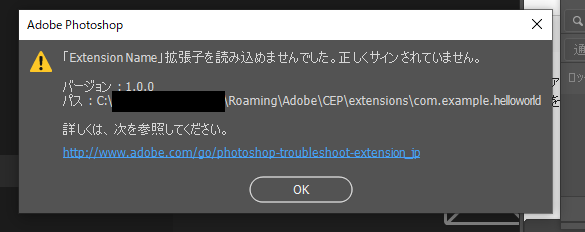
Warningが発生して起動できないですね…。
実はエクステンションは専用のツールで署名を組み込まないと実行できないようになっています。
ただしデバッグモードをレジストリで設定することで回避できるので、今回はレジストリを編集して突破します。
- キー: コンピューター\HKEY_CURRENT_USER\Software\Adobe\CSXS.
- 値: PlayerDebugMode(REG_SZ)
- データ: 1
編集したらPhotoshopを起動しなおします。
そして先ほどと同じようにエクステンションを起動すると……
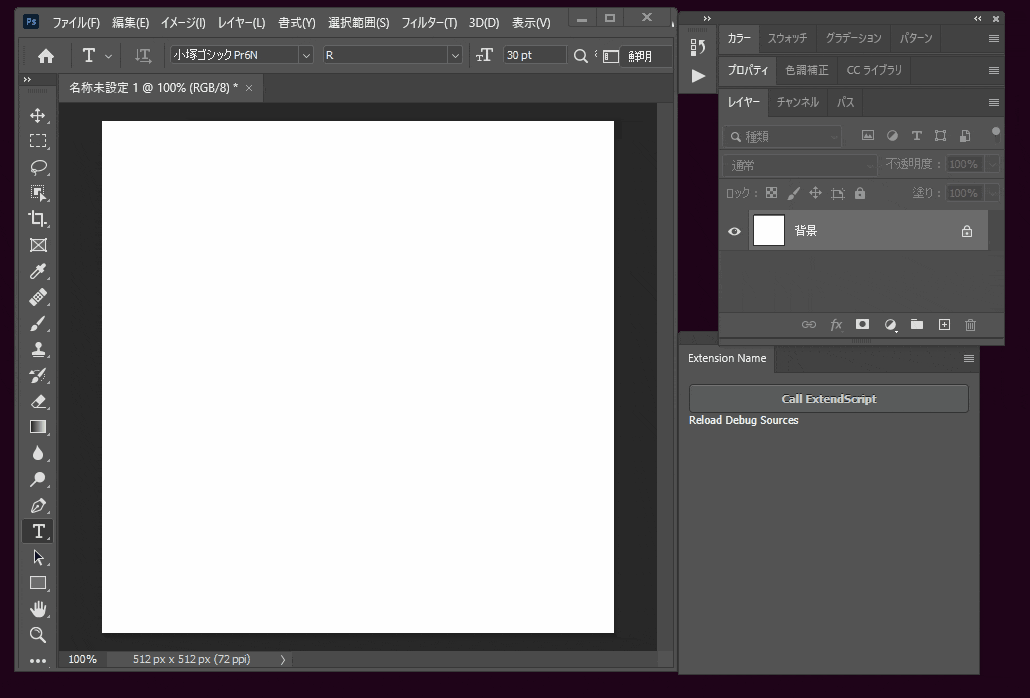
無事起動しました!以下のUIが現れます。
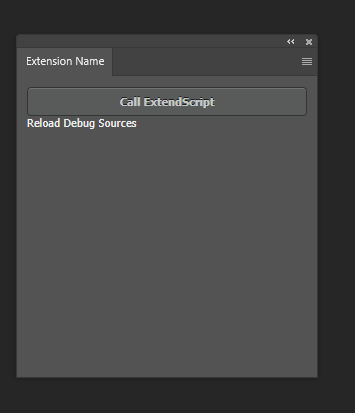
call ExtendScriptボタンを押すと……

アラートが出ましたね!
とりあえず動くエクステンションができました。
今回はファイル構成について見ていきます。
ファイル構成
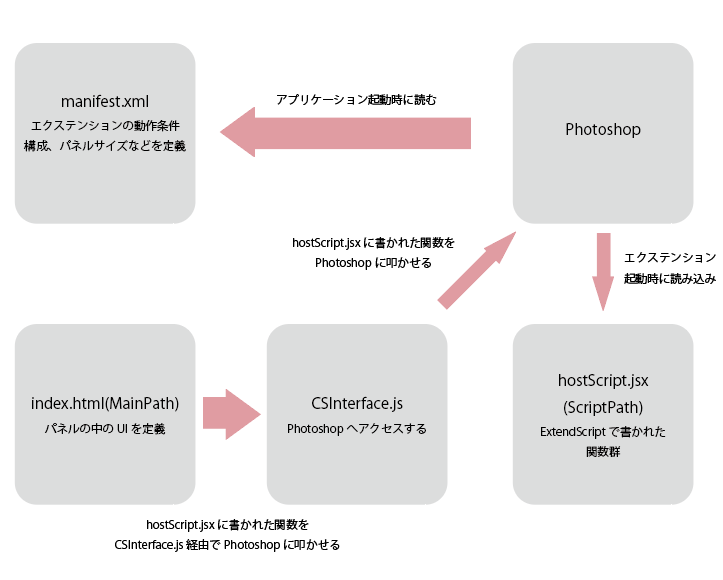
CSXS/manifest.xml
CSXSはCEPの前の名称ですね。CS6時代はそう呼ばれていたらしいです。その名残ですね。
このファイルはエクステンションを構成する情報をまとめたファイルです。起動時に読まれます。
CSXS以下にmanifest.xmlが無いとエクステンションとして認識されません。必須ファイルですね。
ちょっと中を見てみましょう。
<?xml version="1.0" encoding="UTF-8"?>
<ExtensionManifest Version="9.0" ExtensionBundleId="com.example.helloworld" ExtensionBundleVersion="1.0.0"
		ExtensionBundleName="Extension Name" xmlns:xsi="http://www.w3.org/2001/XMLSchema-instance">
	<ExtensionList>
		<Extension Id="com.example.helloworld" Version="1.0.0" />
	</ExtensionList>
	<ExecutionEnvironment>
		<HostList>

             <!-- Uncomment tags according to the apps you want your panel to support
			Make sure to change these tags to use realistic version ranges before releasing your extensions, not 99.9!
			You may also need to change the CEP version in order to support certain apps. -->

            <!-- Photoshop -->
            <Host Name="PHXS" Version="[16.0,99.9]" />
            <Host Name="PHSP" Version="[16.0,99.9]" />

            <!-- Illustrator -->
            <!-- <Host Name="ILST" Version="[18.0,99.9]" /> -->

            <!-- InDesign -->
            <!-- <Host Name="IDSN" Version="[10.0,99.9]" /> -->

             <!-- InCopy -->
            <!-- <Host Name="AICY" Version="[10.0,99.9]" /> -->

            <!-- Premiere -->
            <!-- <Host Name="PPRO" Version="[8.0,99.9]" /> -->

            <!-- AfterEffects -->
            <!-- <Host Name="AEFT" Version="[13.0,99.9]" /> -->

            <!-- PRELUDE -->
            <!-- <Host Name="PRLD" Version="[3.0,99.9]" />   -->

            <!-- Animate -->
            <!-- <Host Name="FLPR" Version="[14.0,99.9]" /> -->

            <!-- Audition -->
            <!-- <Host Name="AUDT" Version="[8.0,99.9]" /> -->

            <!-- Dreamweaver -->
            <!-- <Host Name="DRWV" Version="[16.0,99.9]" /> -->

		</HostList>
		<LocaleList>
			<Locale Code="All" />
		</LocaleList>
		<RequiredRuntimeList>
			<RequiredRuntime Name="CSXS" Version="9.0" />
		</RequiredRuntimeList>
	</ExecutionEnvironment>
	<DispatchInfoList>
		<Extension Id="com.example.helloworld">
			<DispatchInfo >
				<Resources>
				<MainPath>./index.html</MainPath>
				<ScriptPath>./jsx/hostscript.jsx</ScriptPath>
				</Resources>
				<Lifecycle>
					<AutoVisible>true</AutoVisible>
				</Lifecycle>
				<UI>
					<Type>Panel</Type>
					<Menu>Extension Name</Menu>
					<Geometry>
						<Size>
							<Height>300</Height>
							<Width>300</Width>
						</Size>
                    <!--<MinSize>
                            <Height>550</Height>
                            <Width>400</Width>
                        </MinSize>
                        <MaxSize>
                            <Height>550</Height>
                            <Width>400</Width>
                        </MaxSize>-->

					</Geometry>
					<Icons>
						<Icon Type="Normal">./icons/iconNormal.png</Icon>
						<Icon Type="RollOver">./icons/iconRollover.png</Icon>
						<Icon Type="Disabled">./icons/iconDisabled.png</Icon>
						<Icon Type="DarkNormal">./icons/iconDarkNormal.png</Icon>
						<Icon Type="DarkRollOver">./icons/iconDarkRollover.png</Icon>
					</Icons>
				</UI>
			</DispatchInfo>
		</Extension>
	</DispatchInfoList>
</ExtensionManifest>
ExtensionManifest
<ExtensionManifest Version="9.0" ExtensionBundleId="com.example.helloworld" ExtensionBundleVersion="1.0.0"
        ExtensionBundleName="Extension Name" xmlns:xsi="http://www.w3.org/2001/XMLSchema-instance">
このエクステンションのID, Verion, 名前を定義している要素ですね。
ExtensionBundleId属性はユニークである必要があり、重複すると優先度が高い方だけが読まれます。
ExtensionList
<ExtensionList>
    <Extension Id="com.example.helloworld" Version="1.0.0" />
</ExtensionList>
Extension Idを定義している要素です。
HostList
<HostList>
    <!-- Uncomment tags according to the apps you want your panel to support
    Make sure to change these tags to use realistic version ranges before releasing your extensions, not 99.9!
    You may also need to change the CEP version in order to support certain apps. -->

    <!-- Photoshop -->
    <Host Name="PHXS" Version="[16.0,99.9]" />
    <Host Name="PHSP" Version="[16.0,99.9]" />

    <!-- Illustrator -->
    <!-- <Host Name="ILST" Version="[18.0,99.9]" /> -->

    <!-- InDesign -->
    <!-- <Host Name="IDSN" Version="[10.0,99.9]" /> -->

    <!-- InCopy -->
    <!-- <Host Name="AICY" Version="[10.0,99.9]" /> -->

    <!-- Premiere -->
    <!-- <Host Name="PPRO" Version="[8.0,99.9]" /> -->

    <!-- AfterEffects -->
    <!-- <Host Name="AEFT" Version="[13.0,99.9]" /> -->

    <!-- PRELUDE -->
    <!-- <Host Name="PRLD" Version="[3.0,99.9]" />   -->

    <!-- Animate -->
    <!-- <Host Name="FLPR" Version="[14.0,99.9]" /> -->

    <!-- Audition -->
    <!-- <Host Name="AUDT" Version="[8.0,99.9]" /> -->

    <!-- Dreamweaver -->
    <!-- <Host Name="DRWV" Version="[16.0,99.9]" /> -->
</HostList>
HostListは利用可能なアプリケーションを定義している要素です。
試しにAfterEffectの行のコメントアウトを外すと……
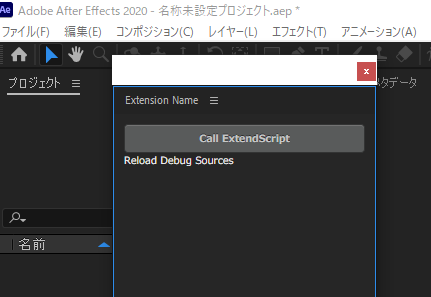
AfterEffectsでも同じエクステンションが起動できました。意味はありませんが。
Version属性は利用可能なバージョンを指しています。
Photoshopは[16.0,99.9]なのでCC 2015以降のバージョンで使えるということになりますね。
このバージョン指定から外れると、エクステンションとして読みこまれることはありません。
Host NameとVersionの内容はここで参照できます。
Extension
<Extension Id="com.example.helloworld">
    <DispatchInfo >
        <Resources>
            <MainPath>./index.html</MainPath>
            <ScriptPath>./jsx/hostscript.jsx</ScriptPath>
        </Resources>
        <Lifecycle>
            <AutoVisible>true</AutoVisible>
        </Lifecycle>
        <UI>
            <Type>Panel</Type>
            <Menu>Extension Name</Menu>
            <Geometry>
                <Size>
                    <Height>300</Height>
                    <Width>300</Width>
                </Size>
            <!--<MinSize>
                    <Height>550</Height>
                    <Width>400</Width>
                </MinSize>
                <MaxSize>
                    <Height>550</Height>
                    <Width>400</Width>
                </MaxSize>-->

            </Geometry>
            <Icons>
                <Icon Type="Normal">./icons/iconNormal.png</Icon>
                <Icon Type="RollOver">./icons/iconRollover.png</Icon>
                <Icon Type="Disabled">./icons/iconDisabled.png</Icon>
                <Icon Type="DarkNormal">./icons/iconDarkNormal.png</Icon>
                <Icon Type="DarkRollOver">./icons/iconDarkRollover.png</Icon>
            </Icons>
        </UI>
    </DispatchInfo>
</Extension>
Extensionはエクステンションを構成するための要素です。Id属性は先述のExtension Idと紐づけます。
MainPathはエクステンションを構成するHTMLを呼び出すパス。ScriptPathはExtendScriptを呼び出すスクリプトのパスです。
Typeはウィンドウのタイプを定義します。Panel以外にModalDialog, Modeless, Custom(非表示)があります。
Menuはウィンドウ > エクステンション のメニューでの表示名です。
Geometoryの子孫の要素はエクステンションのサイズを定義します。
width, heightのみだと固定値ですが、min, maxの行をコメントアウトするとリサイズ可能になり、
ドッキングしたパネルもエクステンションのサイズに準じます。
index.html (MainPath)
<!doctype html>
<html>
<head>
<meta charset="utf-8">

<link rel="stylesheet" href="css/topcoat-desktop-dark.min.css"/>
<link  id="hostStyle" rel="stylesheet" href="css/styles.css"/>

<title></title>
</head>

<body class="hostElt">

    <div id="content">

        <div>
            <button id="btn_test" class="topcoat-button--large hostFontSize">
                Call ExtendScript
            </button>
        </div>

    </div>

    <!-- These are debugging shortcuts.  Class debuglink items only appear in debug mode  -->
    <span class="debuglink" id="reload">Reload</span>
    <span class="debuglink" id="debug">Debug</span>
    <span class="debuglink" id="sources">Sources</span>

    <script src="js/libs/CSInterface.js"></script>
    <script src="js/libs/jquery-2.0.2.min.js"></script>

    <script src="js/themeManager.js"></script>
    <script src="js/main.js"></script>


</body>
</html>
先ほどのmanifest.xmlのMainPathで定義したHTMLですね。
ここのポイントはjs/libs/CSInterface.jsと`js/themeManager.js``が読まれていることぐらいですかね。
themeManager.jsはPhotoshopでのUIの色設定をエクステンションの背景色などの色設定にいい感じにセットしてくれるヤツです。
CSInterface.jsは中身を見ても仕方ないので、呼び出し部分のmain.jsを見てみましょう。
js/main.js
/*jslint vars: true, plusplus: true, devel: true, nomen: true, regexp: true, indent: 4, maxerr: 50 */
/*global $, window, location, CSInterface, SystemPath, themeManager*/

(function () {
    'use strict';

    var csInterface = new CSInterface();


    function init() {

        themeManager.init();

        $("#btn_test").click(function () {
            csInterface.evalScript('sayHello()');
        });
    }

    init();

}());
はい、#btn_testをクリックするとCSInterfaceでsayHello関数をevalで呼び出すようにセットしてますね。
jsx/hostScript.jsx (ScriptPath)
/*jslint vars: true, plusplus: true, devel: true, nomen: true, regexp: true, indent: 4, maxerr: 50 */
/*global $, Folder*/


function sayHello(){
    alert("hello from ExtendScript!");
}
sayHello関数を定義してますね。
ファイル構成を振り返る
これまでのファイル構成を大体図にするとこんな感じ。
改造する / Photoshopの機能を呼び出す
…というわけで、ちょっと改造するにはhostScript.jsxをいじればいいわけです。
せっかくなので、hostScript.jsxを編集して、sayHello関数をテキストレイヤーを作成する関数に変えてしまいましょう。
# target photoshop
/*jslint vars: true, plusplus: true, devel: true, nomen: true, regexp: true, indent: 4, maxerr: 50 */
/*global $, Folder*/

function sayHello(){
    // undoを1スタックにする
    if (documents.length){
        app.activeDocument.suspendHistory("Say Hello", "sayHello_()")
    }
}

function sayHello_(){
    var color = new SolidColor();
    color.rgb.red = 20;
    color.rgb.green = 20;
    color.rgb.blue = 20;

    var textlayer = activeDocument.artLayers.add();
    textlayer.kind = LayerKind.TEXT;

    var textitem = textlayer.textItem;
    textitem.kind = TextType.PARAGRAPHTEXT;
    textitem.size = 30;
    textitem.color = color;
    textitem.justification = Justification.CENTER;
    textitem.contents = "Hello from ExtendScript";
    textitem.width = activeDocument.width;
    textitem.height = activeDocument.height;
    textitem.position = [0, activeDocument.height/2];
}
動いてますね!
配布するために署名を埋め込む
現在のエクステンションの配布方法は大きく分けて2種類です。
- Creative Cloud にて配布/入手する
- .zxp[^2]ファイルをExtensionManager(ExManCmd)、Anastasiy's Extension Manager でインストールする。
- 実態はzipなので、解凍して
%appdata%/adobe/CEP\extensionsに置けば使える。
既にExtensionManagerは非推奨となってるので、この方法が一番いいのかもしれない。
- 実態はzipなので、解凍して
今回に関してはZXPファイルの生成を目指します。
-
まず、ZXPファイルの生成に必要なZXPSignCmdを Release CEP 10.0 · Adobe-CEP/CEP-Resources から手に入れます。
-
次にZXPSignCmdで署名ファイルを作成します。
ZXPSignCmd.exe -selfSignedCert <countryCode> <stateOrProvince> <organization> <commonName> <password> <outputPath.p12>
自分の場合だとこんな感じですね。
ZXPSignCmd.exe -selfSignedCert JP Miyazaki TakumiAkashiro helloWorld <password> "sign.p12" -
2で作成した署名ファイル.p12とエクステンションのフォルダからZXPSignCmdでZXPを作成します。
-sign <inputDirectory> <outputZxp> <p12> <p12Password>
自分の場合だと
ZXPSignCmd.exe -sign C:\Users\<username>\AppData\Roaming\Adobe\CEP\extensions\com.example.helloworld D:\sample_extension\com.example.helloworld.zxp sign.p12 <password>
締め
何も思いつかないッ!
割とエクステンションを作るのは簡単なので挑んでみてはいかがでしょうか!
-
紛らわしいですね…… ↩