概要
こちらの質問に記載されている問題を解決します。
https://power.users.community/forums/topic/%E6%84%8F%E5%9B%B3%E3%81%97%E3%81%9F%E6%9D%A1%E4%BB%B6%E3%81%A7%E3%81%AE%E6%8A%9C%E3%81%8D%E5%87%BA%E3%81%97%E6%96%B9%E3%81%8C%E3%82%8F%E3%81%8B%E3%82%89%E3%81%AA%E3%81%84/
質問には書かれていませんでしたが、おそらく日ごとにもまとめる必要がありそうです。今回はその手順をご紹介します。
実装
データの用意
まずはサンプルデータを作成しましょう。
Excel と記載がありますが、操作や説明がしやすいように今回はコレクションから作成していきます。
今回の式はボタンの OnSelectアクション に記載する想定で書いていますが、どのアクションに書いても基本的に問題ありません。
/ データの作成(Excelを想定)
ClearCollect(Data,
{
    ID:"01", Name:"Suzuki", Order:"○", DateTime:DateTimeValue("2020/09/08 01:23:45")
},{
    ID:"02", Name:"Yamada", Order:"○", DateTime:DateTimeValue("2020/09/08 03:33:33")
},{
    ID:"03", Name:"Tanaka", Order:"×", DateTime:DateTimeValue("2020/09/08 11:22:33")
},{
    ID:"04", Name:"Yamada", Order:"×", DateTime:DateTimeValue("2020/09/08 11:33:55")
},{
    ID:"05", Name:"Tanaka", Order:"○", DateTime:DateTimeValue("2020/09/08 12:12:12")
},{
    ID:"06", Name:"Tanaka", Order:"○", DateTime:DateTimeValue("2020/09/09 12:12:12")
}
);
次に日ごとにまとめる為に日の列を追加します。
// 日ごとにまとめるので、日を表すカラムを追加
ClearCollect(DataInDay,AddColumns(Data,"Day",Text(DateTime,"[$-ja]yyyy/mm/dd")))
GroupBy
次に今回の肝である関数 GroupBy 関数を利用して、先ほど作成したカラム Day (日)ごとにデータをまとめていきます。
// 日ごとの注文にまとめる
ClearCollect(DayOrdersGroup,GroupBy(DataInDay,"Day","DayOrders"));
GroupBy 関数に関してはこちらをご覧ください。
https://docs.microsoft.com/ja-jp/powerapps/maker/canvas-apps/functions/function-groupby
最後にこのデータをユーザーごとにまとめていきます。
// コレクションの初期化
Clear(OrdersGroup);

// ユーザーごとにまとめる SortByColums を利用して日時降順で並べ替えておきます。
ForAll(DayOrdersGroup,Collect(OrdersGroup,GroupBy(SortByColumns(DayOrders,"DateTime",Descending),"Name","Orders")));
これで目的のデータを作成することができました。
最後に1つにまとめると以下のようになります。
// データの作成(Excelを想定)
ClearCollect(Data,
{
    ID:"01", Name:"Suzuki", Order:"○", DateTime:DateTimeValue("2020/09/08 01:23:45")
},{
    ID:"02", Name:"Yamada", Order:"○", DateTime:DateTimeValue("2020/09/08 03:33:33")
},{
    ID:"03", Name:"Tanaka", Order:"×", DateTime:DateTimeValue("2020/09/08 11:22:33")
},{
    ID:"04", Name:"Yamada", Order:"×", DateTime:DateTimeValue("2020/09/08 11:33:55")
},{
    ID:"05", Name:"Tanaka", Order:"○", DateTime:DateTimeValue("2020/09/08 12:12:12")
},{
    ID:"06", Name:"Tanaka", Order:"○", DateTime:DateTimeValue("2020/09/09 12:12:12")
}
);
// 日ごとにまとめるので、日を表すカラムを追加
ClearCollect(DataInDay,AddColumns(Data,"Day",Text(DateTime,"[$-ja]yyyy/mm/dd")));

// 日ごとの注文にまとめる
ClearCollect(DayOrdersGroup,GroupBy(DataInDay,"Day","DayOrders"));

// コレクションの初期化
Clear(OrdersGroup);

// ユーザーごとにまとめる SortByColums を利用して日時降順で並べ替えておきます。
ForAll(DayOrdersGroup,Collect(OrdersGroup,GroupBy(SortByColumns(DayOrders,"DateTime",Descending),"Name","Orders")));


// これでユーザーごと+日ごとにまとめることができたので、ギャラリーなどで First() で取得が可能になります。
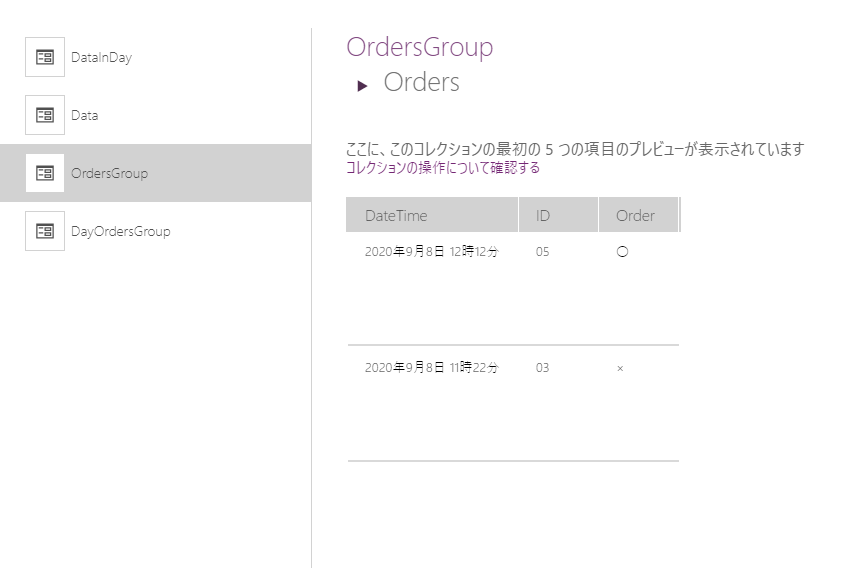
作成されるデータは以下のようになります。
ギャラリーに表示
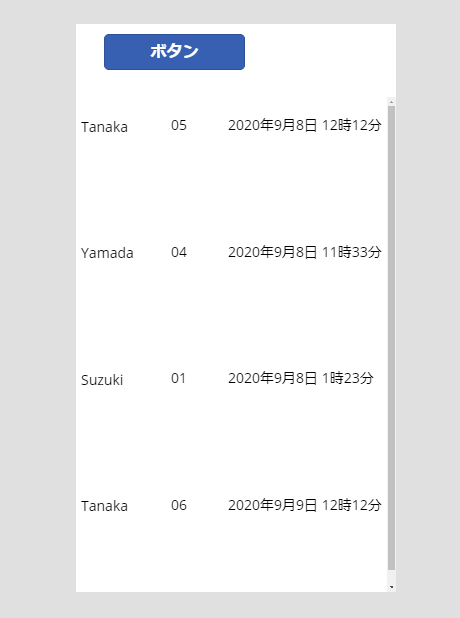
最後に First 関数を使ってギャラリーに表示してみましょう。
例)ギャラリーの Textコントロール
First(ThisItem.Orders).ID
想定通り、日ごと&ユーザーごとにまとめることができました。
まとめ
データを1まとめにしたい場合は GroupBy 関数を利用しましょう。
一意のデータの場合は Distinct 関数でも対応可能な場合はありますが、今回のように複数の条件がある場合は向きません。


