概要
最終的にはMacOS、Android、iOSで
unityとwebrtcを連携させて色々やるのが目標
とりあえず今回はMacOSで利用できる準備をするのが目標
ここに書いてある内容は、とりあえず僕がうまくいったという話です。
ここにサンプル置いていく予定
https://github.com/taktod/UnityWebrtcPlugin
ライブラリのコンパイル
https://webrtc.org/native-code/development/
ここにしたがってninjaでbuildを実施する。
利用したバージョンはこんな具合
$ cat .gclient_entries
entries = {
  'src': 'https://webrtc.googlesource.com/src.git',
  'src/base': 'https://chromium.googlesource.com/chromium/src/base@1325ca683ab2b427aa27112cfff53614328a1781',
  'src/build': 'https://chromium.googlesource.com/chromium/src/build@d9b1b8481806794959fae0ced886a212d9746057',
  'src/buildtools': 'https://chromium.googlesource.com/chromium/buildtools.git@1be57dc4c2c68fa564ee258a3af0cf8003007edf',
  'src/testing': 'https://chromium.googlesource.com/chromium/src/testing@8e923163dd2388b953418843ff9be4b7177023ce',
  'src/third_party': 'https://chromium.googlesource.com/chromium/src/third_party@bacc4e1bcc117fffae9e8007434c1116a950e63b',
  'src/third_party/boringssl/src': 'https://boringssl.googlesource.com/boringssl.git@02e6256b16b54319b1c01d4133ca3317e82b2dbb',
  'src/third_party/catapult': 'https://chromium.googlesource.com/catapult.git@3b3f9e1e789dbed2726dcd3c97d9dcd080ca7f23',
  'src/third_party/colorama/src': 'https://chromium.googlesource.com/external/colorama.git@799604a1041e9b3bc5d2789ecbd7e8db2e18e6b8',
  'src/third_party/depot_tools': 'https://chromium.googlesource.com/chromium/tools/depot_tools.git@ebe839b6bfc3e9276b8d1e42a0d6e830bb04899e',
  'src/third_party/ffmpeg': 'https://chromium.googlesource.com/chromium/third_party/ffmpeg.git@423f74fab02ff573b52abd542eb5dfdadaa05cf4',
  'src/third_party/googletest/src': 'https://chromium.googlesource.com/external/github.com/google/googletest.git@247a3d8e5e5d403f7fcacdb8ccc71e5059f15daa',
  'src/third_party/gtest-parallel': 'https://chromium.googlesource.com/external/github.com/google/gtest-parallel@180c2f52341c065fd4d8418a238375ab6c91b336',
  'src/third_party/icu': 'https://chromium.googlesource.com/chromium/deps/icu.git@94d819fa3e7e71f3dd8210d428c213ddb6e2b336',
  'src/third_party/jsoncpp/source': 'https://chromium.googlesource.com/external/github.com/open-source-parsers/jsoncpp.git@f572e8e42e22cfcf5ab0aea26574f408943edfa4',
  'src/third_party/libFuzzer/src': 'https://chromium.googlesource.com/chromium/llvm-project/compiler-rt/lib/fuzzer.git@ba2c1cd6f87accb32b5dbce297387c56a2e53a2f',
  'src/third_party/libjpeg_turbo': 'https://chromium.googlesource.com/chromium/deps/libjpeg_turbo.git@a1750dbc79a8792dde3d3f7d7d8ac28ba01ac9dd',
  'src/third_party/libsrtp': 'https://chromium.googlesource.com/chromium/deps/libsrtp.git@1d45b8e599dc2db6ea3ae22dbc94a8c504652423',
  'src/third_party/libvpx/source/libvpx': 'https://chromium.googlesource.com/webm/libvpx.git@a2127236ae4742f329e5571d76b84de08cd3b8ea',
  'src/third_party/libyuv': 'https://chromium.googlesource.com/libyuv/libyuv.git@c67db6053495a2744511a43ba7b6ba3fa49b26a5',
  'src/third_party/openh264/src': 'https://chromium.googlesource.com/external/github.com/cisco/openh264@a180c9d4d6f1a4830ca9eed9d159d54996bd63cb',
  'src/third_party/openmax_dl': 'https://webrtc.googlesource.com/deps/third_party/openmax.git@b611996df3b8f6b151339d22c12c21f167009cb6',
  'src/third_party/usrsctp/usrsctplib': 'https://chromium.googlesource.com/external/github.com/sctplab/usrsctp@0e076261b832121cf120ddc04aaff87ac3a34d30',
  'src/third_party/yasm/source/patched-yasm': 'https://chromium.googlesource.com/chromium/deps/yasm/patched-yasm.git@b98114e18d8b9b84586b10d24353ab8616d4c5fc',
  'src/tools': 'https://chromium.googlesource.com/chromium/src/tools@56fadf9c9eb4669df2478c511e672326a4b3fba0',
  'src/tools/gyp': 'https://chromium.googlesource.com/external/gyp.git@d61a9397e668fa9843c4aa7da9e79460fe590bfb',
  'src/tools/swarming_client': 'https://chromium.googlesource.com/infra/luci/client-py.git@4bd9152f8a975d57c972c071dfb4ddf668e02200',
  'src/buildtools/clang_format/script': 'https://chromium.googlesource.com/chromium/llvm-project/cfe/tools/clang-format.git@0653eee0c81ea04715c635dd0885e8096ff6ba6d',
  'src/buildtools/third_party/libc++/trunk': 'https://chromium.googlesource.com/chromium/llvm-project/libcxx.git@f56f1bba1ade4a408d403ff050d50e837bae47df',
  'src/buildtools/third_party/libc++abi/trunk': 'https://chromium.googlesource.com/chromium/llvm-project/libcxxabi.git@05ba3281482304ae8de31123a594972a495da06d',
  'src/buildtools/third_party/libunwind/trunk': 'https://chromium.googlesource.com/external/llvm.org/libunwind.git@fc0a910c25d5415dd72ba9451b7cba380e3cc1e7',
}
buildした結果必要になったのは、以下のライブラリ
out/Release/obj/third_party/boringssl/libboringssl.a
out/Release/obj/rtc_base/librtc_base.a
out/Release/obj/rtc_base/librtc_base_generic.a
out/Release/obj/libwebrtc.a
と、boringsslのasmコードから生成したもの。
これはlib*.aの形になってなかったので、arコマンドでarchiveにした。
$ cd out/Release/obj/third_party/boringssl
$ ar r libhogehoge.a boringssl_asm/*.o
まぁ、別にlibhogehoge.aである必要はないんだけど・・・
これで必要なライブラリは揃った。
実際に適当なプログラムを組んでみます
unityと連携させて動作する予定なので、ライブラリをbundleで、組んでmono経由で実行することにします。
bundleを作り始める
xcodeを開き、Create a new Xcode projectを選択
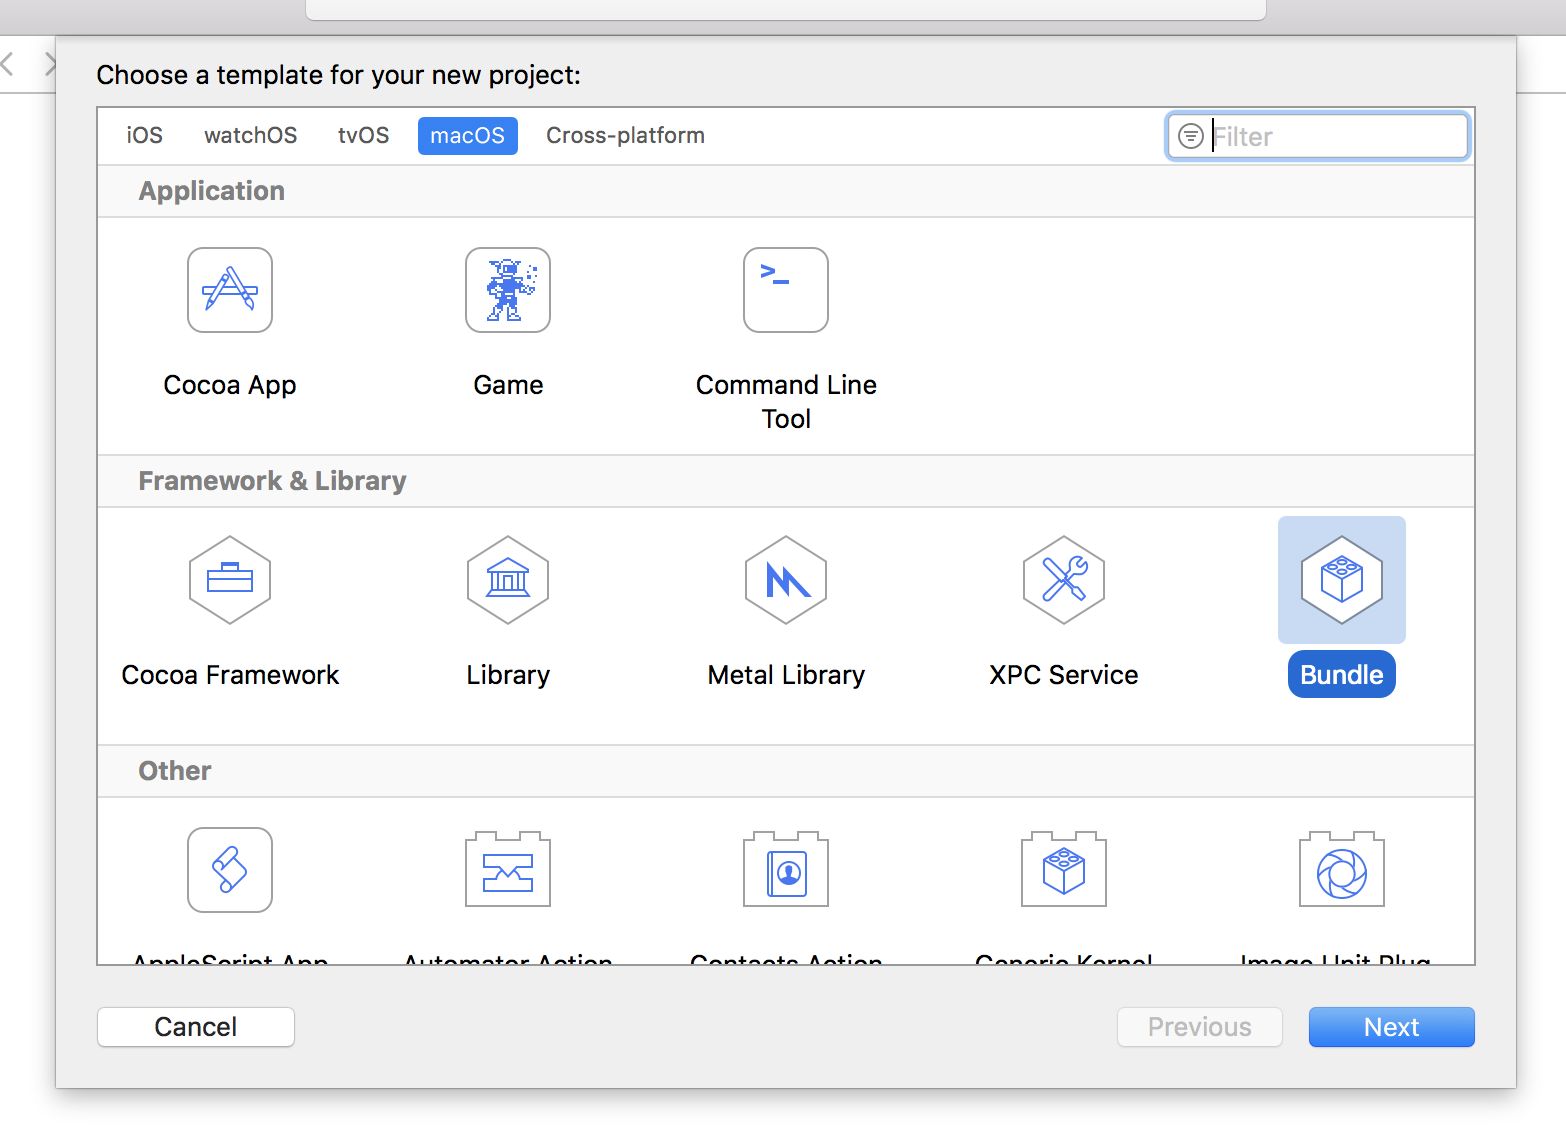
ここで選択するのは、MacOSでBundleです。
とりあえずUnityWebrtcPluginとしました。
プロジェクトの設定のBuild SettingsにあるPer-configuration Build Products PathをProductsに書き換えます。
mono経由でなんでもいいからcallしてみる。
New Fileからcppファイルを作成を実施
名前を適当にEntryとして実行すると
Entry.cppとEntry.hppができる。
で、このEntry.cppをリネームして、Entry.mmにしておく。
これでObjective-c++でプログラミングができる。
適当に
# include "Entry.hpp"
# include <iostream>

using namespace std;
extern "C" {
  void test()
  {
    cout << "test is called." << endl;
  }
}
というコードを作って
Buildを実行
するとProjectディレクトリ配下に
Products/UnityWebrtcPlugin.bundleができる。
次にProjectディレクトリ配下に
monoというディレクトリを作り
そこにtest.csを作る。
using System;
using System.Runtime.InteropServices;

public class Test {
  static public void Main() {
    Console.WriteLine("test is called.");
  }
}
$ mcs test.cs
を実行するとtest.exeが出来上がる。
$ mono test.exe
test is called.
こうやると実行できる。
次にbundleの関数をcallしてみる。
using System;
using System.Runtime.InteropServices;

public class Test {
  [DllImport("../Products/UnityWebrtcPlugin.bundle/Contents/MacOS/UnityWebrtcPlugin")]
  static extern void test();
  static public void Main() {
    test();
  }
}
これを同じようにmcsでコンパイルしてmonoで実行すると・・・
$ mono test.exe
test is called.
test()がcallされて文字列が表示される。
なお、Unityでcallする場合は
[DllImport("UnityWebrtcPlugin")]
だけで指定OKになります。
サンプル
https://github.com/taktod/UnityWebrtcPlugin/commit/24c66858623ecc98df5dcfe7640285203432ceea
webrtcをちょっとだけ動作させてみる。
さっきの5つのライブラリをProjectディレクトリにコピーする。
でAdd Files to "UnityWebrtcPlugin"...で取り込ませると
Build Phases、Link Binary With Librariesに取り込まれる。
あとframeworkもいくつか必要なので、入れていく。
必要なのは
CoreVideo
CoreMedia
AVFoundation
CoreGraphics
AudioToolbox
CoreAudio
Foundation
CFNetwork
Security
OpenGL
Metal
の11個のframework
Header Search Pathを書き換えて、webrtc/src/のディレクトリに向けておく。
とりあえず僕は~/Documents/gn/webrtc/src に向けました。
Preprocessor Macrosを設定しておく。
NOGUI=1
OPENSSL_IS_BORINGSSL=1
WEBRTC_POSIX=1
WEBRTC_MAC=1
これだけ必要
とりあえずコードも更新して、webrtcで必要なthreadとssl周りの初期化だけやってみました。
実行結果はこんな具合
$ mono test/exe
make is called
clean is called
処理おわり
実際にプログラムを組み進めていくのは
https://qiita.com/taktod/items/76f0fc450745e5e87f57
こちらでやってみました。