pythonでPDFを作成してみたかったので、ReportLabを使用してみました。
環境
・Windows10
・python 3.6.4
・reportlab 3.5.19
インストール方法
pip install ReportLab
PDF作成
from reportlab.pdfgen import canvas
from reportlab.lib.pagesizes import A4, portrait
from reportlab.pdfbase import pdfmetrics
from reportlab.lib.units import mm
from reportlab.pdfbase.cidfonts import UnicodeCIDFont
from reportlab.platypus import Table
from reportlab.platypus import TableStyle
from reportlab.lib import colors
import webbrowser

class BasePdfView:

    def __init__(self):
        self.file_name = 'HelloWorld.pdf'
        # PDF作成 ここではファイル名、サイズ(A4), 開始位置を指定
        self.c = canvas.Canvas(self.file_name, pagesize=portrait(A4), bottomup=False)

        # フォントサイズ
        self.font_size = 15

        # フォント登録 日本語を指定
        pdfmetrics.registerFont(UnicodeCIDFont('HeiseiMin-W3'))
        self.c.setFont('HeiseiMin-W3', 20)
PDF書込
テキスト
描画したい座標を指定する
        width, height = A4  # A4用紙のサイズ
        self.c.drawCentredString(width / 2, height / 5, 'タイトル')
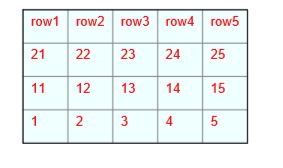
テーブル
テーブルを作成するには二次元リストを用意してTableを作成する
    def draw(self):
        data2 = [
            ["1", "2", "3", "4", "5"],
            ["11", "12", "13", "14", "15"],
            ["21", "22", "23", "24", "25"],
            ["row1", "row2", "row3", "row4", "row5"],
        ]
        table = Table(data2)
次にテーブルの書式を作成する
TableStyleを使用して、設定したい書式だけ設定する。
以下に紹介する以外にもいろいろある
        table_style = TableStyle([
            # テキストの色
            ('TEXTCOLOR', (0, 0), (-1, -1), colors.red),
            # 背景色
            ('BACKGROUND', (0, 0), (-1, -1), colors.azure),
            # 罫線 太さ0.25
            ('GRID', (0, 0), (-1, -1), 0.25, colors.grey),
            # 四角形 太さ0
            ('BOX', (0, 0), (-1, -1), 0, colors.black),
            # 文字の大きさ
            ("FONTSIZE", (0, 0), (-1, -1), 10),
            # 下方向のパディング
            ("BOTTOMPADDING", (0, 0), (-1, -1), 10),

        ])

        table.setStyle(
            table_style
        )

        # キャンバスに設定
        table.wrapOn(self.c, 20*mm, 20*mm)
        table.drawOn(self.c, 20*mm, 20*mm)
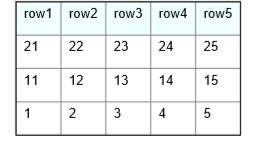
先頭部の色のみ変更
テーブルの書式をきれいにするために、先頭のみに色を付ける場合
            # 背景色
            ('BACKGROUND', (0, 1), (-1, -2), colors.white),
            # 背景色 先頭
            ('BACKGROUND', (0, -1), (-1, -1), colors.azure),
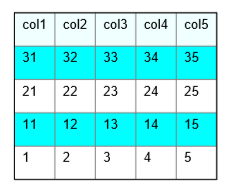
テーブルの色を交互に変更
一行毎に設定する色を変更する
table_styleに後から追加する際は、addで可能。
追加する際は1個ずつ渡す必要がある(初期化時はタプルで渡しているが)
    def set_colorful(self, table_style, data):
        """
        テーブルの色を交互に設定
        :param table_style:
        :param data:
        :return:
        """

        # サイズを取得
        row_size = len(data)

        for i in range(0, row_size - 1):
            tuple_range_from = (0, i)
            tuple_range_to = (-1, i)
            if i % 2 == 0:
                table_style.add('BACKGROUND', tuple_range_from, tuple_range_to, colors.green)
            else:
                table_style.add('BACKGROUND', tuple_range_from, tuple_range_to, colors.red)

        return table_style
最後にファイル出力
        # Canvasに書き込み
        self.c.showPage()
        # ファイル保存
        self.c.save()