GameCIを使ったら、すごく簡単にUnityでもGitHubActionsが使えたのでご紹介します。
英語がわかる方は公式のGetting Startedを見たほうが早いです。
※ちなみにパーソナルライセンスではビルドができなかったため、本記事には載せていないのですがv2.0のalpha版では使えたので、正式リリースされたら記事を書きます〜
この記事の対象の方
- UnityTestRunnerの手動実行に疲れた方
- チーム開発の生産性をあげたい方
- てっとり早くUnityプロジェクトでGitHub Actionsを使いたい方 ←
- GitHubのVM上でUnity動かしたい方
必要な環境
- Unityライセンス(無料のパーソナルでOK)
- Unityプロジェクト
- GitHubActionsが実行可能なGitHubアカウント
実現したいこと
- GitHubでPushされる
- 自動でUnityTestRunnerが走る
- 結果ファイルがダウンロードできる
ビルドまでの道
準備は2つで、あとはトリガーに従ってテストとビルドが実行されます。
- ymlの用意
- Unityアクティベート
必要なymlを用意
.github/workflows/ 配下に2つのファイルを配置してmainブランチとマージしてください。
サンプルはこの環境で設定しています。
UnityVersion: 2019.4.5f1
ビルドターゲット: Android
- activation.yml
GitHubActionsのVM上でUnityを動かせるようにライセンスと紐付けます
name: Acquire activation file
# Work when you need
on: workflow_dispatch

jobs:
  activation:
    name: Request manual activation file 🔑
    runs-on: ubuntu-latest
    steps:
     # R:equest manual activation file
    - name: Request manual activation file
      id: getManualLicenseFile
      uses: webbertakken/unity-request-manual-activation-file@v1.2
      with:
        unityVersion: 2019.4.5f1
    - name: Expose as artifact
      uses: actions/upload-artifact@v1
      with:
        name: ${{ steps.getManualLicenseFile.outputs.filePath }}
        path: ${{ steps.getManualLicenseFile.outputs.filePath }}
- main.yml
テスト実行とビルドをしてくれます。
デフォルトだとEditTest, PlayTestの両方が実行されます。
name: Unity Workflow Sample
on: [push]
env:
  UNITY_LICENSE: ${{ secrets.UNITY_LICENSE }}

jobs:
  setup:
    runs-on: ubuntu-latest
    steps:
     - name: Checkout repository
       uses: actions/checkout@v2
       with:
         lfs: true

     - uses: webbertakken/unity-test-runner@v1.4
       with:
        unityVersion: 2019.4.5f1

     - uses: actions/upload-artifact@v1
       with:
        name: Test results
        path: artifacts
Unityアクティベート
パーソナル(無料)の方
- GitHub のActionsタブからactivation.ymlを実行(Run workflow)します。

- alfファイルをダウンロードしてきます。

- license.unity3d.comでalfファイルをアップロードします。そうするとulfファイルがもらえます。
- urlファイルの中身をコピーしてをGithubの
Settings>SecretsでUNITY_LICENSEに貼り付ける
プロフェッショナルの方
必要情報をSecretsに詰めるだけでかんたんです。 公式ドキュメントに従って入力してください。
動作結果
あとはGitHubActionsのトリガーを実行するだけです。
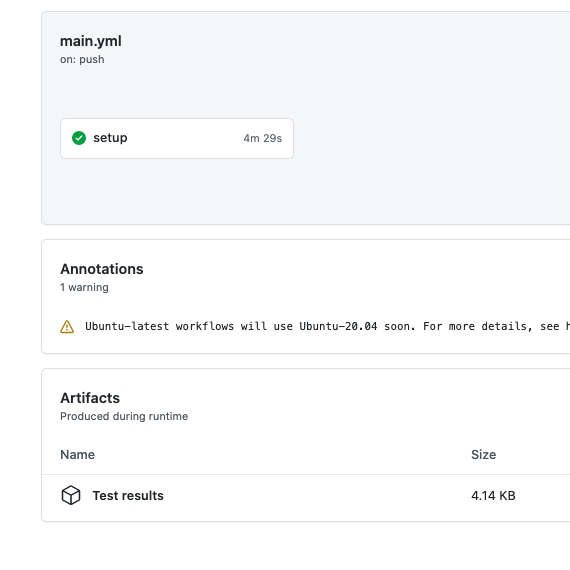
何かしらpushがあったときに、main.ymlが動きます。
テスト結果がartifactsにアップロードされています。

所感
UnityTestRunnerが動くようになったので、
PRで「自動テストちゃんと直しましたか?」という質問はいらなくなりまたね。
あとテスト結果を見やすくしたいですね...
ビルドはしばしお待ち下さい
パーソナルライセンスでのビルドが今失敗してしまいますが、v2.0では修正されています。
こちらを参考にビルドも作ってみてください。