はじめに
「Terraformのコマンドやオプションを一通り使えば何ができるのか体系的に学べるかな」とふと思ったので、できるだけ使ってみようかと。
→2020/12/14 現在、絶賛後悔中。
注意点
- Terraformは毎月のように更新されているので、最新情報は公式ドキュメントを確認してください
- 今回、Terraformもproviderは諸事情により最新バージョンではありませんのでご注意ください
- 一度使ったオプションは、他のコマンドでは割愛します(ごめんなさい)
また、本記事ですが、想定以上に時間がかかっているので少しずつ追記する形にしようと思います。。すみません。。
環境
Mac OS X 10.14.1 x86_64
$ terraform -version
Terraform v0.13.0
+ provider registry.terraform.io/hashicorp/aws v3.3.0

$ export AWS_ACCESS_KEY_ID=...
$ export AWS_SECRET_ACCESS_KEY=...
$ export AWS_DEFAULT_REGION=ap-northeast-1
こちらは、メインで使用したtfファイルです。
必要に応じて変更しています。
resource "aws_instance" "ec2_instance" {
  ami           = "ami-0cc75a8978fbbc969"
  instance_type = "t2.micro"

  tags = {
    Name = "qiita_example"
  }
}
順番
この順で試していきます。
$ terraform
Usage: terraform [-version] [-help] <command> [args]

The available commands for execution are listed below.
The most common, useful commands are shown first, followed by
less common or more advanced commands. If you're just getting
started with Terraform, stick with the common commands. For the
other commands, please read the help and docs before usage.

Common commands:
    apply              Builds or changes infrastructure
    console            Interactive console for Terraform interpolations
    destroy            Destroy Terraform-managed infrastructure
    env                Workspace management
    fmt                Rewrites config files to canonical format
    get                Download and install modules for the configuration
    graph              Create a visual graph of Terraform resources
    import             Import existing infrastructure into Terraform
    init               Initialize a Terraform working directory
    login              Obtain and save credentials for a remote host
    logout             Remove locally-stored credentials for a remote host
    output             Read an output from a state file
    plan               Generate and show an execution plan
    providers          Prints a tree of the providers used in the configuration
    refresh            Update local state file against real resources
    show               Inspect Terraform state or plan
    taint              Manually mark a resource for recreation
    untaint            Manually unmark a resource as tainted
    validate           Validates the Terraform files
    version            Prints the Terraform version
    workspace          Workspace management

All other commands:
    0.12upgrade        Rewrites pre-0.12 module source code for v0.12
    0.13upgrade        Rewrites pre-0.13 module source code for v0.13
    debug              Debug output management (experimental)
    force-unlock       Manually unlock the terraform state
    push               Obsolete command for Terraform Enterprise legacy (v1)
    state              Advanced state management
terraform apply
リソースの作成・変更ができるコマンド。
terraform apply 実行時に本当に実行していいか聞かれるので、 yes と打てばOK。
terraform apply [options] [dir-or-plan] のように使うことができます。
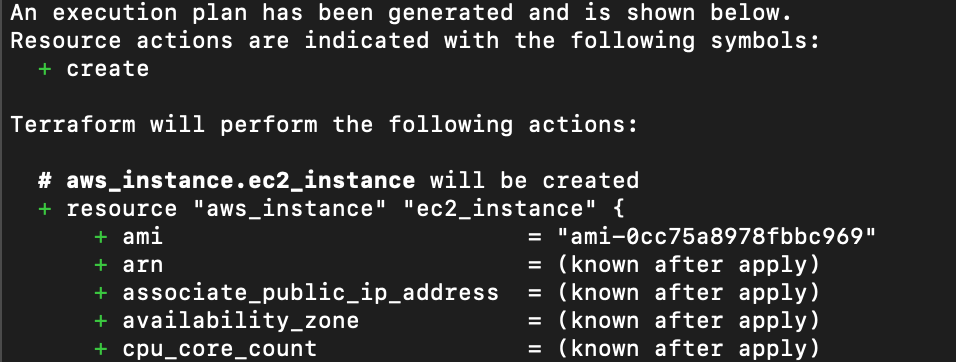
$ terraform apply

An execution plan has been generated and is shown below.
Resource actions are indicated with the following symbols:
  + create

Terraform will perform the following actions:

  # aws_instance.ec2_instance will be created
  + resource "aws_instance" "ec2_instance" {
      + ami                          = "ami-0cc75a8978fbbc969"
      + …

Plan: 1 to add, 0 to change, 0 to destroy.

Do you want to perform these actions?
  Terraform will perform the actions described above.
  Only 'yes' will be accepted to approve.

  Enter a value: yes

aws_instance.ec2_instance: Creating...
aws_instance.ec2_instance: Still creating... [10s elapsed]
aws_instance.ec2_instance: Still creating... [20s elapsed]
aws_instance.ec2_instance: Creation complete after 26s [id=i-xxxxx]

Apply complete! Resources: 1 added, 0 changed, 0 destroyed.
apply オプション一覧
$ terraform apply -h
| オプション | 内容 |
|---|---|
| -auto-approve | 作成予定のリソース表示や実行確認 yes を省略する |
| -backup=path | バックアップファイル terraform.tfstate.backup のパスを指定する |
| -compact-warnings | エラーを含まない Warning の場合は、省略した形で表示する |
| -lock=true |
tfstate ファイルをロックする(またはしない)ように指定する |
| -lock-timeout=0s |
tfstate ファイルのロックが失敗した場合のリトライまでの時間を指定する |
| -input=true | 未定義の変数がある場合に変数の入力を求めるかどうかを指定する |
| -no-color | 実行中のアウトプットを色なしで表示させる |
| -parallelism=n | 並列で実行するリソース数を指定する |
| -refresh=true | 実行前に tfstate ファイルを更新するかどうかを指定する |
| -state=path |
tfstate ファイルのパスを指定する |
| -state-out=path | 更新する tfstate ファイルを指定する ※ -state は読み込む&更新するファイル |
| -target=resource | どのリソースを実行するかを指定する |
| -var 'foo=bar' | 変数をコマンド実行時に上書きする |
| -var-file=foo | 変数を定義した tfvars ファイルを指定する |
terraform apply -auto-approve
terraform apply のみの場合は、実行前に実行計画を確認した上で yes と入力する必要がありますが、入力不要になります。
$ terraform apply --auto-approve
aws_instance.ec2_instance: Creating...
aws_instance.ec2_instance: Still creating... [10s elapsed]
aws_instance.ec2_instance: Still creating... [20s elapsed]
aws_instance.ec2_instance: Creation complete after 25s [id=i-xxxxx]

Apply complete! Resources: 1 added, 0 changed, 0 destroyed.
terraform apply -backup
https://www.terraform.io/docs/commands/apply.html#backup-path
バックアップファイル terraform.tfstate.backup のパスを指定できます。
ファイル名も指定しつつ任意の場所に配置できるかやってみました。
$ terraform apply -backup=/Users/username/study/terraform/backup/ec2.tfstate.backup
 …
aws_instance.ec2_instance: Creation complete after 35s [id=i-xxxxxx]

Apply complete! Resources: 1 added, 0 changed, 0 destroyed.
backup 配下に ec2.tfstate.backup が新しく作成されました。
$ tree
.
├── backup
│   └── ec2.tfstate.backup
├── ec2.tf
└── terraform.tfstate
terraform apply -compact-warnings
エラーを含まない Warning の場合は、省略した形で表示してくれます。
複数の警告がある場合はぎゅっとまとまるので、特に嬉しいかも。
https://www.terraform.io/docs/commands/apply.html#compact-warnings
$ terraform apply -compact-warnings
  …
Warnings:

- Quoted type constraints are deprecated
  on ec2.tf line 2
- Interpolation-only expressions are deprecated
  on ec2.tf line 11 (and 1 more)

To see the full warning notes, run Terraform without -compact-warnings.
…
このオプションを使わずに Warning が出た場合は詳細まで解説してくれるので、簡易メッセージでいいのかどうかを必要に応じて選べば良さそう。
$ terraform apply
  …
Warning: Quoted type constraints are deprecated

  on ec2.tf line 2, in variable "aws_iam_user":
   2:   type = "list"

Terraform 0.11 and earlier required type constraints to be given in quotes,
but that form is now deprecated and will be removed in a future version of
Terraform. To silence this warning, remove the quotes around "list" and write
list(string) instead to explicitly indicate that the list elements are
strings.


Warning: Interpolation-only expressions are deprecated
…

(and one more similar warning elsewhere)
…
terraform apply -lock=true
-
true:.tfstateファイルをロックしてくれます。- なお、デフォルトは
trueです。なので、このオプションを使わない場合も自動的にロックをかけてくれています。
- なお、デフォルトは
-
false: ロックかけないようにできる。使うならこっちかな。
ただ、 false ロックをかけないというのは公式的には非推奨 のようなので、注意しましょう。
https://www.terraform.io/docs/state/locking.html
State locking happens automatically on all operations that could write state. You won't see any message that it is happening. If state locking fails, Terraform will not continue. You can disable state locking for most commands with the -lock flag but it is not recommended.
$ terraform apply -lock=true       # terraform applyと同様
$ terraform apply -lock=false
terraform apply -lock-timeout=0s
.tfstate ファイルのロックがうまくいかなかった場合に、何秒後にリトライするかを指定します。
https://www.terraform.io/docs/commands/apply.html#lock-timeout-0s
$ terraform apply -lock-timeout=5s
terraform apply -input=true
未定義の変数がある場合に変数の入力を求めるかどうかを設定できます。
なお、デフォルトは true のようです。
例えば、以下のように変数定義をしているとします。
# 未定義の変数
variable "example_instance_type" {}

# instance_typeで変数を使用
resource "aws_instance" "ec2_instance" {
  ami           = "ami-0cc75a8978fbbc969"
  instance_type = var.example_instance_type

  tags = {
    Name = "qiita_example"
  }
}
-var や TF_VAR_<name> で環境変数の設定をしなかった場合、実行時に入力を求められます。
そこで改めて環境変数の設定をすればOKです。
$ terraform apply -input=true
var.example_instance_type
  Enter a value: t2.micro
…
あとは通常通りの動き
しかし、オプションで ture ではなくfalse にすると未定義の変数入力は要求されません。
なので、きちんと環境変数を設定していないと「おいおい、定義されてないよ!」と怒られてしまうので、注意です。
$ terraform apply -input=false

Error: No value for required variable

  on ec2.tf line 1:
   1: variable "example_instance_type" {}

The root module input variable "example_instance_type" is not set, and has no
default value. Use a -var or -var-file command line argument to provide a
value for this variable.
terraform apply -no-color
通常は apply 実行中のアウトプットに赤や緑など色が付いてたりするんですが、一切色がなくなります。
…まあ、そのままですね。
https://www.terraform.io/docs/commands/apply.html#no-color
$ terraform apply -no-color
これが…
こうなります。

terraform apply -parallelism=n
並列で実行するリソース数を増やして、実行時間を短くすることができます。
https://www.terraform.io/docs/commands/apply.html#parallelism-n
デフォルトの並列可能数は10個なので、まずはEC2インスタンスを15個を作って時間を計ってみます。
$ time terraform apply --auto-approve
…
Apply complete! Resources: 15 added, 0 changed, 0 destroyed.

real	1m2.131s
user	0m5.261s
sys	0m2.269s
1分2秒かかっていますね。
では、次に並列での実行数を15個に引き上げてみます。
時間を計測するために time を使っていますが、通常は terraform apply -parallelism=20 のみで良いです。
$ time terraform apply -parallelism=15 --auto-approve
…
Apply complete! Resources: 15 added, 0 changed, 0 destroyed.

real	0m49.121s
user	0m5.321s
sys	0m1.984s
13秒ほど実行時間が短くなったようですね。
多くのリソースを取り扱っている場合は、かなり効果がありそうです。
terraform apply -refresh=true
apply や plan の実行前に、tfstateファイルを更新するかどうかを設定することができます。デフォルトは true です。
※ tfstateファイルは、「現在の状態を記録する」ファイルです。
https://www.terraform.io/docs/commands/apply.html#no-color
前提になりますが apply や plan を実行すると、以下のような動きをしています。
(あくまでも私の理解として…なので、違ったらすみません)
- tfstateファイルをもとにプロバイダ(私の場合はAWS)のリソース情報を取得し、tfstate更新しに行く(refresh)
- tfstateファイルの更新後に、リソースの作成・更新や削除を行う(apply, destroy)
- 作成されたリソース情報をもとに再度tfstateファイルを更新
 なので、この `refresh` を使えば①を省略するかどうかを設定できる、ということです。
使いどころとしては、「いっぱいリソースがあるから、refreshする時間減らしたいよー」とかでしょうか?
なので、この `refresh` を使えば①を省略するかどうかを設定できる、ということです。
使いどころとしては、「いっぱいリソースがあるから、refreshする時間減らしたいよー」とかでしょうか?
オプション無しの場合はこちら。
$ terraform apply --auto-approve
aws_instance.ec2_instance: Refreshing state... [id=i-xxxx]
aws_instance.ec2_instance: Modifying... [id=i-xxxx]
aws_instance.ec2_instance: Modifications complete after 3s [id=i-xxxx]

Apply complete! Resources: 0 added, 1 changed, 0 destroyed.
-refresh=false のオプションを設定したものはこちら。
$ terraform apply --auto-approve -refresh=false
aws_instance.ec2_instance: Modifying... [id=i-xxxx]
aws_instance.ec2_instance: Modifications complete after 3s [id=i-xxxx]

Apply complete! Resources: 0 added, 1 changed, 0 destroyed.
terraform apply -state=path
tfstateファイルのパスを指定することができます。
https://www.terraform.io/docs/commands/apply.html#state-path
$ tree
.
└── ec2.tf
$ terraform apply -state=/Users/username/study/terraform/example/state/ec2.tfstate
$ tree
.
├── ec2.tf
└── state
    └── ec2.tfstate
実際のプロジェクトではリモートのストレージを使ってtfstateファイルを管理していると思います。(まだ個人でしか使ったことないのでまだ知らないけれど…)
AWSの場合は「S3バケット」「Terraform Cloud」を使っている人が多いんですかね。
何れにせよ、リモートで管理している人は、リモートでの設定が優先されるためこのオプションを使っても無視されるようです。
terraform apply -state-out=path
下の図で言うと、②の後に作成/削除されたリソース情報をもとに更新するtfstateファイルを指定することができるっぽい。
特に指定しない場合は、 -state で指定されたファイルが更新されます。
- ①で読み込むtfstateファイル
- ①や②の後に更新するtfstateファイル
読み込み用のファイルは作って中身を確認しておきました。
$ tree
.
├── ec2.tf
└── state.tfstate
$ cat state.tfstate
そのあと、もともとある state.tfstate ファイルを読み込みつつ、更新するファイルは別途指定してみました。
$ terraform apply --auto-approve -state=state.tfstate -state-out=newstate.tfstate
無事 state.tfstate は更新されず、 newstate.tfstate が指定通りに生成されました。
$ tree
.
├── ec2.tf
├── state.tfstate
└── newstate.tfstate
$ cat state.tfstate
$ cat new state.tfstate
terraform apply -target=resource
特定のリソースを選択して実行することができます。
https://www.terraform.io/docs/commands/apply.html#target-resource
2つリソースを作っておきます。
:ec2.tf
resource "aws_instance" "ec2_instance_t2" {
  ami           = "ami-0cc75a8978fbbc969"
  instance_type = "t2.micro"

  tags = {
    Name = "qiita_example"
  }
}

resource "aws_instance" "ec2_instance_t3" {
  ami           = "ami-0cc75a8978fbbc969"
  instance_type = "t3.micro"

  tags = {
    Name = "qiita_example"
  }
}
それから、1つだけターゲットに設定して apply します。
$ terraform apply -target=aws_instance.ec2_instance_t2
…
Apply complete! Resources: 0 added, 1 changed, 0 destroyed.
特定のリソースを指定するというのは日常的に使う機能ではないので、Warningが2つほど出ていました。
何かしらの理由があった上で使う機能ですね。
terraform apply -var 'foo=bar'
変数をコマンド実行時に上書きすることができます。
https://www.terraform.io/docs/commands/apply.html#var-39-foo-bar-39-
:ec2.tf
# 未定義の変数
variable "example_instance_type" {}

# instance_typeで変数を使用
resource "aws_instance" "ec2_instance" {
  ami           = "ami-0cc75a8978fbbc969"
  instance_type = var.example_instance_type

  tags = {
    Name = "qiita_example"
  }
}
こんな感じで example_instance_type の変数を上書きすることができます。
$ terraform apply -var 'example_instance_type=t2.micro'
他にも書き方はいろいろあるようです。
https://www.terraform.io/docs/configuration/variables.html#variables-on-the-command-line
terraform apply -var-file=foo
変数を定義した tfvars ファイルを指定することができます。
https://www.terraform.io/docs/commands/apply.html#var-file-foo
# 未定義の変数
variable "example_instance_type" {}

# instance_typeで変数を使用
resource "aws_instance" "ec2_instance" {
  ami           = "ami-0cc75a8978fbbc969"
  instance_type = var.example_instance_type

  tags = {
    Name = "qiita_example"
  }
}
変数定義のファイルはこちらを参考にします。
https://www.terraform.io/docs/configuration/variables.html#variable-definitions-tfvars-files
example_instance_type = "t2.micro"
ファイルを指定して、実行。こうすることで変数をファイルに切り出してあげることができ、便利そうです。
$ terraform apply -var-file=testing.tfvars
terraform console
以下、2つができます。
- すでにリソースが作成されている場合の
tfstateの確認 - 組み込み関数のテスト
終了する際は、 ctrl + C or ctrl + Dです。
terraform console [options] [dir-or-plan] のように使うことができます。
使い方ですが、terraform console と打った後に、tfstate の好きな値を確認できるようになっています。
なので、例えば 「EC2インスタンスのタグを知りたい」という場合は、 aws_instance.ec2_instance_t2.tags と打てばOK。
$ terraform console
> aws_instance.ec2_instance_t2.tags
{
  "Name" = "qiita_example"
}
組み込み関数のテストについてはこんな感じ。
公式で関数の1つ1つ丁寧に例が載っていると思うのですが、例えば file という関数を使った場合はこんな感じで使えますよと。
https://www.terraform.io/docs/configuration/functions/file.html
$ terraform console
> file("hello.txt")
Hello World!
事前にどう動くのかを検証したい時に使えそうです。
また、本題とちょっとはずれるけど、組み込み関数はこんな感じで使うやつ。
resource "aws_instance" "ec2_instance_t2" {
  ami           = "ami-0cc75a8978fbbc969"
  instance_type = "t2.micro"

  tags = {
    Name = "qiita_example"
  }
}

output "hello" {
  value = file("hello.txt")
}
Hello World!
console オプション一覧
$ terraform console -h
| オプション | 内容 |
|---|---|
| -state=path |
tfstate ファイルのパスを指定する |
| -var 'foo=bar' | 変数をコマンド実行時に上書きする |
| -var-file=foo | 変数を定義した tfvars ファイルを指定する |
オプションは apply と同じものなので、割愛します。
terraform destroy
シンプルですが、クラウド上のリソースを削除することができます。
destroy オプション一覧
$ terraform destroy -h
| オプション | 内容 |
|---|---|
| -backup=path | バックアップファイル terraform.tfstate.backup のパスを指定する |
| -auto-approve | 削除予定のリソース表示や実行確認 yes を省略する |
| -force | 非推奨。 -auto-approve と同様にリソースの削除を行える |
| -lock=true |
tfstate ファイルをロックする(またはしない)ように指定する |
| -lock-timeout=0s |
tfstate ファイルのロックが失敗した場合のリトライまでの時間を指定する |
| -no-color | 実行中のアウトプットを色なしで表示させる |
| -parallelism=n | 並列で実行するリソース数を指定する |
| -refresh=true | 実行前に tfstate ファイルを更新するかどうかを指定する |
| -state=path |
tfstate ファイルのパスを指定する |
| -state-out=path | 更新する tfstate ファイルを指定する ※ -state は読み込む&更新するファイル |
| -target=resource | どのリソースを削除するかを指定する |
| -var 'foo=bar' | 変数をコマンド実行時に上書きする |
| -var-file=foo | 変数を定義した tfvars ファイルを指定する |
新しいのは force ですね。
terraform destroy -force
-auto-approve と同様にサクッとリソースの削除を行えます。
ただし、公式としては非推奨の機能です。
$ terraform destroy -force
aws_instance.ec2_instance_t2: Refreshing state... [id=i-056b9686bdb0b7a24]
aws_instance.ec2_instance_t2: Destroying... [id=i-056b9686bdb0b7a24]
aws_instance.ec2_instance_t2: Still destroying... [id=i-056b9686bdb0b7a24, 10s elapsed]
aws_instance.ec2_instance_t2: Still destroying... [id=i-056b9686bdb0b7a24, 20s elapsed]
aws_instance.ec2_instance_t2: Destruction complete after 21s

Destroy complete! Resources: 1 destroyed.
ちなみに、このオプションを使えば force_destroy のようにS3バケットにオブジェクトがあっても強制削除してくれるのでは?と思って試してみましたが、全く別の機能でした。
resource "aws_s3_bucket" "takkii_s3_bucket" {
  bucket        = "alb-log-pragmatic-terraform-takkii1010"
  force_destroy = false
 …
}
$ terraform destroy -force
aws_s3_bucket.takkii_s3_bucket: Refreshing state... [id=alb-log-pragmatic-terraform-takkii1010]
aws_s3_bucket.takkii_s3_bucket: Destroying... [id=alb-log-pragmatic-terraform-takkii1010]

Error: error deleting S3 Bucket (alb-log-pragmatic-terraform-takkii1010): BucketNotEmpty: The bucket you tried to delete is not empty. You must delete all versions in the bucket.
	status code: 409, request id: 20DD64E032887A3D, host id: xxx=
terraform env
この機能ですが将来的には削除される機能のようで、 terraform workspace を代わりに使いなさいと言っています。
なので、詳細は terraform workspace にて使ってみることにします。
$ terraform env
Warning: the "terraform env" family of commands is deprecated.

"Workspace" is now the preferred term for what earlier Terraform versions
called "environment", to reduce ambiguity caused by the latter term colliding
with other concepts.

The "terraform workspace" commands should be used instead. "terraform env"
will be removed in a future Terraform version.

Usage: terraform workspace

  new, list, show, select and delete Terraform workspaces.
terraform fmt
Terraformの設定ファイルをフォーマットしてくれるコマンドです。JSONはサポート外のようです。
また、Terraformのバージョンごとにフォーマットが微妙に異なる場合があるため、 バージョンを上げたら全てのファイルに再度フォーマットをかけて統一しておくこと をおすすめしているみたいです。
- フォーマット対象
.tf.tfvars
- フォーマット対象外
.tf.json.tfvars.json
fmt オプション一覧
$ terraform fmt -h
| オプション | 内容 |
|---|---|
| -list=false | フォーマットをかけたファイル一覧を表示するか |
| -write=false | ファイルの上書きをするかどうか(下の -check とほぼ同じ) |
| -diff | フォーマット差分をみる |
| -check | フォーマットの修正が入るファイルがあるかどうかをチェック |
| -no-color | 実行中のアウトプットを色なしで表示させる ※公式ドキュメントには記載ないですね |
| -recursive | サブディレクトリ含めてフォーマットをかける |
terraform fmt -list=false
https://www.terraform.io/docs/commands/fmt.html#list-false
オプションなしの場合は、フォーマットをかけたファイル一覧を出力してくれています。
$ terraform fmt
ec2_first.tf
ec2_second.tf
なので、このオプションを使えば、ファイル一覧を非表示にすることができます。
$ terraform fmt -list=false
$ terraform fmt -list=true
ec2_first.tf
ec2_second.tf
terraform fmt -write=false
フォーマット対象のファイルを上書きするかどうかを選択できます。
https://www.terraform.io/docs/commands/fmt.html#write-false
上書きをしない設定にすれば、コンソールにフォーマットが正しくないファイルのみ表示されました。
ファイルはもちろん上書きされず、対象ファイルの存在だけ教えてくれます。
$ terraform fmt -write=false
ec2_first.tf
terraform fmt -check と結果的には同じに見えます。
terraform fmt -diff
フォーマットの差分をみることができます。
https://www.terraform.io/docs/commands/fmt.html#diff
プラスとマイナスで差分を表示してくれていますね。
$ terraform fmt -diff
ec2_first.tf
--- old/ec2_first.tf
+++ new/ec2_first.tf
@@ -1,8 +1,8 @@
 resource "aws_instance" "ec2_instance_t2" {
-  ami   = "ami-0cc75a8978fbbc969"
+  ami           = "ami-0cc75a8978fbbc969"
   instance_type = "t2.micro"

-    tags = {
-    Name =  "qiita_example"
+  tags = {
+    Name = "qiita_example"
   }
 }
terraform fmt -check
フォーマットの修正が入るファイルがあるかどうかをチェックできます。なお、修正の実行はしません。あくまでもチェック。
https://www.terraform.io/docs/commands/fmt.html#check
$ terraform fmt -check
ec2_first.tf
terraform fmt -no-color
[terraform apply -no-color](## terraform apply -no-color) と同じなので割愛。
terraform fmt -recursive
サブディレクトリがある場合は、まとめてフォーマットをかけてくれます。
デフォルトでは、指定したディレクトリやカレントディレクトリのみが対象になっているので、まとめて一気にやりたいときは便利です。
https://www.terraform.io/docs/commands/fmt.html#recursive
$ terraform fmt -recursive
terraform get
こちらは、rootディレクトリ配下のmoduleをダウンロードしてくれます。
https://www.terraform.io/docs/commands/get.html
Terraformのmoduleはterraform init や terraform get を実行して、moduleを事前に取得する操作を行うことで利用できるようになるので、そのための機能ですね。
例えば、こんな構成だったとします。
$ tree
.
├── ec2
│   └── main.tf
├── iam_role
│   └── main.tf
├── main.tf
├── terraform.tfstate
└── terraform.tfstate.backup
terraform get をすれば、サブディレクトリ配下のファイルも読み込んでくれます。
なので、そのあとに terraform apply をすればまとめて作成できるようになります。
$ terraform get
- describe_regions_for_ec2 in iam_role
- ec2_instance_t2 in ec2
なお、 get では、 .terraform にモジュールをダウンロードしてくれるようです。
get 実行後には module フォルダと modules.json が作成されていました。
中身はこんな感じ。
$ tree -a
.
├── .terraform
│   ├── modules
│   │   └── modules.json
│   └── plugins
│       ├── registry.terraform.io
…

$ cat .terraform/modules/modules.json
{"Modules":[{"Key":"","Source":"","Dir":"."},{"Key":"describe_regions_for_ec2","Source":"./iam_role","Dir":"iam_role"},{"Key":"ec2_instance_t2","Source":"./ec2","Dir":"ec2"}]}
get オプション一覧
$ terraform get -h
| オプション | 内容 |
|---|---|
| -update | すでに一度読み込んだモジュールに更新がないかチェックし、変更があればインストールする |
| -no-color | 実行中のアウトプットを色なしで表示させる |
terraform get -update
すでに一度読み込んだモジュールに更新がないかチェックし、変更があれば追加でインストールしてくれます。
https://www.terraform.io/docs/commands/get.html#update
先ほど作成したmoduleに少し変更を加えてから、実行してみます。
$ terraform get -update
- describe_regions_for_ec2 in iam_role
- ec2_instance_t2_micro in ec2_updated

$ cat .terraform/modules/modules.json
{"Modules":[{"Key":"ec2_instance_t2_micro","Source":"./ec2","Dir":"ec2"},{"Key":"","Source":"","Dir":"."},{"Key":"describe_regions_for_ec2","Source":"./iam_role","Dir":"iam_role"},{"Key":"ec2_instance_t2","Source":"./ec2","Dir":"ec2"}]}
無事 ec2_instance_t2_micro をインストールしてくれました。
上記を見る限り、一度インストールしたものは削除されるわけではなく、そのまま残っているようです。
terraform get -no-color
[terraform apply -no-color](## terraform apply -no-color) と同じなので割愛。
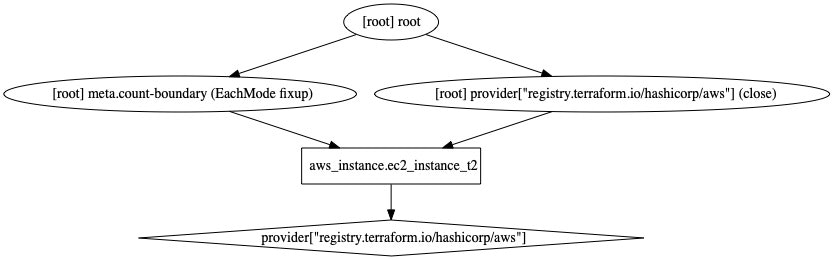
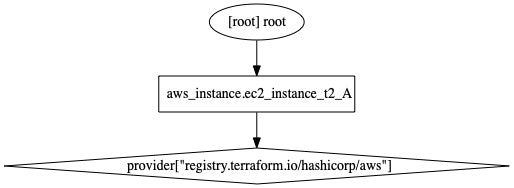
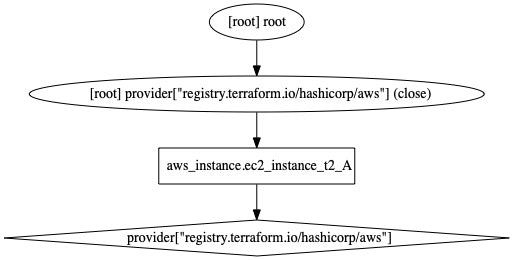
terraform graph
DOTフォーマットでリソースの依存関係を出力してくれます。
最終的には GraphViz のdotコマンドも併せて使うことで図に表すことができます。
https://www.terraform.io/docs/commands/graph.html
また、以下の形式のことをDOT形式というみたいです。
$ terraform graph
digraph {
	compound = "true"
	newrank = "true"
	subgraph "root" {
		"[root] aws_instance.ec2_instance_t2 (expand)" [label = "aws_instance.ec2_instance_t2", shape = "box"]
		"[root] provider[\"registry.terraform.io/hashicorp/aws\"]" [label = "provider[\"registry.terraform.io/hashicorp/aws\"]", shape = "diamond"]
		"[root] aws_instance.ec2_instance_t2 (expand)" -> "[root] provider[\"registry.terraform.io/hashicorp/aws\"]"
		"[root] meta.count-boundary (EachMode fixup)" -> "[root] aws_instance.ec2_instance_t2 (expand)"
		"[root] provider[\"registry.terraform.io/hashicorp/aws\"] (close)" -> "[root] aws_instance.ec2_instance_t2 (expand)"
		"[root] root" -> "[root] meta.count-boundary (EachMode fixup)"
		"[root] root" -> "[root] provider[\"registry.terraform.io/hashicorp/aws\"] (close)"
	}
}
ここからさらに GraphViz のdotコマンドを使うことで図に変換します。
公式を参考にしつつ、jpgでやってみました。
$ terraform graph | dot -Tjpg > graph.jpg
作成された表はこんな感じです。
EC2インスタンス1つしか書いていないので、シンプルです。実務ではもっと複雑な図になりそう…。
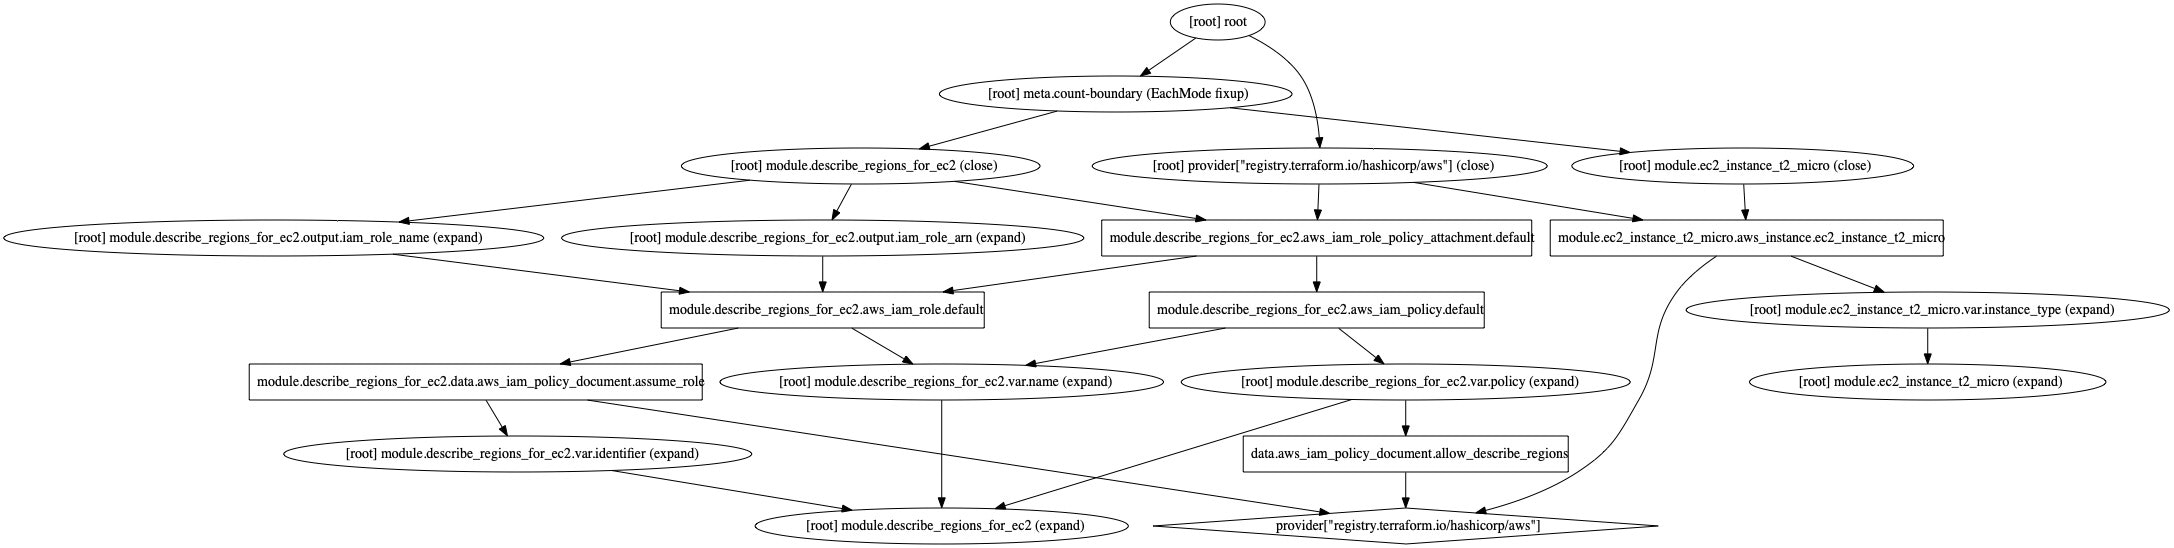
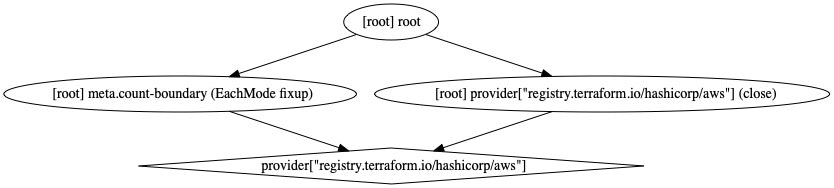
また、こちらはmoduleを使ってみたバージョンです。(すごく汚い…)
graph オプション一覧
$ terraform graph -h
| オプション | 内容 |
|---|---|
| -draw-cycles | 依存関係に循環があった場合、強調表示ができる |
| -type=plan | 表示するグラフのタイプを選択できる |
| -module-depth=n | (非推奨)表示するmoduleの深さを指定する |
terraform graph -draw-cycles
依存関係に循環があった場合、強調表示をしてくれます。
https://www.terraform.io/docs/commands/graph.html#draw-cycles
まず簡単にですが、循環するリソースを作成します。
resource "aws_instance" "ec2_instance_t2_A" {
  ami           = "ami-0cc75a8978fbbc969"
  instance_type = [ aws_instance.ec2_instance_t2_B.instance_type ]

  tags = {
    Name = "qiita_example"
  }
}

resource "aws_instance" "ec2_instance_t2_B" {
  ami           = "ami-0cc75a8978fbbc969"
  instance_type = [ aws_instance.ec2_instance_t2_A.instance_type ]

  tags = {
    Name = "qiita_example"
  }
}
$ terraform graph -draw-cycles | dot -Tjpg > graph.jpg
出力された図はこんな感じで、循環している箇所を赤く強調してくれました。
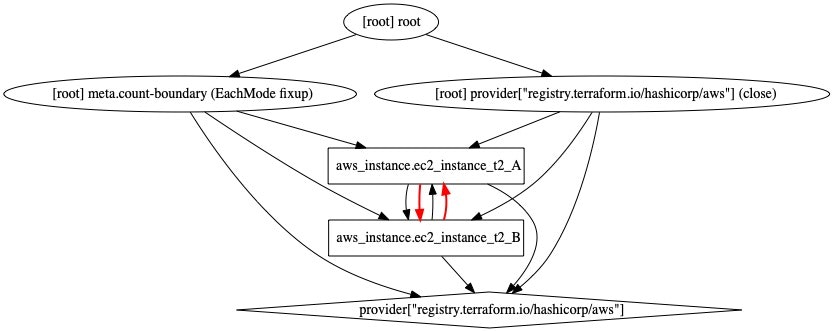
なお、 terraform plan を使っても循環してるよ!と注意してくれるので、他の方法でも検知自体は出来そうですが図だとわかりやすいですね。
terraform graph -type=plan
表示するグラフのタイプを選択できます。
https://www.terraform.io/docs/commands/graph.html#type-plan
選択できるのは、plan, plan-destroy, apply, validate, input, refreshの6つ。
まずはAというインスタンスを作成し、図に出力してみました。
なお、デフォルトは -type=plan のようなので、明示的な指定はしていません。
$ terraform graph | dot -Tjpg > graph.jpg

-type=plan-destroy では削除されるリソースが出力されました。
$ terraform graph -type=plan-destroy | dot -Tjpg > graph.jpg
-type=refreshを使うと meta.count-boundary が消えました。
refresh するときのリソースたちを表示してくれてるように見えるのですが、なぜ消えるのかよくわからないです…。
https://github.com/hashicorp/terraform/issues/20063
$ terraform graph -type=refresh | dot -Tjpg > graph.jpg
-type=apply を使うとリソースが消えました…。
$ terraform graph -type=apply | dot -Tjpg > graph.jpg
ううん、すみません、私の実力では type の使い方がいまいちわかりませんでした。。。
私の使い方があっていないような気がします。これは宿題ですね。。
terraform import
Terraform以外の手段で既に作成したリソースをインポートし、取り込みます。
https://www.terraform.io/docs/commands/import.html
今まで手でポチポチ設定してたけど、Terraformに移行しようかなって時に使えます。
使い方は、 terraform import [options] ADDRESS ID とあるように、 ADDRESS , ID の2つが必要です。
このADDRESSはリソース名を指していて、 aws_instance.ec2_instance_t2 とすればOK。
コンソール上で適当にEC2インスタンスを作成したら、ローカルに空の main.tf を作成。
resource "aws_instance" "ec2_instance_t2" {}

terraform {
  required_version = "0.13.0"

  required_providers {
    aws = {
      source  = "hashicorp/aws"
      version = "3.3.0"
    }
  }
}
コンソール上からEC2インスタンスIDをコピーして実行。
$ terraform init
$ $ terraform import aws_instance.ec2_instance_t2 i-xxxxxxxx
aws_instance.ec2_instance_t2: Importing from ID "i-xxxxxxxx"...
aws_instance.ec2_instance_t2: Import prepared!
  Prepared aws_instance for import
aws_instance.ec2_instance_t2: Refreshing state... [id=i-xxxxxx]

Import successful!

The resources that were imported are shown above. These resources are now in
your Terraform state and will henceforth be managed by Terraform.
terraform.tfstate を確認すると、更新されています。
$ cat terraform.tfstate
{
  "version": 4,
  "terraform_version": "0.13.0",
  "serial": 1,
  "lineage": "def80f38-083c-bd15-1aef-529e894a5533",
  "outputs": {},
  "resources": [
    {
      "mode": "managed",
      "type": "aws_instance",
      "name": "ec2_instance_t2",
      "provider": "provider[\"registry.terraform.io/hashicorp/aws\"]",
      "instances": [
        {
          "schema_version": 1,
          "attributes": {
            "ami": "ami-00f045aed21a55240",
            "arn": "arn:aws:ec2:ap-northeast-1:xxxxx:instance/i-xxxxxxxxx",
            "associate_public_ip_address": true,
            "availability_zone": "ap-northeast-1d",
            "cpu_core_count": 1,
            "cpu_threads_per_core": 1,
            "credit_specification": [
              {
                "cpu_credits": "standard"
              }
            ],
…
ただ、あくまでも terraform.tfstate を更新してくれるだけでして、 main.tf は更新されません。
つまり、 main.tf と terraform.tfstate に差分がある = main.tf を書き換えなきゃいけない、となります(大変…)
この辺りを見て埋めていくんですかね…。
$ terraform state show aws_instance.ec2_instance_t2
# aws_instance.ec2_instance_t2:
resource "aws_instance" "ec2_instance_t2" {
    ami                          = "ami-00f045aed21a55240"
    arn                          = "arn:aws:ec2:ap-northeast-1:xxxxxx:instance/i-xxxxxxx"
    associate_public_ip_address  = true
    availability_zone            = "ap-northeast-1d"
…
The current implementation of Terraform import can only import resources
into the state. It does not generate configuration. A future version of
Terraform will also generate configuration.
将来的には main.tfもやってくれるっぽいです。
imoprt オプション一覧
$ terraform import -h
| オプション | 内容 |
|---|---|
| -backup=path | バックアップファイル terraform.tfstate.backup のパスを指定する |
| -config=path | 設定ファイルやディレクトリへのパスを指定する |
| -allow-missing-config |
resource blockがなくても実行可能にする |
| -input=true | 未定義の変数がある場合に変数の入力を求めるかどうかを指定する |
| -lock=true |
tfstate ファイルをロックする(またはしない)ように指定する |
| -lock-timeout=0s |
tfstate ファイルのロックが失敗した場合のリトライまでの時間を指定する |
| -no-color | 実行中のアウトプットを色なしで表示させる |
| -state-out=PATH | 更新する tfstate ファイルを指定する ※ -state は読み込む&更新するファイル |
| -var 'foo=bar' | 変数をコマンド実行時に上書きする |
| -var-file=foo | 変数を定義した tfvars ファイルを指定する |
使ったことがなさそうなオプションは -config -allow-missing-config の2つ。
terraform import -config=path
インポートする際のファイルやディレクトリへのパスを指定することができます。
https://www.terraform.io/docs/commands/import.html#config-path
例えば、ファイルは別のディレクトリにある物を使いたい時
$ tree
.
├── import_config_file
│   └── main.tf
└── import_ec2
こんな感じで使えます。
$ terraform import -config=../import_config_file aws_instance.ec2_instance_t2 i-xxxxxxx
aws_instance.ec2_instance_t2: Importing from ID "i-xxxxxxx"...
aws_instance.ec2_instance_t2: Import prepared!
  Prepared aws_instance for import
aws_instance.ec2_instance_t2: Refreshing state... [id=i-xxxxxxx]

Import successful!

The resources that were imported are shown above. These resources are now in
your Terraform state and will henceforth be managed by Terraform.
$ tree
.
├── import_config_file
│   └── main.tf
└── import_ec2
    └── terraform.tfstate
terraform import -allow-missing-config
リソースのブロックを設定しなかったとします。
provider "aws" {}
-allow-missing-config のオプションを利用すると、設定しなくてもインポートができるみたいです。
$ terraform import -allow-missing-config aws_instance.ec2_instance_t2 i-xxxxxx
aws_instance.ec2_instance_t2: Importing from ID "i-xxxxxx"...
aws_instance.ec2_instance_t2: Import prepared!
  Prepared aws_instance for import
aws_instance.ec2_instance_t2: Refreshing state... [id=i-xxxxxxx]

Import successful!

The resources that were imported are shown above. These resources are now in
your Terraform state and will henceforth be managed by Terraform.

Import does not generate resource configuration, you must create a resource
configuration block that matches the current or desired state manually.

If there is no matching resource configuration block for the imported
resource, Terraform will delete the resource on the next "terraform apply".
It is recommended that you run "terraform plan" to verify that the
configuration is correct and complete.
最後に
コマンドやオプションが多いのもありますが、私自身の理解が遅く時間がかかっています。
なので、これから少しづつ追記していく形で進めていこうと思います。
間違っている箇所などありましたら是非教えてください。