思いついたものから更新中。インストールについては過去記事参照で、Mac上のg++ 6.4.0を利用して、ネット上から拾ってきたCUDDのver3.0を利用: Binary Decision Diagramを扱うためにCUDDをインストール
使用例: BDDの可視化(graphviz経由)
- C++の理解度がイマイチなので文字列渡すところが少し悩んだけど実装読んだらOKだった。
- 使っている論理関数はインストール記事で動作させた関数の例
- 第一引数のinameは、BDDのrootからのレベル(index)の順番で文字列を与えると、dotに反映される
- 第二引数のonameは、描画するvectorの1番目から順番に文字列を与えると、関数の名前としてdotに反映される
# include <iostream>
# include <vector>
# include "cuddObj.hh"

using namespace std;

int main() {
  Cudd mgr;
  BDD x = mgr.bddVar();
  BDD y = mgr.bddVar();
  BDD f = x * y;
  BDD g = y +!x;
  cout << "f is" << (f <= g ? "" : " not")
       << " less than or equal to g" << endl;

  // dump
  const vector<BDD> vec1 = {f};
  const vector<BDD> vec2 = {f, g};
  auto fp1 = fopen("dot/output1.dot", "w");
  auto fp2 = fopen("dot/output2.dot", "w");
  const char* iname[2] = {"x", "y"};
  const char* oname[2] = {"f", "g"};
  mgr.DumpDot(vec1, iname, oname, fp1);
  mgr.DumpDot(vec2, iname, oname, fp2);
  return 0;
}
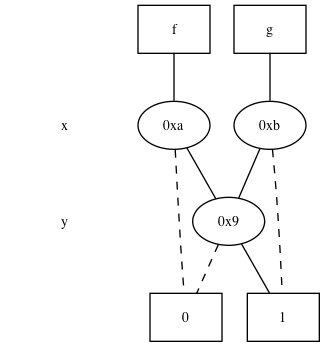
- 出力したf/gの例
-
CUDDのdotファイルはうまく簡素化されていて、よく見ると点線に種類があることが分かる
- 細い点線と中ぐらいの点線
-
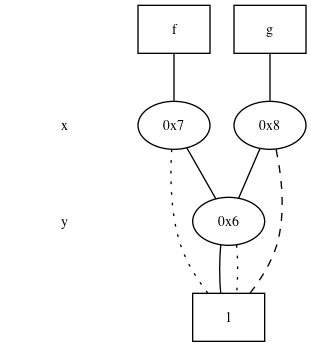
これを見慣れた二分決定図に直すには、簡単にはBDDをADDに変換すると良い(中身がどう違うかは知らない)
const vector<ADD> vec3 = {f.Add(), g.Add()};
auto fp3 = fopen("dot/output3.dot", "w");
mgr.DumpDot(vec3, iname, oname, fp3);