はじめに
Slackを使ってAmazon RDSを上げ下げできるようにしました。使わない時間帯はちゃんと落としてから帰りましょう。
やること
以下のことを行います。時間配分は作業目安です。
- AWS に Chatbot を設定(5分)
- SlackにAWS Chatbotアプリを追加(5分)
- Lambdaを書く(30分)
- IAMを追加(5分)
- Slackワークフロービルダーを設定(10分)
構成図
SlackにAWS Chatbotアプリを追加してSlackワークフロービルダー経由でLambdaを叩きます。
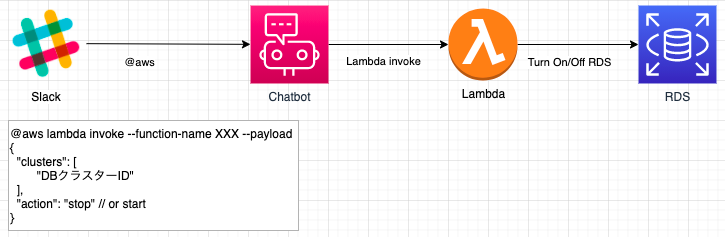
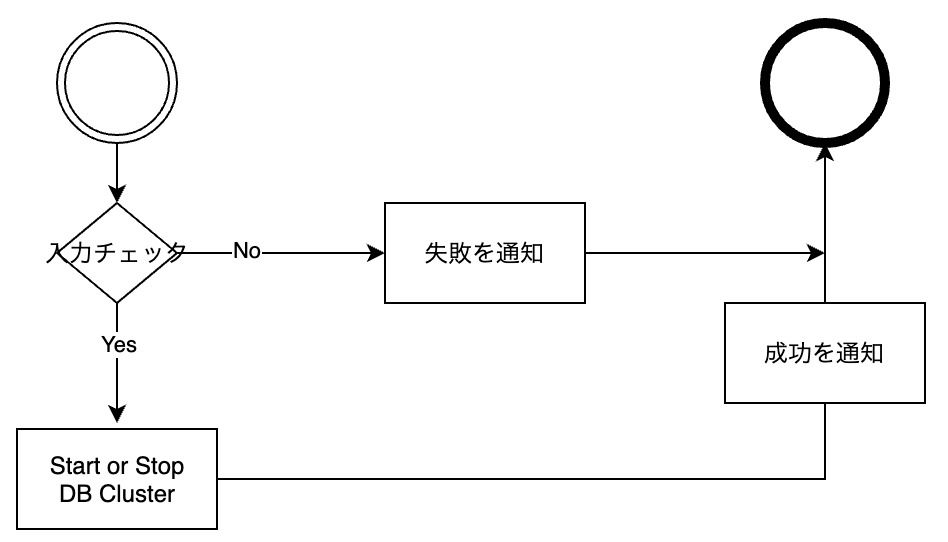
Lambdaの動きは以下のようにしています。
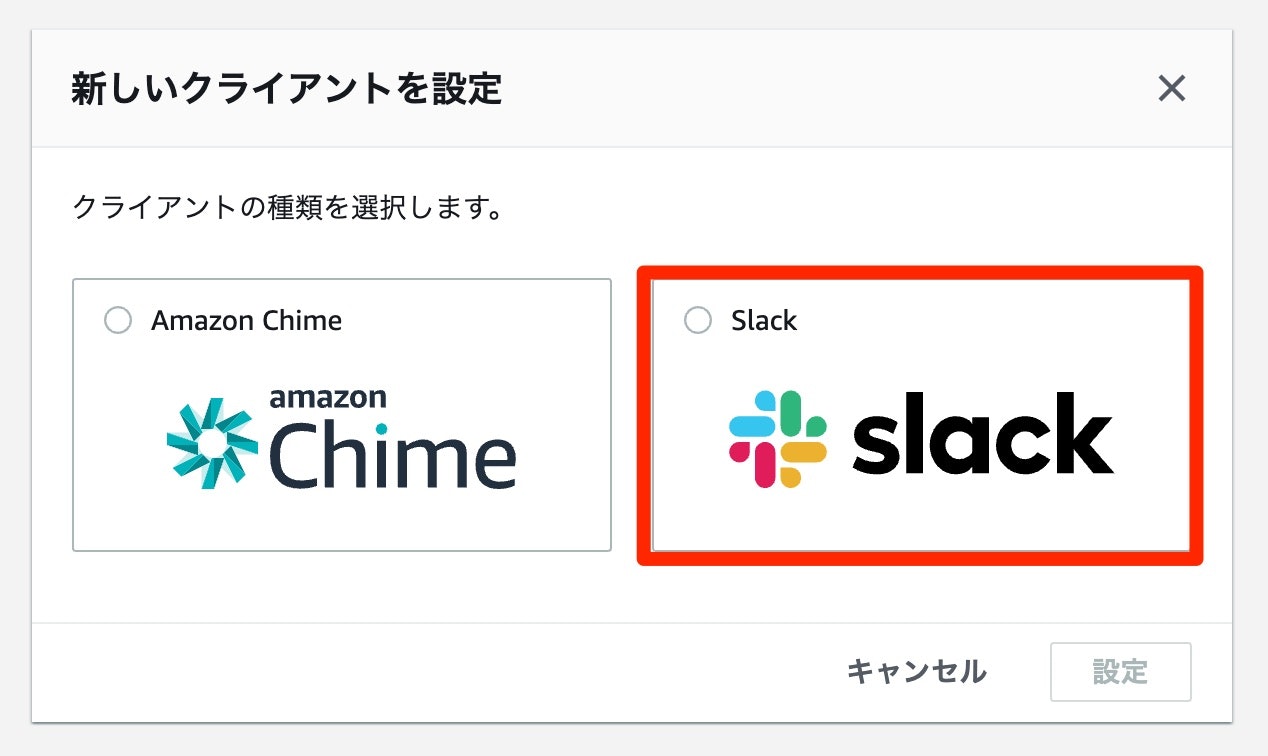
AWS に Chatbot を設定(5分)
AWSのコンソールにログインし、Chatbotと検索してください。クライアントにSlackを選択し、画面の指示に従って設定を完了させてください。
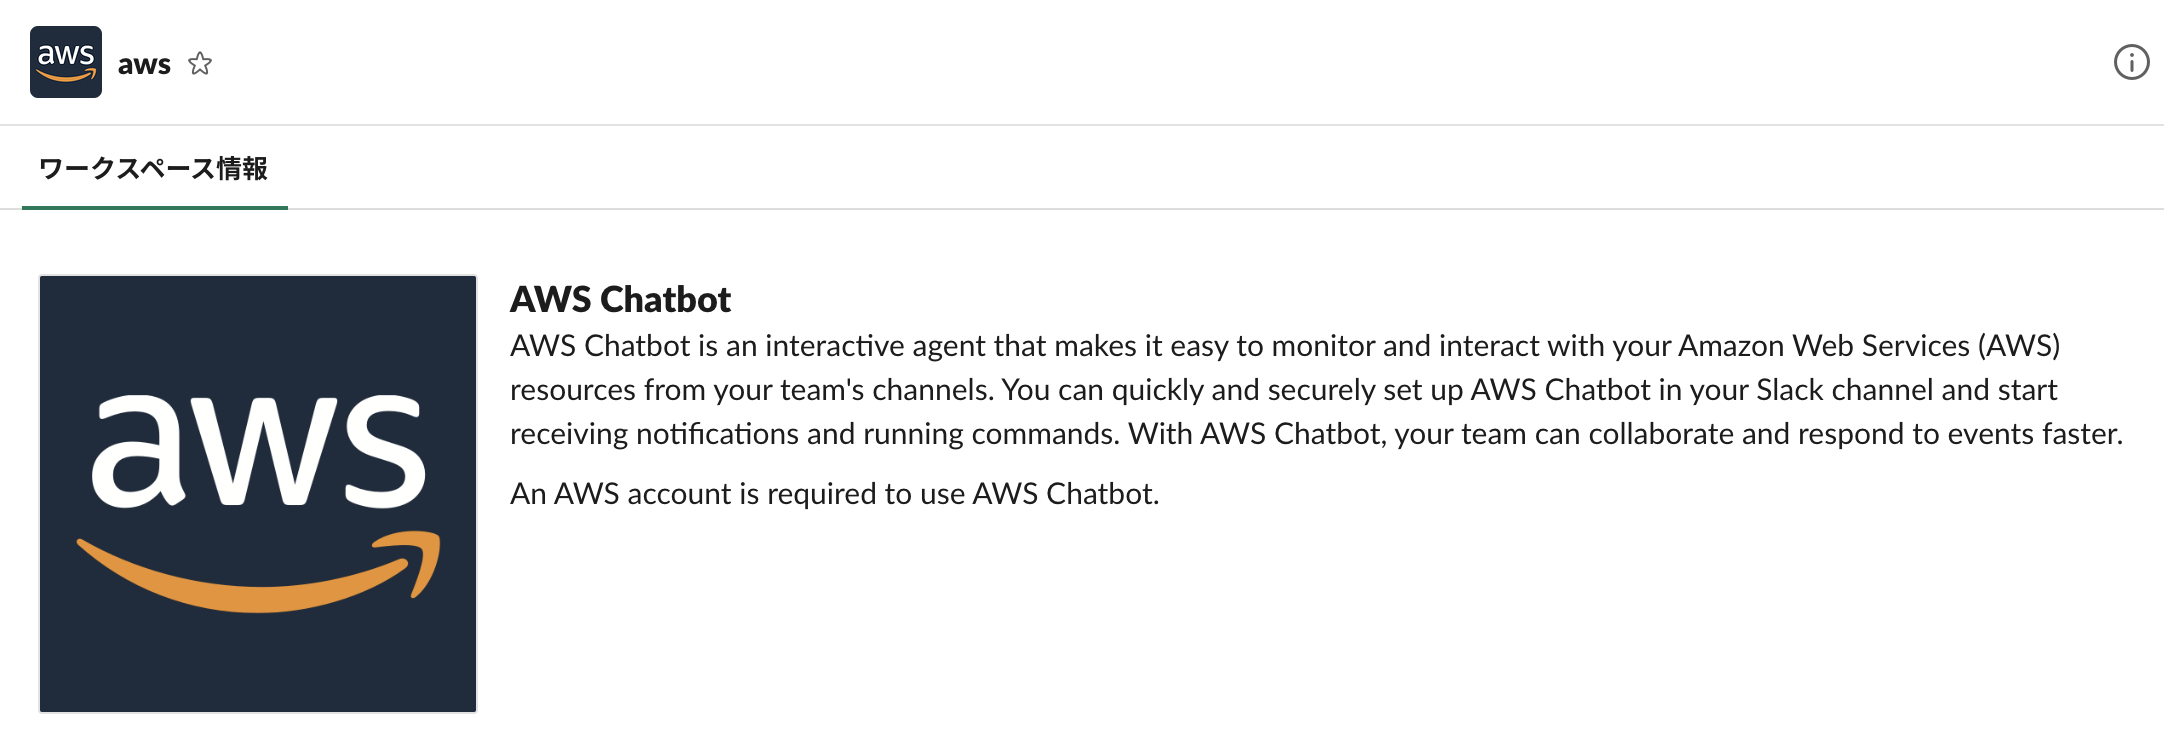
SlackにAWS Chatbotアプリを追加(5分)
SlackにAWS Chatbotアプリを追加してください。
Lambdaを書く(30分)
Lambdaを書きましょう。コードはPythonです。そのままコピペして使うと良いでしょう。
import boto3
RDS = boto3.client('rds')

# Type in {"clusters": ["<cluster-1>", "<cluster-2>"], "action": "stop"}
def lambda_handler(event, context):

    # 入力チェック
    try:
        clusters = event.get('clusters')
        action = event.get('action')
    except Exception as e:
        invalid_msg = "Invalid Request! Failed with: {0}".format(e)
        print(invalid_msg)
        return invalid_msg

    if (not (action == "stop" or action == "start")) or (not isinstance(clusters, list)):
        invalid_msg = "Invalid Request! clusters must be a list of strings, action must be \"Start\" or \"Stop\""
        print(invalid_msg)
        return invalid_msg

    # アクションを実行
    for db in clusters:
        try:
            if action == "start":
                print("Start {0} cluster.".format(db))
                response = RDS.start_db_cluster(DBClusterIdentifier=db)
            else:
                print("Stop {0} cluster.".format(db))
                response = RDS.stop_db_cluster(DBClusterIdentifier=db)

        except Exception as e:
            print("Exception: {0}".format(e))

    return {
        'status': "Success!",
        'clusters': "{0}".format(clusters),
        'action':  "{0}".format(action),
    }
IAMを追加(5分)
Lambdaの実行ロールにRDSを再起動できるように追加でポリシーをアタッチします。
{
  "Version": "2012-10-17",
  "Statement": [
    {
      "Effect": "Allow",
      "Action": ["rds:DescribeDBInstances", "rds:StartDBCluster", "rds:StopDBCluster"],
      "Resource": "*"
    }
  ]
}
Slackワークフロービルダーを設定(10分)
以下のコマンドをSlackワークフロービルダーに設定してみましょう。ワークフロービルダーが使えない環境の場合はAWS Chatbotアプリを追加したChannel内で直接Slackに打ち込んでみよう。
DBクラスター起動
SlackからLambda経由でRDSを起動します。clustersに起動したいクラスター名、actionにstartを指定します。
@aws lambda invoke --payload {"clusters": ["<Cluster-1>","<Cluster-2>"], "action":"start"} --function-name <作成したLambda関数名> --region ap-northeast-1
DBクラスター停止
SlackからLambda経由でRDSを停止します。clustersに停止したいクラスター名、actionにstopを指定します。
@aws lambda invoke --payload {"clusters": ["<Cluster-1>","<Cluster-2>"], "action":"stop"} --function-name <作成したLambda関数名> --region ap-northeast-1
おまけ:DBクラスターのステータス確認
ステータス確認はLambdaを経由せずとも直接取得できます。
@aws rds describe-db-instances --query DBInstances[].[DBInstanceIdentifier,DBInstanceStatus] --region ap-northeast-1
さいごに
今回はSlackをトリガーにRDSの上げ下げを紹介しましたが、Amazon EventBridgeと Lambda を連携させれば決まった時間に自動で上げ下げもできるようになります。こちらもセットで設定しておけば、うっかり起動しっぱなしなんてことはなくなるでしょう。またクラスターではなくインスタンスを上げ下げしたいんじゃ、という需要もあります。その場合は、適宜クラスターのところをインスタンスに書き換えてみてください。
追記
インスタンスの起動にも対応したLambda
上記の「Lambdaを書く」のLambdaをカスタマイズしてインスタンスの起動にも対応しました。
"instances"というパラメータを追加しています。
import boto3
RDS = boto3.client('rds')

# Type in {"clusters": ["<cluster-1>", "<cluster-2>"], "instances": ["<instance-1>", "<instance-2>"], "action": "stop"}
def lambda_handler(event, context):

    # 入力チェック
    try:
        clusters = event.get('clusters')
        instances = event.get('instances')
        action = event.get('action')
    except Exception as e:
        invalid_msg = "Failed with: {0}".format(e)
        print(invalid_msg)
        return invalid_msg

    if (not (action == "stop" or action == "start")):
        invalid_msg = "Action must be \"Start\" or \"Stop\""
        print(invalid_msg)
        return invalid_msg

    if (not isinstance(instances, list)):
        invalid_msg = "Instances must be a list of strings"
        print(invalid_msg)
        return invalid_msg

    if (not isinstance(clusters, list)):
        invalid_msg = "Clusters must be a list of strings"
        print(invalid_msg)
        return invalid_msg

    # クラスターのアクションを実行
    for cluster in clusters:
        try:
            if action == "start":
                print("Start {0} cluster.".format(cluster))
                response = RDS.start_db_cluster(DBClusterIdentifier=cluster)
            else:
                print("Stop {0} cluster.".format(cluster))
                response = RDS.stop_db_cluster(DBClusterIdentifier=cluster)

        except Exception as e:
            print("Exception: {0}".format(e))

    # インスタンスのアクションを実行
    for instance in instances:
        try:
            if action == "start":
                print("Start {0} instance.".format(instance))
                response = RDS.start_db_instance(DBInstanceIdentifier=instance)
            else:
                print("Stop {0} instance.".format(instance))
                response = RDS.stop_db_instance(DBInstanceIdentifier=instance)

        except Exception as e:
            print("Exception: {0}".format(e))

    return {
        'status': "Success!",
        'clusters': "{0}".format(clusters),
        'instances': "{0}".format(instances),
        'action':  "{0}".format(action),
    }
Amazon EventBridge を設定
EventBridge を設定すれば、上記で設定したLambdaを決まった時間に起動させることができます。
平日20:00にLambdaを起動
Cronの時間はUTCで指定する点に注意。
[パターンを定義]-[スケジュール]-[Cron式]。
0 11 ? * MON-FRI *
Cron式 詳細
https://docs.aws.amazon.com/AmazonCloudWatch/latest/events/ScheduledEvents.html
Lambdaへのパラメータを設定
[ターゲットを選択]-[入力の設定]-[定数(JSONテキスト)]。
{ "clusters": ["<cluster-1>", "<cluster-2>"], "instances": ["<instance-1>", "<instance-2>"], "action": "start" }