はじめに
ブログや投稿系のアプリを作成するとを考え、Django REST FrameworkとVue.jsを使って、投稿一覧データを取得し画面に表示させるまでの流れを扱いたいと思います。
大まかな流れは以下の通りです。
1. Django REST Frameworkで投稿一覧APIを作成する。
2. フロントのVue.jsからaxiosによってAPIからデータを取得し画面に表示する。
1. Django REST Frameworkの記述
まず、Django REST Frameworkをインストールしsettings.pyのINSTALLED_APPSにrest_frameworkの追加をしてください。
Djangoの設定ディレクトリ名を「config」, アプリケーションディレクトリ名を「apiv1」としています。
models.pyの設定
今回はCategoryモデルとPostモデルと作成しました。
from django.db import models
from django.contrib.auth import get_user_model

class Category(models.Model):
    name = models.CharField(max_length=100)
    slug = models.SlugField(unique=True)

    def __str__(self):
        return self.name


class Post(models.Model):
    category = models.ForeignKey(to=Category, on_delete=models.CASCADE)
    author = models.ForeignKey(get_user_model(), on_delete=models.CASCADE)
    title = models.CharField(max_length=100)
    content = models.TextField()
    published_at = models.DateTimeField(auto_now_add=True)

    class Meta:
        ordering = ['-published_at']

    def __str__(self):
        return self.title
serializers.pyの設定
from rest_framework import serializers
from django.contrib.auth import get_user_model
from .models import Category, Post

class UserSerializer(serializers.ModelSerializer):
    """ユーザーシリアライザー"""
    class Meta:
        model = get_user_model()
        fields = '__all__'


class CategorySerializer(serializers.ModelSerializer):
    """カテゴリシリアライザ"""
    class Meta:
        model = Category
        fields = ('id', 'name')


class PostSerializer(serializers.ModelSerializer):
    """投稿シリアライザ"""
    class Meta:
        model = Post
        fields = '__all__'
views.pyの設定
Viewの指定方法はいくつか種類がありますが、今回は自分が一番わかりやすいと感じたgeneric viewを使いたいと思います。
generic viewは以下のコードにあるようなListAPIView(一覧取得)の他に、CreateAPIView(作成)やRetrieveAPIView(詳細取得)、UpdateAPIView(更新)などがあります。他にもたくさん種類があり、作成, 取得, 削除, 更新によって使い分けることができます。ListCreateAPIViewという一覧取得と作成を行ってくれるものもあります。
from rest_framework import generics
from django.contrib.auth import get_user_model
from .models import Post, Category
from .serializers import CategorySerializer, PostSerializer

class CategoryListAPIView(generics.ListAPIView):
    """カテゴリモデルの取得(一覧)APIクラス"""
    queryset = Category.objects.all()
    serializer_class = CategorySerializer


class PostListAPIView(generics.ListAPIView):
    """投稿モデルの取得(一覧)APIクラス"""
    queryset = Post.objects.all()
    serializer_class = PostSerializer
urls.pyの設定
from django.contrib import admin
from django.urls import path, include
urlpatterns = [
    path('admin/', admin.site.urls),
    path('api/v1/', include('apiv1.urls')),
]
from django.urls import path
from . import views

app_name = 'apiv1'
urlpatterns = [
    path('categories/', views.CategoryListAPIView.as_view()),
    path('posts/', views.PostListAPIView.as_view()),
]
この時点でスーパーユーザーを作成した後admin管理画面からカテゴリおよび投稿をいくつか作成し、 http://127.0.0.1:8000/api/v1/categories/, http://127.0.0.1:8000/api/v1/posts/ にアクセスするとそれぞれ以下のような表示になると思います。
http://127.0.0.1:8000/api/v1/categories/

http://127.0.0.1:8000/api/v1/posts/

これらのデータをVue.js側で呼び出し、表示させたいと思います。
2. Vue.jsの記述
まず最初にaxios, vue-axiosのインストールをしてmain.jsに設定を記述します。
import Vue from 'vue'
import App from './App.vue'
import router from './router'
import store from './store'
import axios from 'axios' //追記
import VueAxios from 'vue-axios' //追記

Vue.config.productionTip = false

Vue.use(VueAxios, axios) //追記

new Vue({
  router,
  store,
  render: h => h(App)
}).$mount('#app')
次にVueRouterを使ってパスを指定します。
今回は http://127.0.0.1:8080/postlist と指定されたら、PostList.vueが表示されるように設定しました。
import Vue from 'vue'
import VueRouter from 'vue-router'
import PostList from '@/components/PostList'

Vue.use(VueRouter)

const router = new VueRouter({
  mode: 'history',
  base: process.env.BASE_URL,
  routes: [
    {
      path: '/postlist',
      component: PostList
    },
  ]
})
PostList.vueファイルに記述していきます。
<template>
  <div>
    <div v-for="(post, key) in Posts" :key="key">
      <hr>
      <p>カテゴリ: {{ post.category }}</p>
      <p>タイトル: {{ post.title }}</p>
      <p>内容: {{ post.content }}</p>
      <p>投稿日: {{ post.published_at}}</p>
      <hr>
    </div>
  </div>
</template>

<script>
export default {
  data() {
    return {
      Posts: []
    };
  },
  mounted() {
    this.axios
      .get("http://127.0.0.1:8000/api/v1/posts/")
      .then(response => (this.Posts = response.data));
  }
};
</script>
http://127.0.0.1:8080/postlist にアクセスすると次の様に表示できました。

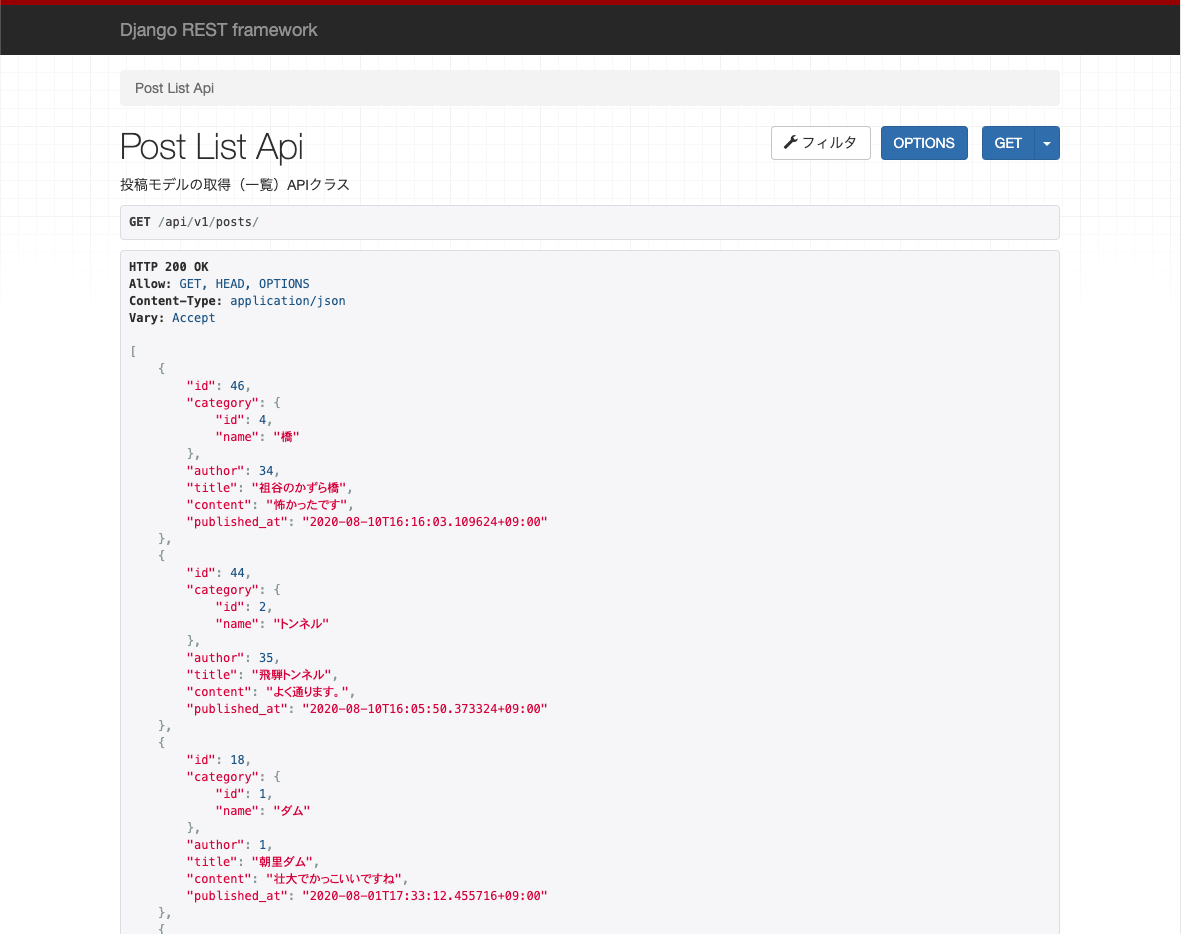
今の段階ではカテゴリが数字(id)で表現されています。今回は文字を表示して欲しいので、Djangoのserializers.pyに追記していきます。
PostSerializerにcategory = CategorySerializer()を追記してカテゴリ名が取得できるようにします。
from rest_framework import serializers
from django.contrib.auth import get_user_model
from .models import Category, Post

class UserSerializer(serializers.ModelSerializer):
    """ユーザーシリアライザー"""
    class Meta:
        model = get_user_model()
        fields = '__all__'


class CategorySerializer(serializers.ModelSerializer):
    """カテゴリシリアライザ"""
    class Meta:
        model = Category
        fields = ('id', 'name')


class PostSerializer(serializers.ModelSerializer):
    """投稿シリアライザ"""
    category = CategorySerializer() #追記

    class Meta:
        model = Post
        fields = '__all__'
そのあともう一度 http://127.0.0.1:8000/api/v1/posts/ にアクセスすると、以下のようになると思います。
CategoryとPostが1対多の関係でありForeignKeyで結び付けられているためcategoryの正体を見ることができました。

最後にPostList.vueの<p>カテゴリ: {{ post.category }}</p>の部分を<p>カテゴリ: {{ post.category.name }}</p>と変更し http://127.0.0.1:8080/postlist にアクセスすると、以下の様にカテゴリ名が正しく表示されるようになりました。

以上がDjangoRestFrameworkとVueを用いてAPIからデータを取得、表示する大まかな流れでした。