並列プログラミングすればCPUを最大限使って処理が速くなる。そういうのを私もやりたい。
環境はWindows 10 64bit / Python3.6.5 / PowerShell端末
PCはIntel(R) Core(TM) i7-8700 CPU @ 3.20GHz / コア6 / 論理プロセッサ数12
子プロセスを実行
まずは練習として子プロセスを実行するところまでやります。
子プロセスを実行し管理するライブラリにsubprocessモジュールがあるので、それを使います。
import subprocess

proc = subprocess.Popen(['echo', 'Hello from the child!'], stdout=subprocess.PIPE, shell=True)
out, err = proc.communicate()
print(out.decode("utf-8"))
"Hello from the child!"
私のPowerShell環境ではshell=Trueが必要でした。
子プロセスを並列実行
子プロセスの実行のやり方がわかったところで、複数の子プロセスを実行してみます。
run_sleep.pyという1秒スリープするだけのプログラムを作成し、それをいくつか並列に実行してみます。
# -*- coding: utf-8 -*-
import time
time.sleep(1.0)
import subprocess
import time

def run_multisleep():
    """ 複数の子プロセスでrun_sleep.pyを実行する """
    def run_sleep():
        proc = subprocess.Popen(["python", "run_sleep.py"])
        return proc

    start = time.time()
    procs = []
    for _ in range(10):
        procs.append(run_sleep())

    for proc in procs:
        proc.communicate()

    end = time.time()
    print("Finished in {} seconds.".format(end-start))

if __name__ == "__main__":
    run_multisleep()
Finished in 1.07468843460083 seconds.
逐次実行したら10秒以上かかるはずなのでできてるっぽいです。
もっと重たい処理でやってみる
時間のかかりそうな画像処理で実験してみます。100枚の人物画像の顔をモザイク画像に加工する処理を行います。プログラムはPython, OpenCVで画像にモザイク処理(全面、一部、顔など)を参考にさせていただいています。
import cv2
from pathlib import Path
import time

IMAGE_PATH = "../../../tmp/image"


def mosaic(src, ratio=0.1):
    small = cv2.resize(src, None, fx=ratio, fy=ratio, interpolation=cv2.INTER_NEAREST)
    return cv2.resize(small, src.shape[:2][::-1], interpolation=cv2.INTER_NEAREST)

def mosaic_area(src, x, y, width, height, ratio=0.1):
    dst = src.copy()
    dst[y:y + height, x:x + width] = mosaic(dst[y:y + height, x:x + width], ratio)
    return dst

def img2mosaic(src, ratio=0.1):
    """ 元画像srcを受け取り、モザイク処理した画像dstを返す """
    cascade_path = "".join(cv2.__path__) + "/data/haarcascade_frontalface_default.xml"
    cascade = cv2.CascadeClassifier(cascade_path)

    src_gray = cv2.cvtColor(src, cv2.COLOR_BGR2GRAY)
    faces = cascade.detectMultiScale(src_gray)

    for x, y, w, h in faces:
        dst = mosaic_area(src, x, y, w, h, ratio)

    return dst


def main():
    """ 100枚の画像から、100枚のモザイク処理した画像を生成する """
    files = Path(IMAGE_PATH + "/origin/").glob("*")
    for file in files:
        src = cv2.imread(str(file))
        dst = img2mosaic(src, ratio=0.01)
        cv2.imwrite(IMAGE_PATH + "/mosaic/" + file.name, dst)

if __name__ == "__main__":
    start = time.time()
    main()
    end = time.time()
    print("Finished in {} seconds.".format(end-start))
Finished in 126.99714469909668 seconds.
逐次処理では約2分かかりました。
これを並列処理に書き換えます。
外部プログラムを呼び出す形にする必要があるので、ちょっと面倒です。親プロセスであるimage2mosaic2_main.pyが、子プロセスとなるimage2mosaic2_sub.pyを呼び出す形に変更しました。子プロセス側でモザイク画像を生成します。
import cv2
from pathlib import Path
import time
import subprocess

IMAGE_PATH = "../../../tmp/image"


def main():
    """ 100枚の画像から、100枚のモザイク処理した画像を生成する
    Popenを使って並列処理でモザイク画像を生成する
    """
    files = Path(IMAGE_PATH + "/origin/").glob("*")
    procs = []
    N = 5  # メモリ不足にならないようにNを適切に設定する必要がある
    for file in files:
        proc = subprocess.Popen(["python", "image2mosaic2_sub.py", str(file), file.name, IMAGE_PATH])
        procs.append(proc)

        if len(procs) == N:
            # メモリ不足で実行に失敗するので、
            # 子プロセスの数がNになったら、一旦全ての子プロセスの終了を待つ
            for proc in procs:
                proc.communicate()
            procs.clear()
    for proc in procs:
        proc.communicate()


if __name__ == "__main__":
    start = time.time()
    main()
    end = time.time()
    print("Finished in {} seconds.".format(end-start))
import cv2
from pathlib import Path
import time
import sys

def mosaic(src, ratio=0.1):
    # 略

def mosaic_area(src, x, y, width, height, ratio=0.1):
    # 略

def img2mosaic(src, ratio=0.1):
    # 略


def main(fullpath, filename, image_path):
    """ 与えられた画像から、モザイク処理した画像を生成する """
    src = cv2.imread(fullpath)
    dst = img2mosaic(src, ratio=0.01)
    cv2.imwrite(image_path + "/mosaic/" + filename, dst)

if __name__ == "__main__":
    """ 親プロセスのimage2mosaic2_main.pyから呼ばれ、子プロセスとして動作する """
    _, fullpath, filename, image_path = sys.argv
    main(fullpath, filename, image_path)
Finished in 56.587809324264526 seconds.
コア数6、論理プロセッサ数12の環境で処理時間は約1分になりました。処理時間は約半分になってます。
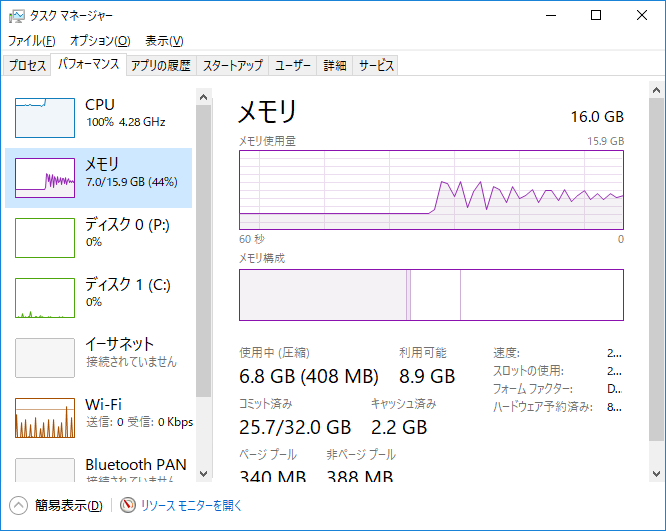
image2mosaic2_main.pyではメモリ不足にならないように子プロセスの起動にN個の制限をかけています。この制限がないと、以下のようなエラーが発生しました。
cv2.error: OpenCV(3.4.4) C:\projects\opencv-python\opencv\modules\core\src\alloc.cpp:55: error: (-4:Insufficient memory) Failed to allocate 1277946880 bytes in function 'cv::OutOfMemoryError'
YouTubeは止まり、Atomが落ちたので気を付けなければなりません。うまくチューニングしてくれる術はないものでしょうか。
concurrent.futuresモジュールを使う
前章では並列化処理にするために処理の一部を外部ファイル化しました。正直面倒くさい。関数呼び出しを並列化するようなことができれば嬉しいので、それができないのかなと調べた結果、コルーチンを使う方法やconcurrent.futuresモジュールのThreadPoolExecutorクラスとProcessPoolExecutorクラスでそういうことができそうです。
今回はThreadPoolExecutorクラスとProcessPoolExecutorクラスを使ってみます。
特にProcessPoolExecutorクラスは、分離した、レバレッジの高いタスクに適しているようです。分離とはプログラムのほかの部分と状態を共有する必要がないということで、レバレッジが高いというのは、少量のデータだけを親と子のプロセス間でやりとりすれば、大量の計算が可能という状況のことを指すようです。
今回のような元画像からモザイク処理した画像を生成するという処理では、別にほかのプログラムと状態を共有していませんし、親と子のプロセス間のやりとりは画像のファイル名やパス名くらいなので、十分適していると思われます。早速使ってみます。
import cv2
from pathlib import Path
import time
from concurrent.futures import ThreadPoolExecutor, ProcessPoolExecutor

IMAGE_PATH = "../../../tmp/image"


def mosaic(src, ratio=0.1):
    # 略

def mosaic_area(src, x, y, width, height, ratio=0.1):
    # 略

def img2mosaic(src, ratio=0.1):
    # 略


def main(file):
    """ 与えられた画像から、モザイク処理した画像を生成する """
    src = cv2.imread(str(file))
    dst = img2mosaic(src, ratio=0.01)
    cv2.imwrite(IMAGE_PATH + "/mosaic/" + file.name, dst)


if __name__ == "__main__":
    files = Path(IMAGE_PATH + "/origin/").glob("*")
    start = time.time()

    #pool = ThreadPoolExecutor(max_workers=6)  # CPUコア数6なので
    pool = ProcessPoolExecutor(max_workers=6)
    results = list(pool.map(main, files)) # list()で囲まないとすぐに終了するので注意

    end = time.time()
    print("Finished in {} seconds.".format(end-start))
Finished in 45.469430923461914 seconds.
Finished in 41.60276937484741 seconds.
今回の場合、ThreadPoolExecutorとProcessPoolExecutorは両者の処理時間は大して変わりませんでした。
処理時間は40秒台で、逐次処理と比較して約1/3の処理時間で済みました。さらに前章でsubprocessモジュールを使った場合と違って、メモリ不足を考慮した記述をしなくても動作してくれました。やさしい。
感想
I/OブロッキングとかバッファとかスレッドセーフやGILとかの話がたくさんあって考えることが多すぎる。
この辺まだ理解しながら実装できてないのでちゃんと身につけていきたい。
おまけ
image2mosaic2_main.pyでメモリ不足の状態
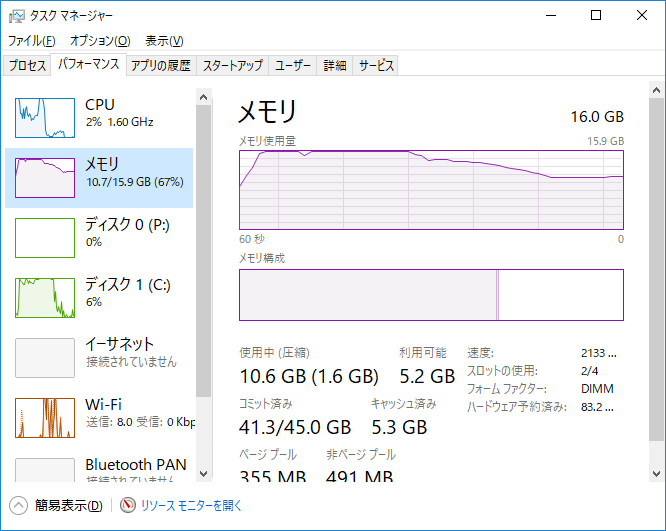
image2mosaic2_main.pyでN=5で処理したときの状態
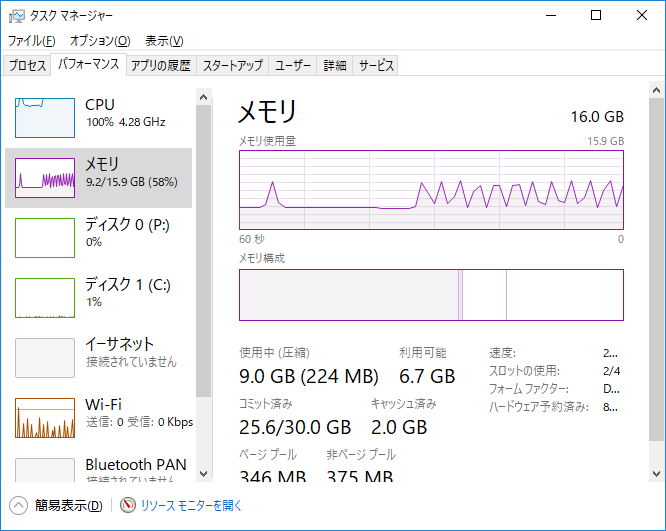
ProcessPoolExecutorを使用したときの処理

子プロセスの終了と同時に次の子プロセスを処理してくれているので、カクカク具合は緩やか。
生成したモザイク処理の画像

PAKUTASO様からダウンロードしました。

