AWS FargateでBlue/Greenの自動デプロイを設定します。
ソースレポジトリにはGitHub、ビルドにはCodeBuild、デプロイパイプラインにはCodePipelineを用います。
自動ビルドの設定は、CloudFormationとマネジメントコンソールを利用します。
※以下の手順を実行すると、AWSのサービス利用料が発生します。
※FargateのBlue/Greenデプロイ設定は完了しているものとします。
※FargateのBlue/Greenデプロイ設定は、以下を参照してください。
※今回のサンプルは以下を利用しています。
https://github.com/Thirosue/cross-accout-deploy-sample
構成イメージ
今回の構成のイメージは下図のとおりです。

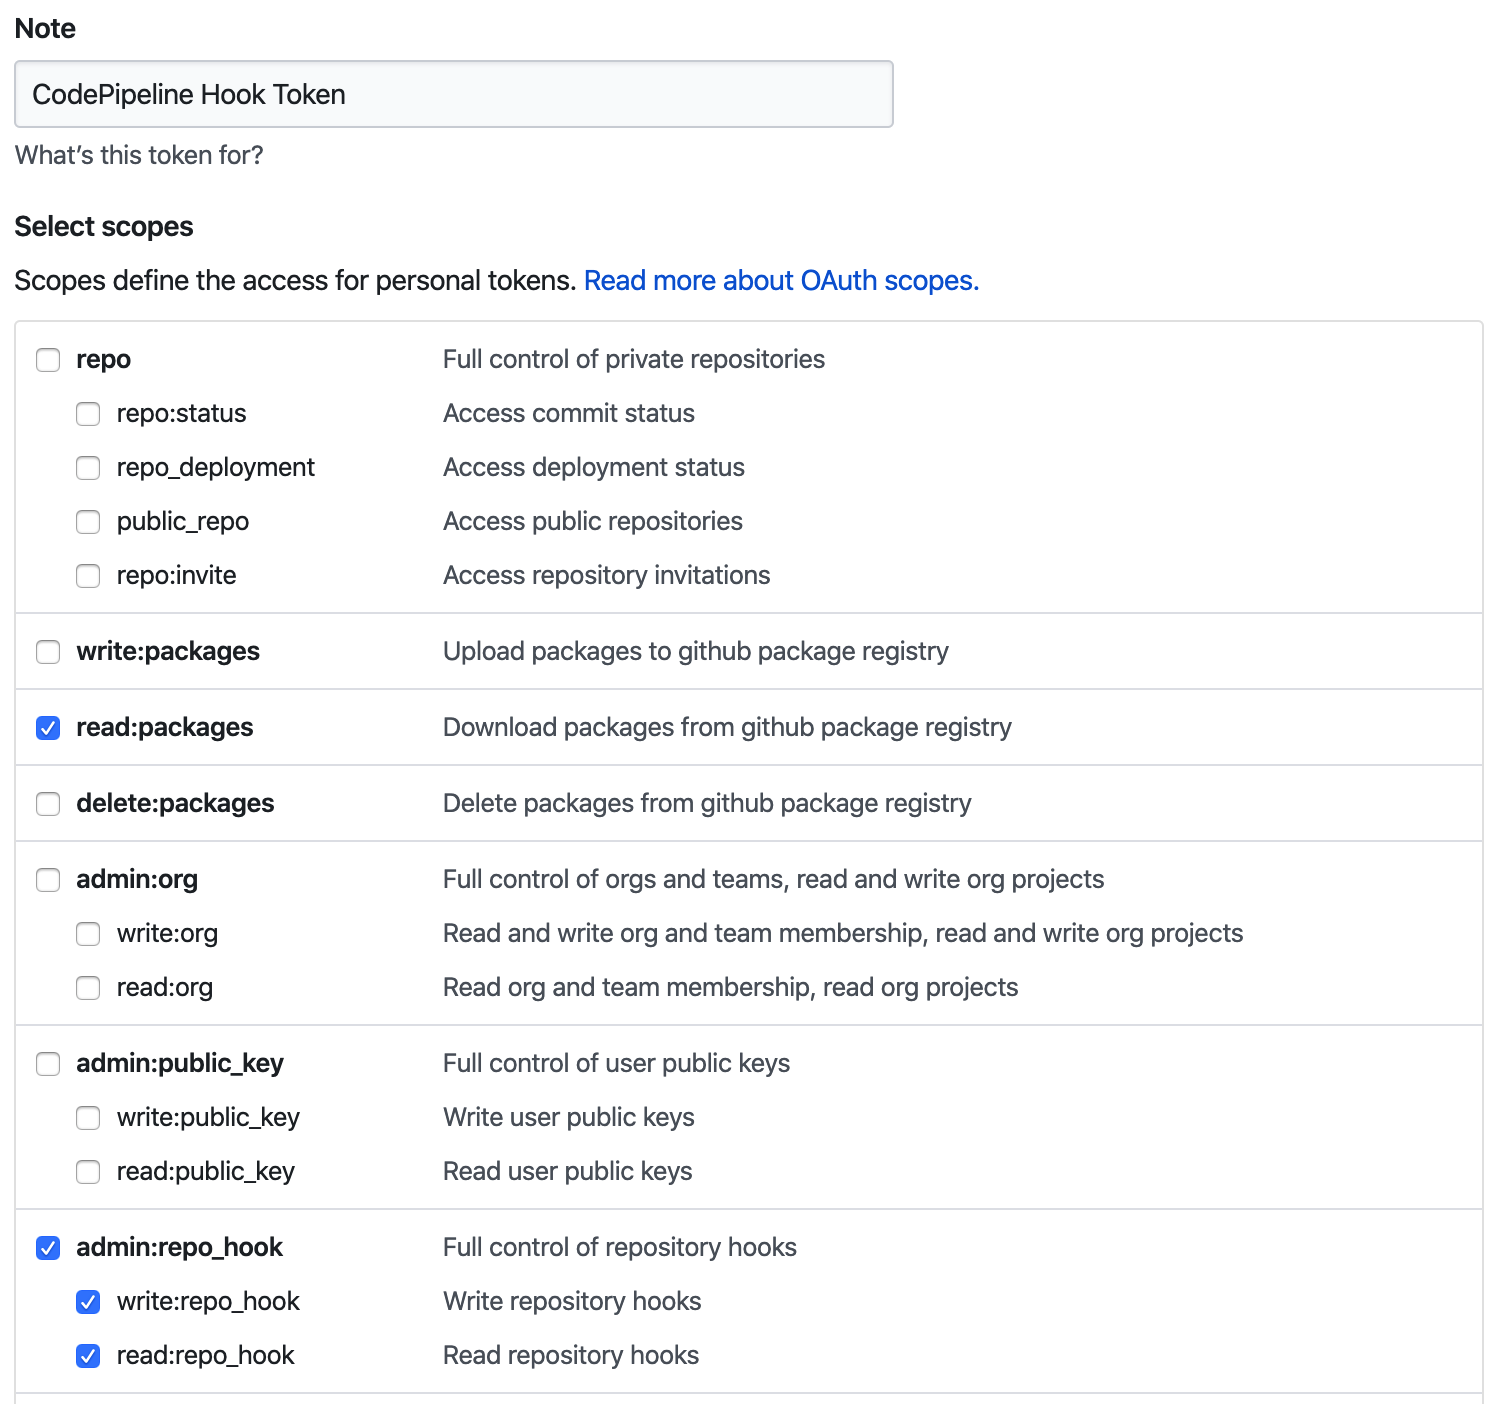
GitHubで認証トークンを作成する
認証トークンの作成の仕方は こちら を参照
認証トークンには
ReadおよびWebhookの権限を付与する
自動ビルド設定(CodeBuild)
Blue/Greenデプロイには以下の3ファイルを作成する必要があります。
- imageDetail.json(ビルドイメージ指定ファイル ※ECSビルドで必要)
- appspec.yaml(CodeDeploy設定ファイル ※ECSの場合、Blue/Greenデプロイでのみ必要)
- taskdef.json(タスク定義ファイル ※ECSの場合、Blue/Greenデプロイでのみ必要)
version: 0.2

phases:
  install:
    runtime-versions:
      docker: 18
  pre_build:
    commands:
      - echo Logging in to Amazon ECR...
      - $(aws ecr get-login --no-include-email --region $AWS_DEFAULT_REGION) #ECRへログイン
      - REPOSITORY_URI=${AWS_ACCOUNT_ID}.dkr.ecr.${AWS_DEFAULT_REGION}.amazonaws.com/${IMAGE_NAME}
      - IMAGE_TAG=$(echo $CODEBUILD_RESOLVED_SOURCE_VERSION | cut -c 1-7) #リリースタグを生成
      - echo AWS Account Setiing ...
      - sed -i -e "s/__ACOUNTID__/$AWS_ACCOUNT_ID/" taskdef.json #ビルド実行AWSアカウントで置換
  build:
    commands:
      - echo Build started on `date`
      - echo Vue.js Project Building...
      - docker run --rm -v $(pwd):/work node:lts /bin/bash -c "cd /work && yarn && yarn build" #安定版(LTS)でビルド
      - cp -r dist docker/
      - echo Building the Docker image...
      - docker build -t $REPOSITORY_URI:latest docker/
      - docker tag $REPOSITORY_URI:latest $REPOSITORY_URI:$IMAGE_TAG
  post_build:
    commands:
      - echo Pushing the Docker image...
      - docker push $REPOSITORY_URI:latest
      - docker push $REPOSITORY_URI:$IMAGE_TAG
      - echo Writing image definitions file...
      - printf '{"Version":"1.0","ImageURI":"%s"}' $REPOSITORY_URI:$IMAGE_TAG > imageDetail.json #イメージ指定ファイルを出力
      - cat imageDetail.json
artifacts:
  files:
    - appspec.yaml
    - taskdef.json
    - imageDetail.json
※設定ファイルの全量は以下を参照してください。
https://github.com/Thirosue/cross-accout-deploy-sample/blob/master/buildspec.yml
デプロイパイプライン設定(CodePipeline)
CloudFormationとマネジメントコンソールで設定します。
Buildステージまでの設定
CloudFormationでBuildステージまで設定します。
->GitHubOAuthTokenには、上記で取得した認証トークンを設定する
->ProdAccountは任意の値を設定する(本記事では利用しない)

  SampleCodeBuild:
    Type: AWS::CodeBuild::Project
    Properties:
      Artifacts:
        Type: CODEPIPELINE
      Source:
        BuildSpec: buildspec.yml
        Type: CODEPIPELINE
      Environment:
        ComputeType: BUILD_GENERAL1_SMALL
        Image: aws/codebuild/standard:3.0
        Type: LINUX_CONTAINER
        PrivilegedMode: true
        EnvironmentVariables:
          - Name: AWS_ACCOUNT_ID
            Type: PLAINTEXT
            Value: !Ref AWS::AccountId
          - Name: AWS_DEFAULT_REGION
            Type: PLAINTEXT
            Value: !Ref AWS::Region
          - Name: CONTAINER_NAME
            Type: PLAINTEXT
            Value: front
          - Name: IMAGE_NAME
            Type: PLAINTEXT
            Value: !Sub ${ServiceName}
      LogsConfig:
        CloudWatchLogs:
          Status: ENABLED
      Name: !Sub ${ServiceName}-codebuild
      ServiceRole: !Ref CodeBuildServiceRole

  SampleCodePipeline:
    Type: AWS::CodePipeline::Pipeline
    Properties:
      Name: !Sub ${ServiceName}-codepipeline
      RoleArn: !GetAtt CodePipelineServiceRole.Arn
      ArtifactStore:
        Type: S3
        Location: !Ref ApplicationDeployArtifactBucket
      Stages:
        - Name: Source
          Actions:
            - Name: download-source
              ActionTypeId:
                Category: Source
                Owner: ThirdParty
                Version: 1
                Provider: GitHub
              Configuration:
                Owner: !Ref GitHubOwner
                Repo: !Ref GitHubRepositoryName
                OAuthToken: !Ref GitHubOAuthToken
                Branch: master
              OutputArtifacts:
                - Name: SourceOutput
        - Name: Build
          Actions:
            - Name: BuildAction
              ActionTypeId:
                Category: Build
                Owner: AWS
                Version: 1
                Provider: CodeBuild
              Configuration:
                ProjectName: !Ref SampleCodeBuild
              RunOrder: 1
              InputArtifacts:
                - Name: SourceOutput
              OutputArtifacts:
                - Name: BuildOutput
※CloudFormationの全量は以下を参照してください。
https://github.com/Thirosue/cross-accout-deploy-sample/blob/master/provisioning/pipeline.yaml
Deployステージの設定
上記で作成したパイプラインに
Deployステージを追加します。

Deployアクションを追加する。
->Amazon ECS(ブルー/グリーン)を選択し、ビルドで作成したBuildOutputを入力アーティファクトに指定します。


自動デプロイ確認
変更を
GitHubにPushします。
->サンプルプロジェクトであれば、index.htmlのタイトルを修正してみてください。
以下のとおり正常にデプロイされるはずです。
