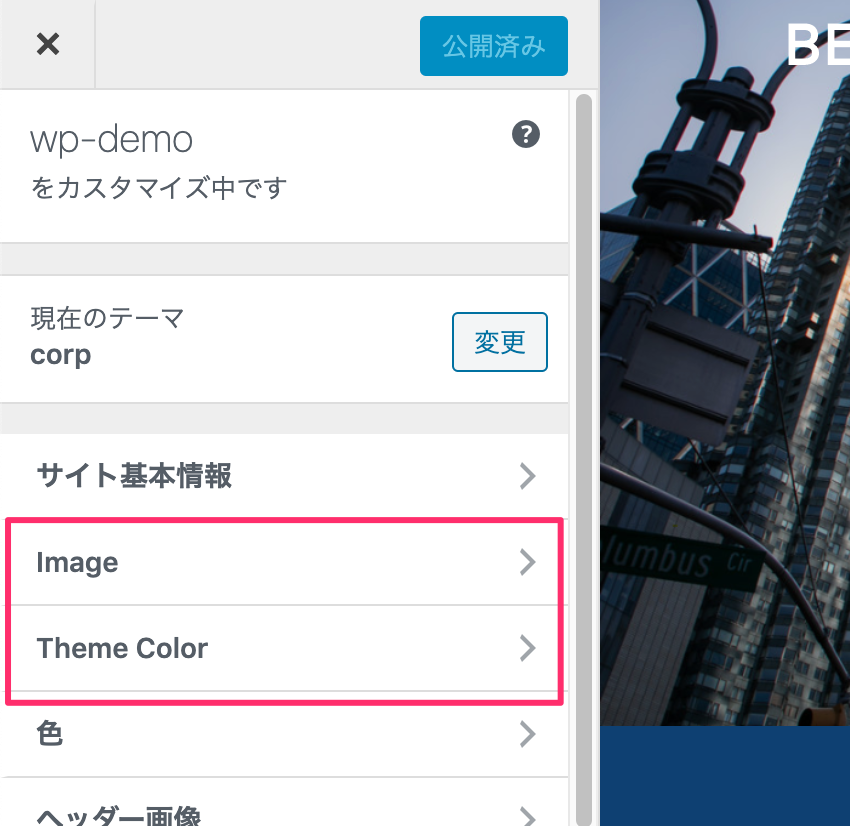
カスタマイザーを使うことでロゴやヘッダー画像のアップロード、テーマカラーの設定などWordpressテーマの様々なオプション設定ができるようになる。
カスタマイザーを作成する方法
functios.phpに以下のコードを追記する。
function mytheme_customize_register( $wp_customize ) {
  // セクション(グループ)を作成
  $wp_customize->add_section( 'theme_color' , array(
		'title'      => __( 'Theme Color', 'text_domain' ),
		'priority'   => 21,
	) );
  // データベースに新しい設定項目を登録
	$wp_customize->add_setting( 'color_base' , array(
    'default'   => '#fff',
		'transport' => 'refresh',
		'sanitize_callback' => 'sanitize_hex_color',
	) );
  // 管理画面に表示するコントローラ(フォーム)を登録
	$wp_customize->add_control( new WP_Customize_Color_Control( $wp_customize, 'color_base', array(
		'label'      => __( 'Base Color', 'text_domain' ),
		'section'    => 'theme_color',
		'settings'   => 'color_base',
	) ) );

  // 画像のアップロードの場合
	$wp_customize->add_section( 'theme_image' , array(
		'title'      => __( 'Image', 'text_domain' ),
		'priority'   => 20,
	) );
	$wp_customize->add_setting( 'logo_upload' , array(
		'transport' => 'refresh',
		'sanitize_callback' => 'text_domain_sanitize_file',
	) );
	$wp_customize->add_control( new WP_Customize_Image_Control( $wp_customize, 'logo', array(
		'label'      => __( 'Upload a logo', 'text_domain' ),
		'section'    => 'theme_image',
		'settings'   => 'logo_upload',
	)));
}

// カラー設定をCSSで表示するための関数、wp_headで呼び出し
function header_output() {
	$color_base = get_theme_mod('color_base', '#fff');
	$css = '
	/**
	 * custom theme
	 */
	body { color: '.$color_base.'; }
	'
  ?>
	<style type="text/css">
		<?php echo $css; ?>
	</style>
	<?php
}
// 画像用サニタイザー、ファイルタイプをチェックする
function text_domain_sanitize_file( $file, $setting ) {
  //allowed file types
  $mimes = array(
    'jpg|jpeg|jpe' => 'image/jpeg',
    'gif'          => 'image/gif',
    'png'          => 'image/png'
  );

  //check file type from file name
  $file_ext = wp_check_filetype( $file, $mimes );

  //if file has a valid mime type return it, otherwise return default
  return ( $file_ext['ext'] ? $file : $setting->default );
}

// カスタマイザーの登録
add_action( 'customize_register', 'mytheme_customize_register' );

// headに設定したCSSを表示
add_action( 'wp_head' , 'header_output' );
カスタマイザーにオプションを登録するには以下の3つの設定を行う必要がある。
- section: オプションのグループを作る
- setting: オプションの設定をデータベースに登録
- control: オプションの表示(フォームやラベルなど)を設定
コードを追記してカスタマイザーを表示すると、画像のように項目が追加される。

カスタマイザーのデータをテンプレートに表示する方法
上記のコードの場合、headで出力するものはアクションの登録で自動的に表示される。
画像はアップロードしたデータをテンプレート側で取得して表示する必要がある。
取得方法は、get_theme_mod()で登録した設定名を指定するだけ。
<?php if( get_theme_mod('logo_upload') ): ?>
  <h1><img src="<?php echo get_theme_mod('logo_upload'); ?>" alt="logo"></h1>
<?php endif; ?>