はじめに
某プログラミングスクールで、担当した実装を復習していきたいと思います。
今回は、出品・取引中・売却済みのこの3つをクリックした際に、それぞれにあった商品を
表示させる実装を行いました。
これを実装するにあたって、1つのテーブル内に複数の外部キーを設定する必要があり、
ここで詰まったため、記録として残していきます。
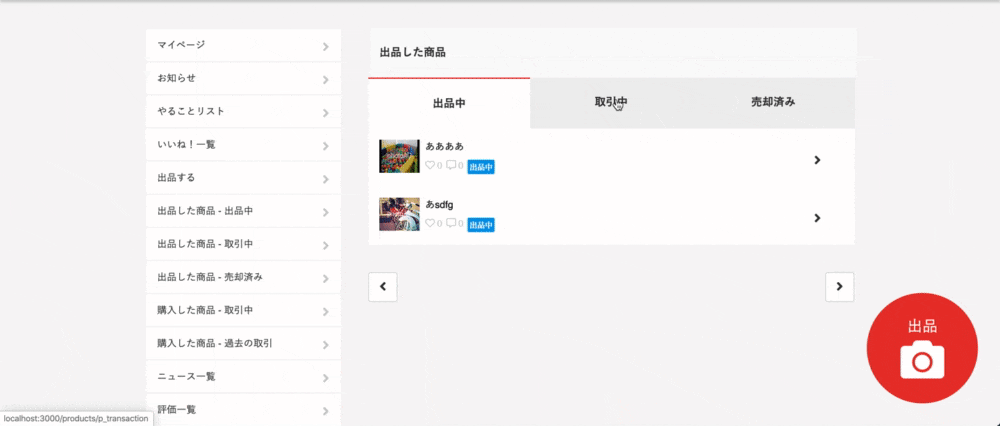
ちなみにこんな感じの実装をしていきます。
工程
今回は、工程を以下に分けて説明をしていきます。
1.実装の大まかな説明とマイグレーションファイルの作成
2.モデルの作成
3.コントローラーの作成
4.hamlでの条件分岐設定
の順で行っていきます。
少し、長いですががんばっていきましょう。
解説
1.実装の大まかな説明とマイグレーションファイルの作成
はじめに出品中・取引中・売却済みを区別するために、
productというテーブル内に、seller_id・auction_id・buyer_idという
userと紐づく外部キーを3つ設定しました。
そして、出品中の際には、productのレコードの中から
seller_id(出品者)にだけ値が入っているレコードをDBから引っ張って来ています。
取引中の場合は、seller_id(出品者)とauction_id(取引者)がいる
productのレコードをDBから引っ張ってきています。
売却済みの場合は、seller_id(出品者)とbuyer_id(買取者)がいる
productのレコードをDBから引っ張って来ることで、
それぞれを区別してDBから取得してきています。
マイグレーションファイルはこんな感じです。
*今回の実装であれば、user側はテーブルを作成しidがあればOKだと思います。
class CreateProducts < ActiveRecord::Migration[5.2]
  def change
    create_table :products do |t|
      t.string :name, null: false
      t.references :seller, foreign_key: {to_table: :users}
      t.references :buyer, foreign_key: {to_table: :users}
      t.references :auction, foreign_key: {to_table: :users}
      t.timestamps
    end
  end
end
「詰まったポイント その1」
(1)foreign_key: {to_table: :users}
通常であれば、
t.references :user, foreign_key: true
foreign_key: trueのみで外部キーを設定できるのですが、
今回のように、同じテーブル内に複数の外部キーを設定する場合、
foreign_key: trueで定義してしまうと、
カラム名がテーブル名_idになってしまうため、
複数カラムを設定したいときにうまくいかないことがありました。
そのため、{to_table: :テーブル名}で今回使用するテーブルを直接指定する必要があるようです。
「参考記事」

2.モデルの作成
class Product < ApplicationRecord
  belongs_to :seller, class_name: "User", optional: true,foreign_key: "seller_id"
  belongs_to :buyer, class_name: "User", optional: true,foreign_key: "buyer_id"
  belongs_to :auction, class_name: "User", optional: true,foreign_key: "auction_id"
end
各、外部キーをuserとアソシエーションを組んでいます。
class User < ApplicationRecord
  has_many :saling_items, -> { where("seller_id is not NULL && buyer_id is NULL") }, class_name: "Product"
  has_many :sold_items, -> { where("seller_id is not NULL && buyer_id is not NULL && auction_id is NULL") }, class_name: "Product"
  has_many :auction_items, -> { where("seller_id is not NULL && auction_id is not NULL && buyer_id is NULL") }, class_name: "Product"
end
次に、user.rbに焦点を当てて説明をしていきます。
has_many :saling_items, -> { where("saler_id is not NULL && buyer_id is NULL && auction_id is NULL") }, class_name: "Product"
この1文は、出品中のアイテムをproductのレコードから取得するための記述となっています。
今回でいう、出品中の商品とは言い換えると、
「seller_id(出品者)はいるが、まだ、buyer_id(買取者)またはauction_id(取引者)はいないproductのレコード」
を取得すればいいという形となるため、
上記のwhereの記述で制限することで、:saling_itemsカラムには
出品中の商品のみが取得できるという感じです。
has_many :auction_items, -> { where("seller_id is not NULL && auction_id is not NULL && buyer_id is NULL") }, class_name: "Product"
次に、取引中の商品の記述になります。
取引中は言い換えると
「seller_id(出品者)とauction_id(取引者)のユーザーが存在し、buyer_id(買取者)はまだ存在していないproductレコード」
という形となるため、
上記のwhereでの制限となっています。
has_many :sold_items, -> { where("seller_id is not NULL && buyer_id is not NULL && auction_id is NULL") }, class_name: "Product"
最後に、売却済みの商品の記述です。
売却済みは言い換えると
「seller_id(出品者)とbuyer_id(買取者)は存在するが、auction_id(取引者)は存在していないproductレコード」
ということになるため、
上記のwhereでの制限となっています。
これで、とりあえずはproductとuser間のアソシエーションは終了です。
「参考記事」

3.コントローラーの作成
1.2の記述で、マイグレーションファイルとアソシエーションを組んだため、
コントローラーでその取得したデーターを取り出す記述を行っていきます。
class ProductsController < ApplicationController
  before_action :set_current_user_products,only:[:p_transaction,:p_exhibiting,:p_soldout]
  before_action :set_user,only:[:p_transaction,:p_exhibiting,:p_soldout]


  def p_exhibiting #出品中のアクション

  end

  def p_transaction  #取引中のアクション

  end

  def p_soldout    #売却済みのアクション

  end

  private

  def set_current_user_products
    if user_signed_in?
      @products = current_user.products.includes(:seller,:buyer,:auction,:product_images)
    else
      redirect_to new_user_session_path
    end
  end

  def set_user
    @user = User.find(current_user.id)
  end
end
*product.conrollerで行っていますが、productとuserでネストをしている場合は、
user.controllerへ上記の記載をしても大丈夫だと思います。
*current_userを使用しているため、ログインしていない場合idがないため、
エラーが出てしまうことがあります。
その際は、DBへの直打ち等でユーザーを存在させる必要があると思います。(ここはあまり自信がないので、この方法でエラーをはいてしまったら、すみません。)
【解説】
@user = User.find(current_user.id)
この1行によって、まずはログインしているユーザーのレコードを
取得している形となっています。
    if user_signed_in?
      @products = current_user.products.includes(:seller,:buyer,:auction,:product_images)
    else
      redirect_to new_user_session_path
    end
この記述によって、ログインしているユーザーが所持しているproductレコードのみを取得していきます。
「詰まったポイント その2」
(1)上記で、指定のuserやprodutのレコードの取得はできた。
だが、そもそもproductテーブルに複数のカラムを指定したが、どうやって・どのタイミングで狙ったidへいれるのかがわかりませんでした。
「解決策」
  def new
    @product = Product.new
    @product.product_images.new
  end

  def create
    @product = Product.new(product_params)
    if @product.save
      redirect_to root_path
    else
      redirect_to new_product_path,data: { turbolinks: false }
    end
  end

  private
  def product_params
    params.require(:product).permit(:name product_images_attributes: [:image, :_destroy]).merge(seller_id: current_user.id) #productやご自身のカラムに合わせて変更してください。
  end
まず、seller_idとは、出品者がもつidなため、出品する段階のnew・createの段階で、
そのユーザーが持っているidをseller_idへいれることによって解決しました。
@product.update(buyer_id: current_user.id)
また、buyer_idに関しては、上記の一行を購入する画面でいれることによって実装しました。
4.hamlでの条件分岐設定
最後に、コントローラーで取得してきた値を繰り返し処理する記述を加えていきます。
上記の画像のように、productに指定したレコードがある場合と、
ない場合で表示の仕方を変更する必要があるため、以下でif文による条件分岐を行っていきます。
- if @user.saling_items.present?
  - @user.saling_items.each do |product|
    = link_to product_path(product),data: { turbolinks: false },class:"item_content" do
      .item_content__image
        = image_tag product.product_images[0].image.to_s,size:"58x48"
      .item_content__right
        .item_content__right--name
          =product.name
        .item_content__right__good
          .item_content__right__good--goods
            = icon("far","heart")
            0
          .item_content__right__good--comment
            = icon("far","comment-alt")
            0
          .item_content__right__good--exhibition
            出品中
      = icon('fas', 'angle-right', class: 'item_content__icon')
- else
  .pmain__bottom
    = image_tag "", class: "pmain__bottom--img", size: "100x100"
    .pmain__bottom--text
      出品中の商品がありません
*今回は、長いため出品中のみの記載としています。
特に重要な部分を記載していきます。
- if @user.saling_items.present?
この一行で、userのsaling_itemsがある場合は以下に記述した
- @user.saling_items.each do |product|
のsaling_itemsを繰り返すようにしています。
以上です。
最後に
長い行を読んでいただきありがとうございました。
所々、切り抜いて記事を書かせて頂いているため、間違っている箇所があった際には、
私の記述でエラーを起こしてしまい申し訳ありません。
また、間違っている箇所がありましたら、コメントをいただけると幸いです。
ご視聴ありがとうございました。