0. これは何のメモか?
マイコン通信の基礎であるCOMポートを使ったシリアル通信を学んだ次の段階として、TCP/IP通信上の通信実験を行う。実験の最中は無線LANでのインターネットアクセスは不可にする。
少ない人数での実験であれば、Bluetooth接続や無線LAN接続も考えられる。今回は、受講生が公式配付イメージをSDカードに書き込んで持参してくれば、実験グループごとに個別のネットワーク環境を構築し、グループの数が多くなっても同一条件で実験できるように、クロスケーブルでWindowsノートパソコンと小さなLinux Box(具体的にはRaspberry PiあるいはEV3)をクロスケーブルで有線接続する形で実験する。
なお、こちらで実験に用意しているUSB-イーサネットIFとRaspberry Pi3はAuto-MDI/MDIX仕様なので、実は、ストレートケーブルでも接続できる。
(以前は、ミニLinux Boxのイメージを個別に用意し、ブート時にミニLinux Box側に固定のIPアドレスを割り振っていたが、公式配付イメージを持参すれば、ネットワーク接続なしで実験環境の構築ができるように、Windows PC側でOpen DHCP Serverを立てる形にした。)
実際にモータを駆動するev3側のプログラムは以下にある。
https://qiita.com/takelab/items/ed4435f0278fd58fd286
なお、次のソフトはあらかじめインストールしておく
- TeraTerm
- WinSCP
※もちろんインストールしてあるなら、更新する必要はない。
1. OPEN DHCP Server
以下から「OpenDHCPServerInstallerV1.73.exe」をダウンロードする。
http://dhcpserver.sourceforge.net/
2019.4.8現在
※念のため実験中は、実験室に準備されたPC以外、各自のPCや携帯電話の無線LANとBluetoothをオフにすること。
1.1 Open DHCPサーバのインストール
- OpenDHCPServerのインストーラーexeファイルを右クリック「管理者による実行」でインストール
残念ながら日本語の言語選択はできない。
インストールが終わると以下の画面が出る。
チェックのままにして、windowsのサービスとして起動することに注意して、finishボタンを押すこと。
インストール中のデフォルトフォルダを変えていなければ、
C:\OpenDHCPServer以下にpdfのマニュアル等があり、スタートメニューにもOpenDHCPServerのフォルダができる。
1.2 イーサネットインターフェースの設定
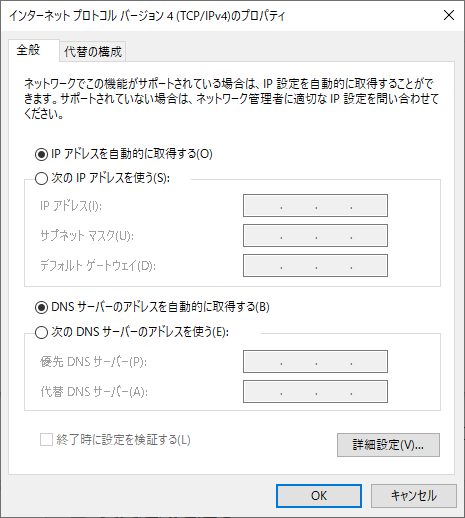
Windowsマシン側のイーサネットを自動IPではなく以下の固定IP(IPv4)に設定
(※実験が終わったら自動に戻すことを覚えておくこと)
スタートメニュー右クリック→ネットワーク接続→アダプターのオプションを変更する→イーサネットで右クリック-プロパティ→インターネットプロトコルバージョン(TCP/IPv4)のプロパティを選択
IPアドレスの自動的設定のチェックを外し、その下の空白項目欄に以下の設定を書き込む
IPアドレス: 192.168.137.5
サブネットマスク: 255.255.255.0
ゲートウェイ: 192.168.137.5
DNSについては自動的に取得するのままにするか、192.168.137.5を使う(IPアドレスで直接アクセスするので、イーサネットのクロスケーブル接続においてはDomain Nameは必要ない)。
1.3 OpenDHCPServer.iniの設定
以下のOpenDHCPServer.iniをC:\OpenDHCPServerにコピーする。
もともとのOpenDHCPServer.iniは、OpenDHCPServer.ini.bkupとでも改名して、バックアップしておく。
# This is configuration file, may need editing
# Any line starting with a punctuation character will be a comment
# You need to remove ' from begining of values and replace with your
# own values below if you need change settings.

[LISTEN_ON]
# Specify the Interfaces you would like Server to listen
# if you have more than one NIC card on your server
# always specify which cards will listen DHCP/DNS requests
# Requests from diffent Interfaces look for matching DHCP ranges.
# Requests from relay agents look for matching range to relay agent IP.
# upto 125 interfaces can be specified
# Default is All static Interfaces
;192.168.0.1
192.168.137.5

[LOGGING]
# LogLevel can be set as None, Errors or All
# It is advisable to keep logging to Normal, Normal include errors
# and DHCP renewal messages. Normal is defaul logging also.
;LogLevel=None
;LogLevel=Normal
;LogLevel=All

[REPLICATION_SERVERS]
# You can have 2 instances of Open DHCP Servers in a network. Open DHCP Server
# will send replication inform messages to other instance of Open DHCP
# server and leases will be replicated. The IP address alloted by one server
# will not be realotted by other server to another host. Also when one server
# goes down, other can will renew the leases, without NAK and DISCOVER. You need
# to specify Primary and secondary servers for replication to work.
# Make sure that Primary & Secondary Server entries are identical on both
# servers. You should copy the entire ini file on both servers and change the
# LISTEN_ON on individual servers, if needed.
;Primary=192.168.0.253
;Secondary=192.168.0.254


[HTTP_INTERFACE]
# This is http inerface for viewing lease status,
# Default is 127.0.0.1:6789
# You can change it here to any network interface.
;HTTPServer=192.168.55.1:6789
# Also to limit the clients access, you can specify upto 8
# HTTP client IPs Here. If no Client IP is specified then All
# Clients can access the HTTP Interface
;HTTPClient=192.168.0.11
;HTTPClient=192.168.23.123
# You can also change the title of html page
;HTTPTitle=This is Custom Title

[RANGE_SET]
# This is first and simple DHCP range section example,
# This example may be good enough for simple/home use.
# If you need range filters, look at example below
DHCPRange=192.168.137.6-192.168.137.254
;DHCPRange=192.168.5.1-192.168.5.254

# Following are range specific DHCP options.
# You can copy more options names from [GLOBAL_OPTIONS]
SubnetMask=255.255.255.0
;SubnetMask=255.255.255.0
;DomainServer=192.168.55.252
# Router is default gateway
Router=192.168.137.5
;Router=192.168.0.1
# Lease Time can be different for this Range
;AddressTime=360

[GLOBAL_OPTIONS]
# These are global DHCP Options and would supplement
# client specific options and [RANGE_SET] options.
# Options tags start with 1 and goes up to 254, you can
# always specify option like 1=255.255.255.0, but it may
## I removed text from here ##.
1.4 Windowsサービス設定の確認
サービスの起動条件を確認する。

自動に設定されているなら、「Open DHCP Server」を右クリック-プロパティから起動条件を手動しておく。
2. OpenDHCPServerの起動
※ここから先は実際の実験で!(ここから上のことを事前に準備しておくこと)
2.1以降は、あらかじめ読んで良くこと。
2.1 Stand Aloneで起動する。
接続手続きクロスLANケーブルを接続し、スタートメニューからOpenDHCPServerのstandaloneでサービスを開始(Ctl+Cで終了)
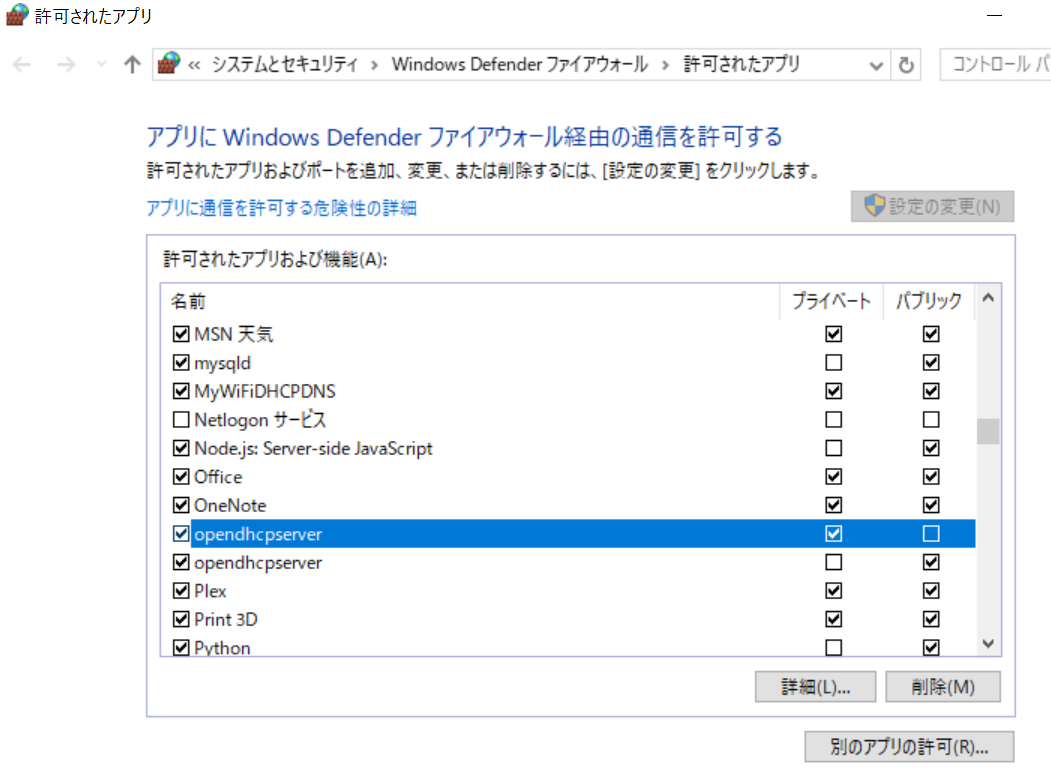
Windowsのファイアウォールの設定と選択には、プライベートとパブリックの2種類がある。どちらでも適切に設定していれば、その端末ではインターネットに接続できる。異なるのは、ファイアウォールの設定。
「プライベート」だと、同じネットワーク内の他のPCから自分のPCを検索でき、ファイルやプリンターを共有することができる。
「アクセスを許可する」を押す。
この許可によりWindowsのファイアウォールの設定が決まる。設定を元の状態に戻す方法等は2.3で説明する。
ここでは、とりあえず、尋ねられるがままに許可しておく。

サーバを起動するとコンソールが表示される。
ただし、それだけはクロスケーブルの相手側の電源が入っていないので、イーサネットが繋がれていないと判断される。
Open DHCP Server Version 1.73 Windows Build 1051 Starting...
Logging: Normal
Warning: Section [LISTEN_ON] Interface 192.168.137.5 is not found, ignored
    :
Detecting Static Interfaces..
Warning: Section [LISTEN_ON] Interface 192.168.137.5 is not found, ignored
No Static Interface ready, Waiting...
2.2 ミニLinux Boxの電源を入れる。
電源をいれると、
Open DHCP Server Version 1.73 Windows Build 1051 Starting...
Logging: Normal
Warning: Section [LISTEN_ON] Interface 192.168.137.5 is not found, ignored
Warning: No IP Address for DHCP Static Host 00:ff:a4:0e:ef:99 specified
Warning: No IP Address for DHCP Static Host ff:00:27:78:7b:01 specified
Warning: No IP Address for DHCP Static Host ff:00:27:78:7b:02 specified
Warning: No IP Address for DHCP Static Host ff:00:27:78:7b:03 specified
Default Lease: 36000 (sec)
Server Name: hogehoge
Detecting Static Interfaces..
Warning: Section [LISTEN_ON] Interface 192.168.137.5 is not found, ignored
No Static Interface ready, Waiting...
Network changed, re-detecting Static Interfaces..
Warning: Section [LISTEN_ON] Interface 192.168.137.5 is not static, ignored
No Static Interface ready, Waiting...
Network changed, re-detecting Static Interfaces..
Warning: Section [LISTEN_ON] Interface 192.168.137.5 is not static, ignored
No Static Interface ready, Waiting...
Network changed, re-detecting Static Interfaces..
Warning: Section [LISTEN_ON] Interface 192.168.137.5 is not static, ignored
No Static Interface ready, Waiting...
Network changed, re-detecting Static Interfaces..
Lease Status URL: http://127.0.0.1:6789
Listening On: 192.168.137.5
DHCPDISCOVER for b8:27:eb:e7:c7:a0 (raspberrypi) from interface 192.168.137.5 received
Host b8:27:eb:e7:c7:a0 (raspberrypi) offered 192.168.137.6
DHCPREQUEST for b8:27:eb:e7:c7:a0 (raspberrypi) from interface 192.168.137.5 received
Host b8:27:eb:e7:c7:a0 (raspberrypi) allotted 192.168.137.6 for 36000 seconds
netstat -a で確認すると
ポート67が開いている。
67はDHCPサーバー側のポート番号(サーバからクライアント側が受け取るポートは68)
2.3 Windowsファイアウォールの確認
ファイアウォールの詳細(ポート)レベルの設定についても以下のポートについて状態を念のため、確認しておく。
スタートメニュー→設定(歯車印)→ネットワークとインターネット→Windowsファイアウォール→詳細設定
スタートメニュー→ファイアウォールで検索→Windowsファイアウォールによるアプリケーションの許可

2.4 ミニLinux BoxのIPv4アドレスの取得後
teraterm等でアクセス
まず、PC側コマンドプロンプトから以下のアドレスへping
自分自身: 192.168.137.5
モータサーバ:192.168.137.nn
※nnはモータサーバ番号:モータサーバのIPアドレスはLegoEV3の液晶上部に表示される。
ev3devの場合のデフォルトのユーザとパスワードは、
それぞれ、robot
password: maker
(Raspberry Piであればユーザ名は「pi」)
実際のモータ駆動実験の内容
https://qiita.com/takelab/items/ed4435f0278fd58fd286
ここから先は、Seiji Matsumoto先生のドキュメントが非常に助かる。
http://yakushi.shinshu-u.ac.jp/robotics-ev3/
http://yakushi.shinshu-u.ac.jp/robotics/?EV3
3. 接続終了時の注意
DHCPサーバの終了(コマンドプロンプトのウィンドウを閉じる)
イーサネットアダプタのプロパティIPv4のアドレス取得を自動取得に戻す
参考にしたページ(ありがとうございました)
Open DHCP Server.ini設定の記事
http://www.sir-2.net/dablg/index.php?e=5831
Open DHCP Serverのqitta記事
https://qiita.com/tmiki/items/d5965ee767378cf7f13f
Windowsファイアウォールの設定
https://www.buffalo.jp/support/faq/detail/792.html
EV3については
http://yakushi.shinshu-u.ac.jp/robotics-ev3/
http://yakushi.shinshu-u.ac.jp/robotics/?EV3


