hitTest(:with:)メソッドについて、具体例を用いてわかりやすく解説してみたいと思います。
検証用アプリの実装
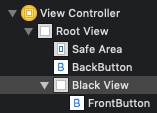
ビュー階層と画面
FrontButtonはBlackViewの上に重なっています。
BackButtonはBlackViewの背後にあり、タップできない位置にあります。
実装
愚直なやり方ですが、各メソッドにprintを仕込んで、メソッドが呼び出される様子を観察します。
class RootView: UIView {
    override func hitTest(_ point: CGPoint, with event: UIEvent?) -> UIView? {
        print("RootView hitTest(:with:)")
        return super.hitTest(point, with: event)
    }

    override func point(inside point: CGPoint, with event: UIEvent?) -> Bool {
        let result = super.point(inside: point, with: event)
        print("RootView point(inside:with:): \(result)")
        return result
    }

    override func touchesBegan(_ touches: Set<UITouch>, with event: UIEvent?) {
        print("RootView touchesBegan(:with:)")
        super.touchesBegan(touches, with: event)
    }
}

class FrontButton: UIButton {
    override func hitTest(_ point: CGPoint, with event: UIEvent?) -> UIView? {
        print("FrontButton hitTest(:with:)")
        return super.hitTest(point, with: event)
    }

    override func point(inside point: CGPoint, with event: UIEvent?) -> Bool {
        let result = super.point(inside: point, with: event)
        print("FrontButton point(inside:with:): \(result)")
        return result
    }

    override func touchesBegan(_ touches: Set<UITouch>, with event: UIEvent?) {
        print("FrontButton touchesBegan(:with:)")
        super.touchesBegan(touches, with: event)
    }
}

class BackButton: UIButton {
    override func hitTest(_ point: CGPoint, with event: UIEvent?) -> UIView? {
        print("BackButton hitTest(:with:)")
        return super.hitTest(point, with: event)
    }

    override func point(inside point: CGPoint, with event: UIEvent?) -> Bool {
        let result = super.point(inside: point, with: event)
        print("BackButton point(inside:with:): \(result)")
        return result
    }

    override func touchesBegan(_ touches: Set<UITouch>, with event: UIEvent?) {
        print("BackButton touchesBegan")
        super.touchesBegan(touches, with: event)
    }
}

class BlackView: UIView {
    override func hitTest(_ point: CGPoint, with event: UIEvent?) -> UIView? {
        print("BlackView hitTest(:with:)")
        return super.hitTest(point, with: event)
    }

    override func point(inside point: CGPoint, with event: UIEvent?) -> Bool {
        let result = super.point(inside: point, with: event)
        print("BlackView point(inside:with:): \(result)")
        return result
    }

    override func touchesBegan(_ touches: Set<UITouch>, with event: UIEvent?) {
        print("BlackView touchesBegan(:with:)")
        super.touchesBegan(touches, with: event)
    }
}
hitTest(:with:)の動作の解説
具体例を見る前に、簡単にhitTest(:with:)の動作を説明しておきます。
hitTest(:with:)は内部でpoint(inside:with:)を呼び出し、ビューがタッチ位置に含まれているかどうかを確認します。
含まれていると判定(true)されたら、サブビューのhitTest(:with:)を呼び、これを再帰的に繰り返していきます。
ビュー階層の一番深い位置でtrueと判定されたビューが、タッチされたビューであると判断されます。
ケーススタディ
hitTest(:with:)の動作を具体例で見てみましょう。
まず、以下の部分をタッチしたときの動きを見てみます。

コンソールの出力結果です。
RootView hitTest(:with:)
RootView point(inside:with:): true
BlackView hitTest(:with:)
BlackView point(inside:with:): true
FrontButton hitTest(:with:)
FrontButton point(inside:with:): false
BlackView touchesBegan(:with:)
RootView touchesBegan(:with:)
以下のような流れになります。
- RootViewのhitTest()が呼ばれる。point()がtrueなので続ける
- 一番手前にあるサブビューであるBlackViewのhitTest()を呼ぶ。point()がtrueなので続ける
- BlackViewのサブビューであるFrontButtonのhitTest()を呼ぶ。point()がfalseなので終了
- タッチがBlackViewで発生したと判断される。
- BlackViewのtouchesBegan()が呼ばれる
- タッチイベントがフォワードされ、RootViewのtouchesBegan()が呼ばれる
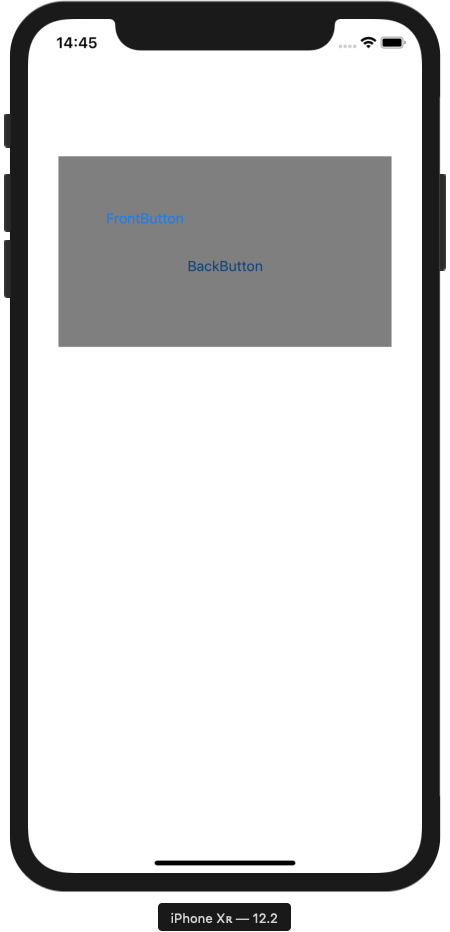
次に、FrontButtonをタップしたときの動きを見てみます。
コンソールの出力結果です。
RootView hitTest(:with:)
RootView point(inside:with:): true
BlackView hitTest(:with:)
BlackView point(inside:with:): true
FrontButton hitTest(:with:)
FrontButton point(inside:with:): true
FrontButton touchesBegan(:with:)
以下のような流れになります。
- RootViewのhitTest()が呼ばれる。point()がtrueなので続ける
- 一番手前にあるサブビューであるBlackViewのhitTest()を呼ぶ。point()がtrueなので続ける
- BlackViewのサブビューであるFrontButtonのhitTest()を呼ぶ。point()がtrueなので続ける
- FrontButtonはサブビューを持っていないので終了
- タッチがFrontButtonで発生したと判断される
- FrontButtonのtouchesBegan()が呼ばれる
- ボタンはタッチイベントをフォワードしない
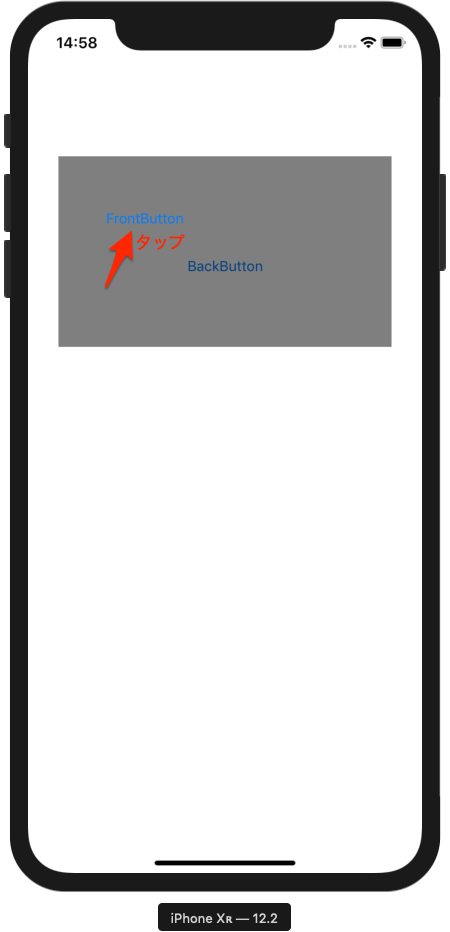
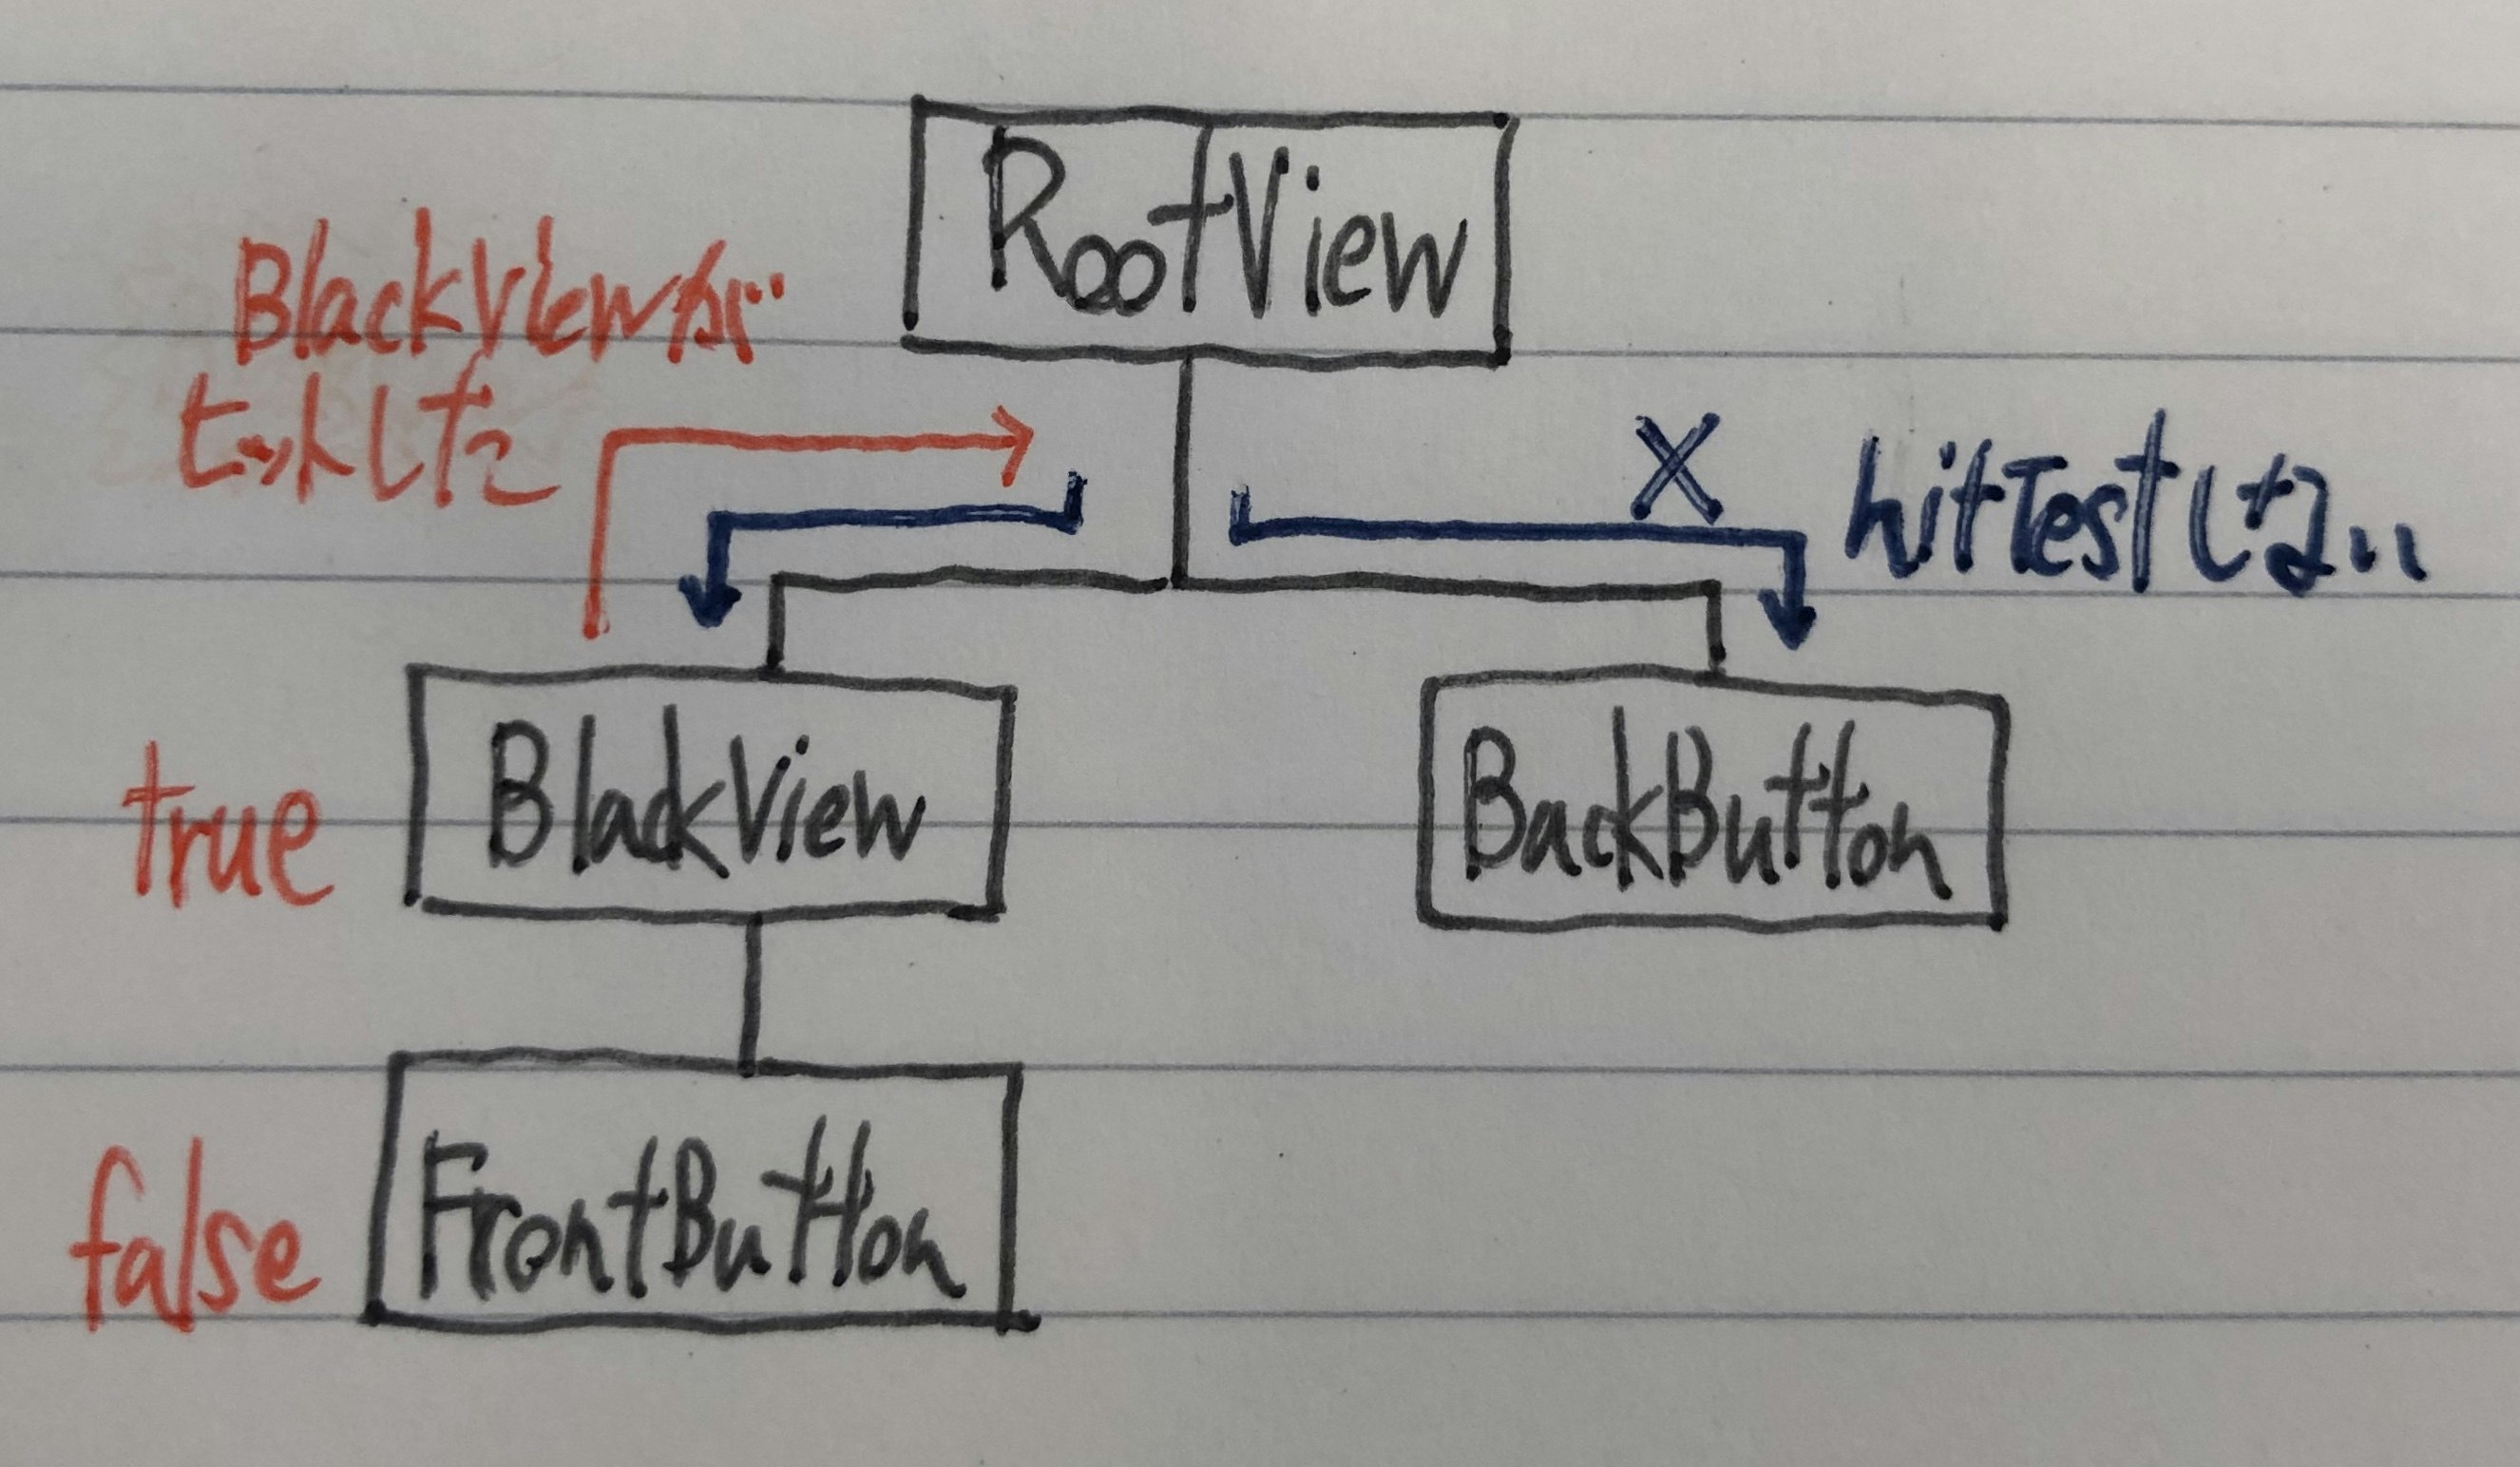
次に、以下の部分をタッチしたときの動きを見てみます。
コンソールの出力結果です。
RootView hitTest(:with:)
RootView point(inside:with:): true
BlackView hitTest(:with:)
BlackView point(inside:with:): false
BackButton hitTest(:with:)
BackButton point(inside:with:): false
RootView touchesBegan(:with:)
以下のような流れになります。
- RootViewのhitTest()が呼ばれる。point()がtrueなので続ける
- 一番手前にあるサブビューであるBlackViewのhitTest()を呼ぶ。point()がfalseなので、もう一つのサブビューであるBackButtonのhitTest()を呼ぶ。point()がfalseなので終了。
- タッチがRootViewで発生したと判断される。
BackButtonのあたりをタッチするとどうなるか

この場合は最初のケースと同じです。
最初にBlackViewの階層をたどっていき、この時点でBlackViewがタッチ位置に含まれていると判定されるので、BlackViewと同階層にあるBackButtonのhitTest()は行われません。
BackButtonをタップできるようにする
ビュー階層は変更しないまま、BackButtonをタップできるようにするには、BlackViewのhitTest(:with:)をオーバーライドします。
override func hitTest(_ point: CGPoint, with event: UIEvent?) -> UIView? {
    print("BlackView hitTest(:with:)")
    let hitView = super.hitTest(point, with: event)

    if hitView == self {
        return nil
    }

    return hitView
}
BlackViewの階層を調べていった結果、BlackView自身がタッチの発生元と判定されたらnilを返すようにしてあげます。
hitTestの結果がnilつまり何もヒットしなかったと判定された場合、RootViewのhitTest(:with:)はもう一つのサブビューであるBackButtonのhitTest(:with:)を呼び出します。
その結果BackButtonがヒットしたと判断されるようになります。
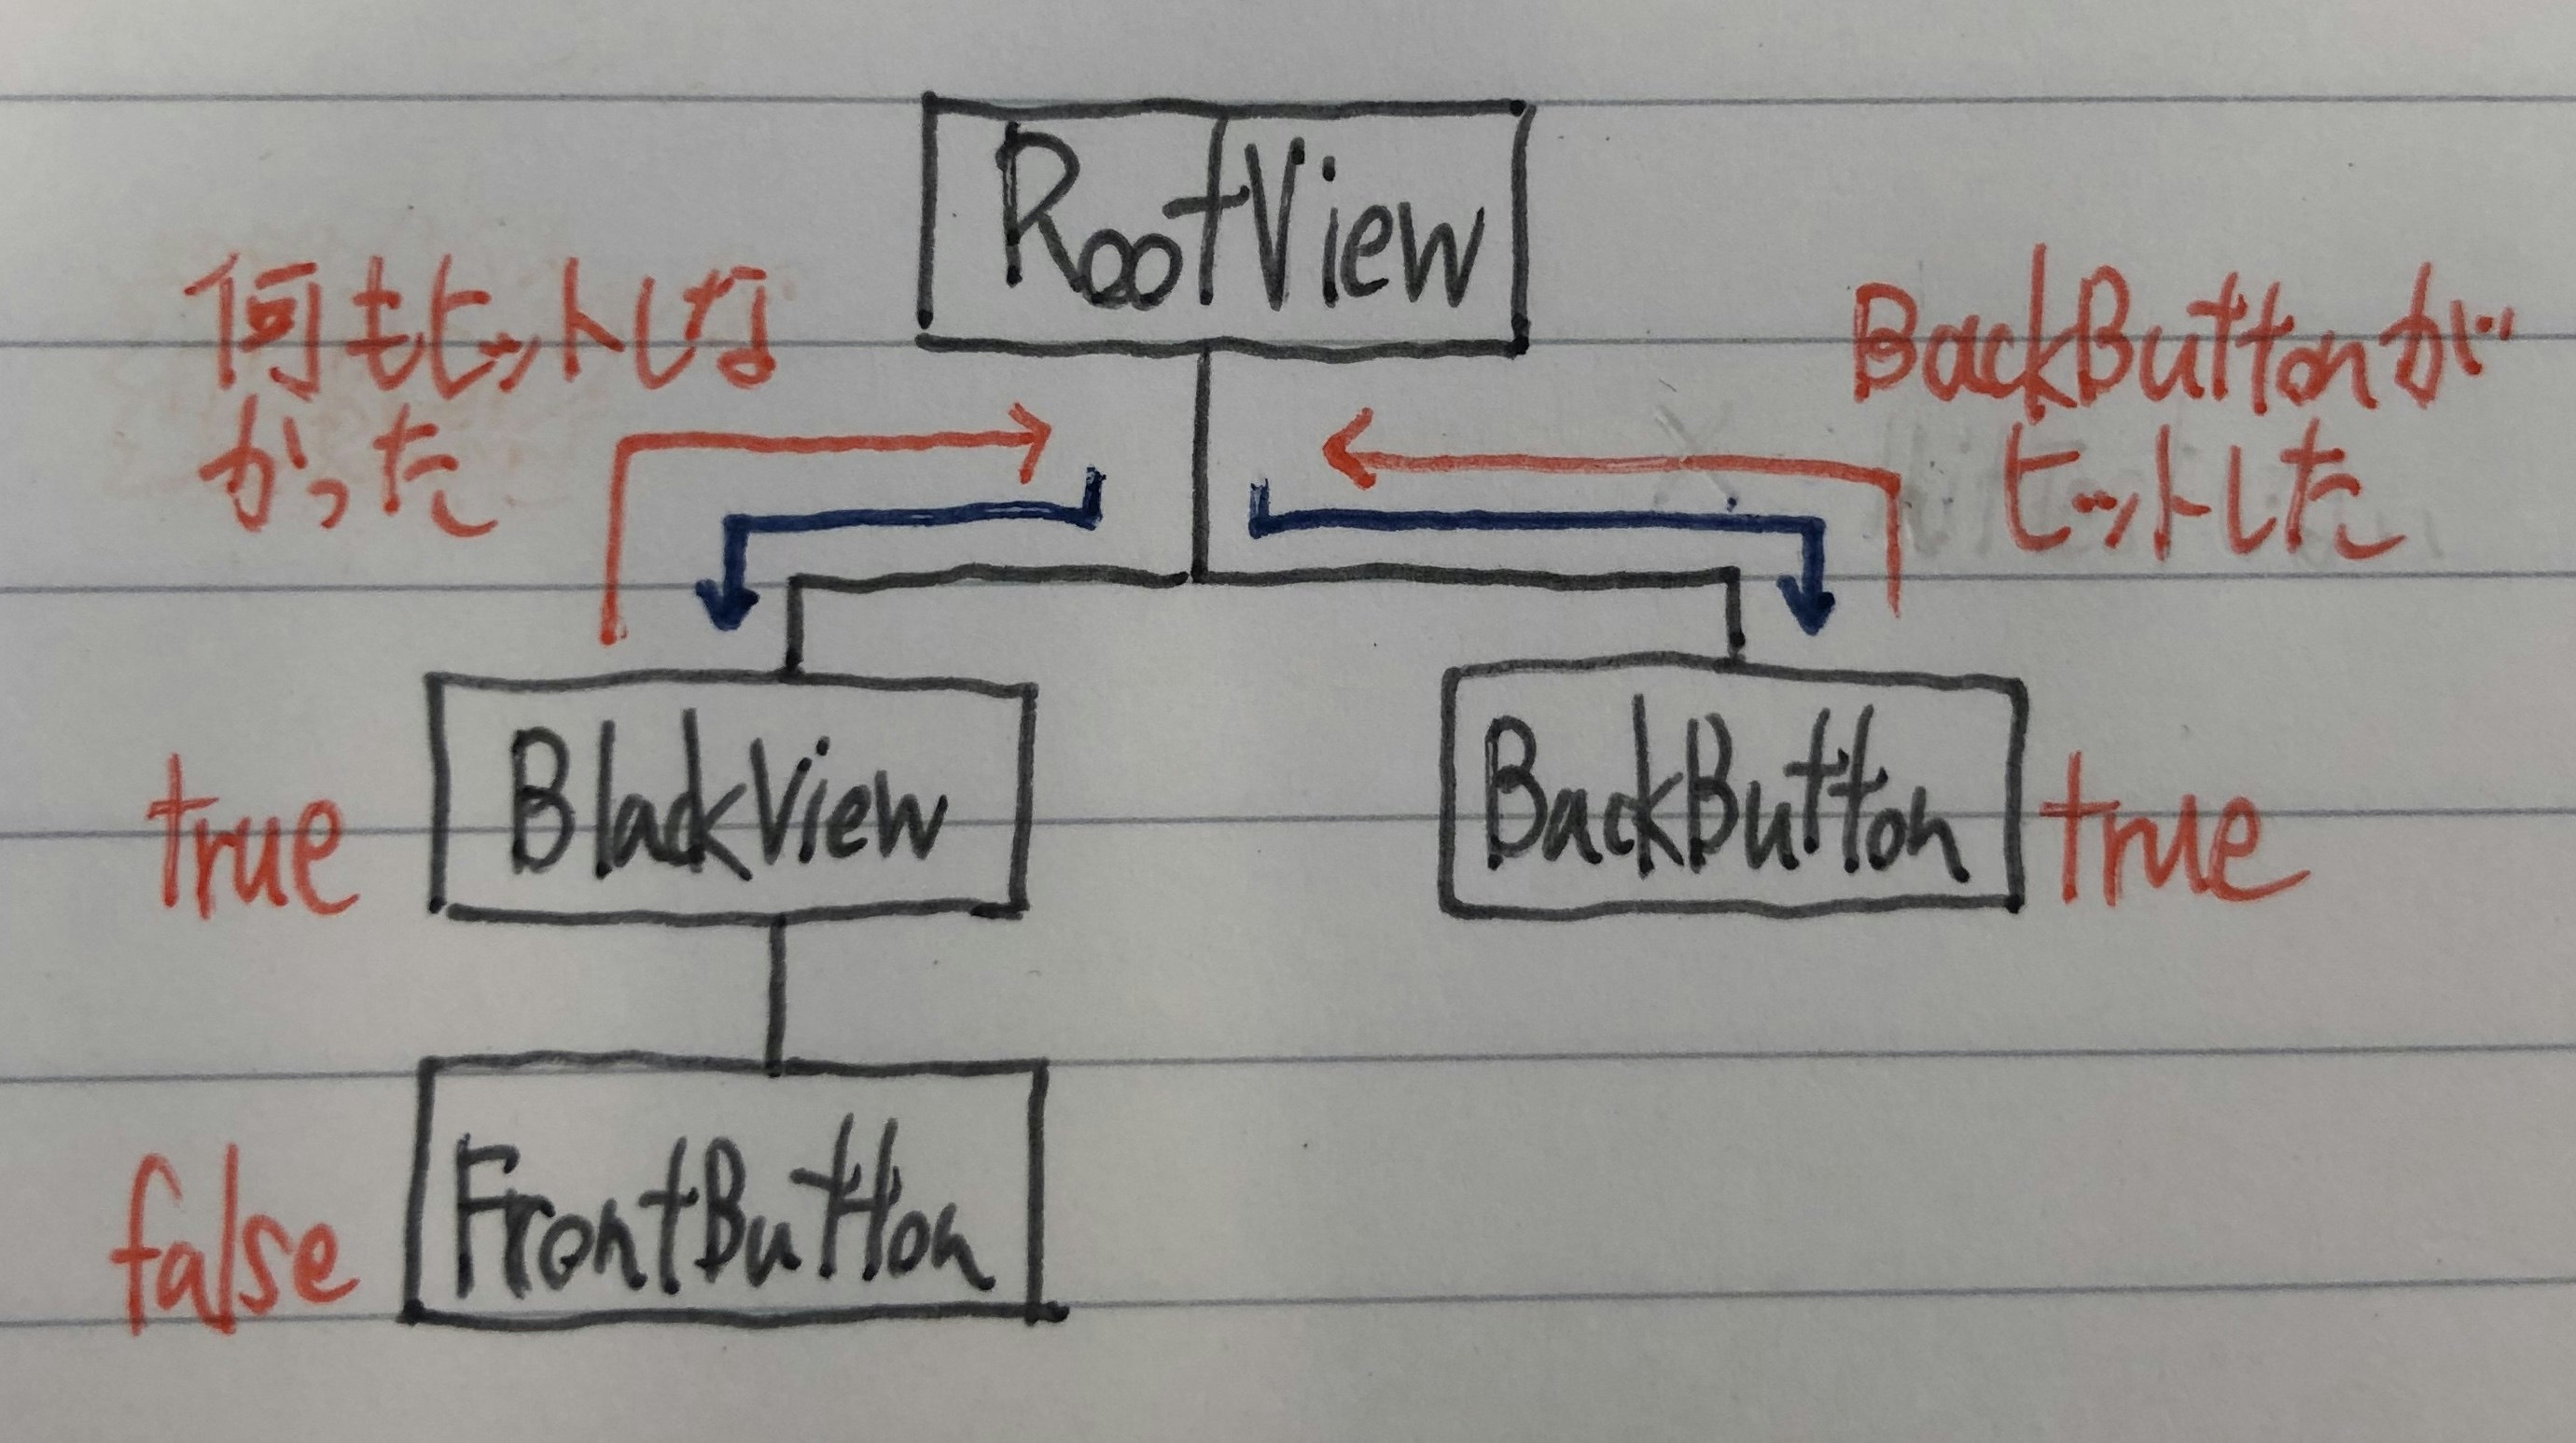
コンソール出力
RootView hitTest(:with:)
RootView point(inside:with:): true
BlackView hitTest(:with:)
BlackView point(inside:with:): true
FrontButton hitTest(:with:)
FrontButton point(inside:with:): false
BackButton hitTest(:with:)
BackButton point(inside:with:): true
BackButton touchesBegan