これは何
Notionのデータベースって便利ですよね。
一方、グラフなど可視化の機能は弱いので、なんらかの形でBIツールでいろいろいじりたいなと思いました。
GASとスプレッドシートを使って実装したので、その方法をまとめます。
スクリプト作成にあたり、@johnmackay150のアドバイスをたくさん頂きました。
Special Thanks !!
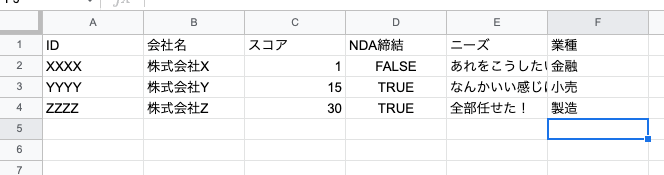
スプレッドシートを用意
列名もスクリプトで入力するので、白紙で大丈夫です。
シークレットキーを用意
以下の記事に従って用意してください。
他にもいろんな記事で解説されています。
スクリプト
function getNotion() {
  let secret = 'XXXX' // シークレットキー
  let db_id = 'XXXX'; // データベースID
  let base_url = 'https://api.notion.com/v1/databases/' + db_id + '/query';

  let next_curser = undefined;
  let has_more = true;

  let array = [
    [
      'ID'
      , '会社名'
      , 'スコア'
      , 'NDA締結'
      , 'ニーズ'
      , '業種'
    ]
  ];

  let id = '';
  let name = '';
  let score = 0;
  let has_nda = false;
  let needs = '';
  let industry = '';

  while(has_more){

    let cursor = {
      'start_cursor': next_curser
      , 'filter': {
        'property': 'スコア',
        'formula': {
          'number': {
            'greater_than': 10
          }
        }
      }
    }

    let options = {
      'method': 'post',
      'headers':{
        'Authorization': 'Bearer ' + secret,
        'Notion-Version': '2022-06-28',
        'Content-Type': 'application/json'
      },
      'payload': JSON.stringify(cursor)
    };

    let res = UrlFetchApp.fetch(base_url, options);
    let tables = JSON.parse(res.getContentText());
    next_curser = tables['next_cursor'];
    has_more = tables['has_more'];

    let i = 0;

    for(let item of tables.results){
      while(tables.responses)
        i ++;

        id = item.id;
        name = item.properties['会社名'].title[0].plain_text;
        score = item.properties['スコア'].formula.number;
        has_nda = item.properties['NDA締結'].checkbox;

        if(needs = item.properties['ニーズ'].rich_text.length > 0){
          needs = item.properties['ニーズ'].rich_text.plain_text;
        } else {
          needs = '';
        }

        if(item.properties['業種'].select != null){
          industry = item.properties['業種'].select.name
        } else {
          industry = '';
        };


        array.push(
          [
            id
            , name
            , score
            , has_nda
            , needs
            , industry
          ]
        )
    }
  }

  let ss = SpreadsheetApp.openById('XXXX'); //書き込み先のスプレッドシートID
  let sheet = ss.getSheetByName('シート1'); //書き込み先のシート
  let array_row = array.length;
  let array_column = array[0].length;

  sheet.getRange(1, 1, array_row, array_column).setValues(array);
}
これをトリガー設定すればスプレッドシートが定期更新されます。
私はこれをLooker Studioにつないでいますが、そのままスプレッドシートのグラフを使ってもいいと思います。
スクリプトをかいつまんで解説します。
工夫したところ・つまずいたところ
100件以上のページを取得する
Notion APIの制限で、一回のリクエストあたりの取得ページ数上限が100に設定されています。
100以上ページ数がある場合は、next_cursor = XXXX、has_more = trueとなっているので、has_moreがfalseになるまでリクエストを繰り返し、リクエスト時のstart_cursorに前回リクエスト時のnext_cursorの値を代入しています。
こちらの記事で詳しく解説されています。
Content-TypeはHeaderに入れないとエラーになる
    let options = {
      'method': 'post',
      'headers':{
        'Authorization': 'Bearer ' + secret,
        'Notion-Version': '2022-06-28',
        'Content-Type': 'application/json'
      },
      'payload': JSON.stringify(cursor)
    };
なんでかはわかっていません笑
ここでとにかくつまずいたので書いておきます。
プロパティのデータ型
テキストだったり関数だったり、データ型によってjsonファイルの中身が変わるので、取得のスクリプトも変わります。
API Referenceを見たり、tablesをテキストファイルに出力して読んだりして調整していました。
        id = item.id;
        name = item.properties['会社名'].title[0].plain_text;
        score = item.properties['スコア'].formula.number;
        has_nda = item.properties['NDA締結'].checkbox;

        if(needs = item.properties['ニーズ'].rich_text.length > 0){
          needs = item.properties['ニーズ'].rich_text.plain_text;
        } else {
          needs = '';
        }

        if(item.properties['業種'].select != null){
          industry = item.properties['業種'].select.name
        } else {
          industry = '';
        };
また、空白(null)があるプロパティはエラーになってしまうので、if文で分岐させています。
気に食わないところ
リレーションプロパティは全部空白になって取得できませんでした。
それをトリガーに、リレーション先のテーブルを取得してくればいいのでしょうが、ちょっと面倒なので、別のシートにまとめて吐かせて、関数(MINIFSやCOUNTIFなど)で加工しています。
他にいい方法あるかもですが、こういうブサイクな方法に逃げました。