はじめに
Livesense Advent Calendar 8日目を担当します @take-m です。
本日はRed Hat Enterprise Linux 7およびCentOS7で新たに導入されたOpenLMIについてまとめてみたいと思います。
OpenLMIとは
OpenLMI は Open Linux Management Infrastructure の略で、Linuxサーバの管理や監視をリモートから効率的に行うAPIを提供する管理ツールです。
特徴として、mkfs、ip、service、systemctlといった、従来、管理で使用されたコマンドは利用せず、その代わり、抽象化されたAPIを管理コマンドとして使用します。これによりサーバの環境の違い、設定の違い、ディレクトリ構成の違い、などを意識せず、管理対象のサーバにアクセス、オペレーションをすることが出来ます。
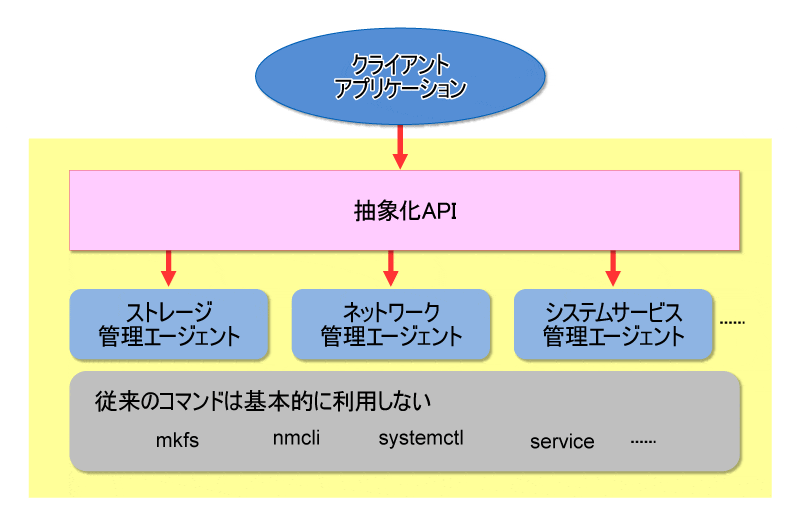
(http://itpro.nikkeibp.co.jp/atcl/column/14/072400026/081200008/ より転載)
Install
http://www.openlmi.org/QuickStart を参考にインストールします。やることとしては以下の通り。
- openlmi関連のパッケージをインストール
- tog-pegasusサービスの起動
- wbem-https用TCP port 5989の解放
- pegasusユーザー作成、パスワード設定
これらをchefレシピ化したものが以下になります。
%w{
  epel-release
  openlmi
  openlmi-scripts
  openlmi-scripts-account
  openlmi-scripts-doc
  openlmi-scripts-hardware
  openlmi-scripts-journald
  openlmi-scripts-logicalfile
  openlmi-scripts-networking
  openlmi-scripts-powermanagement
  openlmi-scripts-service
  openlmi-scripts-software
  openlmi-scripts-storage
  openlmi-scripts-system
}.each do |pkg|
    package pkg do
        action :install
    end
end
service "tog-pegasus" do
    supports :status => true, :restart => true, :reload => true
    action [ :enable, :start ]
end
execute 'set firewall' do
  command 'firewall-cmd --permanent --add-port 5989/tcp'
end
user "pegasus" do
  password '*****'    # 適宜置き換える
end
上記のレシピでpegasusユーザーのパスワードに入れる文字列は、opensslコマンドでハッシュ化した文字列になります。
openssl passwd -1 "yourpassword"
使い方
LMI CLI
OpenLMIではCLIツールを提供しています。これにより、簡単に管理対象サーバに接続しオペレーションを実行することが出来ます。
- 起動
lmi -h (管理対象サーバ)
- help
lmi> help

Static commands
===============
EOF  exit  help

Application commands (type help <topic>):
=========================================
file  group  hwinfo  journald  net  power  service  storage  sw  system  user

Built-in commands (type :help):
===============================
:..  :cd  :pwd  :help
- ハードウェア情報を取得
- 実行時にusernameとpasswordを聞かれるので、pegasusユーザーでログインする
- 以下はVirtualBoxに作成したCentOS7に対しての実行結果
lmi> hwinfo
username: pegasus
password:
Hostname:        localhost
Chassis Type:    Other
Manufacturer:    Oracle Corporation
Model:           1.2 (VirtualBox)
Serial Number:   Not Specified
Asset Tag:       0
Virtual Machine: N/A
Motherboard:     VirtualBox
Manufacturer:    Oracle Corporation
CPU:             Intel(R) Core(TM) i7-4750HQ CPU @ 2.00GHz
Topology:        1 cpu(s), 1 core(s), 1 thread(s)
Max Freq:        0 MHz
Arch:            x86_64
Memory:          994 MB
Modules:         N/A
Slots:           N/A used, N/A total
- httpdをインストールする
- Installedの値がTrueになりインストールされたことが確認できる
lmi> sw install httpd
lmi> sw search httpd
NEVRA                                                Installed Summary
darkhttpd-0:1.10-1.el7.x86_64                        False     A secure, lightweight, fast, single-threaded HTTP/1.1 server
httpd-0:2.4.6-18.el7.centos.x86_64                   True      Apache HTTP Server
httpd-devel-0:2.4.6-18.el7.centos.x86_64             False     Development interfaces for the Apache HTTP server
httpd-itk-0:2.2.22-9.el7.x86_64                      False     MPM Itk for Apache HTTP Server
httpd-manual-0:2.4.6-18.el7.centos.noarch            False     Documentation for the Apache HTTP server
httpd-tools-0:2.4.6-18.el7.centos.x86_64             True      Tools for use with the Apache HTTP Server
libmicrohttpd-0:0.9.33-2.el7.i686                    False     Lightweight library for embedding a webserver in applications
libmicrohttpd-0:0.9.33-2.el7.x86_64                  False     Lightweight library for embedding a webserver in applications
libmicrohttpd-devel-0:0.9.33-2.el7.i686              False     Development files for libmicrohttpd
libmicrohttpd-devel-0:0.9.33-2.el7.x86_64            False     Development files for libmicrohttpd
libmicrohttpd-doc-0:0.9.33-2.el7.noarch              False     Documentation for libmicrohttpd
lighttpd-0:1.4.35-1.el7.x86_64                       False     Lightning fast webserver with light system requirements
lighttpd-fastcgi-0:1.4.35-1.el7.x86_64               False     FastCGI module and spawning helper for lighttpd and PHP configuration
lighttpd-mod_geoip-0:1.4.35-1.el7.x86_64             False     GeoIP module for lighttpd to use for location lookups
lighttpd-mod_mysql_vhost-0:1.4.35-1.el7.x86_64       False     Virtual host module for lighttpd that uses a MySQL database
mod_dav_svn-0:1.7.14-6.el7.x86_64                    False     Apache httpd module for Subversion server
prototype-httpd-0:1.7.1.0-1.el7.noarch               False     Apache configuration for prototype
python-sphinxcontrib-httpdomain-0:1.1.8-4.el7.noarch False     Sphinx domain for documenting HTTP APIs
scriptaculous-httpd-0:1.9.0-1.el7.noarch             False     Apache configuration for scriptaculous
syntaxhighlighter-httpd-0:3.0.83-2.el7.noarch        False     Apache configuration for syntaxhighlighter
web-assets-httpd-0:5-1.el7.noarch                    False     Web Assets aliases for the Apache HTTP daemon
- httpdを起動する
lmi> service start httpd
lmi> service show httpd
Name=httpd
Caption=The Apache HTTP Server
Enabled=No
Status=Running
LMI CLIの詳細はlmi meta-command usageを参照してください。
LMIShell
前述のCLIツールはLMIShell上で動作するOpenLMIのメタコマンドになります。LMIShellはPythonベースのスクリプトで、各種用意されているPythonオブジェクト、クラス、メソッドを使うことが出来ます。
まずサンプルとして以下のスクリプトを作成し、chmod +xで実行権限を付与し、実行してみてください(IPアドレス、パスワードは適宜修正してください)。
# !/usr/bin/lmishell

c = connect("192.168.10.10", "pegasus", "yourpassword")
c.root.print_namespaces()
- connect()で管理対象サーバのCIMOMへ接続します。
- rootはnamespaceのルートとなります。
- print_namespaces()でroot以下のnamespaceのリストを表示します。
実行結果は以下の通りです。
cimv2
interop
PG_InterOp
PG_Internal
続いて以下のように書き換えてみます。
# !/usr/bin/lmishell

c = connect("192.168.10.10", "pegasus", "yourpassword")
c.root.cimv2.print_classes()
ネームスペースのcimv2はCommon Information Model Version 2の略で、CIMとはDMTFで定義されたシステム、ネットワーク、アプリケーション、サービスなどの管理情報モデルのことです。ここで用意されているクラスの一覧をprint_classes()で表示します。
CIM_DeviceSAPImplementation
CIM_ControlledBy
CIM_CollectionInSystem
CIM_NetworkPacketAction
CIM_ConcreteIdentity
...
ではこのCIMのクラスを使ったサンプルを実行してみたいと思います。以下のスクリプトを実行してみます。
# !/usr/bin/lmishell

c = connect("192.168.10.10", "pegasus", "yourpassword")

for iname in c.root.cimv2.LMI_InstalledSoftwareIdentity.instance_names():
    print(iname.InstalledSoftware.InstanceID
            [len("LMI:LMI_SoftwareIdentity:"):])
実行結果は以下の通り。LMI_InstalledSoftwareIdentityクラスを用いて、インストールされているパッケージのリストが表示されます。
ModemManager-glib-0:1.1.0-6.git20130913.el7.x86_64
NetworkManager-1:0.9.9.1-13.git20140326.4dba720.el7.x86_64
NetworkManager-glib-1:0.9.9.1-13.git20140326.4dba720.el7.x86_64
NetworkManager-tui-1:0.9.9.1-13.git20140326.4dba720.el7.x86_64
acl-0:2.2.51-12.el7.x86_64
aic94xx-firmware-0:30-6.el7.noarch
...
続いて管理対象サーバにhttpdのパッケージをインストールしてみたいと思います。まずはパッケージの検索から。以下のスクリプトを実行してみます。
# !/usr/bin/lmishell

c = connect("192.168.10.10", "pegasus", "yourpassword")
service = c.root.cimv2.LMI_SoftwareInstallationService.first_instance()
ret = service.FindIdentity(Name="httpd")
for identity in ret.rparams["Matches"]:
    print identity.InstanceID[len("LMI:LMI_SoftwareIdentity:"):]
実行結果は以下の通り。LMI_SoftwareInstallationServiceクラスのFindIdentity()を使って、名前がhttpdにマッチするパッケージを検索します。
darkhttpd-0:1.10-1.el7.x86_64
httpd-0:2.4.6-18.el7.centos.x86_64
httpd-devel-0:2.4.6-18.el7.centos.x86_64
httpd-itk-0:2.2.22-9.el7.x86_64
httpd-manual-0:2.4.6-18.el7.centos.noarch
...
では検索結果から、httpd-0:2.4.6-18.el7.centos.x86_64をインストールしてみます。
# !/usr/bin/lmishell

c = connect("192.168.10.10", "pegasus", "yourpassword")
identity = c.root.cimv2.LMI_SoftwareIdentity.new_instance_name(
    {"InstanceID" : "LMI:LMI_SoftwareIdentity:httpd-0:2.4.6-18.el7.centos.x86_64"})
cs = c.root.cimv2.PG_ComputerSystem.first_instance_name()
installed_assoc = c.root.cimv2.LMI_InstalledSoftwareIdentity.create_instance(
    properties={
            "InstalledSoftware" : identity,
            "System"            : cs
})
管理対象サーバでhttpdがインストールされたのを確認してみてください。
まとめ
以上、OpenLMIの簡単な紹介になります。今回LMIShellのみ紹介しましたが、C/C++, Java, PythonにもAPIが提供されているため、エンジニアの用途に応じて使い分けることも可能です。
今回紹介したサンプルプログラムを応用すれば、管理している多数のサーバすべてに対して一括でパッケージをアップデートできるようになるなど、様々なサーバ管理場面で効率化を図ることが出来るようになります。
OpenLMIはPuppetやChefなどと比較されることも多く、また日本語の情報がまだまだ少ないため、浸透するまで少し時間がかかりそうですが、パッケージやリソースの管理をOS標準の機能でプログラマブルに扱うことが出来るのは、非常に大きな強みだと思います。
明日9日目は @dkatsura です。
それでは Happy Hacking, and Merry Xmas!!