FIRST PLAN株式会社のフロントエンドエンジニアtakeです。
sampleText
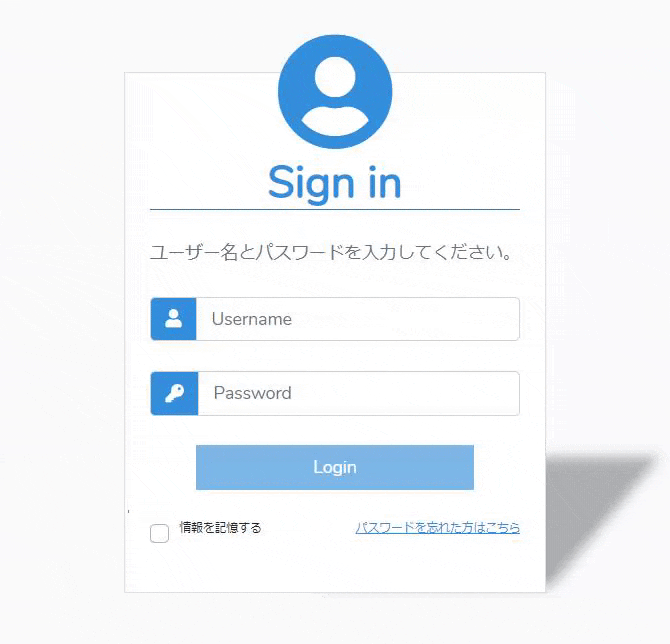
さて、今回はテストでログインフォームを作ったので良ければご覧ください。
こんな事をやりました
環境設定
まずはVue.js。
今回はLaravel内で使っているので、LaravelでVue.jsを使えるようにするには以下のコマンドを実行します。
$ composer require laravel/ui
$ php artisan ui vue --auth
すぐにvueを始めたい場合は公式ドキュメントにある通りCDNでも使えますし、初めからwebpackの環境構築がされている「Vue CLI」もあるので活用してみてください。
ただ今回は環境設定の記事ではないのでそこら辺は割愛します。
そして次にBootstrapですが、BootstrapVueを使用します。
機能は同じでBootstrapの記法もそのまま使えるのですが、jQuery依存だったコンポーネントがVueのディレクティブが使えるように拡張されています。
$ npm install bootstrap-vue bootstrap
でインストールし、
以下のコードをメインのjsファイルに追加します。
import BootstrapVue from 'bootstrap-vue';
Vue.use(BootstrapVue);
後は好みの問題なのですが、FontAwesomeとvue-sweetalert2をインストールします。
vue-sweetalert2もBootstrapVueと同じで機能は元のsweetalert2と変わりませんが、Vueでそちらを使うとアイコン部分で表示崩れが起きる事があるのでそれを修正したものになります。
Bootstrapと同様にこちらもインストールします。
FontAwesome
$ npm install --save @fortawesome/fontawesome-free
import '@fortawesome/fontawesome-free/css/all.css';
vue-sweetalert2
$ import VueSweetalert2 from 'vue-sweetalert2';
import 'sweetalert2/dist/sweetalert2.min.css';
Vue.use(VueSweetalert2);
コード
HTML
今回は以下のような感じで、cardとinput-groupを使って実装しました。
<template>
  <section class="login-form d-flex flex-solumn justify-content-center align-items-center w-100 text-center">
    <div class="login-form__field card rounded-0 pt-5 pb-3">
      <i class="login-form__budge fas fa-user-circle text-primary bg-white rounded-circle"></i>
      <div class="card-body">
        <h1 class="login-form__heading card-title text-primary font-weight-bold mb-0">Sign in</h1>

        <hr class="bg-primary mt-0 mb-4">

        <p class="card-text text-muted mb-4">ユーザー名とパスワードを入力してください。</p>

        <div class="input-group mx-auto mb-4">
          <div class="input-group-prepend">
            <span class="input-group-text bg-primary text-white" id="basic-addon1">
              <i class="fas fa-user"></i>
            </span>
          </div>
          <input class="form-control" type="text" placeholder="Username" v-model="login.user_name">
        </div>

        <div class="input-group mx-auto mb-4">
          <div class="input-group-prepend">
            <span class="input-group-text bg-primary text-white" id="basic-addon1">
              <i class="fas fa-key"></i>
            </span>
          </div>
          <input class="form-control rouded-0" type="password" placeholder="Password" v-model="login.password">
        </div>

        <button class="login-form__button btn btn-primary w-75 mb-4" type="button" :disabled="checkInput" @click="signIn">Login </button>

        <div class="login-form__attention d-flex justify-content-between my-o mx-auto">
          <div class="custom-control custom-checkbox">
            <input type="checkbox" class="custom-control-input" id="remember-me" v-model="login.remember">
            <label class="custom-control-label" for="remember-me">情報を記憶する</label>
          </div>
          <a class="card-link" href="#">
            <u>パスワードを忘れた方はこちら</u>
          </a>
        </div>
      </div>
    </div>
  </section>
</template>
CSS
飽くまでBootstrapベースなので、scssでBEMを採用して影のエフェクト以外は軽く整える程度にしました。
.login-form {
  &__field {
    position: relative;
    max-width: 30rem;
    //影エフェクト
    &:after {
      content: '';
      position: absolute;
      bottom: 20px;
      right: 55px;
      z-index: -1;
      width: 50%;
      height: 100px;
      box-shadow: 100px 0 10px 15px rgba(0, 0, 0, .3);
      transform: skew(-40deg);
    }
  } //__field
  &__budge {
    position: absolute;
    top: -2rem;
    left: 50%;
    font-size: 6rem;
    transform: translateX(-50%);
  } //__budge
  &__attention {
    font-size: 0.6rem;
  } //__attention
  &__button {
    border-radius: 0!important;
  } //__button
} // .login-form
JavaScript
以下がデフォルトのVueの記述方法になります。
ざっくり説明するとdataは変数等を格納する場所・computedは変更があるとリアルタイムで値を再計算してくれる場所・methodsは文字通りメソッドを格納する場所です。
他にもwatchやライフサイクルフック等開発に便利な機能が色々とあるので、詳しくは公式ドキュメントをご参照ください。
さて、まずdata内のloginは「ユーザーネーム・パスワード・ユーザー情報を記憶するか否か」を保持しています。
html内にv-model="login.user_name"といった記述があると思いますが、このv-modelによって双方向データバインディングを実現しています。
どちらかが変更された段階でもう片方にも自動で変更が同期されるため、自分で逐一document.querySelector(element)~をする必要がなくなります。
次はcomputedですが、今回はlogin.user_nameとlogin.passwordが条件に組み込まれていますが、どちらかの値が変更された段階で自動で値を更新します。
メソッド内にif (!this.checkInput)と指定されている関数がありますが、このように使用する事で他の場所で毎回入力を確認する必要がなくなります。
ちなみにbuttonにある:disabled="checkInput"にも使用されていますが、まずこの:マークはv-bindといってhtml内の属性(classやhref等)に付ける事で内部でJavaScriptのコードを直接使用可能にするものです。
今回はこれらを利用してdisabledの値をフォーム入力の有無によって動的に変更しています。
最後にmethodsは一番簡単で、関数を格納する場所になります。
とりあえず確認用にv-modelで同期した値をsweetalert2で表示しています。
イベントハンドリングはhtml側で@event="hoge"のように行います。(今回の場合は@click="signIn")
ちなみにこの@click以下はコンパイル時に削除されるため、htmlを汚染する心配はありません。
export default {
  data() {
    return {
      //ログイン情報
      login: {
        user_name: '',
        password: '',
        remember: false
      }
    }
  },
  computed: {
    //ユーザーネームとパスワードの両者が入力されている事を判定する値、自動で変更を検知し反映してくれる
    checkInput() {
      return (!this.login.user_name || !this.login.password) ? true : false;
    }
  },
  methods: {
    signIn() {
      //ユーザーネームとパスワードの両者が入力されていた時のみ発火する。
      if (!this.checkInput) {
        //v-modelで同期した値を出力する
        this.$swal({
          icon: 'info',
          title: 'Information',
          text: `
            ID: ${this.login.user_name},
            Password: ${this.login.password},
            Remember: ${this.login.remember}
          `
        })
      }
      return;
    } //signIn
  }
}
最後に
$ npm run dev
でコンパイルして確認すると...
キチンと動いています。
よろしければ参考にしてみて下さい。