目次
1. はじめに
2. 邪魔なカーソルのon/off
3. position: absoluteを使っているときに画面中央に刺激を提示したい
4. ブロックの途中で何かする
5. 終わりに
はじめに
psyJsアドカレ(https://adventar.org/calendars/6320)
15日目の記事です。
「プログラムなんてよくわからないけど, とりあえず大まかな実験の実装はできた!」という方が使うかもしれない小技集です。集とか言いながら3つしかないです。かなり限定的なものなので、実際に使うかは分かりませんが。
この記事はjsPsych7.0をベースに書かれています。旧バージョンでも、おおよそは同じです。
邪魔なカーソルのon/off
課題にもよりますが、課題中にカーソルが画面上にあると邪魔です。ただ, カーソルがないと回答できないようなものもあります。call-functionを使ってカーソルのon/offを自由自在にコントロールしてしまいます。
その他のpluginと同様に事前にjspsych-call-function.jsを読み込んでおきます。
    <script src="jspsych/dist/plugin-html-keyboard-response.js"></script>
    <script src="jspsych/dist/plugin-call-function.js"></script>
call-functionでcursor_onとcursor_offをtimelineで呼び出せるようにしておきます。
    var cursor_off = {
        type: jsPsychCallFunction,
        func: function () {
            document.body.style.cursor = "none";
        }
    };

    var cursor_on = {
        type: jsPsychCallFunction,
        func: function () {
            document.body.style.cursor = "auto";
        }
    };
課題の前後で操作するのであれば
jsPsych.run([cursor_off, task, cursor_on]);
などとします。
position: absoluteを使っているときに画面中央に刺激を提示したい
position: absoluteを使っているときのtop, bottom, left, rightは画像の起点を指定することになります。例えば、top: 50%、left: 50%と指定したときは以下のように画面上に提示されます。
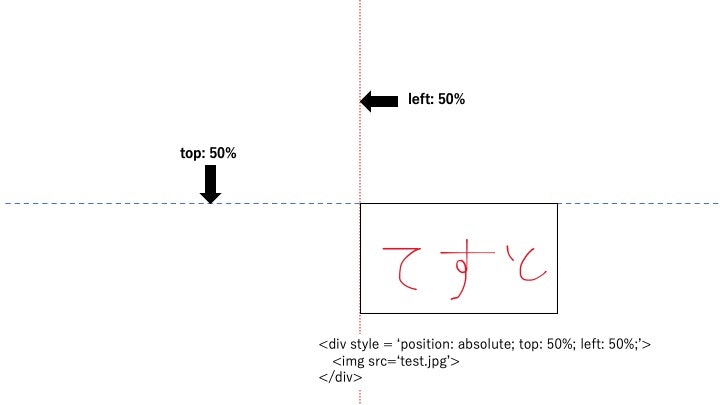
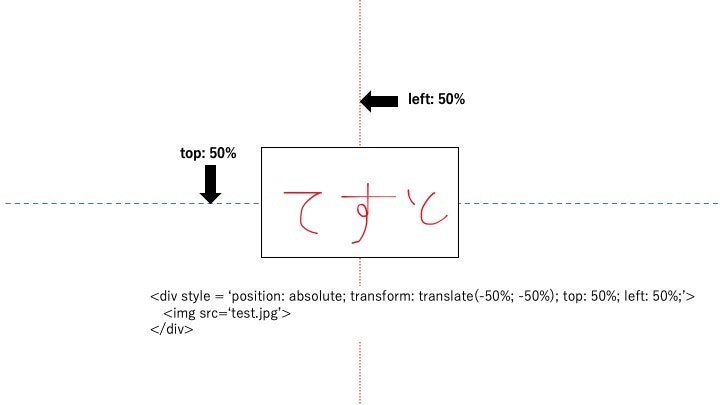
transformを使えば画像の中央が起点にくるように指定することができます。
ブロックの途中で何かする
jsPsychに関する素晴らしい資料が多数ありますが,それらはあくまで例題としてあるもので,10試行ほどのものになっています。
多くの実験では結構な試行数があったりします。そのときに小休憩の時間がないと参加者は大変です。条件はブロック内でランダムにしつつ,小休憩の時間を入れる。あるいは途中で質問紙をとるなどがあるかもしれません。
もしかすると課題のスコアがある一定の値になったときに表や図を提示することがあるかもしれません。
そんなときはconditional_functionを使うと便利です。(https://zenn.dev/snishiyama/articles/c75f419817c4f9d1d494 )
ここではnishiyamaさんのフランカー課題を例にしてみます( https://zenn.dev/snishiyama/books/jspsych-tutorial/viewer/flanker_timeline-variable )。
まずは課題に必要なタイムラインたちを作っておきます。その際にカウンターも作っておきます。
    var Counter=0;
    var fixation = {
        type: jsPsychHtmlKeyboardResponse,
        stimulus: '+',
        choices: "NO_KEYS",
        trial_duration: 500,
    };

    var stims_flanker = [
        { stim: '<<<<<' },
        { stim: '>>>>>' },
        { stim: '>><>>' },
        { stim: '<<><<' },
    ];

    var trial = {
        type: jsPsychHtmlKeyboardResponse,
        stimulus: jsPsych.timelineVariable('stim'),
        choices: ['f', 'j'],
        post_trial_gap: 500,
        on_finish: function () { Counter += 1 },
    };
重要なのは
・課題開始前にCounterを作っている(初期値は0)
・試行終了時(on_finish)にCounterが1ずつ増える(Counter +=1)
conditional_functionを使えばこのCounterに基づいて試行を操作することができます。
例えば,3試行終わったときに小休憩を入れるなら
    var rest = {
        type: jsPsychHtmlKeyboardResponse,
        stimulus: "小休憩です。<br>Enterキーで再開します。",
        choices: ['enter']
    }

    var if_rest = {
        timeline: [rest],
        conditional_function: function () {
            if (Counter == 3) {
                return true;
            } else {
                return false
            }
        }
    }

    var block = {
        timeline: [fixation, trial, if_rest],
        timeline_variables: stims_flanker,
        sample: {
            type: 'fixed-repetitions',
            size: 3,
        }
    };
今回は小休憩にしましたが,リッカートにしてもいいですし,なんでも良いです。
最後にサンプルコードを置いておきます。
12試行ある中で、3試行目と9試行目に小休憩を入れ、6試行目の終わりにリッカートがあります。ついでに課題中はカーソルをoffにしてリッカートのときだけカーソルをonにしておきます。
    var jsPsych = initJsPsych({
        on_finish: function () {
            jsPsych.data.displayData();
        }
    });

    var Counter = 0;
    var cursor_off = {
        type: jsPsychCallFunction,
        func: function () {
            document.body.style.cursor = "none";
        }
    };

    var cursor_on = {
        type: jsPsychCallFunction,
        func: function () {
            document.body.style.cursor = "auto";
        }
    };

    var likert = {
        type: jsPsychSurveyLikert,
        questions: [
            {
                prompt: "この記事はためになりましたか?",
                labels: ["ならなかった", "なった"]
            },
        ]
    }

    var if_likert = {
        timeline: [cursor_on, likert, cursor_off],
        conditional_function: function () {
            if (Counter == 6) {
                return true;
            } else {
                return false
            }
        }
    }

    var rest = {
        type: jsPsychHtmlKeyboardResponse,
        stimulus: "小休憩です。<br>Enterキーで再開します。",
        choices: ['enter']
    }

    var if_rest = {
        timeline: [rest],
        conditional_function: function () {
            if (Counter == 3 || Counter == 9) {
                return true;
            } else {
                return false
            }
        }
    }


    var fixation = {
        type: jsPsychHtmlKeyboardResponse,
        stimulus: '+',
        choices: "NO_KEYS",
        trial_duration: 500,
    };

    var stims_flanker = [
        { stim: '<<<<<' },
        { stim: '>>>>>' },
        { stim: '>><>>' },
        { stim: '<<><<' },
    ];

    var trial = {
        type: jsPsychHtmlKeyboardResponse,
        stimulus: jsPsych.timelineVariable('stim'),
        choices: ['f', 'j'],
        post_trial_gap: 500,
        on_finish: function () { Counter += 1 },
    };

    var block = {
        timeline: [fixation, trial, if_rest, if_likert],
        timeline_variables: stims_flanker,
        sample: {
            type: 'fixed-repetitions',
            size: 3,
        }
    };

    jsPsych.run([cursor_off, block, cursor_on]);
こちらにデモを置いておきます。
終わりに
入れ子構造になっているので少しわかりにくいですが、やっていることは非常にシンプルです。今回はCounterを使いましたが、試行の反応などに基づいて操作するとかもありです。
明日はAya Hatanoさんです!
https://adventar.org/calendars/6320