こんにちわ。
Terraform のコードを GitLab で管理していたのでその際作った .gitlab-ci.yml についてお話します。
環境毎に terraform plan, terraform apply できれば基本的なCIの動作は満たせるしテンプレ化しそうだなと思ったのが本記事を書くに至った背景です。
.gitlab-ci.yml is 何???
GitLab Runner がプロジェクトのジョブを管理するために使用するファイルです。
プロジェクトのルートディレクトリに配置することでCIを設定できます。
プロジェクト構成
vpc を起動してその中に ec2 を開発・本番環境の2台立ち上げるシンプルなプロジェクトです。
vpc/example.tf には VPC、environment/example.tf には EC2 を管理する terraform コードを定義します。
プロジェクトのルートディレクトリに .gitlab-ci.yml を配置します。
├── environment
│   ├── example.tf
├── vpc
│     └── example.tf
├──.gitlab-ci.yml
terraform のコード
vpc/example.tf
vpc 構築の terraform コードです。
locals {
  name = "tf-for-gitlab"
}

terraform {
  backend "s3" {
    bucket = "t-horikoshi-bucket"
    key    = "example.tfstate"
    region = "ap-northeast-1"
  }
}

resource "aws_vpc" "example" {
  cidr_block = "10.0.0.0/16"
  tags {
    Name = "${local.name}"
  }
}

resource "aws_security_group" "example" {
  name        = "${local.name}"
  vpc_id      = "${aws_vpc.example.id}"
  tags {
    Name = "${local.name}"
  }
}

output "security-group-ids" {
  value = ["${aws_security_group.example.id}"]
}

output "vpc_id" {
  value = "${aws_vpc.example.id}"
}
ec2 作成時に所属する vpc の情報が必要なので、vpc_id、security-group-ids
を output し example.tfstate ファイルへ出力します。
tfstate ファイルの保存先である S3 の情報を backend に指定します。((S3バケットは事前に作成されていることを前提としています。))
environment/example.tf
ec2 インスタンスを vpc 内に立ち上げる terraform のコードです。
locals {
  stage  = "${terraform.workspace == "prod" ? "prod" : "dev"}"
}

data "terraform_remote_state" "example" {
  backend = "s3"
  config {
    bucket = "t-horikoshi-bucket"
    key = "example.tfstate"
    region = "ap-northeast-1"
  }
}

resource "aws_subnet" "example-a" {
  cidr_block = "10.0.1.0/24"
  vpc_id = "${data.terraform_remote_state.example.vpc_id}"
  tags {
    Name = "example-a"
  }
}

resource "aws_instance" "example" {
  ami = "${var.ami}"
  instance_type = "t2.micro"
  subnet_id = "${aws_subnet.example-a.id}"
  vpc_security_group_ids = ["${data.terraform_remote_state.example.security-group-ids}"]
  tags {
    Name = "tf-for-gitlab-${local.stage}"
  }
}

variable "ami" {
  type ="string"
  default = "ami-0a2de1c3b415889d2"
}
今回は、dev、prod という環境の切り分けを terraform workspace で実現します。
locals の stage 変数に選択した workspace を読み込みます。
data に さきほどの vpc 構築時に設定した s3、tfstate ファイルの情報を読み込めるように設定します。
aws_subnet に vpc_id を、aws_instance に security-group-ids をそれぞれ設定します。
.gitlab-ci.yml
image:
  name: hashicorp/terraform:0.11.11
  entrypoint: [""]

.artifacts: &artifacts
  paths:
    - 'vpc/.terraform'
    - 'environment/.terraform'

stages:
  - fmt
  - init
  - plan
  - apply

fmt:
  stage: fmt
  script:
    - cd vpc && terraform fmt -check=true
    - cd ../environment && terraform fmt -check=true

init:
  stage: init
  script:
    - cd vpc && terraform init
    - cd ../environment && terraform init
  artifacts: *artifacts

plan_vpc:
  stage: plan
  script:
    - cd vpc && terraform plan
  artifacts: *artifacts

.plan_env_job: &plan_env_job
  stage: plan
  script:
    - cd environment
    - terraform workspace new $ENV && terraform workspace select $ENV && terraform plan
  artifacts: *artifacts

plan_env_dev:
   <<: *plan_env_job
   variables:
     ENV: dev

plan_env_prod:
  <<: *plan_env_job
  variables:
    ENV: prod

apply_vpc:
  stage: apply
  script:
    - cd vpc && terraform apply -auto-approve
  when: manual
  artifacts: *artifacts
  only:
    - master

.apply_env_job: &apply_env_job
  stage: apply
  script:
    - cd environment
    - terraform workspace select $ENV && terraform apply -auto-approve
  when: manual
  artifacts: *artifacts

apply_env dev:
  <<: *apply_env_job
  variables:
    ENV: dev

apply_env prod:
  <<: *apply_env_job
  variables:
    ENV: prod
  only:
    - master
下記より、詳細に見ていきます。
image
image:
  name: hashicorp/terraform:0.11.11
  entrypoint: [""]
HashiCorp が管理している docker image を指定します。
デフォルトだと entrypoint に terraform が指定されており、
コンテナ内で Pipeline の job が動かせないのでオーバーライドしておきます。
terraform は update が早いので version は指定したほうが良さそうです。
.artifacts
.artifacts: &artifacts
  paths:
    - 'vpc/.terraform'
    - 'environment/.terraform'
vpc, environment の成果物を stage 間で利用できるようにするための設定です。
terraform init, terraform apply 後の成果物が出力される .terraform ディレクトリを指定します。
stages
stages:
  - fmt
  - init
  - plan
  - apply
Pipeline における各 stage を設定します。
terraform のプロジェクトなので、fmt >init > plan > apply という構成になっています。
fmt
fmt:
  stage: fmt
  script:
    - cd vpc && terraform fmt -check=true
    - cd ../environment && terraform fmt -check=true
Terraform のコードをフォーマットチェックする stage です。
-check=true をつけることでフォーマットに不備があった場合は失敗させるようにしてます。
init
init:
  stage: init
  script:
    - cd vpc && terraform init
    - cd ../environment && terraform init
  artifacts: *artifacts
terraform init して vpc, environment をそれぞれイニシャライズする stage です。
plan
plan_vpc:
  stage: plan
  script:
    - cd vpc && terraform plan
  artifacts: *artifacts

.plan_env_job: &plan_env_job
  stage: plan
  script:
    - cd environment
    - terraform workspace new $ENV || terraform workspace select $ENV && terraform plan
  artifacts: *artifacts

plan_env_dev:
   <<: *plan_env_job
   variables:
     ENV: dev

plan_env_prod:
  <<: *plan_env_job
  variables:
    ENV: prod
terraform plan するステージです。
vpc は一つ立ち上げるだけなのでジョブも一つですが、
environment では dev, prod と環境を分けて構築したいので、
plan_env_dev, plan_env_prod とそれぞれジョブを定義しています。
YAML のアンカーという機能を利用して .plan_env_job という共通ジョブを作成しています。
ENV によって workspace 毎にジョブを実行できるようにしました。
apply
apply_vpc:
  stage: apply
  script:
    - cd vpc && terraform apply -auto-approve
  when: manual
  artifacts: *artifacts
  only:
    - master

.apply_env_job: &apply_env_job
  stage: apply
  script:
    - cd environment
    - terraform workspace select $ENV && terraform apply -auto-approve
  when: manual
  artifacts: *artifacts

apply_env dev:
  <<: *apply_env_job
  variables:
    ENV: dev

apply_env prod:
  <<: *apply_env_job
  variables:
    ENV: prod
  only:
    - master
environment を環境毎に分けたり、ジョブの定義をアンカー使って共通化したりなど、
基本的には plan と同じ仕組みになっています。
terraform apply すると実際にプロビジョニングが始まってしまうので、
when: manual を指定して手動実行するようにしてます。
また、only を指定して ジョブを実行できるブランチを master に限定しました。
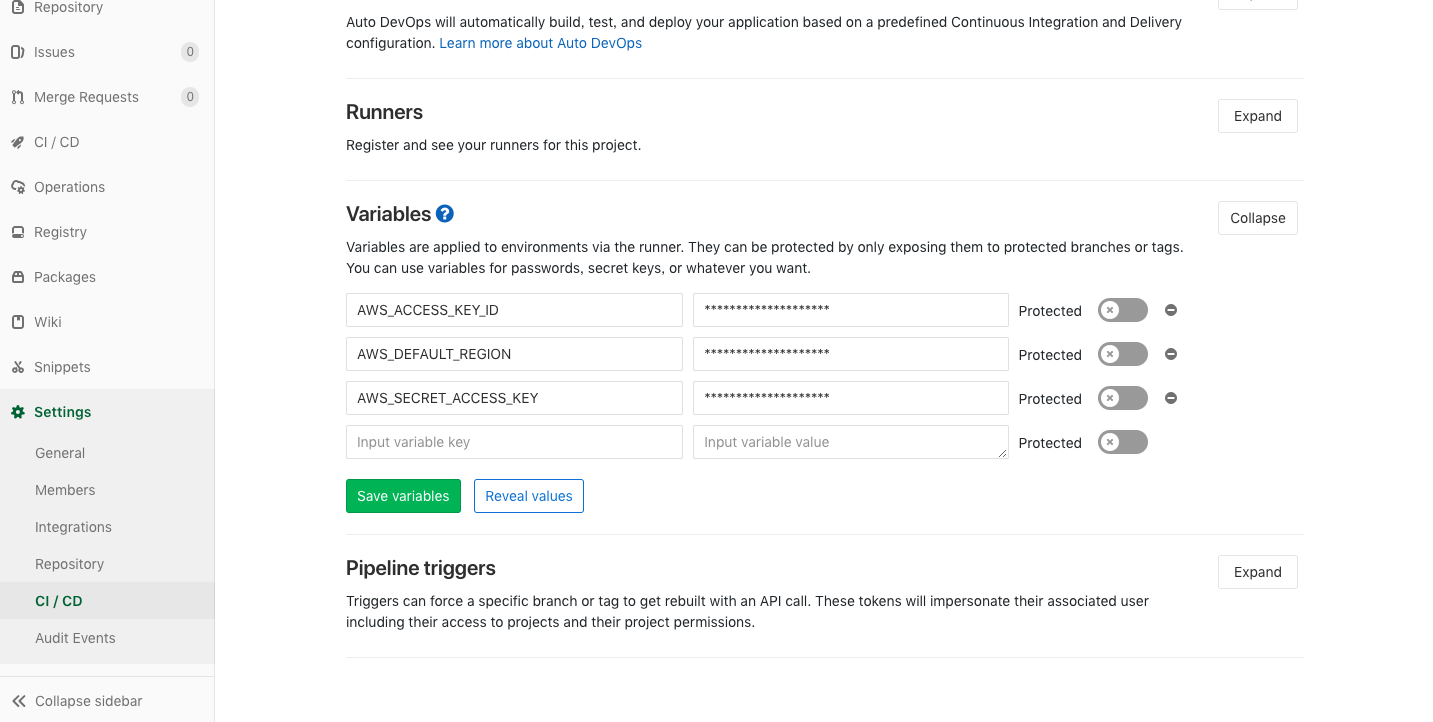
Gitlabに環境変数を設定
aws credential などのセキュアな情報はコードにコミットしたくないので、
Gitlabの環境変数に設定しました。
完成した Pipeline
これまでのコードを git repository に push すると下記のような Pipeline ができあがります。
まとめ
今回紹介した Gitlab の CI/CD 機能はまだまだ触りの部分です。
他にも便利そうな機能があるので使いこなしていきたいですね。
また、手動で作られたインフラストラクチャを管理するつらみは既知の事実ですが、
コード管理されていると安心ですね。
それでは、Enjoy Infrastructure as code!!!

