Proto DataStoreとは
ProtoDataStoreは、SharedPreferencesに変わるデータストレージであるDataStoreの一種であり、Protocol Buffersを用いてプリミティブ型以外も保存できるという特徴があります。
SharedPreferences, PreferencesDataStore, Roomとの比較
現在 SharedPreferences を使用してデータを保存している場合は、DataStore に移行することを検討してください。
と説明されており、DataStoreは、小規模な永続的なデータを保存する際 に用いられていたSharedPreferencesの代わりとして使うことが推奨されています。
SharedPreferencesの代わりにDataStoreを使用すべき理由
なぜSharedPreferencesの代わりとして用いられることが推奨されているのでしょうか?
公式ブログを見てみると、SharedPreferencesにはいくつかの弱点があることがわかります。
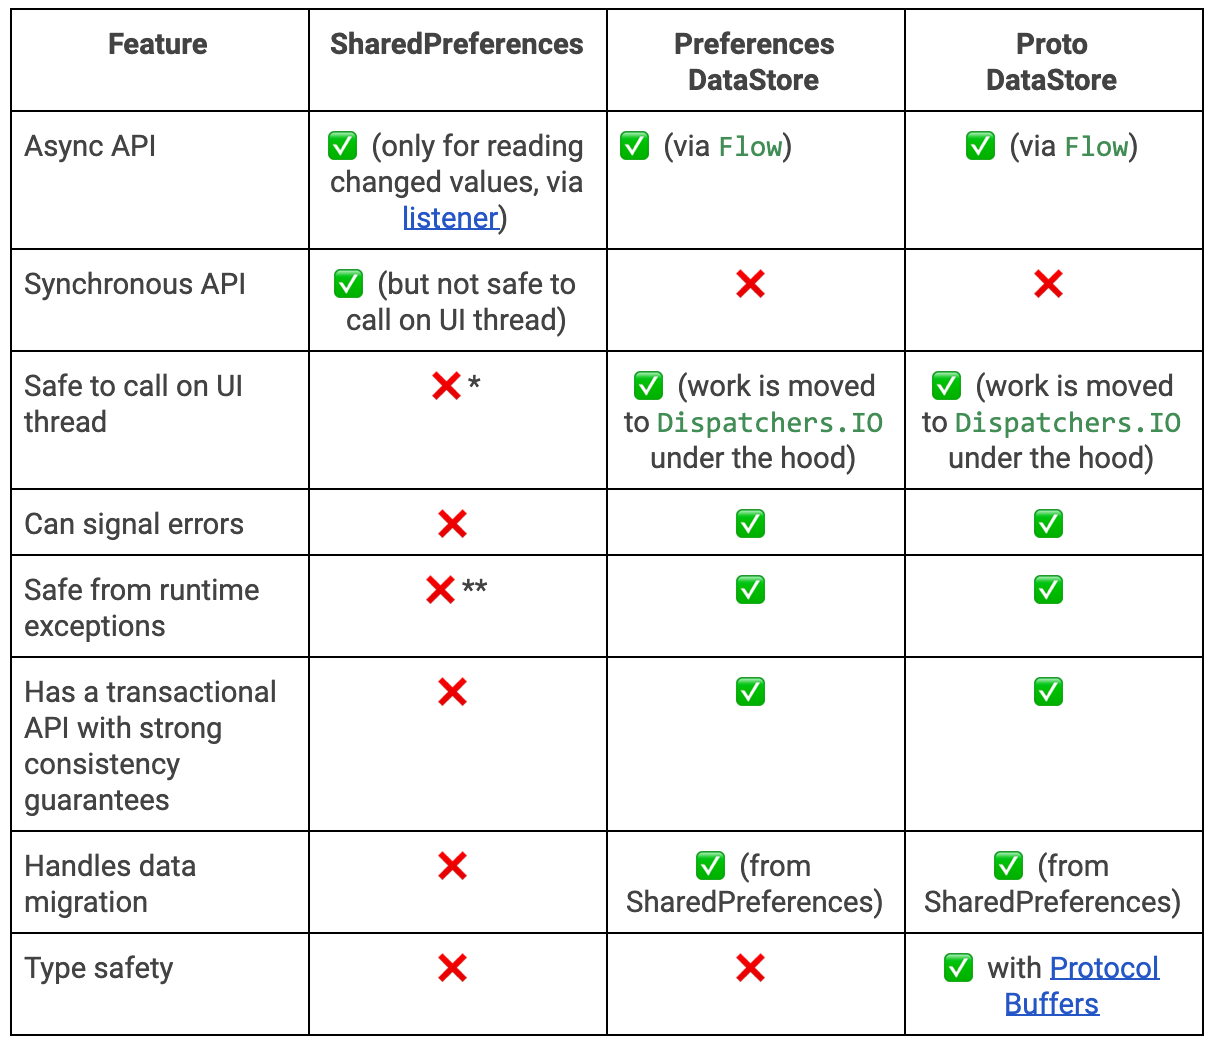
Safe to call on UI thread
「UIスレッドで呼んでも安全かどうか」という意味です。
SharedPreferencesの書き込みを反映させるapplyを用いる際、UIスレッドをブロックして処理を行うため、アプリがフリーズしているかのように見えるという問題が発生する場合があります。
この問題についてはこちらの記事で詳しく書いたので、気になる方はこちらを見てください
一方で、ProtoDataStoreの処理はCoroutineを用いており、IOスレッドで完全非同期で行われるため、アプリがフリーズしているかのように見える問題は発生しません。
Can signal erros, Safe from runtime exception
「エラーが正しく伝播するか」、「RuntimeExceptionから保護されるか」という意味です。
SharedPreferencesでは、エラーが起こったときにRuntimeExceptionのParseExceptionがスローされるのですが、この型は非検査例外と呼ばれるものであり、コンパイラが例外であると理解することができません。
それゆえ、正しくエラーが伝搬せず、データが正しく保存できたかどうか分からないという問題が生じていました。
一方で、DataStoreではエラー時にIOExceptionのような検査例外が投げられるため、エラーが正しく伝播するようになっています。
Flowが返ってくる
また、DataStoreはFlowを介してデータの取得ができるため、mapやfilterといった様々なオペレーターを用いることができます。
override val data: Flow<T> = flow {

        val currentDownStreamFlowState = downstreamFlow.value

        if (currentDownStreamFlowState !is Data) {
            // We need to send a read request because we don't have data yet.
            actor.offer(Message.Read(currentDownStreamFlowState))
        }

        emitAll(
            downstreamFlow.dropWhile {
                if (currentDownStreamFlowState is Data<T> ||
                    currentDownStreamFlowState is Final<T>
                ) {
                    // We don't need to drop any Data or Final values.
                    false
                } else {
                    // we need to drop the last seen state since it was either an exception or
                    // wasn't yet initialized. Since we sent a message to actor, we *will* see a
                    // new value.
                    it === currentDownStreamFlowState
                }
            }.map {
                when (it) {
                    is ReadException<T> -> throw it.readException
                    is Final<T> -> throw it.finalException
                    is Data<T> -> it.value
                    is UnInitialized -> error(
                        "This is a bug in DataStore. Please file a bug at: " +
                            "https://issuetracker.google.com/issues/new?" +
                            "component=907884&template=1466542"
                    )
                }
            }
        )
    }
PreferencesDataStoreとProtoDataStoreとの使い分け
続いて、PreferencesDataStoreとProtoDataStoreとの使い分けについて解説を行います。
この2つの間にはプリミティブ型以外も保存できるかどうかという違いがあります。
ProtoDataStoreは、Protocol Buffersを用いることでプリミティブ型以外も保存できるようになっていますが、Protocol Buffersを用いる分だけコード量が増えるため、プリミティブ型を保存するかどうかでこの2つを使い分けるようにしましょう。
Roomとの使い分け
大規模なデータはRoomに、小規模なデータはDataStoreに保存するように使い分けましょう。
Codelabにも以下のように書かれています。
部分更新、参照整合性、大規模なデータセットや複雑なデータセットが必要な場合は、DataStore の代わりに Room を使用することを検討してください。DataStore は、小規模で単純なデータセットに適しており、部分更新や参照整合性をサポートしていません。
実装
それでは、実際にProtoDataStoreを用いて、プリミティブ型以外の型を保存していきましょう。
今回は、以下のQRStringResultというカスタムクラスを保存していきます。
sealed interface QRCodeStringResult {
    data class Url(
        val url: List<String>
    ) : QRCodeStringResult

    data class Text(
        val text: String
    ) : QRCodeStringResult
}
ライブラリの追加
まずライブラリを追加します(各自で最新versionを確認してください)。
dependencies {
    // DataStore
    implementation "androidx.datastore:datastore:1.1.0-alpha01"

    // protobuf
    implementation  "com.google.protobuf:protobuf-javalite:3.21.9"

    // lifecycleScope
    implementation 'androidx.lifecycle:lifecycle-runtime-ktx:2.5.1'
}

protobuf {
    protoc {
        artifact = "com.google.protobuf:protoc:3.21.9"
    }

    // Generates the java Protobuf-lite code for the Protobufs in this project. See
    // https://github.com/google/protobuf-gradle-plugin#customizing-protobuf-compilation
    // for more information.
    generateProtoTasks {
        all().each { task ->
            task.builtins {
                java {
                    option 'lite'
                }
            }
        }
    }
}
Protoファイルの追加
続いてProtoファイルを作成します。
Proto datastoreではProtocol Buffersを用いてデータを保存するため、proto言語を用いた.protoのファイルをapp/main/proto内に作成する必要があります。
注意
main直下でないと自動生成されるファイルが作成されない可能性があるため、作成場所に注意しましょう。
それでは、上に示したQRStringResultというカスタムクラスをProto言語に置き換えていきましょう。
Proto言語の詳細はこれらの記事にまとまっているため、省かせていただきます。
今回のQRStringResultというカスタムクラスには以下の2つが存在しているため、これらをProtoファイルに置き換えます。
val url: List<String>val text: String
list型はrepeatedを用いて置き換えることができるため、置き換えた結果は以下のようになります。
syntax = "proto3";

option java_package = "com.example.qrcodereader";
option java_multiple_files = true;

message QRCodeStringResultPreference {
  repeated string url = 1;
  string text = 2;
}
ここまでできたら一度ビルドを行い、ファイルを自動生成しましょう。
Serializer
続いて、Serializerを作成します。
Serializerによって、データの書き込み、読み込みを行えるようになります。
writeToを用いて書き込み、readToを用いて読み込みができるようになっているため、これらの関数に先ほど自動生成されたカスタムクラスを教えてあげましょう。
class ResultSerializer @Inject constructor() : Serializer<QRCodeStringResultPreference> {
    override val defaultValue: QRCodeStringResultPreference =
        QRCodeStringResultPreference.getDefaultInstance()

    override suspend fun readFrom(input: InputStream): QRCodeStringResultPreference {
        try {
            return QRCodeStringResultPreference.parseFrom(input)
        } catch (exception: InvalidProtocolBufferException) {
            throw CorruptionException("Cannot read proto.", exception)
        }
    }

    override suspend fun writeTo(
        t: QRCodeStringResultPreference,
        output: OutputStream
    ) = t.writeTo(output)
}

val Context.resultDataStore: DataStore<QRCodeStringResultPreference> by dataStore(
    fileName = "result.pb",
    serializer = ResultSerializer()
)
Repositoryの作成
続いて、data層にリポジトリを作成し、data層から引数の書き込み、呼び出しができるようにします。
interface QRResultRepository {
    suspend fun writeQRCodeResult(qrCodeStringResult: QRCodeStringResult)

    suspend fun getQRCodeResult(): Result<QRCodeStringResultPreference>
}

// 結果を返すクラス
sealed class Result<out T> {
    // 成功した場合
    data class Success<out T>(val data: T) : Result<T>()

    // 失敗した場合
    data class Error(val exception: Exception) : Result<Nothing>()
}
@Singleton
class QRResultRepositoryImpl @Inject constructor(
    private val qrResultDataStore: DataStore<QRCodeStringResultPreference>
    @Dispatcher(IO) private val ioDispatcher: CoroutineDispatcher,
) : QRResultRepository {
    override suspend fun writeQRCodeResult(qrCodeStringResult: QRCodeStringResult) {
        withContext(ioDispatcher) {
            try {
                qrResultDataStore.updateData { currentResult ->
                    when (qrCodeStringResult) {
                        is QRCodeStringResult.Url -> {
                            currentResult.toBuilder().clear().addAllUrl(qrCodeStringResult.url)
                                .build()
                        }
                        is QRCodeStringResult.Text -> {
                            currentResult.toBuilder().clear().setText(qrCodeStringResult.text)
                                .build()
                        }
                    }
                }
            } catch (exception: Exception) {
                Log.e("QRCodeResult", "Failed to update user preferences")
            }
        }
    }

    override suspend fun getQRCodeResult(): Result<QRCodeStringResultPreference> =
        withContext(Dispatchers.IO) {
            try {
                Result.Success(data = qrResultDataStore.data.first())
            } catch (exception: Exception) {
                Result.Error(exception = exception)
            }
        }
}
DI(Optional)
Data層から呼び出すため、DIを行います。
@Module
@InstallIn(SingletonComponent::class)
object QRResultModule {
    @Provides
    @Singleton
    fun providesUserPreferencesDataStore(
        @ApplicationContext context: Context,
        resultSerializer: ResultSerializer
    ): DataStore<QRCodeStringResultPreference> =
        DataStoreFactory.create(
            serializer = resultSerializer,
        ) {
            context.dataStoreFile("result.pb")
        }
}

@Module
@InstallIn(SingletonComponent::class)
abstract class QRResultRepositoryModule {
    @Singleton
    @Binds
    abstract fun bindQRResultRepository(
        impl: QRResultRepositoryImpl
    ): QRResultRepository
}
データの書き込み
ここまで来たら、あとは呼び出すだけです。
データを書き込む関数をViewModelに定義します。
@HiltViewModel
class QRCodeViewModel @Inject constructor(
    private val qrResultRepository: QRResultRepository
) : ViewModel() {

    ...

    fun pushResult(result: QRCodeStringResult) {
        viewModelScope.launch {
            qrResultRepository.writeQRCodeResult(result)
        }
    }
}
その後、書き込みを行う箇所で定義した関数を呼び出すことで、データの書き込みが完了します。
viewModel.pushResult(event.stringResult)
データの読み取り
続いて、データを読み取ります。
データを読み取る関数をViewModelに定義します。
@HiltViewModel
class ResultViewModel @Inject constructor(
    private val qrResultRepository: QRResultRepository
) : ViewModel() {

    ...

    private fun fetchResult() {
        // ローディング開始
        _state.value = _state.value.copy(proceeding = true)

        viewModelScope.launch {
            val result = qrResultRepository.getQRCodeResult()
            // レスポンスに応じて値を格納
            _state.value = when (result) {
                is Result.Success -> {
                    // 値をセット
                    if (!result.data.urlList.isNullOrEmpty()) {
                        _state.value.copy(
                            result = QRCodeStringResult.Url(result.data.urlList)
                        )
                    } else {
                        _state.value.copy(
                            result = QRCodeStringResult.Text(result.data.text)
                        )
                    }
                }
                // エラーが生じていた場合
                is Result.Error -> {
                    ...
                }
            }
            // ローディングを終了
            _state.value = _state.value.copy(proceeding = false)
        }
    }
}
その後、関数を呼び出すことで、データの読み込みが完了します。
fetchResult()
速度
書き込み、読み込みにかかる大まかな速度を計測してみます。
以下のような書き込み、読み込みを連続して行うQRコードアプリを制作し、書き込み、読み込みにかかる時間を測定してみます。
結果
書き込みの際に表示される「書き込み中」や、読み込みの際に表示される「読み込み中」という表示を見ることなく、即座に値の読み書きが行われていることがわかります。
あまりファイルサイズが大きくなく、定量的な評価ではありませんが、かなり高速に読み書きができていることがわかります。
ProtoDataStoreの速度検証してみた
— たかっしー(開発垢) (@takashiho_2) December 12, 2022
(結果受け取り→書き込み→読み取り→表示) pic.twitter.com/7n8bWqoND0
計測に用いたQRコードアプリのリポジトリはこちらです。
最後に
最後まで読んでいただきありがとうございました。よければtwitterのフォローよろしくお願いします。
⚡️ "たかっしーの開発日記"https://t.co/aGE0WGERzU
— たかっしー(開発垢)@東北放浪中 (@takashiho_2) November 15, 2022