Swift4 TableViw の実装を自分のためだけに整理
Swift4 ... インターネットでググりながら試行錯誤して来た結果...
自分なりの TableView の実装の形ができて来たので、自分のためだけに整理してみました。
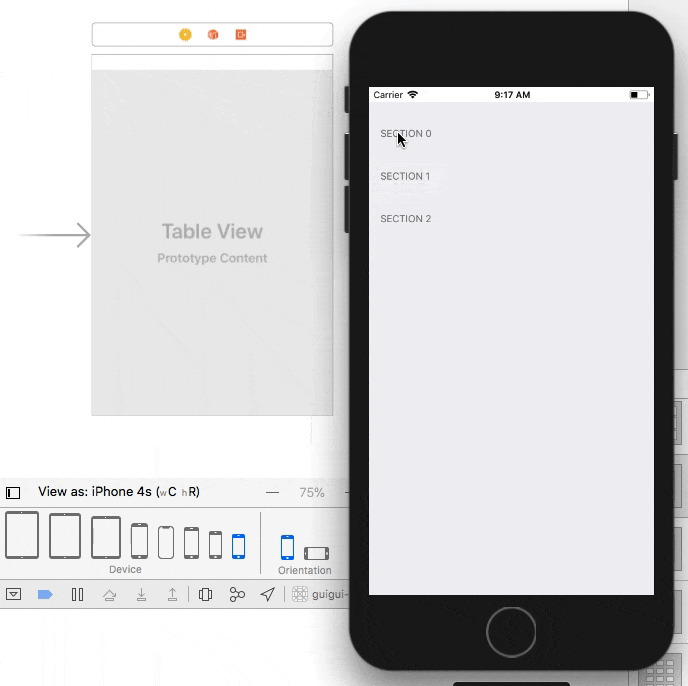
最近作る TableView はこんな感じです。
セルの数が固定で、一部のセルをボタンとして機能させます。
データ数が変化するデータの表示には向かない内容の記事です...。 ^^;
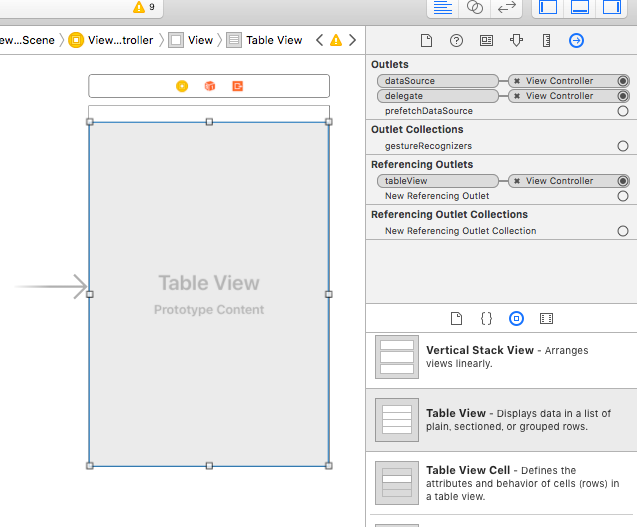
XIBでUIの設定
自分は UITableViewController は好まないので、 ViewController に UITableView を貼り付けます。
UITableView の Outlet設定を 図のように 3箇所 設定しています。
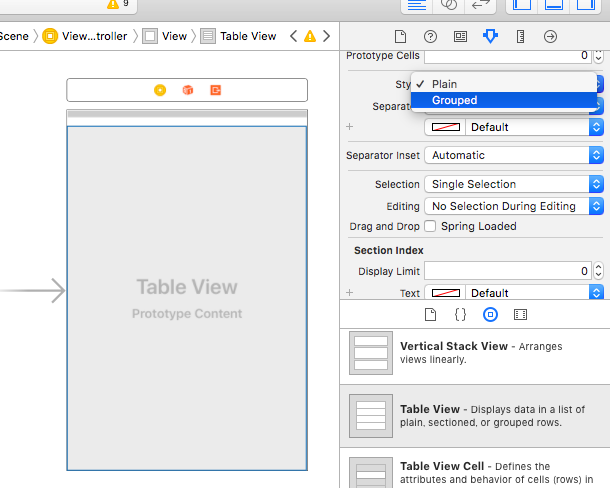
また、 Style は Grouped を好んで選択しています。
コーディング
あとは ViewController に TableView を実装します。
セルのタイトル
固定のセルのTableView を作成する機会が多いので、最近はセル名を固定で定義し、 IndexPath から名称を取得できるようにしています。
extension ViewController {

    internal struct TableDef {

        //~~~ 各セクション ~~~~
        //項目名: セクション1
        static let Section1Rows = [
            "cell A",
            "cell B",
            "cell C",
            ]

        enum Section1RowIndex: Int, Codable {
            case
            cell_A = 0,
            cell_B = 1,
            cell_C = 2
        }
        // ...

        //~~~ セクション (以下の3つの配列の順序を合わせる) ~~~
        //セクション名
        static let Section = [
            "section 0",
            "section 1",
            "section 2",
        ]

        enum SectionRowIndex: Int, Codable {
            case
            section0 = 0,
            section1 = 1,
            section2 = 2
        }

        //項目名 (各セクションをまとめる)
        static let Rows = [
            TableDef.Section1Rows,
            TableDef.Section1Rows,
            TableDef.Section1Rows,
        ]


        //項目名を返す
        static func row(_ indexPath: IndexPath) -> String? {
            guard (0 <= indexPath.section), (indexPath.section < Rows.count) else {
                return nil
            }

            let lists = Rows[indexPath.section]

            guard (0 <= indexPath.row), (indexPath.row < lists.count) else {
                return nil
            }

            //正常終了
            return lists[indexPath.row]
        }
    }
}
KVO (Key Value Observer)
最近よく実装する形は、最近覚えた KVO を利用し、変化がある時は TableView の該当するセルの中を更新しています。
(自分の場合は、セクションごと更新しています。)
    override func viewDidLoad() {
        super.viewDidLoad()

        self.initKVO()
    }

    fileprivate func initKVO() {

        //KVO: battery
        if let status = xxx.status {

            let kvo = status.observe(\.xxx) { (status, change) in
                //change is Always nil. (⇨ Objective-Cで表現できるプロパティではない。)
                print(change)

                //TableViewを更新(セクション単位で更新するメソッドを用意)
                self.updateSection(xxx: status.xxx)
            }

            self.keyValueObservations.append(kvo)
        }
    }
セクションをたたむ
こちらの記事 の「セクションをたたむ様子」 が好きなので、無駄に多用してます。
(コードは参考にさせてもらった記事がとてもわかりやすいので割愛 ^^;
セルをボタン的に扱う
あとは、UIButtonがあるカスタムセルの用意がめんどくさいときは、特定のセルをボタンのように扱っています。
ひとつのセルに触れた時だけ、選択状態にしています。
extension ViewController: UITableViewDataSource, UITableViewDelegate {

    func tableView(_ tableView: UITableView, cellForRowAt indexPath: IndexPath) -> UITableViewCell {

        //セルの作成
        let cell = self.createCell(tableView, indexPath)

        return cell
    }

    func tableView(_ tableView: UITableView, willSelectRowAt indexPath: IndexPath) -> IndexPath? {

        //セルに触れた時にボタンとして振る舞う場合のみ indexPath を返す
        if (self.isTouchCellIndexPath(indexPath)) {
            return indexPath
        }

        return nil
    }

    func tableView(_ tableView: UITableView, didSelectRowAt indexPath: IndexPath) {
        //print(indexPath)

        //セルから指を離したときにコマンドを実行
        self.onClickCell(indexPath)
    }
}

extension ViewController {

    //セルの作成
    internal func createCell(_ tableView: UITableView, _ indexPath: IndexPath) -> UITableViewCell {

        //セルの作成
        let cell = UITableViewCell(style: .value1, reuseIdentifier: "cell")

        if (true) {
            //デバッグ用
            cell.textLabel?.text        = TableDef.row(indexPath)
            cell.detailTextLabel?.text  = self.getString(indexPath)
            //cell.accessoryType = UITableViewCellAccessoryType.disclosureIndicator
        }

        //選択状態 (セルによっては有効にしたい)
        cell.selectionStyle = self.isTouchCellIndexPath(indexPath) ? (.default) : (.none)

        //指を離したときに .selectionStyle を元に戻したい
        if (cell.selectionStyle == .default) {

            // https://qiita.com/taketomato/items/e0e45f0d768109abef2f
            let gesture = UILongPressGestureRecognizer(target: self, action: #selector(tapCell(_:)))
            gesture.minimumPressDuration = 0
            cell.addGestureRecognizer(gesture)
        }

        return cell
    }
}
セルをボタンとして扱うかどうかを判定するためのisTouchCellIndexPathメソッド内の処理は、固定セル前提の実装なので...このような実装をしています。
    fileprivate func isTouchCellIndexPath(_ indexPath: IndexPath) -> Bool {

        //タップしたい項目だけを登録
        let list: [Int : [Int]] = [
            TableDef.SectionRowIndex.section0.rawValue :
                [
                    TableDef.Section1RowIndex.cell_A.rawValue,
                    TableDef.Section1RowIndex.cell_B.rawValue,
                    TableDef.Section1RowIndex.cell_C.rawValue,
            ],

            TableDef.SectionRowIndex.section2.rawValue :
                [
                    TableDef.Section1RowIndex.cell_B.rawValue,
            ],
        ]

        return list[indexPath.section]?.contains(indexPath.row) ?? false
    }
全体的なViewControllerのコードは gist にアップしてみました。(XCode 9.2 で確認)
まとめながら気づいた点
Cell作成時にaddGestureRecognizerしたけど...破棄のことを考慮してなかった...。 ^^;