何度か同じ内容で検索している気がしたので、備忘録として残すことにしました。
バリデーションエラーの処理を追加する際は、ボタンのアクティブ状態についても実装することが多いのであわせて残しておきます。
仕様/作成したもの
- ReactiveProperty
- 7.2.0
- 使用したバリデーション属性
- 必須項目確認(Required)
- 整数/実数確認(自作Int/DoubleValidation)
- 範囲確認(Rangeで適当に範囲設定(ここでは-100から100までに設定))
- 3つの入力箇所ですべてエラーがなければ、ボタンをアクティブ状態へ
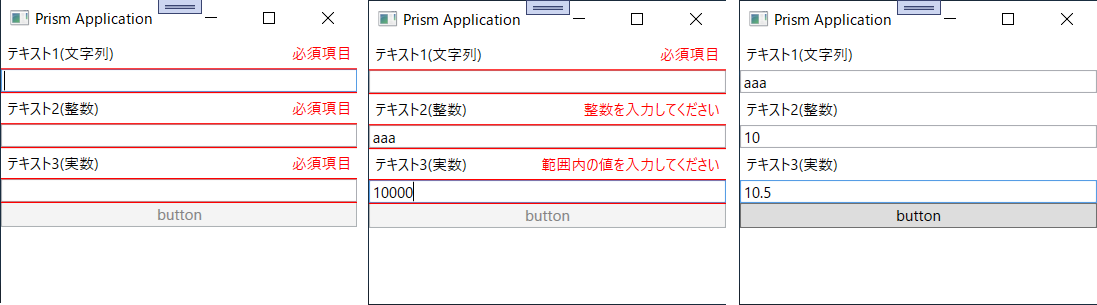
外観
左が初期状態。ボタンは非アクティブ状態。
真ん中がエラーとなる文字列を入力した場合。
右がエラーなしの状態。ボタンはアクティブ状態。
ソースコード
今回はWPFで実装しました。
IntValidationAttribute, DoubleValidationAttributeは、自作のバリデーション属性クラスです。
自作のバリデーション属性のクラス名はHogeValidationAttributeという規則で作成しましたが、実際に属性として使用する際にはAttributeは省略できるようですね。
MainWindowViewModel.cs
namespace ValidationDemo.ViewModels
{
    public class MainWindowViewModel : BindableBase
    {
        private string _title = "Prism Application";
        public string Title
        {
            get { return _title; }
            set { SetProperty(ref _title, value); }
        }

        [Required(ErrorMessage = "必須項目")]
        public ReactiveProperty<string> InputText1 { get; }

        [Required(ErrorMessage = "必須項目")]
        [IntValidation(ErrorMessage = "整数を入力してください")]
        [Range(-100, 100, ErrorMessage = "範囲内の値を入力してください")]
        public ReactiveProperty<string> InputText2 { get; }

        [Required(ErrorMessage = "必須項目")]
        [DoubleValidation(ErrorMessage = "実数を入力してください")]
        [Range(-100.0, 100.0, ErrorMessage = "範囲内の値を入力してください")]
        public ReactiveProperty<string> InputText3 { get; }

        public ReadOnlyReactiveProperty<string> ErrorText1 { get; }
        public ReadOnlyReactiveProperty<string> ErrorText2 { get; }
        public ReadOnlyReactiveProperty<string> ErrorText3 { get; }

        public ReactiveCommand ExecCommand { get; }

        public MainWindowViewModel()
        {
            // バリデーション属性設定
            this.InputText1 = new ReactiveProperty<string>().SetValidateAttribute(() => this.InputText1);
            this.InputText2 = new ReactiveProperty<string>().SetValidateAttribute(() => this.InputText2);
            this.InputText3 = new ReactiveProperty<string>().SetValidateAttribute(() => this.InputText3);

            // ウィンドウ初期表示時にバリデーションエラーを非表示する場合は下記のようにモード設定する
            //this.InputText1 = new ReactiveProperty<string>(mode: ReactivePropertyMode.Default | ReactivePropertyMode.IgnoreInitialValidationError).SetValidateAttribute(() => this.InputText1);

            // バリデーションエラー表示設定
            this.ErrorText1 = this.InputText1.ObserveErrorChanged
                .Select(x => x?.Cast<string>().FirstOrDefault())
                .ToReadOnlyReactiveProperty();
            this.ErrorText2 = this.InputText2.ObserveErrorChanged
                .Select(x => x?.Cast<string>().FirstOrDefault())
                .ToReadOnlyReactiveProperty();
            this.ErrorText3 = this.InputText3.ObserveErrorChanged
                .Select(x => x?.Cast<string>().FirstOrDefault())
                .ToReadOnlyReactiveProperty();

            // 実行コマンドのアクティブ設定
            this.ExecCommand =
                new[]
                {
                    this.InputText1.ObserveHasErrors,
                    this.InputText2.ObserveHasErrors,
                    this.InputText3.ObserveHasErrors,
                }
                .CombineLatestValuesAreAllFalse()   // すべてエラーなしの場合にアクティブ設定
                .ToReactiveCommand();
        }
    }
}
少し話が逸れますが、ここではエラーテキストの表示等にLabelを使用しています。
気になる方は適宜TextBlockに置き換えてください。
一般的に、ユーザー インターフェイス (UI) で短い文を使用するなど限定的なテキストのサポートが必要な場合は、TextBlock 要素を使用するべきです。 最小限のテキスト サポートが必要な場合には、Label を使用します。
パフォーマンスの最適化:テキスト
MainWindow.xaml
<Window x:Class="ValidationDemo.Views.MainWindow"
        xmlns="http://schemas.microsoft.com/winfx/2006/xaml/presentation"
        xmlns:x="http://schemas.microsoft.com/winfx/2006/xaml"
        xmlns:prism="http://prismlibrary.com/"
        prism:ViewModelLocator.AutoWireViewModel="True"
        Title="{Binding Title}" Height="350" Width="525" >

    <Window.Resources>
        <Style x:Key="ValidationStyle" TargetType="Label">
            <Setter Property="Foreground" Value="Red" />
        </Style>
    </Window.Resources>

    <Grid>
        <Grid.RowDefinitions>
            <RowDefinition Height="Auto" />
            <RowDefinition Height="Auto" />
            <RowDefinition Height="Auto" />
            <RowDefinition Height="Auto" />
            <RowDefinition Height="Auto" />
            <RowDefinition Height="Auto" />
            <RowDefinition Height="Auto" />
        </Grid.RowDefinitions>

        <Label Grid.Row="0" Content="テキスト1(文字列)" HorizontalAlignment="Left" />
        <Label Grid.Row="0" Content="{Binding ErrorText1.Value}" Style="{StaticResource ValidationStyle}" HorizontalAlignment="Right" />
        <TextBox Grid.Row="1" Text="{Binding InputText1.Value, UpdateSourceTrigger=PropertyChanged}" />

        <Label Grid.Row="2" Content="テキスト2(整数)" HorizontalAlignment="Left" />
        <Label Grid.Row="2" Content="{Binding ErrorText2.Value}" Style="{StaticResource ValidationStyle}" HorizontalAlignment="Right" />
        <TextBox Grid.Row="3" Text="{Binding InputText2.Value, UpdateSourceTrigger=PropertyChanged}" />

        <Label Grid.Row="4" Content="テキスト3(実数)" HorizontalAlignment="Left" />
        <Label Grid.Row="4" Content="{Binding ErrorText3.Value}" Style="{StaticResource ValidationStyle}" HorizontalAlignment="Right" />
        <TextBox Grid.Row="5" Text="{Binding InputText3.Value, UpdateSourceTrigger=PropertyChanged}" />

        <Button Grid.Row="6" Content="button" Command="{Binding ExecCommand}" />
    </Grid>
</Window>
Validation.cs
namespace ValidationDemo.Models
{
    public class IntValidationAttribute : ValidationAttribute
    {
        public override bool IsValid(object value)
            => int.TryParse(value.ToString(), out var _);
    }

    public class DoubleValidationAttribute : ValidationAttribute
    {
        public override bool IsValid(object value)
            => double.TryParse(value.ToString(), out var _);
    }
}
参考リンク
MVVM をリアクティブプログラミングで快適に ReactiveProperty オーバービュー 2020 年版 前編
【C#】ReactiveProperty全然分からねぇ!って人向けのFAQ集【修正済】
Xamarin.FormsでReactivePropertyとDataAnnotationsを使ってバリデーションを行うサンプル(独自の検証ルールも作ってみる)