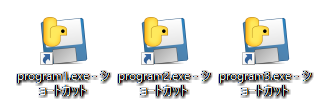
デスクトップツール(野良ツール)をいくつか作成すると、exeファイルのショートカットが並び、美しくないので、

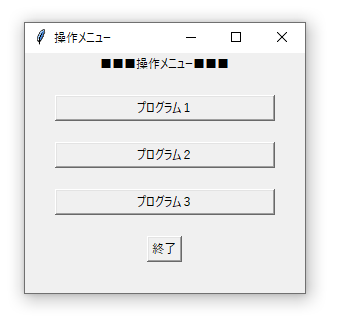
こんなメニューボックスをpythonで作ってみました。

環境
- OS : Windows 10 64bit
- Python 3.6.0 (Anaconda3-4.3.1)
使用したモジュール
- TKInter
- subprocess
- sys
TKinterとは
Python の標準的な GUIツールです。
これでPythonスクリプトをGUI形式で実行することができます。
ここでは、メニューボックスのGUIを提供するのに使いました。
subprocessとは
Pythonからコマンドを実行するためのモジュールです。
外部ファイルの実行がPythonからできるようになります。
ここでは、各プログラムボタンをクリックして、外部ファイルを実行させるのに使いました。
sysとは
Pythonのインタプリタや実行環境に関連した変数や関数がまとめられたライブラリです。
ここでは、メニューボックスを終了させるのに使いました。
コード
import tkinter as tk
import sys
import subprocess

def program_1():
    subprocess.Popen(r'C:\python\program_1.exe')

def program_2():
    subprocess.Popen(r'C:\python\program_2.exe')

def program_3():
    subprocess.Popen(r'C:\python\program_3.exe')

def finish_menu():
    sys.exit()

# 操作メニューボックス
root = tk.Tk()
root.title(u"操作メニュー")
root.geometry("280x240")

# プログラム1
labeltitle = tk.Label(root, text=u'■■■操作メニュー■■■')
labeltitle.pack()
Label_Blanc = tk.Label(root, text=u'')
Label_Blanc.pack()
program_1_Button = tk.Button(root, text=u'プログラム1', width=30)
program_1_Button["command"] = program_1
program_1_Button.pack()

# プログラム2
Label_Blanc = tk.Label(root, text=u'')
Label_Blanc.pack()
program_2_Button = tk.Button(root, text=u'プログラム2', width=30)
program_2_Button["command"] = program_2
program_2_Button.pack()

# プログラム3
Label_Blanc = tk.Label(root, text=u'')
Label_Blanc.pack()
program_3_Button = tk.Button(root, text=u'プログラム3', width=30)
program_3_Button["command"] = program_3
program_3_Button.pack()

# 終了
Label_Blanc = tk.Label(root, text=u'')
Label_Blanc.pack()
finish_menu_Button = tk.Button(root, text=u'終了')
finish_menu_Button["command"] = finish_menu
finish_menu_Button.pack()

root.mainloop()
説明
subprosess.Popen()
プログラムボタンをクリックしたときの動作の関数を作成します。
subprosess.Popenは外部ファイルを実行させるメソッド。
実行するexeファイルを絶対パスで記載してます。
def program_1():
    subprocess.Popen(r'C:\python\program_1.exe')
sys.exit()
終了ボタンをクリックしたときの動作の関数。
sys.exit()はプログラムを終了させるメソッドです。
def finish_menu():
    sys.exit()
メッセージボックス(TKinter)
ボタンクリック時の関数を書き終えたら、TKinterモジュールでメッセージボックスを定義していきます。
ウィンドウの定義
root = tk.Tk()
root.title(u"操作メニュー")
root.geometry("280x240")
メッセージボックスのウィンドウの定義していきます。
root = tk.Tk()でこのウィンドウの名前(root)。
root.title(u"ウィンドウ名")はタイトルバーの表記(操作メニュー)。
root.geometry("縦x横")はウィンドウサイズです(縦280px ✕ 横240px)。
ボックス内のラベルの定義
labeltitle = tk.Label(root, text=u'■■■操作メニュー■■■')
labeltitle.pack()
Label_Blanc = tk.Label(root, text=u'')
Label_Blanc.pack()
labeltitle = tk.label(ウィンドウ名,, text=u'テキスト')でウィンドウ内のラベルの内容を定義し、
labeltitle.pack()でウィンドウ内に格納します。
Label_Blanc = tk.Label(root, text=u'') Label_Blanc.pack()
は1行分スペースを空けるために入れています。
(これが正しい作法なのかどうかはわかりません)
ボックス内のボタンの定義
program_1_Button = tk.Button(root, text=u'プログラム1' width=30)
program_1_Button["command"] = program_1
program_1_Button.pack()
program_1_Button = tk.Button(ウィンドウ名,, text=u'テキスト')でウィンドウ内のボタンの内容を定義。
幅を指定したい場合はwidth=xxで指定。
program_1_Button["command"] = 関数名で呼び出す関数を定義。
program_1_Button.pack()でウィンドウ内に格納します。
メインループ
root.mainloop()
ウィンドウがマウス操作などに対応できるようにメインループを実行する。
Tkinterではこの一行が重要になるので、書き忘れないようにすること。
プログラムの実行内容の処理は、
root = Tkinter.Tk()
と
root.mainloop()
の間に記載する。