OpenCvはまだまだ使えます(OpenCv is still alive and well)


OpencCvと聞いてほぼ死語のよに感じてしまうのではないでしょうか?しかし、OpenCvはAIの先駆けとなる画像認識を幅広く広めてくれて素晴らしいツールです。
今回はそんなOpenCvを復活させるべく、流行りのVSCodeとJavaのMavenを使ったプロジェクトの一端を説明します。OpenCvはC++やPythonではおなじみですが、Javaでどのように開発していくのか今回挑戦してみます。
今回はカスケード分類器を使い、下のような顔の検出と目の検出ができるカメラアプリを作成します。ユーザーはプレイとストップボタン、顔検出、目検出、検出なしの通常再生を選択できる簡単なUIですが、VsCode、JAVA, Mavenの3要素を利用することで初心者でもこのようなアプリがすぐに作れるようになります。

世界を見てもVsCodeとJAVA、OpenCVでのアプリ開発の解説ページはあまりないため、海外からでも検索に引っかかりやすくなるように本文を英訳しています。読みにくい点をご了承ください。
When you hear OpencV, it may feel like a dead word. However, OpenCv is a great tool that has widely disseminated image recognition, a pioneer of AI.
Today, in order to revive OpenCv, I will explain a part of a project using the popular VSCode and Java Maven. OpenCv is familiar in C++ and Python, but this time I will try to develop it in Java.
This time, I will use a cascade classifier to create a camera app that can detect faces and eyes as shown below. It is a simple UI where users can select play and stop buttons, face detection, eye detection, and normal playback without detection, but by using the three elements of VsCode, JAVA, and Maven, even beginners can quickly create such an app.
There are not many pages in the world that explain how to develop apps using VsCode, JAVA, and OpenCV, so we have translated the text into English to make it easier to find in searches from overseas. Please understand that it may be difficult to read.
VsCodeでMavenのプロジェクト作成方法 (How to create a Maven project in VsCode)
JDKはあらかじめPCに導入しておきます。また環境変数にPathを通しておく必要があります。ここら辺の説明は省略します。
その前提をもとにして、最初にVSCodeにJavaの開発環境をインストールします。
Java+Mavenで開発するには最低限以下の拡張機能をインストールする必要があります。
-Extension Pack for Java(Maven含む)
-Java Language Support
MavenのPOMファイルを編集するのにJava Language Supportが必要のようです。
The JDK must be installed on your PC beforehand. You must also set the Path in the environment variables. We won't go into detail here.
Based on that premise, first install the Java development environment in VSCode.
To develop with Java+Maven, you must install the following extensions at a minimum:
-Extension Pack for Java (including Maven)
-Java Language Support
It seems that Java Language Support is required to edit Maven POM files.

ではプロジェクトを開始します。
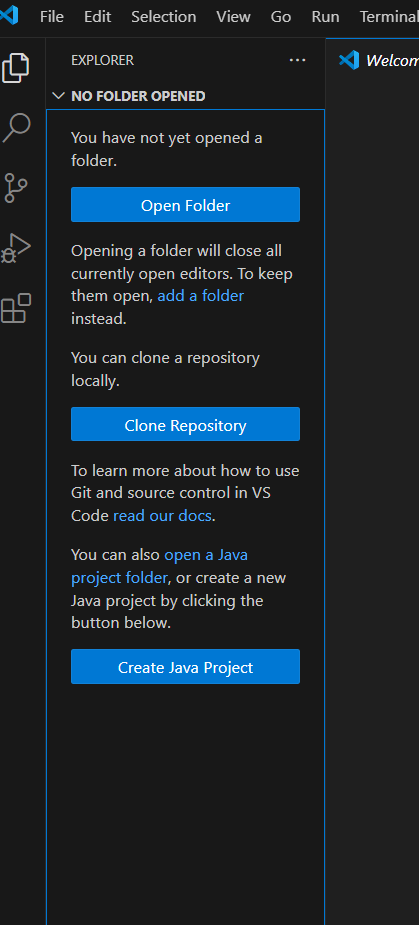
VSCodeを開き、FileメニューからOpen Windowを選びます。左上のドキュメント絵を選択かCTRL+SHIFT+Eを押して左見開きの画面を開きます。そこのCreate Java Projectを選択します。
Let's start the project.
Open VSCode and select Open Window from the File menu. Select the document icon in the upper left or press CTRL+SHIFT+E to open a left-facing screen. Select Create Java Project from there.
プロジェクトタイプを選択します。Mavenにて簡単なデスクトップアプリを作成するのでMaven-archetype-quickstartを選択します。
Select the project type. Since we are creating a simple desktop application with Maven, select Maven-archetype-quickstart.
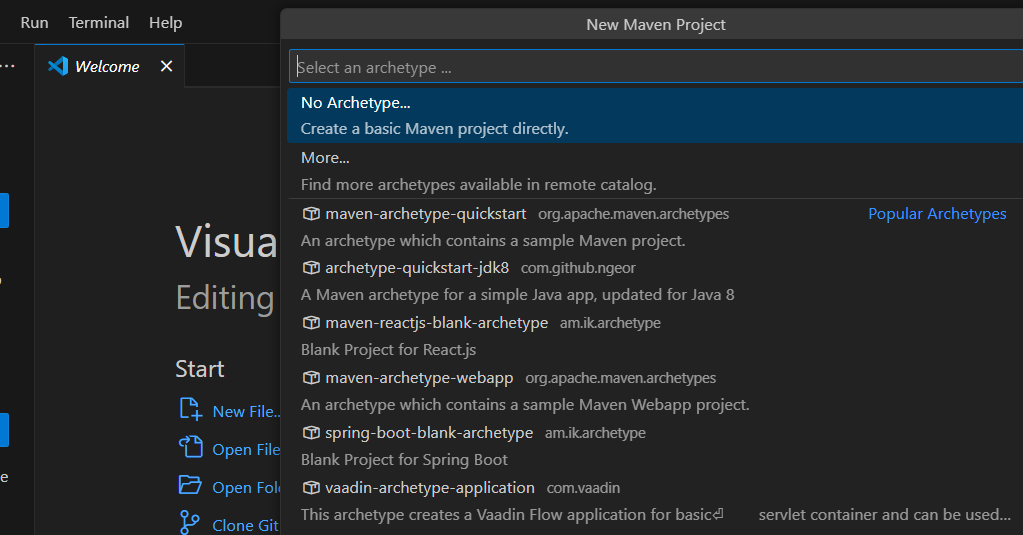
次にバージョン選択します。一番上の1.4を選択します。
Next, select the version. Select the top one, 1.4.

group IDを入力します。com.taro_yamadaのように個人IDや会社IDを入力します。ここでは大文字は使えません。
Enter the group ID. Enter an individual ID, such as com.taro_yamada. Capital letters cannot be used here.

次にプロジェクト名を入力します。opencv_demoのように小文字で入力します。
Next, enter the project name. Enter it in lowercase, such as opencv_demo.

エンターを押すと、フォルダー選択画面が出ます。任意のフォルダーにプロジェクトが作成されるのでフォルダーを新規作成してそこを選択します。
選択するとMavenプロジェクトに必要なファイルが選択したフォルダーにウンロードされていきます。
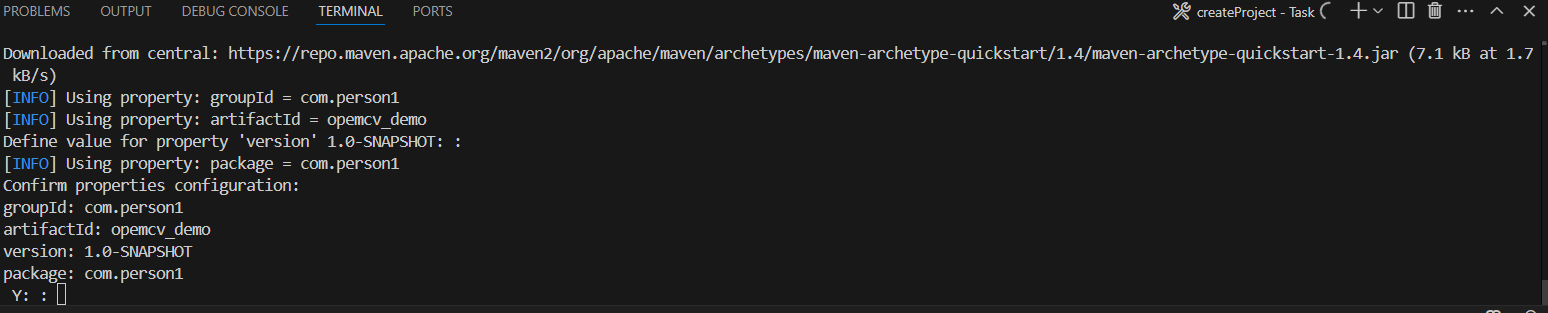
ダウンロードが終了すると以下の画面になります。このままエンターを押して次に進みます。
When you press Enter, a folder selection screen will appear. The project will be created in a folder of your choice, so create a new folder and select it.
Once you select it, the files necessary for the Maven project will be downloaded to the selected folder.
When the download is complete, the following screen will appear. Press Enter to proceed.

この画面でもエンターを押して進みます。
On this screen, press Enter to proceed.
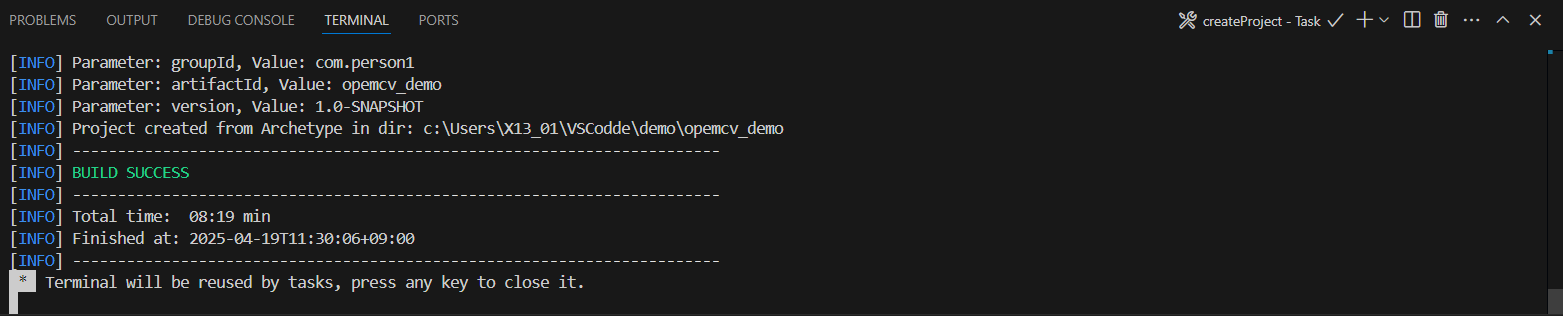
このようにターミナルにBuild Successが表示されていれば成功です。
If Build Success is displayed in the terminal like this, then the build was successful.
MavenのPOMにOpenCvを使用する依存性を宣言をする(Declare a dependency on OpenCV in your Maven POM)
プロジェクトにOpenCvの依存性を持たせるため、POMファイルに依存性を記述します。
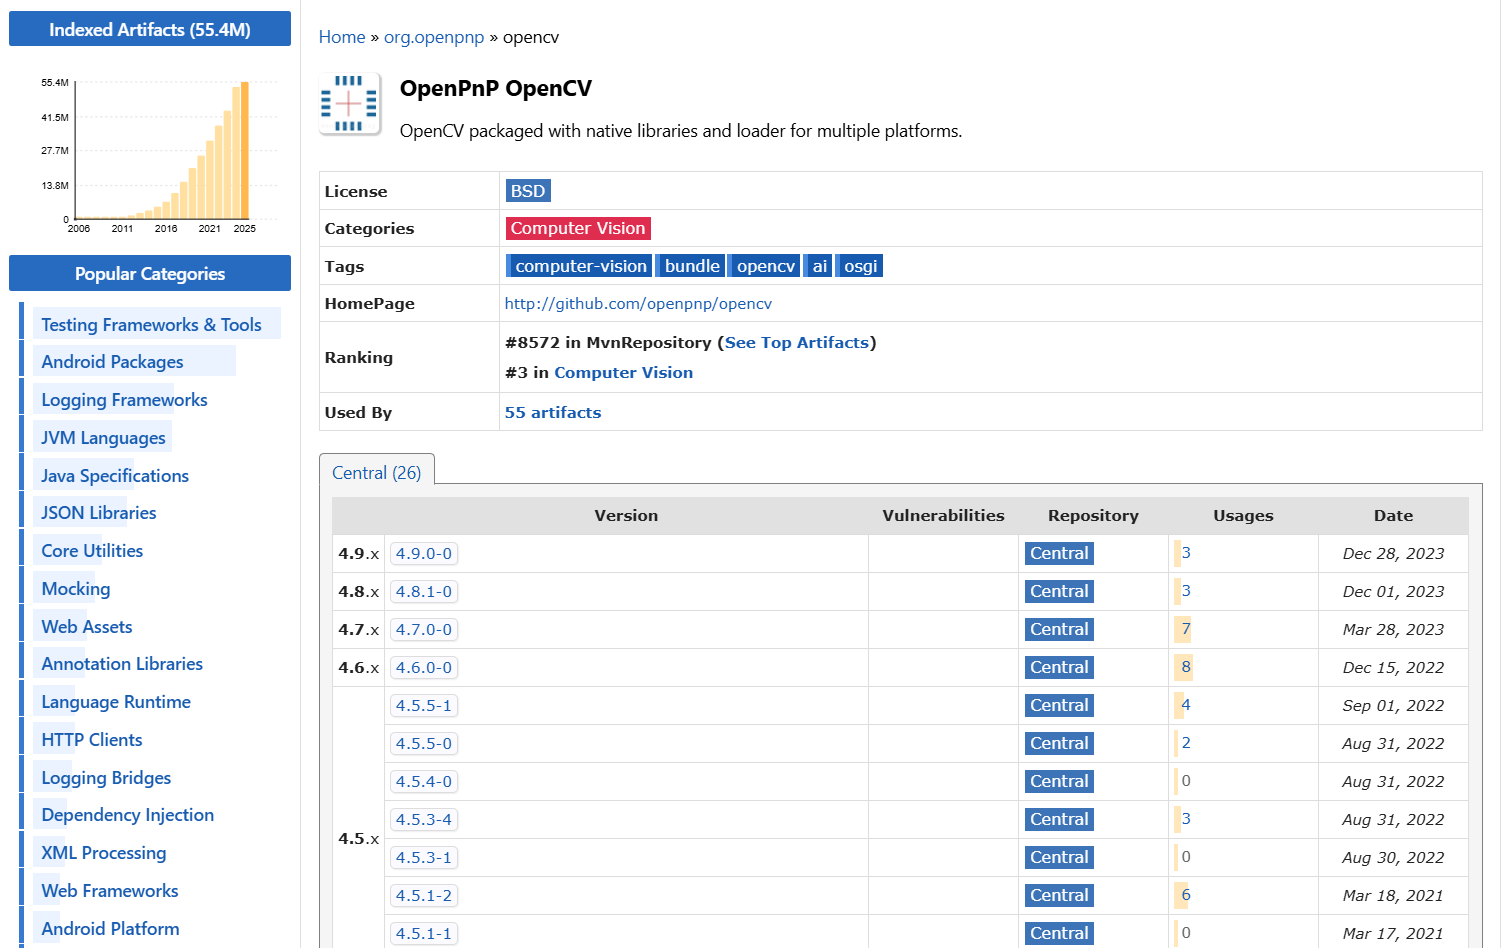
まず下のリンクのMavenのOpenCv Repositorにアクセスします。
ここで好みのバージョンをクリックして、XML部分をコピーします。
First, access the Maven OpenCV Repository.
Click on the version you prefer and copy the XML part.
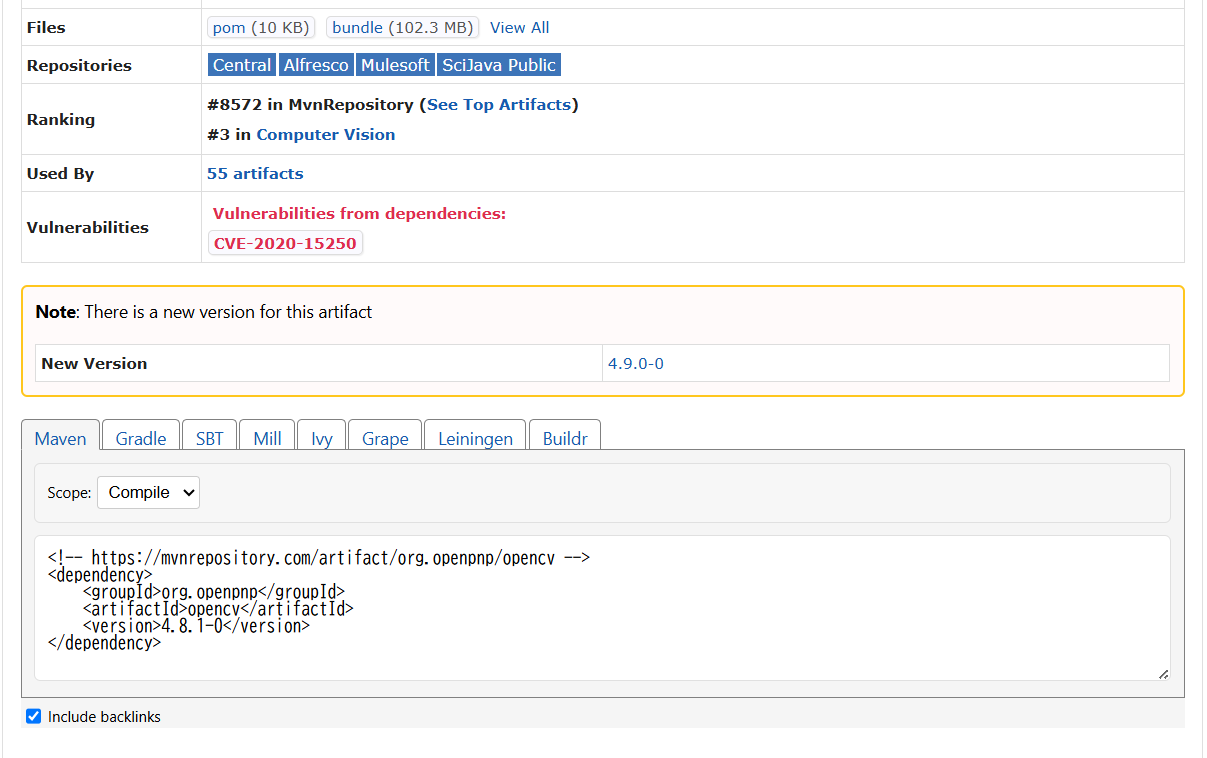
コピーしたXMLをPOMファイルのdependenciesタグ内に貼り付けます。
Paste the copied XML into the dependencies tag of your POM file.

dependenciesタグがない場合、つぎのタグを追加します。
If the dependencies tag is not present, add the following tag:
<dependencies>
ここに貼り付ける
</dependencies>
貼り付けたらCTRL+Sで保存します。するとA build file was modified. Do you want to synchronize the Java classpath/configuration?と聞かれ、YESを押すとOpenCvのダウンロードが開始されます。
Once you have pasted it, save it with CTRL+S. Then you will be asked, "A build file was modified. Do you want to synchronize the Java classpath/configuration?" Click YES and the OpenCv download will begin.

もし、ここでエラーが出る場合は、コンパイラーのバージョンの間違いか何かの拡張機能が不足している可能性があるので、ない分をインストールするようにしてください。
ダウンロードが完了したら、Vs Code のメニュータグ View から Command Palette(CTRL + SHIFT + P)でConfigure Classpathを選択します。LibrariesタブにMaven: org.openpnp:opencv:---が追加されているのを確認します。
If an error occurs here, it may be that the compiler version is incorrect or some extension is missing, so be sure to install the missing extension.
Once the download is complete, select Configure Classpath from the Vs Code menu tag View in the Command Palette (CTRL + SHIFT + P). Confirm that Maven: org.openpnp:opencv:--- has been added to the Libraries tab.

これでJavaでのOpenCvプロジェクトを開始することが可能になりました。つぎは簡単なデスクトップアプリを作っていきます。PCにUSBカメラか内蔵カメラがあれば動作します。カメラ画像を取得し、JFrameに表示させます。またPlayとStopボタンを配置し、Playボタンを押すと撮影開始、ストップで停止させることができるように設計します。こうすることで実用性のあるOpenCvを使ったアプリケーションを開発できるようになります。
Now you can start an OpenCv project in Java. Next, we will create a simple desktop application. This will work if your PC has a USB camera or built-in camera. It will acquire camera images and display them in a JFrame. It will also have a Play and Stop button, so that pressing the Play button will start recording and pressing the Stop button will stop recording. This will allow you to develop a practical application using OpenCv.
OpenCvを使うアプリケーション作成方法(How to create an application using OpenCv)
OpenCvのアプリケーションを作るにあたってはOpenCvが提供しているサンプルの分類器があるのでこれをダウンロードして、使用します。この分類器はあくまでも試用版で実用性があるわけではないので、「画像認識なんてこんなものか」と落胆してしまうかもしれませんが、ちゃんとトレーニングした分類器はより精度が高いものが作れますのでこの点はご理解ください。
When creating an OpenCv application, we will download and use the sample classifier provided by OpenCv. This classifier is only a trial version and is not practical, so you may be disappointed and think "Is this all there is to image recognition?", but please understand that a properly trained classifier can be made to have higher accuracy.
カスケード分類器のダウンロード手順(Cascade Classifier Download Instructions)
まず、VsCodeの左エクスプローラーのresourcesフォルダーを右クリックし、CopyPathを選択します。
つぎにWindowsの下メニューの検索欄にdosまたはcmdと入力し、コマンドプロンプトを起動します。
CDとタイプしスペースを入れてからCtrl + Vを押し、ペーストします。
カレントディレクトリがプロジェクトのresourcesフォルダーになります。
ここで以下のコマンドを入力します。すると「haarcascade_eye.xml」と「haarcascade_frontalface_alt.xml」の2種類のカスケードがresourcesフォルダーにダウンロードされます。
First, right-click on the resources folder in the left explorer of VsCode and select CopyPath.
Next, enter dos or cmd in the search field under Windows to launch the command prompt.
Type CD, enter a space, then press Ctrl + V and paste.
The current directory will be the resources folder of your project.
Now enter the following command. This will download two cascades, "haarcascade_eye.xml" and "haarcascade_frontalface_alt.xml", to the resources folder.

curl -O https://raw.githubusercontent.com/opencv/opencv/refs/heads/4.x/data/haarcascades/haarcascade_eye.xml

curl -O https://raw.githubusercontent.com/opencv/opencv/refs/heads/4.x/data/haarcascades/haarcascade_frontalface_alt.xml
メソッド記述用のJavaファイルの作成(Creating a Java file for writing methods)
最初にSrcフォルダーのApp.javaと同じ場所にCreateFrame.javaファイルを作成します。
エクスプローラーのApp.javaかMain.javaファイルのあるフォルダーで右クリックして、NewFileを選択、CreateFrame.javaとファイル名を入力して作成します。
そこに以下のようにボタン動作用のActionListenerを追記します。
First, create a CreateFrame.java file in the same place as App.java in the Src folder.
Right-click on the folder containing the App.java or Main.java file in Explorer, select New File, and enter the file name CreateFrame.java to create it.
Add an ActionListener for button behavior to it as follows.
public class CreateFrame implements ActionListener {

}
次にコンストラクターを記述します。
OpencvのMatクラスは絵を描くキャンバスのようなイメージです。
VideoCaputure(0)で内蔵カメラまたはUSBカメラを一度オープンし、matに縦横サイズを取得します。
記録したらreleaseでカメラをいったん停止させます。
カメラがない場合、メッセージボックスでアプリケーションを終了させます。
このアプリケーションを実行する場合、USBカメラか内臓カメラがあるか確認してください。
ボタンとラジオボタンを作成します。
ラジオボタンはボタングループに登録します。
このグループ化でどのボタンが押されているか識別します。
次にカスケード分類器をロードします。
ロードするときは分類器のxmlファイルを指定しますが、フルパスを指定します。
mat.width(),mat.height()でJFrameのサイズを決めます。
PlayとStopボタンを追加します。このボタンのActionListnerをクラスに追加します。
Next, write the constructor.
The Opencv Mat class is like a canvas on which you can paint a picture.
Open the built-in camera or USB camera once with VideoCaputure(0) and get the vertical and horizontal dimensions into mat.
Once recording is complete, stop the camera with release.
If there is no camera, a message box will be displayed to terminate the application.
When running this application, please make sure that a USB camera or built-in camera is present.
Create buttons and radio buttons.
Register the radio buttons in a button group.
This grouping identifies which button is pressed.
Next, load the cascade classifier.
When loading, specify the classifier xml file, but specify the full path.
Determine the size of the JFrame using mat.width() and mat.height().
Add Play and Stop buttons. Add an ActionListener for these buttons to the classifier ...
 public CreateFrame() {

        mat = new Mat(100, 100, CvType.CV_8U);// Matを初期化

        state = null; // Thread の状態を初期化

        // カメラの初期化
        cap = new VideoCapture(Videoio.CAP_ANY);// デフォルトのカメラを選択する(PC内蔵カメラ、またはUSBカメラを取得する)
        cap.open(0);// カメラをオープンする。
        if (!cap.isOpened()) {

            System.out.println("No camera found");

        }

        cap.read(mat); // カメラから1度画像を読み、そのサイズをmatへ記録する
        cap.release(); // いったんカメラを開放する

        // カメラの動作スイッチの役目があるブーリアン。trueでオンにする。
        b = false;

        // Jradio button 初期化[cascade]
        strRadio1 = "通常(Normal)";
        strRadio2 = "顔検出(Face Detection)";
        strRadio3 = "目検出(Eye Detection)";
        radio1 = new JRadioButton(strRadio1);
        radio2 = new JRadioButton(strRadio2);
        radio3 = new JRadioButton(strRadio3);
        radio1.setActionCommand(strRadio1);
        radio2.setActionCommand(strRadio2);
        radio3.setActionCommand(strRadio3);

        // Button Group 初期化とRadio button 追加
        bGroup = new ButtonGroup();
        bGroup.add(radio1);
        bGroup.add(radio2);
        bGroup.add(radio3);
        bGroup.setSelected(radio1.getModel(), true);
        bm = bGroup.getSelection();

        // ラジオボタンの動作登録
        radio1.addActionListener(this);
        radio2.addActionListener(this);
        radio3.addActionListener(this);

        // Cascade Classifier の初期化
        try {

            URL ur = getClass().getResource("/haarcascade_eye.xml");// ファイル名の前に必ずスラッシュを入れる
            File f = new File(ur.toURI());
            strEyePath = f.getAbsolutePath();
            eyeClassifier = new CascadeClassifier(strEyePath); // 絶対パスを通す必要がある
            if (eyeClassifier.empty()) {
                System.out.println(strEyePath + " not loaded.");
                return;
            }

            ur = getClass().getResource("/haarcascade_frontalface_alt.xml");
            f = new File(ur.toURI());
            strFacePath = f.getAbsolutePath();
            faceClassifier = new CascadeClassifier(strFacePath);
            if (faceClassifier.empty()) {
                System.out.println(strFacePath + " not loaded.");
                return;
            }

        } catch (Exception e) {

            System.out.println("something wrong with getResource func");
            System.out.println(e.getStackTrace().toString());
            return;

        }

        // JButtonを初期可。[Play][Stop]
        jpButton = new JPanel();
        play = new JButton("Play");
        stop = new JButton("Stop");
        jpButton.add(play, BorderLayout.WEST);
        jpButton.add(stop, BorderLayout.CENTER);
        jpButton.add(radio1);
        jpButton.add(radio2);
        jpButton.add(radio3);

        play.addActionListener(this);
        stop.addActionListener(this);

        // JFrameを初期化
        jf = new JFrame("OpenCv Demo");
        jf.add(jpButton, BorderLayout.SOUTH);
        jf.setDefaultCloseOperation(JFrame.EXIT_ON_CLOSE);
        jf.pack();
        jf.setVisible(true);
        jf.setSize(mat.width(), mat.height());

    }
コンストラクターの下にカメラ映像を描写するメソッドを追加します。メソッド名をdrawCameraView()とします。
流れはこうなります。
カメラから映像を取得し画像に変換、ImageIconにしてJLabelに加えます。
このJLabelをJpanelに加え、さらにそれをJFrameに加えてからJFrameを更新します。
これをブーリアンbがfalseになるまで続けます。
Below the constructor, add a method that draws the camera image. Name the method drawCameraView().
The flow is as follows:
The image from the camera is obtained and converted into an image, then converted into an ImageIcon and added to a JLabel.
Add this JLabel to a Jpanel, then add that to a JFrame, and then update the JFrame.
This continues until Boolean b becomes false.
    public void drawCameraView() {
        // カメラからの画像を取得し、ImageIcon、Jpanel、JFrameに加えるループ作業。スレッドで動かす。

        // カメラを選択する。内蔵カメラとUSBカメラを開く
        if (!cap.open(0)) {

            // カメラがない時の処理
            JOptionPane op = new JOptionPane();
            op.showMessageDialog(null, "カメラがありません。カメラを接続してください。", "注意", JOptionPane.OK_OPTION);
            play.setEnabled(true);
            return;

        }

        while (b) {

            // b がfalseになるまで以下を実行する
            cap.read(mat);

            MatOfByte mob = new MatOfByte();
            Imgcodecs.imencode(".jpg", mat, mob); // MatObByteにデーターを格納する
            byte[] byt = mob.toArray(); // byteに変換する

            System.out.println("looping");
            BufferedImage img = null;

            try {

                img = ImageIO.read(new ByteArrayInputStream(byt));// BufferedImageに変換する

            } catch (IOException ioe) {

                ioe.getStackTrace();
                break;

            }

            // ImageIconにBufferdImageを入れ、JLabelに追加する
            JLabel label = new JLabel(new ImageIcon(img));
            JPanel panel = new JPanel();
            panel.add(label);

            // Jframe にJPanelを追加し、更新する
            jf.add(panel);
            jf.validate();

        }

    }
ボタンが押された時の処理を記述(the process when the button is pressed)
ここではそれぞれのボタンが押された時、どのように処理をしているのか見てみます。
Playが押された時は、カメラ映像を描写するためのメソッドdrawCameraView()を呼びます。
このときスレッドを立ててから動作させます。
スレッドはアプリケーション内で繰り返し処理するループ作業の場合、使用します。アプリケーションを作るうえでかならず使う場面が出ると思います。
Stopボタンで終了させるときは、ループ作業を終わらせ、スレッドもJoin()関数で終了させます。
Here we will look at how each button is processed when it is pressed.
When Play is pressed, the method drawCameraView() is called to display the camera image.
At this time, a thread is created and then run.
Threads are used for repeated loop work within an application. I'm sure you will come across situations where you will use them when creating an application.
When ending with the Stop button, end the loop and end the thread with the Join() function.
@Override
    public void actionPerformed(ActionEvent e) {

        // ボタンが押された時の処理

        if (e.getActionCommand().equals("Play")) {

            // playボタンを押された時の処理

            b = true; // boolをtrueにしてループ処理可能にする
            play.setEnabled(false); // スタートボタンを使用不可にする

            thd = new Thread(new Runnable() { // スレッドを立て、ループ作業を行う
                @Override
                public void run() {
                    drawCameraView();// カメラ画像を得て、表示するループメソッドを呼び出す。
                }

            });

            thd.start(); // スレッドを開始する

        } else if (e.getActionCommand().equals("Stop")) {

            // stopボタンを押されときの処理

            b = false; // bをfalseにしてループ処理を終わらせる。

            if (thd != null) {

                state = null;
                state = thd.getState();

                if (state == State.RUNNABLE || state == State.WAITING || state != State.TERMINATED) {

                    try {

                        thd.join(500); // ループ処理が終わるまで[millis]間待ってからThreadを終了する

                    } catch (InterruptedException ie) {

                        ie.printStackTrace();

                    }
                }

                if (cap.isOpened()) {

                    cap.release();// カメラキャプチャーを終了させる

                }

                play.setEnabled(true); // Playボタンを選択可能にする

            }
        }
    }
カスケード分類器で画像検出を使うメソッドの記述(A method to use image detection with a cascade classifier)
ボタングループのなかで通常、顔検出が選択される場合、目検出が選択された場合の処理を記述していきます。
ここではmatの画像をCV_8Uに変換し、CascadeClassifierのmultidetectScaleファンクションで画像内の識別を行います。このとき検出された部分の短形座標が得られるので、それをもとに短形をmatに描写します。
描写がすんだらmatを返します。通常ボタンは何もせず、matを返します。
We will write the processing that occurs when normal, face detection, and eye detection are selected in the button group.
Here, the mat image is converted to CV_8U and classification within the image is performed using the multidetectScale function of CascadeClassifier. At this time, the rectangle coordinates of the detected part are obtained, and a rectangle is drawn in mat based on these.
Once the drawing is complete, mat is returned. Normal buttons do nothing and return mat.
public Mat faceEyeDetection(ButtonGroup bg, Mat srcMat) {
        // 顔と目の検出を行う。顔や目の枠を描写し、matを返す

        // ボタングループから選択されているボタン名を得る
        String strSelect = bg.getSelection().getActionCommand();

        if (!strRadio1.equals(strSelect)) {

            Mat grayMat = new Mat();
            Imgproc.cvtColor(srcMat, grayMat, CvType.CV_8U);// 画像タイプは必ずCvType.CV_8Uを指定する

            Rect[] rec = null;
            MatOfRect mor = new MatOfRect();
            Size minSizeRect = new Size(30, 30);// このサイズ以下の抽出は行わない

            if (strRadio2.equals(strSelect)) {

                faceClassifier.detectMultiScale(grayMat, mor, 1.3, 3, Objdetect.CASCADE_SCALE_IMAGE, minSizeRect);
                // ScaleFactorはどの程度画像を縮小するかを指定する。1.3は30%縮小させる。
                // minNeghborsは検出する短形数の閾値。近接する短形数で検出とみなす。1とすると誤検知が多くなる。

            } else if (strRadio3.equals(strSelect)) {

                eyeClassifier.detectMultiScale(grayMat, mor, 1.3, 3, Objdetect.CASCADE_SCALE_IMAGE, minSizeRect);
            }

            rec = mor.toArray();

            for (Rect rec2 : rec) {
                // 検出されたすべての短形をMatに表示する

                Imgproc.rectangle(srcMat, rec2, new Scalar(0, 255, 0));

            }

            return srcMat;

        } else {
            // 通常ボタン選択の時ははなにもしない

            return srcMat;

        }

    }
App.javaに記述する重要な構文(Important syntax to write in App.java)
main関数のあるApp.javaまたはMain.javaファイルの最初に以下の文を記述します。
nu.pattern.OpenCV.loadLocally();
javaでOpenCvを使用する際に、これを入れないと実行してくれません。なので、利用する関数の前に記述すると良いでしょう。
Write the following statement at the beginning of the App.java or Main.java file that contains the main function.
When using OpenCv in Java, you must write this statement or it will not run. Therefore, it is a good idea to write it before the functions you will use.
    public static void main(String[] args) {

        nu.pattern.OpenCV.loadLocally();

        CreateFrame cf = new CreateFrame();

    }
アプリケーション完了(Application Complete)
ここまでOpenCvをJavaで編集し、VsCodeでコーディングしてきました。アプリケーションとしては簡単すぎて実用性がないものですが、こんな感じでアプリケーションが作られていく過程を見れたと思います。最後にコード全文を載せますのでコピー貼り付けようにどうぞ。import部分はコピーしなくともVsCodeが自動で記述してくれます。
So far, I have edited OpenCv in Java and coded it in VsCode. As an application, it is too simple to be practical, but I think you have seen the process of creating an application like this. At the end, I will post the full code, so please feel free to copy and paste it. VsCode will automatically write the import part, so you don't have to copy it.
package com.example;

import org.opencv.core.Core;

public class Main {

    public static void main(String[] args) {

        nu.pattern.OpenCV.loadLocally();

        CreateFrame cf = new CreateFrame();

    }
}
package com.example;

import java.io.ByteArrayInputStream;
import java.io.File;
import java.io.IOException;
import java.lang.Thread.State;
import java.net.URL;
import javax.imageio.ImageIO;
import javax.swing.ButtonGroup;
import javax.swing.ButtonModel;
import javax.swing.ImageIcon;
import javax.swing.JButton;
import javax.swing.JFrame;
import javax.swing.JLabel;
import javax.swing.JOptionPane;
import javax.swing.JPanel;
import javax.swing.JRadioButton;
import java.awt.*;
import java.awt.event.ActionEvent;
import java.awt.event.ActionListener;
import java.awt.image.BufferedImage;
import org.opencv.core.CvType;
import org.opencv.core.Mat;
import org.opencv.core.MatOfByte;
import org.opencv.core.MatOfRect;
import org.opencv.core.Rect;
import org.opencv.core.Scalar;
import org.opencv.core.Size;
import org.opencv.imgcodecs.Imgcodecs;
import org.opencv.imgproc.Imgproc;
import org.opencv.objdetect.CascadeClassifier;
import org.opencv.objdetect.Objdetect;
import org.opencv.videoio.VideoCapture;
import org.opencv.videoio.Videoio;

public class CreateFrame implements ActionListener {

    boolean b;
    VideoCapture cap;
    Mat mat;
    JPanel jpButton;
    JButton play;
    JButton stop;
    JRadioButton radio1;
    JRadioButton radio2;
    JRadioButton radio3;
    ButtonGroup bGroup;
    ButtonModel bm;
    JFrame jf;
    Thread thd;
    Thread.State state;
    String strRadio1;
    String strRadio2;
    String strRadio3;
    String strFacePath;
    String strEyePath;
    CascadeClassifier eyeClassifier;
    CascadeClassifier faceClassifier;

    public CreateFrame() {

        mat = new Mat(100, 100, CvType.CV_8U);// Matを初期化

        state = null; // Thread の状態を初期化

        // カメラの初期化
        cap = new VideoCapture(Videoio.CAP_ANY);// デフォルトのカメラを選択する(PC内蔵カメラ、またはUSBカメラを取得する)
        cap.open(0);// カメラをオープンする。
        if (!cap.isOpened()) {

            System.out.println("No camera found");

        }

        cap.read(mat); // カメラから1度画像を読み、そのサイズをmatへ記録する
        cap.release(); // いったんカメラを開放する

        // カメラの動作スイッチの役目があるブーリアン。trueでオンにする。
        b = false;

        // Jradio button 初期化[cascade]
        strRadio1 = "通常(Normal)";
        strRadio2 = "顔検出(Face Detection)";
        strRadio3 = "目検出(Eye Detection)";
        radio1 = new JRadioButton(strRadio1);
        radio2 = new JRadioButton(strRadio2);
        radio3 = new JRadioButton(strRadio3);
        radio1.setActionCommand(strRadio1);
        radio2.setActionCommand(strRadio2);
        radio3.setActionCommand(strRadio3);

        // Button Group 初期化とRadio button 追加
        bGroup = new ButtonGroup();
        bGroup.add(radio1);
        bGroup.add(radio2);
        bGroup.add(radio3);
        bGroup.setSelected(radio1.getModel(), true);
        bm = bGroup.getSelection();

        // ラジオボタンの動作登録
        radio1.addActionListener(this);
        radio2.addActionListener(this);
        radio3.addActionListener(this);

        // Cascade Classifier の初期化
        try {

            URL ur = getClass().getResource("/haarcascade_eye.xml");// ファイル名の前に必ずスラッシュを入れる
            File f = new File(ur.toURI());
            strEyePath = f.getAbsolutePath();
            eyeClassifier = new CascadeClassifier(strEyePath); // 絶対パスを通す必要がある
            if (eyeClassifier.empty()) {
                System.out.println(strEyePath + " not loaded.");
                return;
            }

            ur = getClass().getResource("/haarcascade_frontalface_alt.xml");
            f = new File(ur.toURI());
            strFacePath = f.getAbsolutePath();
            faceClassifier = new CascadeClassifier(strFacePath);
            if (faceClassifier.empty()) {
                System.out.println(strFacePath + " not loaded.");
                return;
            }

        } catch (Exception e) {

            System.out.println("something wrong with getResource func");
            System.out.println(e.getStackTrace().toString());
            return;

        }

        // JButtonを初期可。[Play][Stop]
        jpButton = new JPanel();
        play = new JButton("Play");
        stop = new JButton("Stop");
        jpButton.add(play, BorderLayout.WEST);
        jpButton.add(stop, BorderLayout.CENTER);
        jpButton.add(radio1);
        jpButton.add(radio2);
        jpButton.add(radio3);

        play.addActionListener(this);
        stop.addActionListener(this);

        // JFrameを初期化
        jf = new JFrame("OpenCv Demo");
        jf.add(jpButton, BorderLayout.SOUTH);
        jf.setDefaultCloseOperation(JFrame.EXIT_ON_CLOSE);
        jf.pack();
        jf.setVisible(true);
        jf.setSize(mat.width(), mat.height());

    }

    public void drawCameraView() {
        // カメラからの画像を取得し、ImageIcon、Jpanel、JFrameに加えるループ作業。スレッドで動かす。

        // カメラを選択する。内蔵カメラとUSBカメラを開く
        if (!cap.open(0)) {

            // カメラがない時の処理
            JOptionPane op = new JOptionPane();
            op.showMessageDialog(null, "カメラがありません。カメラを接続してください。", "注意", JOptionPane.OK_OPTION);
            play.setEnabled(true);
            return;

        }

        while (b) {

            // b がfalseになるまで以下を実行する
            cap.read(mat);

            MatOfByte mob = new MatOfByte();
            Imgcodecs.imencode(".jpg", faceEyeDetection(bGroup, mat), mob); // 検出器に通し、MatObByteにデーターを格納する。
            byte[] byt = mob.toArray(); // byteに変換する

            System.out.println("looping");
            BufferedImage img = null;

            try {

                img = ImageIO.read(new ByteArrayInputStream(byt));// BufferedImageに変換する

            } catch (IOException ioe) {

                ioe.getStackTrace();
                break;

            }

            // ImageIconにBufferdImageを入れ、JLabelに追加する
            JLabel label = new JLabel(new ImageIcon(img));
            JPanel panel = new JPanel();
            panel.add(label);

            // Jframe にJPanelを追加し、更新する
            jf.add(panel);
            jf.validate();

        }
    }

    @Override
    public void actionPerformed(ActionEvent e) {

        // ボタンが押された時の処理

        if (e.getActionCommand().equals("Play")) {

            // playボタンを押された時の処理

            b = true; // boolをtrueにしてループ処理可能にする
            play.setEnabled(false); // スタートボタンを使用不可にする

            thd = new Thread(new Runnable() { // スレッドを立て、ループ作業を行う
                @Override
                public void run() {
                    drawCameraView();// カメラ画像を得て、表示するループメソッドを呼び出す。
                }

            });

            thd.start(); // スレッドを開始する

        } else if (e.getActionCommand().equals("Stop")) {

            // stopボタンを押されときの処理

            b = false; // bをfalseにしてループ処理を終わらせる。

            if (thd != null) {

                state = null;
                state = thd.getState();

                if (state == State.RUNNABLE || state == State.WAITING || state != State.TERMINATED) {

                    try {

                        thd.join(500); // ループ処理が終わるまで[millis]間待ってからThreadを終了する

                    } catch (InterruptedException ie) {

                        ie.printStackTrace();

                    }
                }

                if (cap.isOpened()) {

                    cap.release();// カメラキャプチャーを終了させる

                }

                play.setEnabled(true); // Playボタンを選択可能にする

            }
        }
    }

    public Mat faceEyeDetection(ButtonGroup bg, Mat srcMat) {
        // 顔と目の検出を行う。顔や目の枠を描写し、matを返す

        // ボタングループから選択されているボタン名を得る
        String strSelect = bg.getSelection().getActionCommand();

        if (!strRadio1.equals(strSelect)) {

            Mat grayMat = new Mat();
            Imgproc.cvtColor(srcMat, grayMat, CvType.CV_8U);// 画像タイプは必ずCvType.CV_8Uを指定する

            Rect[] rec = null;
            MatOfRect mor = new MatOfRect();
            Size minSizeRect = new Size(30, 30);// このサイズ以下の抽出は行わない

            if (strRadio2.equals(strSelect)) {

                faceClassifier.detectMultiScale(grayMat, mor, 1.3, 3, Objdetect.CASCADE_SCALE_IMAGE, minSizeRect);
                // ScaleFactorはどの程度画像を縮小するかを指定する。1.3は30%縮小させる。
                // minNeghborsは検出する短形数の閾値。近接する短形数で検出とみなす。1とすると誤検知が多くなる。

            } else if (strRadio3.equals(strSelect)) {

                eyeClassifier.detectMultiScale(grayMat, mor, 1.3, 3, Objdetect.CASCADE_SCALE_IMAGE, minSizeRect);
            }

            rec = mor.toArray();

            for (Rect rec2 : rec) {
                // 検出されたすべての短形をMatに表示する

                Imgproc.rectangle(srcMat, rec2, new Scalar(0, 255, 0));

            }

            return srcMat;

        } else {
            // 通常ボタン選択の時ははなにもしない

            return srcMat;

        }

    }
}