最近Support Library側で様々な処理が行われるようになってきています。
ImageViewにtint(色をつける)機能がついたり、今回のVectorDrawableの対応もそうです。
どうやってライブラリがVectorDrawableの処理を差し込むことができたのか、
Vector画像データの仕組みなどではなく、そこまで処理がどうやって行き着くのかを話します。
Support Vector Drawableの仕組み以外の総合的な話は発表資料があるので先に見ておくことをおすすめします。
https://speakerdeck.com/takahirom/support-vector-drawable
VectorDrawableの導入
build.gradleに以下のように記述します。Android Studio 1.5以降にはVectorDrawableがあると自動的にpngファイルを生成する機能があるので、それを無効化するものだと思われます。(未検証)
(Android Gradle Plugin 2.0の場合)
 android {
   defaultConfig {
     vectorDrawables.useSupportLibrary = true
    }
 }
dependencies {
    compile 'com.android.support:support-vector-drawable:23.2.0'
    compile 'com.android.support:animated-vector-drawable:23.2.0'
}
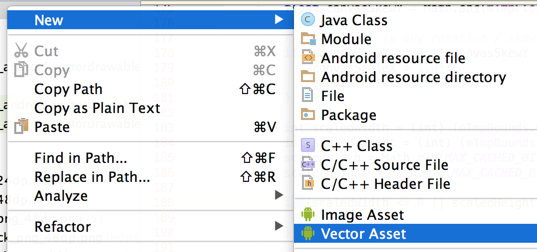
右クリックからVector画像を作成して追加します。
パターン1 app:srcCompatを利用する場合
レイアウトを以下のように記述します。
// xmlの要素でエラーが出るが気にしない(おそらくそのうち治るので、、https://code.google.com/p/android/issues/detail?id=201790 )
 <ImageView
    android:layout_width="wrap_content"
    android:layout_height="wrap_content"
    app:srcCompat="@drawable/ic_android_black_24dp" />

これでActivityがAppCompatActivityを継承していれば画像が表示されるはずです。こちらをパターン1として紹介します。
パターン2 StateListDrawableで間に入れる場合
もう一つやり方があり、こちらがかなり不思議なのですが、StateListDrawable (Selector)を利用する場合は普通にandroid:srcで参照する事ができます。
(StateListDrawableでなくてもInsetDrawableなど間に入るものであればなんでも大丈夫みたいです)
<?xml version="1.0" encoding="utf-8"?>
<selector xmlns:android="http://schemas.android.com/apk/res/android">
    <item android:drawable="@drawable/ic_android_black_24dp"/>
</selector>
 <ImageView
    android:layout_width="wrap_content"
    android:layout_height="wrap_content"
    android:src="@drawable/selector" />
こちらがなんでなのかもパターン2で紹介していきます。
パターン1 app:srcCompatを利用する場合
3行まとめ
AppCompatActivityがViewのInflateをAppCompatViewInflaterで行うようにする。
AppCompatViewInflaterは"ImageView"タグであればAppCompatImageViewに置き換える。
AppCompatImageViewはAppCompatImageHelperによってapp:srcCompat=の要素を取り出してDrawable化してセットする。
Inflaterを横取りするまで
ほぼAppCompatActivity.onCreate()でLayoutInflaterのインストール(差し込み)が行われる。
- AppCompatActivityを継承したクラスのonCreate()が呼ばれる
- super.onCreate()でAppCompatActivity.onCreate()が呼ばれる
- getDelegate().installViewFactory();が呼ばれる
public class AppCompatActivity extends FragmentActivity implements AppCompatCallback,
        TaskStackBuilder.SupportParentable, ActionBarDrawerToggle.DelegateProvider {

    private AppCompatDelegate mDelegate;

    @Override
    protected void onCreate(@Nullable Bundle savedInstanceState) {
        // ※ 注目
        getDelegate().installViewFactory();
        getDelegate().onCreate(savedInstanceState);
        super.onCreate(savedInstanceState);
    }
4.LayoutInflaterCompat.setFactory(layoutInflater, this);で、AppCompatDelegateクラスのインスタンスをLayoutInflaterFactoryとして指定する

以降このActivityから取得したLayoutInflaterではAppCompatDelegateのonCreateView()が利用されるようになる
ImageViewをAppCompatImageViewに上書きする
onCreate()内で呼ぶsetContentView() で以下のようにLayoutInflaterを利用してInflateしようとします。
    @Override
    public void setContentView(int resId) {
        ensureSubDecor();
        ViewGroup contentParent = (ViewGroup) mSubDecor.findViewById(android.R.id.content);
        contentParent.removeAllViews();
        LayoutInflater.from(mContext).inflate(resId, contentParent);
        mOriginalWindowCallback.onContentChanged();
    }
LayoutInflaterにAppCompatDelegateが差し込まれているので、AppCompatViewInflater#createViewが利用されます。
    @Override
    public View createView(View parent, final String name, @NonNull Context context,
            @NonNull AttributeSet attrs) {
        final boolean isPre21 = Build.VERSION.SDK_INT < 21;

        if (mAppCompatViewInflater == null) {
            mAppCompatViewInflater = new AppCompatViewInflater();
        }

        // We only want the View to inherit its context if we're running pre-v21
        final boolean inheritContext = isPre21 && shouldInheritContext((ViewParent) parent);

        return mAppCompatViewInflater.createView(parent, name, context, attrs, inheritContext,
                isPre21, /* Only read android:theme pre-L (L+ handles this anyway) */
                true, /* Read read app:theme as a fallback at all times for legacy reasons */
                isPre21 /* Only tint wrap the context pre-L */
        );
    }
AppCompatViewInflaterでは以下のようにTag名が"ImageView"であればAppCompatImageViewを返します。
        switch (name) {
            case "TextView":
                view = new AppCompatTextView(context, attrs);
                break;
            case "ImageView":
                view = new AppCompatImageView(context, attrs);
                break;
AppCompatImageViewがVector画像を読み込むまで
new AppCompatImageView()されたので、コンストラクタが呼び出されます。
    public AppCompatImageView(Context context, AttributeSet attrs, int defStyleAttr) {
        super(TintContextWrapper.wrap(context), attrs, defStyleAttr);

        final AppCompatDrawableManager drawableManager = AppCompatDrawableManager.get();
  ...
        mImageHelper = new AppCompatImageHelper(this, drawableManager);
        mImageHelper.loadFromAttributes(attrs, defStyleAttr);
    }
AppCompatImageHelper#loadFromAttributesすることでImageViewタグについていた要素を取り出して、適応します。
    void loadFromAttributes(AttributeSet attrs, int defStyleAttr) {
        TintTypedArray a = TintTypedArray.obtainStyledAttributes(mView.getContext(), attrs,
                R.styleable.AppCompatImageView, defStyleAttr, 0);
        try {
            ...
            final int id = a.getResourceId(R.styleable.AppCompatImageView_srcCompat, -1);
            if (id != -1) {
                d = mDrawableManager.getDrawable(mView.getContext(), id);
                if (d != null) {
                    mView.setImageDrawable(d);
                }
            }
このmDrawableManager.getDrawable(mView.getContext(), id);でVectorDrawableを取り出します。
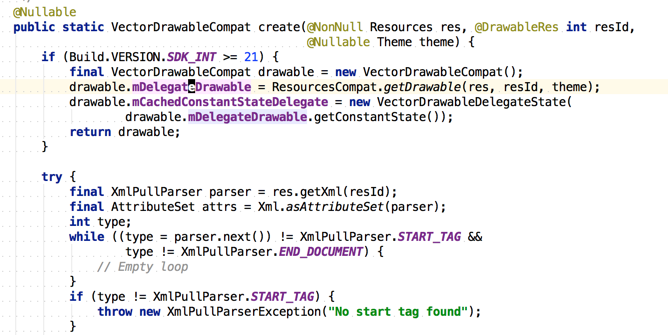
VectorDrawableCompatはAPI Level 21以上であればOSの実装をラップして利用して、あとは普通にxmlのタグを見ていく形で動きます。
パターン2 StateListDrawableで間に入れる場合
めちゃくちゃ不思議なのですがこれがなぜなのかを説明します
3行まとめ
AppCompatImageViewでContextをTintContextWrapperでwrapして渡す。TintContextWrapperはContext#getResources()を上書きしている。
普通にImageViewがDrawableを作ろうとしている時にStateListDrawableが中のDrawableを取得するためにContext#getResources()を利用しようとする。
vectorタグであれば、VectorDrawableに上書きする。
VectorDrawableが差し込まれるまで
AppCompatImageViewでImageViewが使うContextをTintContextWrapperでwrapして渡す。
    public AppCompatImageView(Context context, AttributeSet attrs, int defStyleAttr) {
        super(TintContextWrapper.wrap(context), attrs, defStyleAttr);

        final AppCompatDrawableManager drawableManager = AppCompatDrawableManager.get();
TintContextWrapperはgetResources()をオーバーライドしている
    @Override
    public Resources getResources() {
        if (mResources == null) {
            mResources = new TintResources(this, super.getResources());
        }
        return mResources;
    }
TintResourcesクラスはgetDrawable()を上書きする
    /**
     * We intercept this call so that we tint the result (if applicable). This is needed for
     * things like {@link android.graphics.drawable.DrawableContainer}s which can retrieve
     * their children via this method.
     */
    @Override
    public Drawable getDrawable(int id) throws NotFoundException {
        return AppCompatDrawableManager.get().onDrawableLoadedFromResources(mContext, this, id);
    }
あとはIamgeViewがStateListDrawableを作ってStateListDrawableがTintResources#getDrawable()を呼び出すので、差し込まれます。
AppCompatDrawableManager#onDrawableLoadedFromResources()がうまく処理してVectorDrawableCompatを差し込んでくれます。
まとめ
最近はUIの関連の処理をOSで処理を行うのではなく、なるべくSupport Library内で行うようにハックしており、新機能に対応させようとしている事がなんとなくわかりました。
パターン2のContext#getResources()まで上書きして頑張っているのはびっくりしましたが、ソースコードを読んですっきりしてよかったです。