以下の動画を見てまとめていたのですが、カスタムレイアウトの作り方だけで一つの記事になりそうだったので、その中で出てきたカスタムレイアウトの作り方について書いておきます。普段はConstraintLayoutでなんとかなると思うので、Jetpack Composeの中のコードを読むときに役立つ知識になりそうです。
https://youtu.be/DDd6IOlH3io
alpha1での情報なので、今後変更される可能性があります。
カスタムレイアウトを作るには @Composable fun Layout()の使い方。
Layoutブロック使うとカスタムレイアウトを作れます。実際に以下のようなレイアウトをサンプルで作っています。
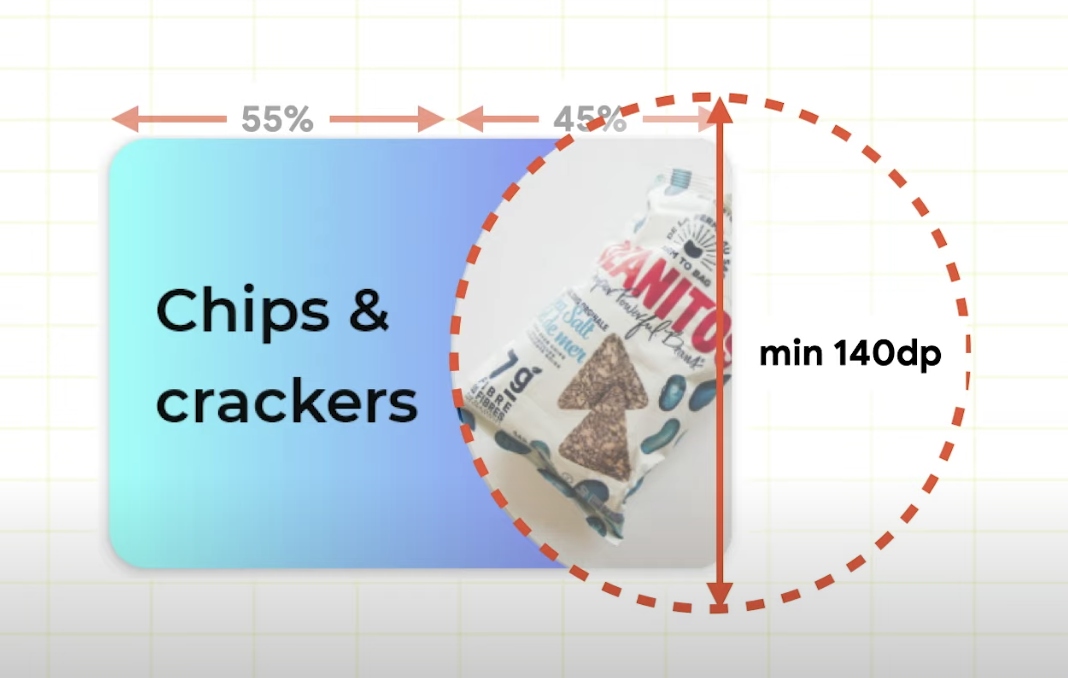
https://youtu.be/DDd6IOlH3io?t=869 より
肝心のレイアウトを作る関数の宣言はこうなっており、Modifierと子要素をかけるchildrenがあり、最後にmeasureBlockというのがあります。
fun Layout(
    /*crossinline*/
    children: @Composable () -> Unit,
    modifier: Modifier = Modifier,
    /*noinline*/
    measureBlock: MeasureBlock
)
メジャーブロックは3つのステップで作ることができます。
- それぞれのアイテムのmeasureを呼び出す。
- layout()を呼ぶ。
- それぞれのアイテムを置く(placeを呼び出す)。
コードの外観
Layout(
  modifier = ...,
  children = {
      Text(
          text = category.name,
          ...
       )
       SnackImage(
          ...
       )
  }
) { measurables: List<Measurable>,
    constraints: Constraints->
  // 1. それぞれのアイテムのmeasureを呼び出す。
  // 2. layout()を呼ぶ。
  // 3. それぞれのアイテムを置く(placeを呼び出す)。
}
MeasureBlockの引数について
引数で渡ってくる constraints: Constraints とはなにか?
AndroidエンジニアにはおなじみのConstraintLayoutとは何も関係なく、maxやminのWidthやHeightが取得できるだけで、このViewの大きさの上限と下限がわかるだけのオブジェクトです。
引数で渡ってくる measurables: List<Measurable> とはなにか?
このリストの一つ一つの要素がUIのコンポーネントのmeasureを呼べるmeasurableになっている。
例えばここでmeasurables[0]はTextに対応して、measurables[1]はSnackImageに対応する。
このMeasurableに対して Measurable#measure()を呼び出すと Placeable を返す。
一番シンプルな例
一番左上にすべての物を置く例がこちらになります。
以下の流れを行っています。
- それぞれのアイテムのmeasureを呼び出す。
- layout()を呼ぶ。
- それぞれのアイテムを置く(placeを呼び出す)。
Layout(
  modifier = ...,
  children = {
      Text(
          text = category.name,
          ...
       )
       SnackImage(
          ...
       )
  }
) { measurables: List<Measurable>,
    constraints: Constraints->
    // 1. それぞれのアイテムのmeasureを呼び出す。
    val placeables = measurables.map {
        it.measure(constraints)
    }
    // 2. layout()を呼ぶ。
    layout(
            width = constraints.maxWidth,
            height = constraints.maxHeight
    ) {
        placeables.forEach {
            // 3. それぞれのアイテムを置く(placeを呼び出す)。
            it.place(
                    x = 0,
                    y = 0
            )
        }
    }
}
placeable.place()関数は、うまくKotlin DSLの機能を使っておりlayout()のブロックの中でしか呼べなくなっています。
Jetpack Composeのサンプルではどうやっているか?
以下のように実際に行っているようです。
コードの中にコメントとして解説を入れてみました。
    Layout(
        modifier = modifier
        // レイアウトのアスペクト比を設定しておく、これがconstraintsに反映されると思われる
            .aspectRatio(1.45f)
            .drawShadow(elevation = 3.dp, shape = CategoryShape)
            .clip(CategoryShape)
            .horizontalGradientBackground(gradient)
            .clickable { /* todo */ },
        children = {
            Text(
                text = category.name,
                style = MaterialTheme.typography.subtitle1,
                color = JetsnackTheme.colors.textSecondary,
                modifier = Modifier
                    .padding(4.dp)
                    .padding(start = 8.dp)
            )
            SnackImage(
                imageUrl = category.imageUrl,
                modifier = Modifier.fillMaxSize()
            )
        }
    ) { measurables, constraints ->
        // 文字の割合を設定する (55%)
        val textWidth = (constraints.maxWidth * CategoryTextProportion).toInt()
        // 横を固定の大きさでConsntraintを渡してmeasure()する
        val textPlaceable = measurables[0].measure(Constraints.fixedWidth(textWidth))

        // 画像が大きい場合はそのサイズをそのまま使って、小さい場合はConstraintの最大サイズを使う
        // アイテムより大きく表示される(がアイテムの大きさで切り抜かれる)
        val imageSize = max(MinImageSize.toIntPx(), constraints.maxHeight)
        // 縦横の大きさを固定でConstraintを渡してmeasure()する
        val imagePlaceable = measurables[1].measure(Constraints.fixed(imageSize, imageSize))
        // おそらくここでModifierに渡したaspectRatioを使って、レイアウトを行って大きさを決定する。
        layout(
            width = constraints.maxWidth,
            height = constraints.minHeight
        ) {
            // テキストを左に置く
            textPlaceable.place(
                x = 0,
                y = (constraints.maxHeight - textPlaceable.height) / 2 // 中央に設置
            )
            // テキストの横幅をxとして指定することで左に置く、画像は外まではみ出すが、クリップされる
            imagePlaceable.place(
                x = textWidth,
                y = (constraints.maxHeight - imagePlaceable.height) / 2 // 中央に設置
            )
        }
    }
}
他の例
スクロールで伸縮するのもこのLayout()で実現できるようです。
@Composable
private fun Image(
    imageUrl: String,
    scroll: Float
) {
    val collapseRange = with(DensityAmbient.current) { (MaxTitleOffset - MinTitleOffset).toPx() }
    val collapseFraction = (scroll / collapseRange).coerceIn(0f, 1f)

    CollapsingImageLayout(
        collapseFraction = collapseFraction,
        modifier = HzPadding.then(Modifier.statusBarsPadding())
    ) {
        SnackImage(
            imageUrl = imageUrl,
            modifier = Modifier.fillMaxSize()
        )
    }
}

@Composable
private fun CollapsingImageLayout(
    collapseFraction: Float,
    modifier: Modifier = Modifier,
    image: @Composable () -> Unit
) {
    Layout(
        modifier = modifier,
        children = image
    ) { measurables, constraints ->
        check(measurables.size == 1)

        val imageMaxSize = min(ExpandedImageSize.toIntPx(), constraints.maxWidth)
        val imageMinSize = max(CollapsedImageSize.toIntPx(), constraints.minWidth)
        val imageWidth = lerp(imageMaxSize, imageMinSize, collapseFraction)
        // **measureを呼ぶ**
        val imagePlaceable = measurables[0].measure(Constraints.fixed(imageWidth, imageWidth))

        // lerpは直線上にある2つのベクトル間を補間する関数らしい
        val imageY = lerp(MinTitleOffset, MinImageOffset, collapseFraction).toIntPx()
        val imageX = lerp(
            (constraints.maxWidth - imageWidth) / 2, // centered when expanded
            constraints.maxWidth - imageWidth, // right aligned when collapsed
            collapseFraction
        )
        // **layoutを呼ぶ**
        layout(
            width = constraints.maxWidth,
            height = imageY + imageWidth
        ) {
        // **placeを呼ぶ**
            imagePlaceable.place(imageX, imageY)
        }
    }
}
どのようにスクロールと連動させるか?
ScrollStateを作成し、Body()、ScrollableColumn()にわたすことで、スクロールの変化を渡せるようになるようです。
@Composable
fun SnackDetail(
...
) {
...
    Stack(Modifier.fillMaxSize()) {
        val scroll = rememberScrollState(0f) // ← ここでScrollStateを作成
...
        Body(related, scroll)
...
        Image(snack.imageUrl, scroll.value)
...
    }

private fun Body(
    related: List<SnackCollection>,
    scroll: ScrollState
) {
    Column {
...
        ScrollableColumn(scrollState = scroll) {
...
他にもいろいろある
他にも JetsnackBottomNavLayout などで以下のような動きなども実装されています。
ここに載っているので確認してみてください。
https://github.com/android/compose-samples/tree/master/Jetsnack#features
まとめ
Layout()はわかりやすいですが、原始的な仕組みになるので、自分で高さの大きさの計算などは行わないといけません。
おそらく今後スクロールでうまく動かせるようなライブラリやうまくBottomNavigationなどをうまく動かしたりできるようなComposeのComponentなどが追加されていくと思いますが、
今後中のコードを読んだりするときに役立ったり、自分で頑張って実装するときの参考になりそうです。