いつもiOS開発で悩むこと
MVCやMVVMで作ってると、最初開発するときは自由度の高くて楽に実装できるのだが、
ViewControllerやModel層は改修を重ねるごとにどんどん肥大化し、複雑化してしまう。
どんどん肥大化するソースは、情熱がない限り結局誰もリファクタリングしないので、
どんどん負の遺産が増える悪循環になってしまう。
ここ数年ではFlux ArchitectureベースのRxSwiftやReactive Cocoaが流行っているのだが。。。。
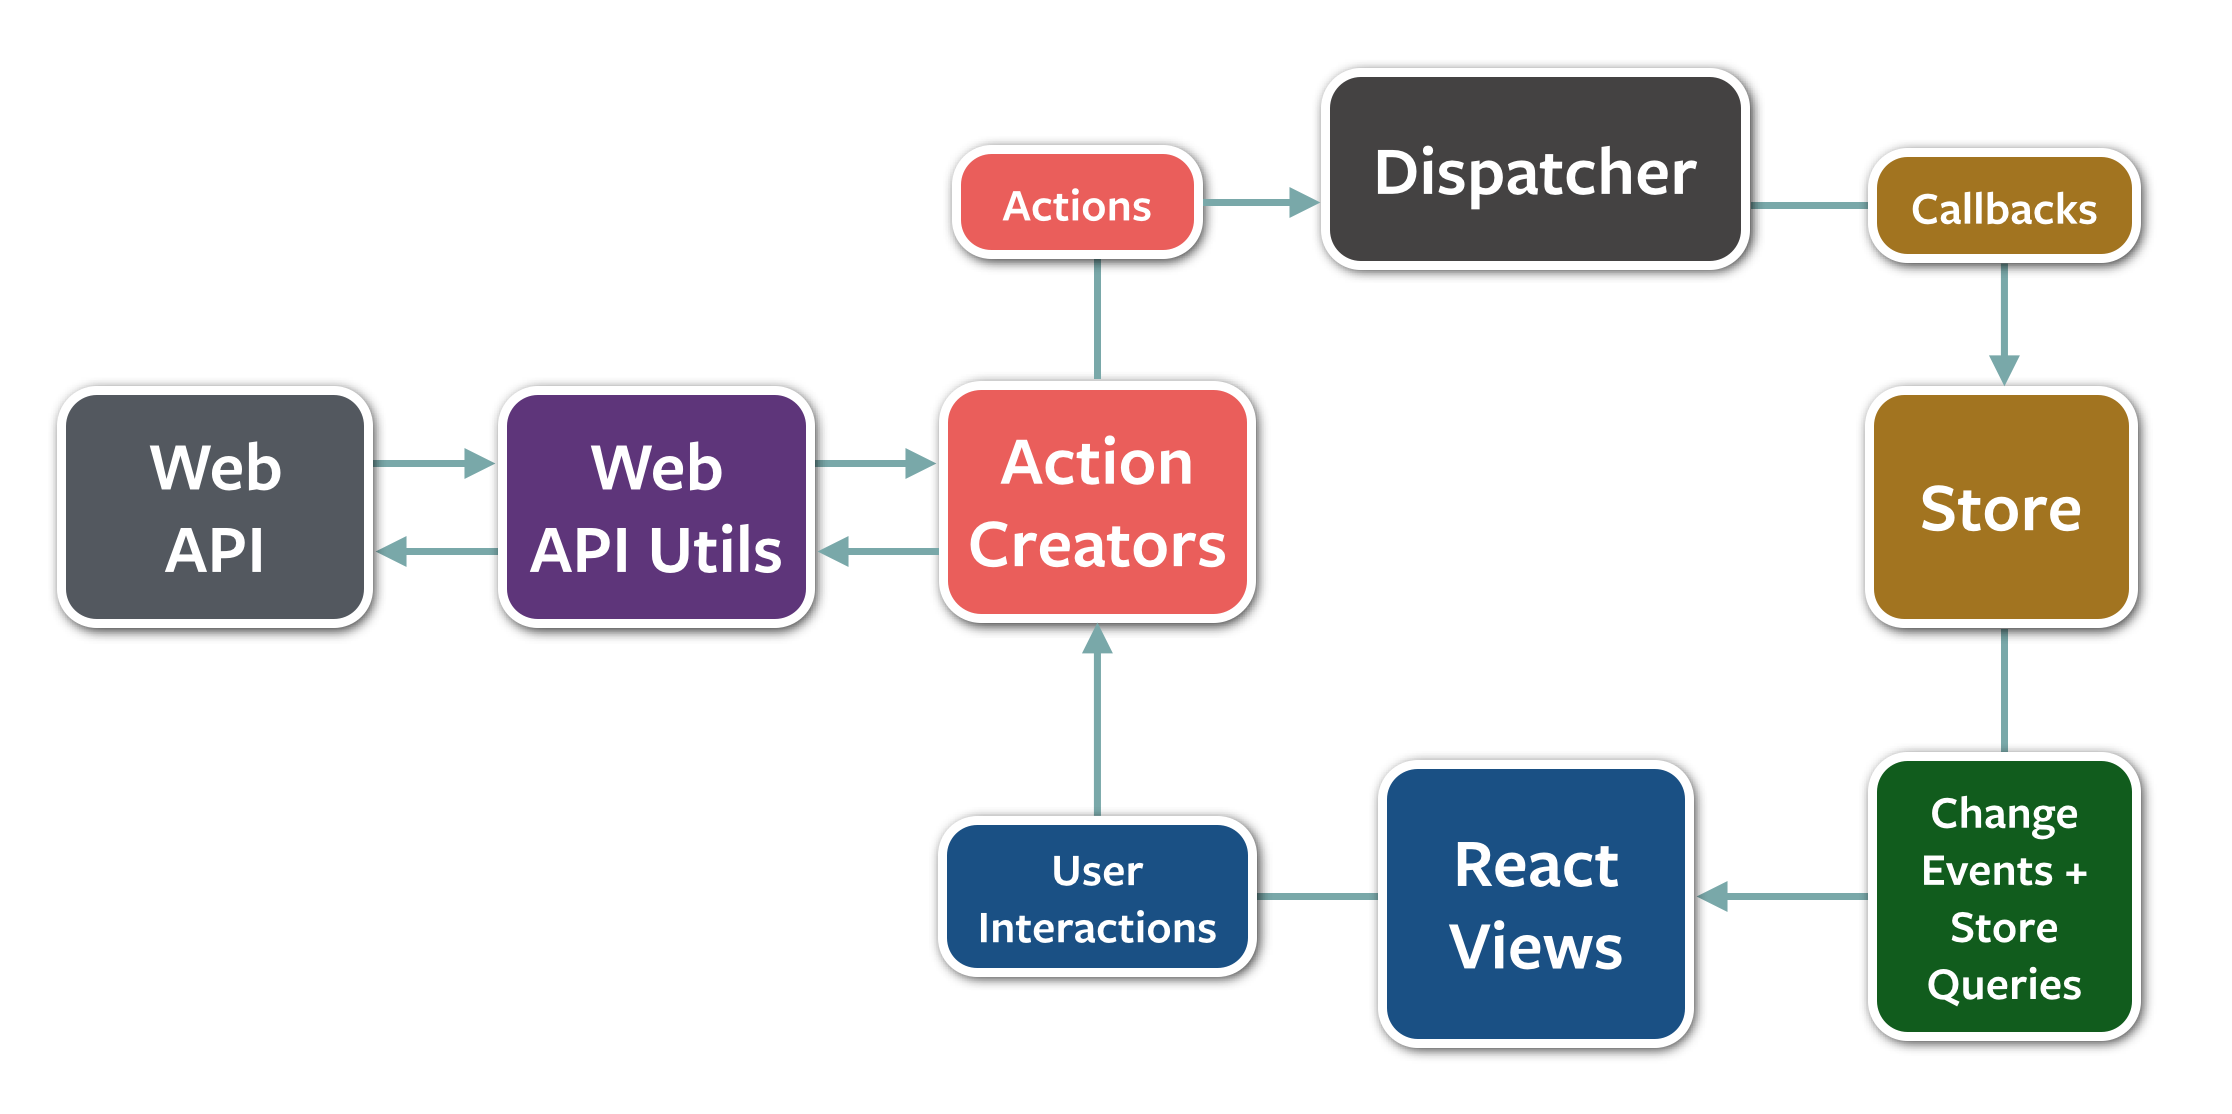
使ったことはないが聞く感じ単純にKVOでしょって感がいなめない。。。
データの画面更新は遷移等考えなくても楽だからすごく魅力的だが、イベント数が増えれば管理が大変だし、イベントは非同期だから予期せぬ画面更新が起こりそうだしっていうので少しマイナスイメージが多い感じ
なんかいいものないかと色々見てみるとQiitaに面白い記事が。
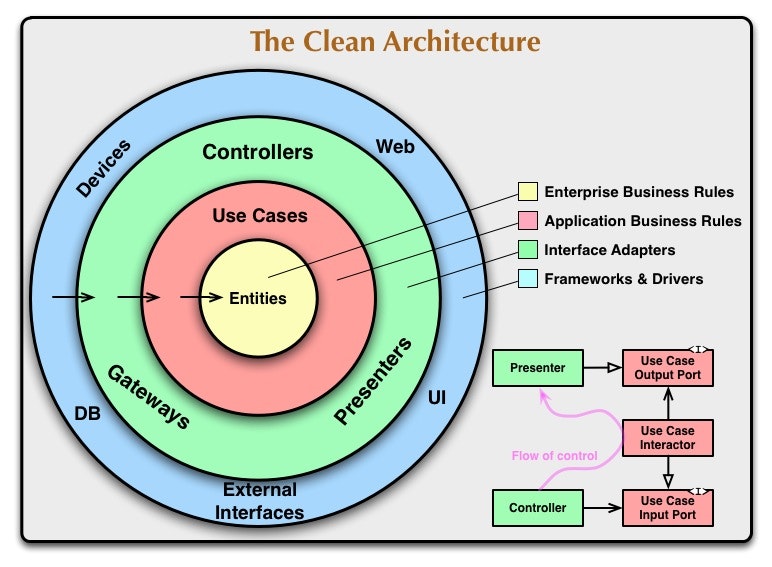
まだMVC,MVP,MVVMで消耗してるの? iOS Clean Architectureについて
お! おお!! javaエンジニアとしてはまさにこれこれ!!
Clean Architecture
もちろんiOSだけじゃなくてAndroidでもこの概念は通用するらしい。
Clean Architectureってなんだよ
Clean ArchitectureはFlux Architectureと同様にデータの流れが一方向性にし、
曖昧なModelという概念をさらに明確に役割分解し、変更機会が多い、UIや外部ソースを一番外側に置き、Entityを一番内側に置いた考え方である。
これならViewControllerがもつロジックも、例えばUse CaseとViewController の間にPresenterを間に入れてそいつにやらせてしまえばいい。
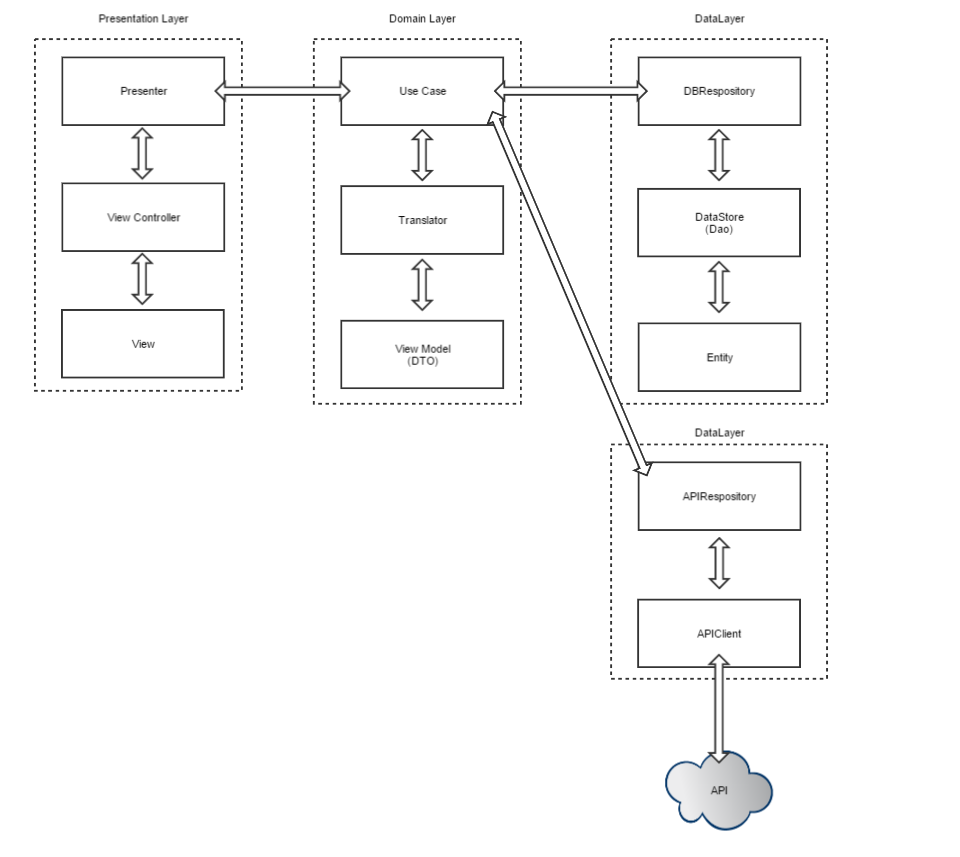
SwiftでClean Architectureを実現しよう!!
構成はリンク先を参考に以下のような感じ。
結局FluxアーキテクチャはデータとUIがObserverによってdata storeと疎結合になるのが利点だけど、
このままClean Architectureを適応すると疎結合にするには難しいよねって感じた。
せっかくロジックを明確に分解できても疎結合にできないとUnit Testを上手くまわせないじゃんって思う。
Javaみたいに簡単にswiftでもDIできて、且つPresenter(ViewControllerのロジック部分)も簡単にUnitテストができるフレームワークがあれば一番嬉しい。
なんかないかなぁっと思ってると
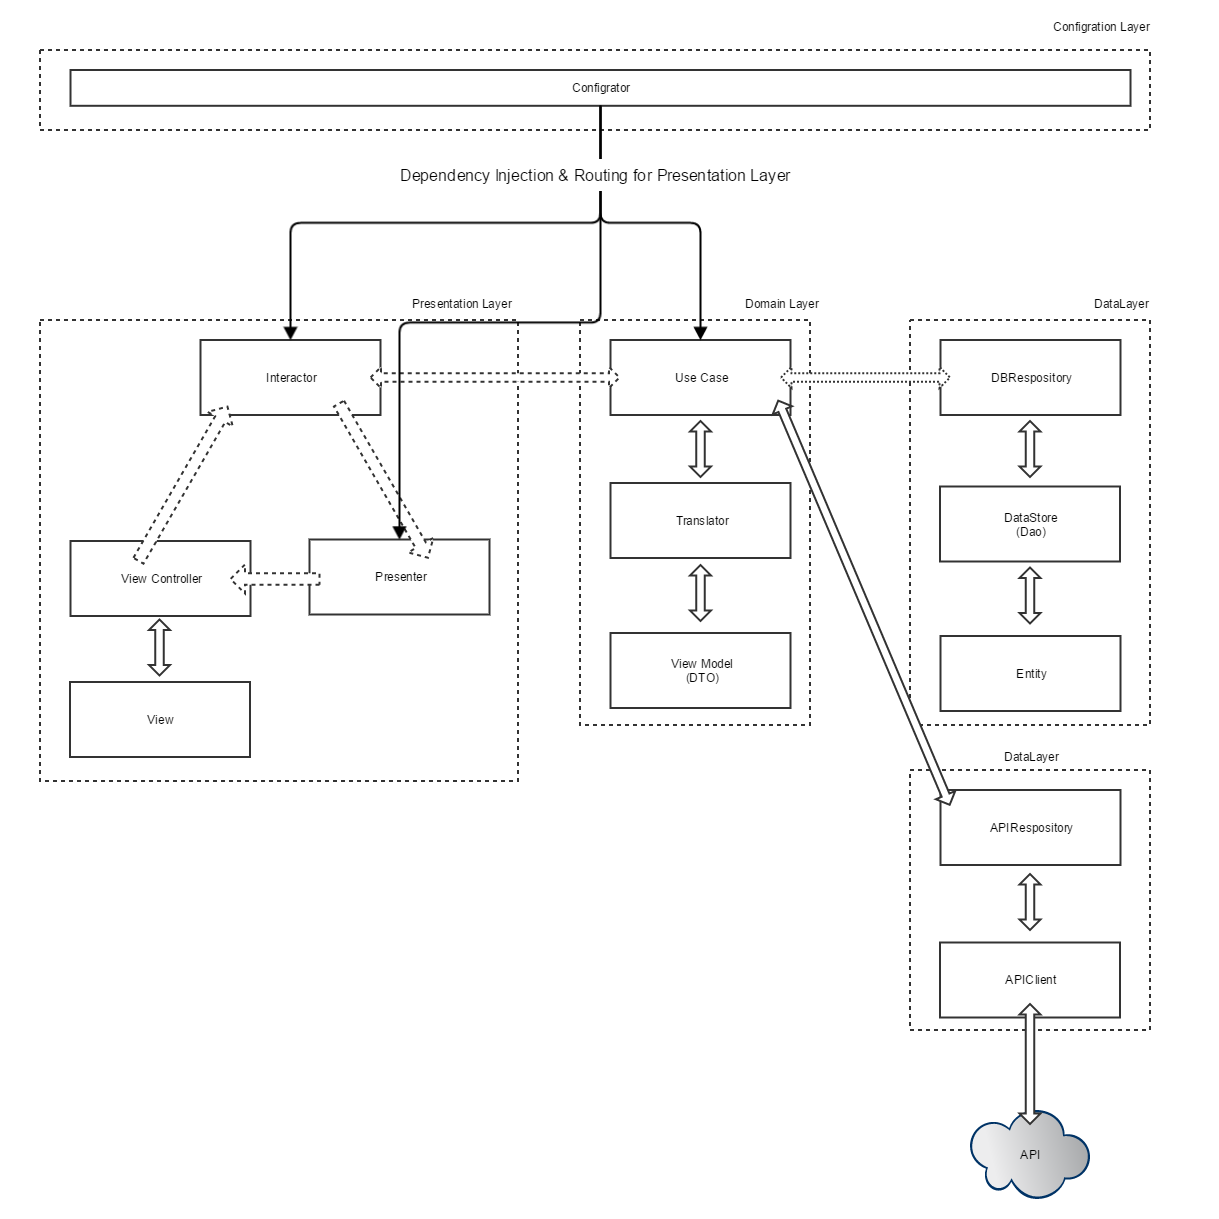
Clean Swift
http://clean-swift.com/clean-swift-ios-architecture/
おぉ、まさにこれこれ。
何かと言うと、先ほどのViewControllerとPresenterからさらにInteractorの層を切り分けて、疎結合にしてしまい、外部クラス(Configrator)からDelegateを使ったRoutingとインスタンスのDIをやってしまおうというもの。
さっきの図をClean Swiftで書き直すとこんな感じ。
試しに実装してみる
ここではClean SwiftのViewController、Interactor、Presenterのコードをここに表記しようと思う。
ポイントはViewController、Interactor、PresenterにInput, Outputプロトコルを定義します。
このとき、ViewControllerのOutputプロトコルはInteractorのInputプロトコルと、
InteractorのOutputプロトコルはPresenterのInputプロトコルと、
PresenterのOutputプロトコルはViewControllerのInputプロトコルと同じメソッドを定義しておく。
それぞれの3つとも自身のOutputプロトコルを型としてインスタンス変数を定義し
ConfigratorはViewController、Interactor、Presenterのoutput先をそれぞれ指定する。
たとえば、ViewControllerのoutputはInteractorなので、
  let interactor = LoginInteractor()
  viewController.output = interactor
みたいなイメージ。
以下がざっくりと書いたソースのイメージ。
これでViewControllerのインスタンス生成がされるときに、ConfigratorによってPresenterとInteractorのDIができる。
テストのときはそれぞれoutputにdummyクラスを突っ込んでやるだけでロジック確認できる!!
import UIKit

protocol LoginViewControllerInput {
    func didLogined()
}

protocol LoginViewControllerOutput {
    func executeLoginFacebook(viewController: UIViewController)
}

protocol LoginViewControllerTransitionDelegate: class {
    func pushViewController()
    func dismissModalViewController()
}

class LoginViewController: UIViewController {

    weak var transitionDelegate:LoginViewControllerTransitionDelegate?
    var output: LoginViewControllerOutput?

    //MARK: Object Lifecycle
    required init(coder aDecoder: NSCoder) {
        super.init(coder: aDecoder)!
        setup()
    }

    override init(nibName nibNameOrNil: String!, bundle nibBundleOrNil: NSBundle!) {
        super.init(nibName: nibNameOrNil, bundle: nibBundleOrNil)
        setup()
    }

    convenience init() {
        self.init(nibName: nil, bundle: nil)
    }

    //MARK: View Lifecycle
    override func viewDidLoad() {
        super.viewDidLoad()
        self.configureOnLoad()
    }

    override func didReceiveMemoryWarning() {
        super.didReceiveMemoryWarning()
        // Dispose of any resources that can be recreated.
    }

    //MARK: private method
    internal func setup() {
        LoginViewConfigurator.sharedInstance.configure(self)
    }

    internal func configureOnLoad() {
        let facebookLoginButton: UIButton = UIButton()
        facebookLoginButton.frame = CGRectMake(0,0,180,40)
        facebookLoginButton.backgroundColor = UIColor.darkGrayColor()
        facebookLoginButton.center = self.view.center
        facebookLoginButton.setTitle("Facebook Login", forState: UIControlState.Normal)
        facebookLoginButton.addTarget(self, action: #selector(LoginViewController.clickFacebookLoginButton(_:)), forControlEvents: UIControlEvents.TouchUpInside)
        self.view.addSubview(facebookLoginButton)
    }

    internal func clickFacebookLoginButton(sender: UIButton) {
        self.output?.executeLoginFacebook(self)
    }
}

//MAKR: LoginViewControllerInput
extension LoginViewController:LoginViewControllerInput {
    func didLogined() {
        self.transitionDelegate?.dismissModalViewController()
    }
}
import Foundation
import UIKit

protocol LoginInteractorInput {
    func executeLoginFacebook(viewController: UIViewController)
}

protocol LoginInteractorOutput {
    func didFacebookLogined()
    func didGoogleLogined()
}

class LoginInteractor {
    var output: LoginInteractorOutput?
    var loginUseCase: LoginUseCase = LoginUseCase()

}

//MARK LoginInteractorInput
extension LoginInteractor: LoginInteractorInput {

    func executeLoginFacebook(viewController: UIViewController) {
        self.loginUseCase.output = self
        self.loginUseCase.executeLoginFacebook(viewController)
    }
}

//MARK LoginUseCaseOutput
extension LoginInteractor: LoginUseCaseOutput {
    func didAuthorizedFacebook(){
        self.output?.didFacebookLogined()
    }

    func didAuthorizedGoogle(){
        self.output?.didGoogleLogined()
    }

    func hasLogined(){

    }

    func notAuthorizedOrNoAccount(){

    }

}
import Foundation

protocol LoginPresenterInput {
    func didFacebookLogined()
    func didGoogleLogined()
}

protocol LoginPresenterOutput {
    func didLogined()
}

class LoginPresenter {

    var output: LoginPresenterOutput?

}

//MARK: LoginPresenterInput
extension LoginPresenter:LoginPresenterInput {
    func didFacebookLogined() {
        self.output?.didLogined()
    }

    func didGoogleLogined(){
        self.output?.didLogined()
    }
}
import Foundation

class LoginViewConfigurator {

    //MARK: Object lifecycle
    static var sharedInstance = LoginViewConfigurator()

    //MARK: public method
    func configure(viewController: LoginViewController) {

        let presenter: LoginPresenter = LoginPresenter()
        presenter.output = viewController

        let interactor: LoginInteractor = LoginInteractor()
        interactor.output = presenter

        viewController.output = interactor

    }
}

extension LoginViewController: LoginPresenterOutput {

}

extension LoginPresenter: LoginInteractorOutput {

}

extension LoginInteractor: LoginViewControllerOutput {

}
総評
メリット
- データの方向性が一方向になりわかりやすい。
- ViewControllerから完全にロジックを分離でき、疎結合にできるため単体テストが実施しやすい。
- DIがやりやすいため、単体テストが書きやすい。
デメリット
- 冗長的にするのでコード量が多くなる。
Javaエンジニアにはしっくりくる構成なのでうれしい。
上記のソースには記載していないが、UseCaseもRepositoryもConfiguratorクラスでDIしてしまえばいい。