はじめに
こんにちは。
Amazon ECSはCodeDeploy経由でBlue/Greenデプロイを行うことができます。
実際に動かして挙動を図解してみました。
図解
早速ですがCodeDeployによるBlue/Greenデプロイの挙動を図にすると以下のようになります。

検証に使ったコード (AWS CDK)
を参考で以下に置いておきます。↑の図の構成を実現できます。
lib/ecs_codedeploy-stack.ts
import {
  aws_ecs as ecs,
  aws_ec2 as ec2,
  aws_elasticloadbalancingv2 as elbv2,
  aws_iam as iam,
  aws_s3 as s3,
  Stack,
  StackProps,
  CfnOutput,
  Duration,
  aws_codedeploy as codedeploy,
} from "aws-cdk-lib";
import { Construct } from "constructs";

export class EcsCodeDeployStack extends Stack {
  constructor(scope: Construct, id: string, props?: StackProps) {
    super(scope, id, props);

    const vpc = new ec2.Vpc(this, "Vpc", {
      ipAddresses: ec2.IpAddresses.cidr("10.0.0.0/16"),
      maxAzs: 2,
    });

    // ALBのセキュリティグループ
    const lbSG = new ec2.SecurityGroup(this, "LbSG", {
      vpc: vpc,
    });
    lbSG.addIngressRule(ec2.Peer.anyIpv4(), ec2.Port.tcp(80));
    lbSG.addIngressRule(ec2.Peer.anyIpv4(), ec2.Port.tcp(8080));

    const alb = new elbv2.ApplicationLoadBalancer(this, "Alb", {
      vpc: vpc,
      internetFacing: true,
      securityGroup: lbSG,
    });
    new CfnOutput(this, "AlbDnsName", {
      value: "http://" + alb.loadBalancerDnsName,
    });

    const cluster = new ecs.Cluster(this, "Cluster", {
      clusterName: "EcsBgCluster",
      vpc: vpc,
    });

    // ECSサービスのセキュリティグループ
    const serviceSG = new ec2.SecurityGroup(this, "ServiceSG", {
      vpc: vpc,
    });

    serviceSG.connections.allowFrom(alb, ec2.Port.tcp(80));
    // ECSタスク定義(Blue)
    const taskDefinitionBlue = new ecs.FargateTaskDefinition(this, "TaskDefBlue", {
      memoryLimitMiB: 512,
      cpu: 256,
    });

    const containerName = "web";
    taskDefinitionBlue.addContainer("ContainerBlue", {
      image: ecs.ContainerImage.fromRegistry("nginx:latest"),
      containerName: containerName,
      command: [
        "/bin/sh",
        "-c",
        "echo '<html> <head> <title>Amazon ECS Sample App</title> <style>body {margin-top: 40px; background-color: #00FFFF;} </style> </head><body> <div style=color:white;text-align:center> <h1>Amazon ECS Sample App</h1> <h2>Congratulations!</h2> <p>Your application is now running on a container in Amazon ECS.</p> </div></body></html>' > /usr/share/nginx/html/index.html && nginx -g 'daemon off;'",
      ],
      portMappings: [
        {
          containerPort: 80,
        },
      ],
    });

    // ECSタスク定義(Green)
    const taskDefinitionGreen = new ecs.FargateTaskDefinition(
      this,
      "TaskDefGreen",
      {
        memoryLimitMiB: 512,
        cpu: 256,
      }
    );

    taskDefinitionGreen.addContainer("ContainerGreen", {
      image: ecs.ContainerImage.fromRegistry("nginx:latest"),
      containerName: containerName,
      command: [
        "/bin/sh",
        "-c",
        "echo '<html> <head> <title>Amazon ECS Sample App</title> <style>body {margin-top: 40px; background-color: #097969;} </style> </head><body> <div style=color:white;text-align:center> <h1>Amazon ECS Sample App</h1> <h2>Congratulations!</h2> <p>Your application is now running on a container in Amazon ECS.</p> </div></body></html>' > /usr/share/nginx/html/index.html && nginx -g 'daemon off;'",
      ],
      portMappings: [
        {
          containerPort: 80,
        },
      ],
    });

    const targetGroupBlue = new elbv2.ApplicationTargetGroup(
      this,
      "TargetGroupBlue",
      {
        vpc: vpc,
        port: 80,
        targetType: elbv2.TargetType.IP,
        healthCheck: {
          path: "/",
          protocol: elbv2.Protocol.HTTP,
          interval: Duration.seconds(30),
          timeout: Duration.seconds(3),
        },
      }
    );

    const targetGroupGreen = new elbv2.ApplicationTargetGroup(
      this,
      "TargetGroupGreen",
      {
        vpc: vpc,
        port: 80,
        targetType: elbv2.TargetType.IP,
        healthCheck: {
          path: "/",
          protocol: elbv2.Protocol.HTTP,
          interval: Duration.seconds(30),
          timeout: Duration.seconds(3),
        },
      }
    );

    const listenerBlue = alb.addListener("ListenerBlue", {
      port: 80,
      defaultAction: elbv2.ListenerAction.weightedForward([
        {
          targetGroup: targetGroupBlue,
          weight: 100,
        },
      ]),
    });
    listenerBlue.node.addDependency(targetGroupGreen);

    const listenerGreen = alb.addListener("ListenerGreen", {
      port: 8080,
      defaultAction: elbv2.ListenerAction.weightedForward([
        {
          targetGroup: targetGroupBlue,
          weight: 100,
        },
      ]),
    });
    listenerBlue.node.addDependency(targetGroupGreen);

    //ECS Service
    const service = new ecs.FargateService(this, "FargateService", {
      cluster: cluster,
      taskDefinition: taskDefinitionBlue,
      desiredCount: 1,
      assignPublicIp: false,
      securityGroups: [serviceSG],
      deploymentController: {
        type: ecs.DeploymentControllerType.CODE_DEPLOY,
      },
      platformVersion: ecs.FargatePlatformVersion.LATEST,
    });
    service.node.addDependency(listenerBlue);
    service.node.addDependency(listenerGreen);
    service.node.addDependency(targetGroupBlue);
    service.node.addDependency(targetGroupGreen);

    targetGroupBlue.addTarget(service);

    // CodeDeployのアプリケーション
    const application = new codedeploy.EcsApplication(this, "App", {
      applicationName: "EcsApp",
    });

    const codeDeployRole = new iam.Role(this, "CodeDeployRole", {
      assumedBy: new iam.ServicePrincipal("codedeploy.amazonaws.com"),
    });

    // CodeDeployのデプロイグループ
    new codedeploy.EcsDeploymentGroup(this, "DeploymentGroup", {
      application: application,
      deploymentGroupName: "DeploymentGroup",
      service: service,
      blueGreenDeploymentConfig: {
        listener: listenerBlue,
        testListener: listenerGreen,
        blueTargetGroup: targetGroupBlue,
        greenTargetGroup: targetGroupGreen,
      },
      role: codeDeployRole,
      deploymentConfig:
        codedeploy.EcsDeploymentConfig.CANARY_10PERCENT_5MINUTES,
      autoRollback: {
        failedDeployment: true,
        stoppedDeployment: true,
      },
    });
  }
}
bin/ecs_bg.ts
#!/usr/bin/env node
import 'source-map-support/register';
import * as cdk from 'aws-cdk-lib';
import { EcsCodeDeployStack } from '../lib/ecs_codedeploy-stack';

const app = new cdk.App();
new EcsCodeDeployStack(app, 'ECSCodeDeploy');
挙動の詳細
0.デプロイ前の状態
まずデプロイ前の状態から見ていきましょう。
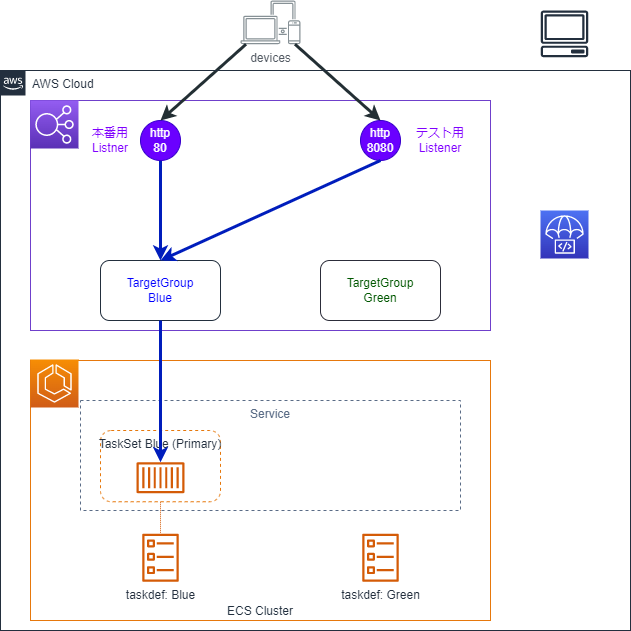
ALB
- ListenerとTargetGroupが2つ存在しています
- Listenerの片方は本番用、もう片方はテスト用です
- テスト用のListenerはオプションです。なくても構いません
- 両方のListenerがBlueのTargetGroupに紐づけられています
- GreenのTargetGroupはLisetnerと紐づけられていません
ECS
- TaskSetが1つ存在し、タスクがBlueのTargetGroupに紐づいています
- TaskSetはECSの概念でサービスに紐づくTaskの集合です。TaskSetを利用することで、1つのサービスに複数のタスク定義を紐づけることができます
- タスクは内部的にいずれかのTaskSetに紐づいています
- タスク定義が2つ存在しています
- 一つが既存のタスクに適用されているもの、もう一つが更新後のタスクに適用予定のものです
CodeDeploy
- ECS用のアプリケーションとデプロイグループが作成されています
- アプリケーション:デプロイの設定をまとめるためのものです
- デプロイグループ:デプロイ先のECSタスクとデプロイの設定をまとめるものです
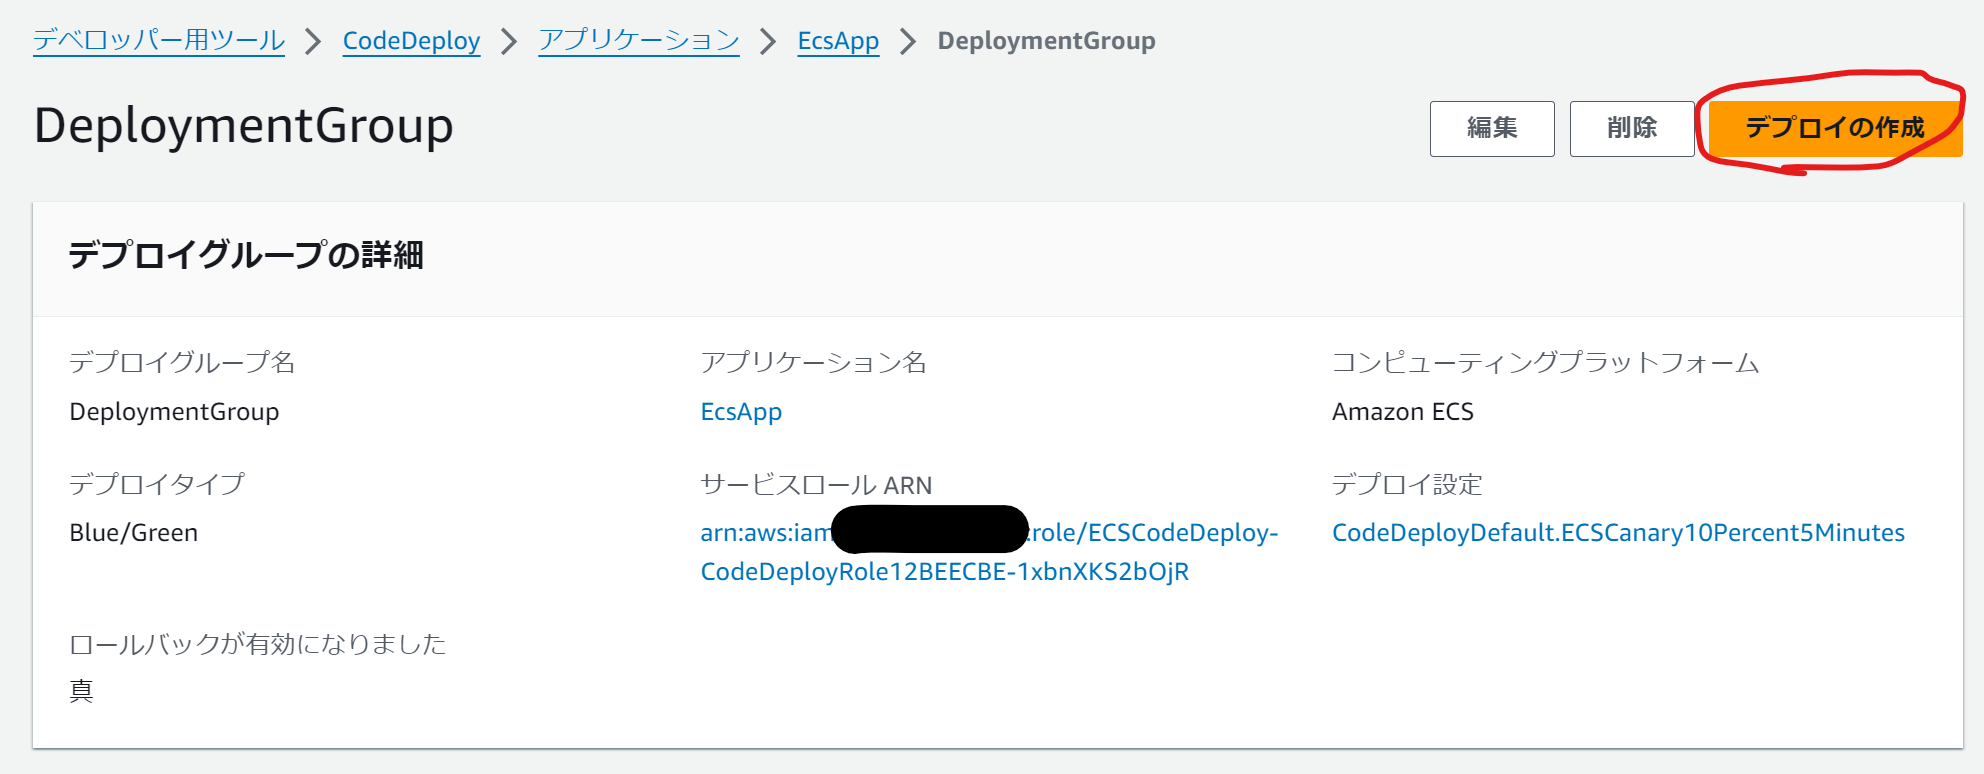
1.デプロイの作成
まずCodeDeployでデプロイを作成します。
CodeDeployのデプロイグループの画面で「デプロイの作成」をクリックします。
次の画面でデプロイ定義ファイル(appspec.yaml)を読み込ませます。デプロイ定義ファイルには更新後のタスク定義などの情報などが含まれています。S3から読み込む方法と、AppSpecエディタを利用する方法があります。
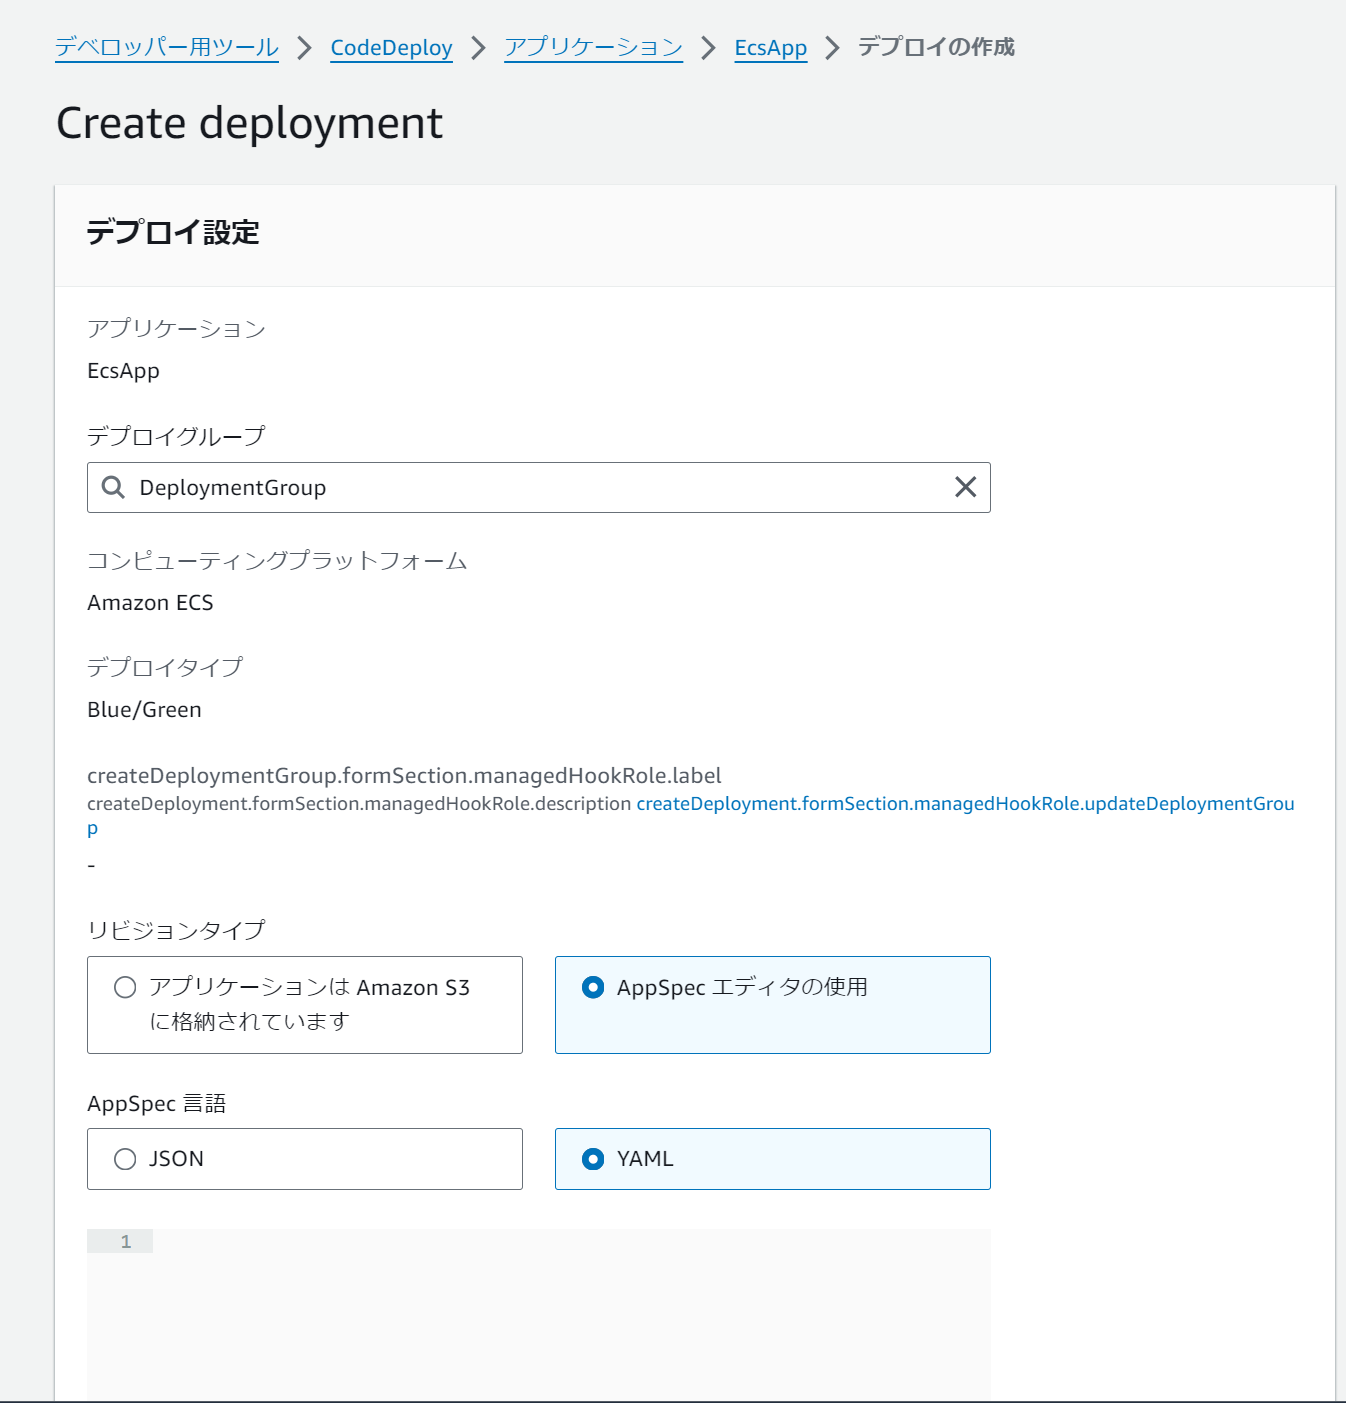
AppSpecエディタを利用する場合は図中のテキストボックスに以下のような内容を貼り付けます。
# appspec.yamlの内容例
version: 0.0
Resources:
  - TargetService:
      Type: AWS::ECS::Service
      Properties:
        TaskDefinition: "arn:aws:ecs:us-west-2:123456789012:task-definition/TASKDEFINITION_NAME:REVISION"
        LoadBalancerInfo:
          ContainerName: "CONTAINER_NAME"
          ContainerPort: CONTAINER_PORT
        PlatformVersion: "LATEST"
その後、「デプロイの作成」をクリックするとデプロイが始まります。以降CodeDeployの画面でデプロイの進捗を確認できます。
2. TaskSetの作成
appspec.yaml内で指定したタスク定義に基づいて、TaskSetが作成されます。
3.TargetGroupと紐づけ
新しく作成されたTaskSet内のタスクがGreenのTargetGroupに紐づきます。
4.テスト用Listenerのルーティング変更
テスト用Listenerに紐づくTargetGroupがBlueからGreenに変わります。
5.本番用Listenerのルーティング変更
本番用Listenerが紐づくTargetGroupもBlueからGreenに最終的に変わります。
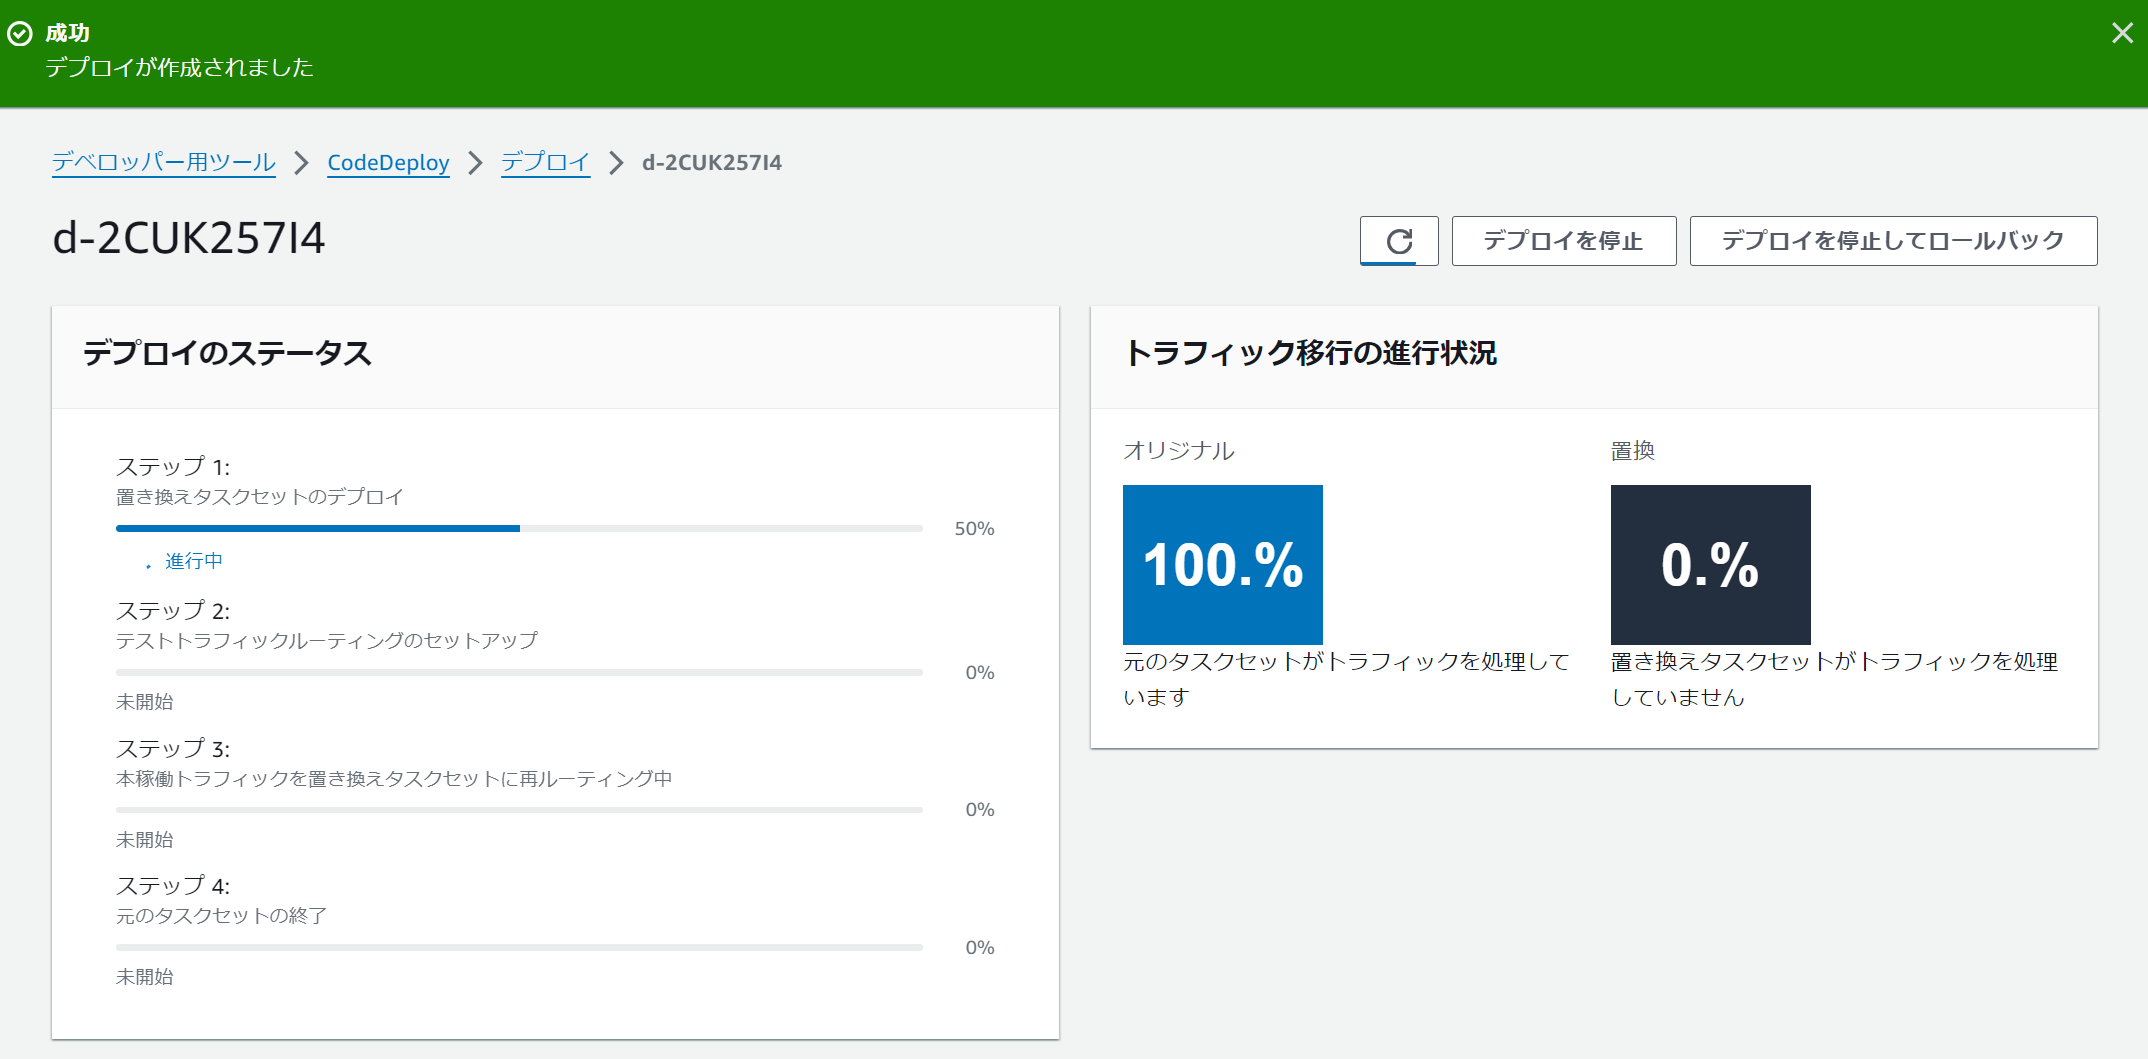
TargetGroupの切り替えが一気になのか徐々になのかは指定が可能です。プリセットで以下のデプロイ設定が用意されています。独自のデプロイ設定を定義することも可能です。
| Option | Description |
|---|---|
| CodeDeployDefault.ECSLinear10PercentEvery1Minutes | 1分ごとに10%の割合でGreenに切り替え |
| CodeDeployDefault.ECSLinear10PercentEvery3Minutes | 3分ごとに10%の割合でGreenに切り替え |
| CodeDeployDefault.ECSCanary10Percent5Minutes | 5分間10%のトラフィックをGreenにルーティングした後切り替え |
| CodeDeployDefault.ECSCanary10Percent15Minutes | 15分間10%のトラフィックをGreenにルーティングした後切り替え |
| CodeDeployDefault.ECSAllAtOnce | 即時 |
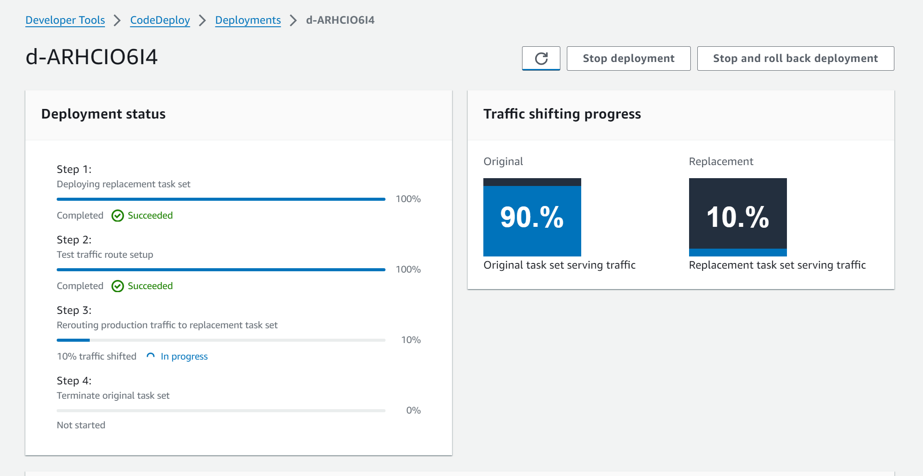
それぞれのTargetGroupにどのくらいの割合でトラフィックが分配されているのかはCodeDeployから確認することが可能です。
なおテスト用Listenerのルーティング変更が完了してから、本番用Listenerのルーティングを開始するまでの待機時間を設定することが可能です。最短5分、最長時1日間23時間55分まで指定できます。
6.タスクセットの削除・TargetGroupとの紐づけ解除
本番用Listenerのルーティング変更が完了し、指定時間が経過するとBlueのTaskSetは削除され、TargetGroupとの紐づけも解除されます。最短5分、最長時1日間23時間55分まで指定できます。(デフォルトは5分)。
7.デプロイの完了
CodeDeployのデプロイが完了します。
まとめ
CodeDeployによるECSのBlue/Greenデプロイの挙動を図解してみました。
何かのお役に立てば幸いです。