はじめに
AppleがWWDC2019で発表したSwiftUIは言うまでもなく素晴らしい技術で、UIKitよりも簡潔、簡単に実装することが出来ます。しかし、一通りビデオも見て、リファレンスに目を通し、チュートリアルもやってみて、それらを反復するビデオやブログにそろそろ飽き飽きし、確かに定型的なことは簡単にできるけれど、独自のユニークな実装はどうするの?という段階なのではないかと思います。そこで、今回は一歩踏み出したCustom Viewの作り方を紹介したいと思います。
下記の素晴らしいブログを参考にしています。
GeometryReader to the Rescue
事前に下記WWDC2019のビデオを見て理解していると良いと思います。(特に今回は前半部分)
今回のCustom View
下記のような真ん中のオブジェクトが徐々に拡大されるようなスクロールビューを作ってみたいと思います。
もちろんSwiftUIのみでUIKitは使いません。
(開発&実行環境:macOS Catalina β3, Xcode 11 β3)

今回のキモ ー GeometryReaderとは
基本的な書式はGeometryReader { geometry in}でgeometryはGeometryProxyタイプになります。このGeometryProxyを通じて、クロージャー内のViewに対する親からの期待されるサイズ、座標などを取得することが出来ます。
簡単な下記の例だと100x100の正方形から"Hello Wolrd"のテキスト部分を抜いた長方形の黒色部分のサイズをgeometry.sizeによって、取得することが出来ます。

import SwiftUI
struct SimpleView : View {
    var body: some View {
        VStack {
            Text("Hello World!")
            GeometryReader { geometry in
                Rectangle()
                geometry.size //黒い長方形のサイズ
            }
        }
        .frame(width:100.0, height: 100.0)
    }
}
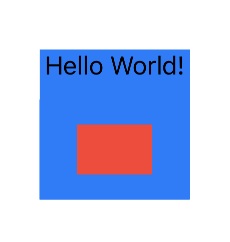
では、GeometryReaderを使って黒色の部分を半分にして、赤色に塗ってみましょう。
import SwiftUI
struct SimpleView : View {
    var body: some View {
        VStack {
            Text("Hello World!")
            GeometryReader { geometry in
                Rectangle()
                .path(in: CGRect(x: geometry.size.width/4,
                                 y: geometry.size.height/4,
                                 width: geometry.size.width/2,
                                 height: geometry.size.height/2))
                .fill(Color.red)
            }
        }
        .frame(width:100.0, height: 100.0)
        .background(Color.blue)
    }
}

このように、元のサイズや座標を使って、形状を変更することが出来ます。親Viewはあくまでも期待されるサイズや座標を子Viewに渡すだけで、実際の表示は子Viewに委ねられます。(何もしなければ親の言う通りに実行されます)このあたりのメカニズムは前述のBuilding Custom Views with SwiftUIの前半部分が参考になります。
簡単な例
import SwiftUI

struct SimpleView : View {
    var body: some View {
        VStack {
            Text("Hello World!"/*@END_MENU_TOKEN@*/)
        }
        .frame(width: 120, height: 120)
        .background(StickyNoteView())
    }
}

struct StickyNoteView: View {
    var color: Color = .green
    var body: some View {
        GeometryReader { geometry in
            ZStack {
                Path { path in
                    let w = geometry.size.width
                    let h = geometry.size.height
                    let m = min(w/5, h/5)
                    path.move(to: CGPoint(x: 0, y: 0))
                    path.addLine(to: CGPoint(x: 0, y: h))
                    path.addLine(to: CGPoint(x: w-m, y: h))
                    path.addLine(to: CGPoint(x: w, y: h-m))
                    path.addLine(to: CGPoint(x: w, y: 0))
                    path.addLine(to: CGPoint(x: 0, y: 0))
                }
                .fill(self.color)
                Path { path in
                    let w = geometry.size.width
                    let h = geometry.size.height
                    let m = min(w/5, h/5)
                    path.move(to: CGPoint(x: w-m, y: h))
                    path.addLine(to: CGPoint(x: w-m, y: h-m))
                    path.addLine(to: CGPoint(x: w, y: h-m))
                    path.addLine(to: CGPoint(x: w-m, y: h))
                }
                .fill(Color.black).opacity(0.4)
            }
        }
    }
}
さて本題のCustom View

下記コードのように非常にシンプルです。
実際にスケールを変更しているのはCircle()のModifierのscaleEffect部分になります。geometory.frame(in: .global).midXで円の中央のx座標を取得し、円が画面X軸上の真んに来た時にmagnificationで指定した倍率のサイズに、左右にずれるほど小さく(最小値は1倍)なるようにサイズを指定しているだけです。注意点としては、GeometryReaderのframe modifierでサイズをサイズを指定しなればならないところです。今回は拡大率りよる最大の高さを指定しています。(でなければ、拡大した時に切れて表示されてしまう)
こんな簡単なコードでこのUIが作れるとは、SWiftUIやっぱり凄いと思います。
import SwiftUI

struct GeometryReaderView : View {
    let halfScreenWidth = UIScreen.main.bounds.width / 2
    let magnification:CGFloat = 1.8
    var body: some View {
        ScrollView(.horizontal, showsIndicators: false) {
            HStack {
                ForEach((0...10), id: \.self) { _ in
                    GeometryReader { geometry in
                        Circle()
                            .frame(width: 100, height: 100)
                            .foregroundColor(Color.red)
                            .scaleEffect(max(1,-abs(self.magnification / self.halfScreenWidth * (geometry.frame(in: .global).midX - self.halfScreenWidth)) + self.magnification))
                        }
                    .frame(width: 100, height: self.magnification * 100)
                    .padding()
                }
            }
        }
    }
}

struct GeometryReaderView_Previews: PreviewProvider {
    static var previews: some View {
        GeometryReaderView()
    }
}
最後に
SwiftUI、本当に素晴らしいです。まだリファレンスもNo overview available.な部分が多く未知な機能が沢山あると思われます。徐々に公開、ユーザーにより解明され、ますます色々な事が出来るようになるでしょう。ワクワクしますね。
不定期連載予定
