はじめに
今回は個人的にはWWDC2019の二大トピックと思っているSwiftUIとCombineの連携についてです。
Combineに関して知識が無い方はCombine自体の説明はここではしないので、下記WWDC2019のビデオで基礎知識を得てください。また、他のSwiftUI関連ビデオでもCombineが散見されますでのご覧になってない方は是非チェックしてみてください。
但し注意しなければならないのは、一部名称と実装方法が当時のものから変わっています。特に下記は注意が必要です。
-
BinableObject(旧)->ObservableObject(新) -
ObjectBinding(旧)->ObservedObject(新) -
@Publishedプロパティラッパー (新)
今回作るもの
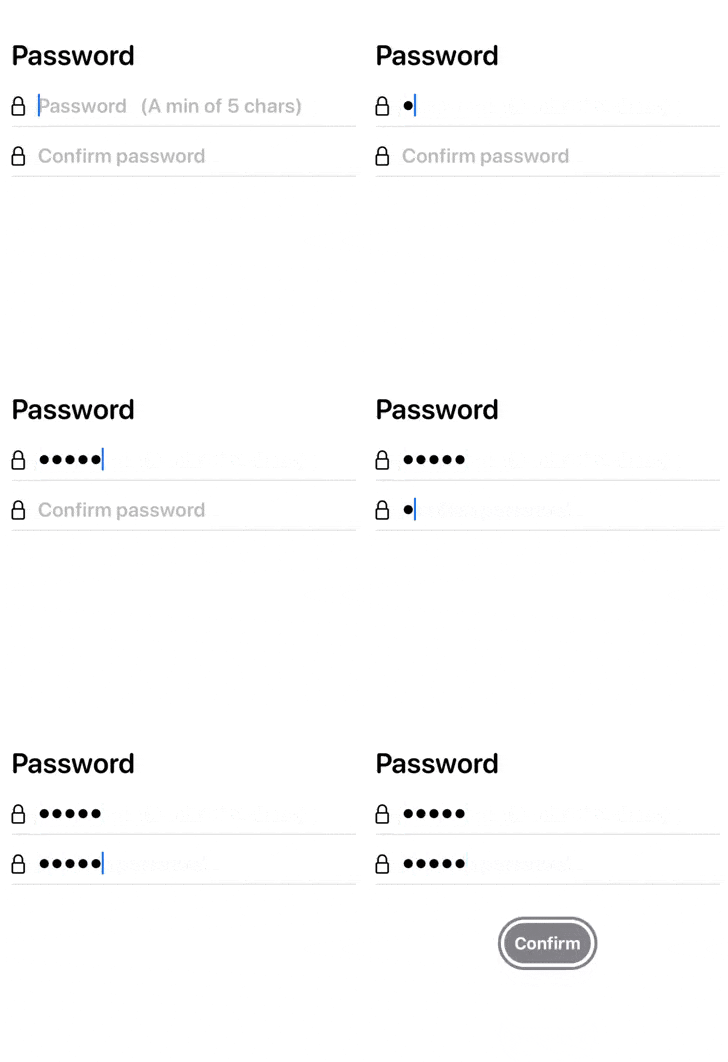
SwiftUIとCombineを使って下記のようなシンプルなものを作ってみようと思います。
入力されるパスワードが下記の2つの条件を満たすと、ボタンが表示されます。
- パスワードに5文字以上入力される
- パスワードと確認用パスワードに同じ文字列が入力される
大まかな方針
データ、Publisher、Subscriberを管理するモデルクラスとUIを分離、実装します。
UI、データの関連性、流れを簡単な図で下記に示します。

Combineの説明をしないと言っておいてなんですが、Combineは楽器のシンセサイザーに置き換えると理解しやすいと思います。Publisherはシンセサイザーのオシレータ(音源)で、Operatorはフィルター、エンベロープ、LFOみたいなもので、シンセサイザーがオシレータを変調したりするのと同様、Publisherのデータをフィルタリングしたり、型変換したり、まとめたりすることが可能です。Subscriberはシンセサーザーで言うと、最終的な音の出口、メインアウトプットやヘッドフォンなどでしょうか。Operatorには色々なものがあってそれらを組み合わせてほぼ無限大のロジックを構築することが可能ですので是非ドキュメントなどでチェックしてみてください。リンク
今回、モデルクラスでは2つのパスワードの入力とバインディングされたPublisherとそれらをまとめValidateした結果をValidatorの状態を表すPublisherにアサインします。そのPublisherはUIのボタン表示の有無にバインドされているのでパスワードがバリデートされれば自動的にボタンが表示されると言う仕組みです。
モデルクラスの作成
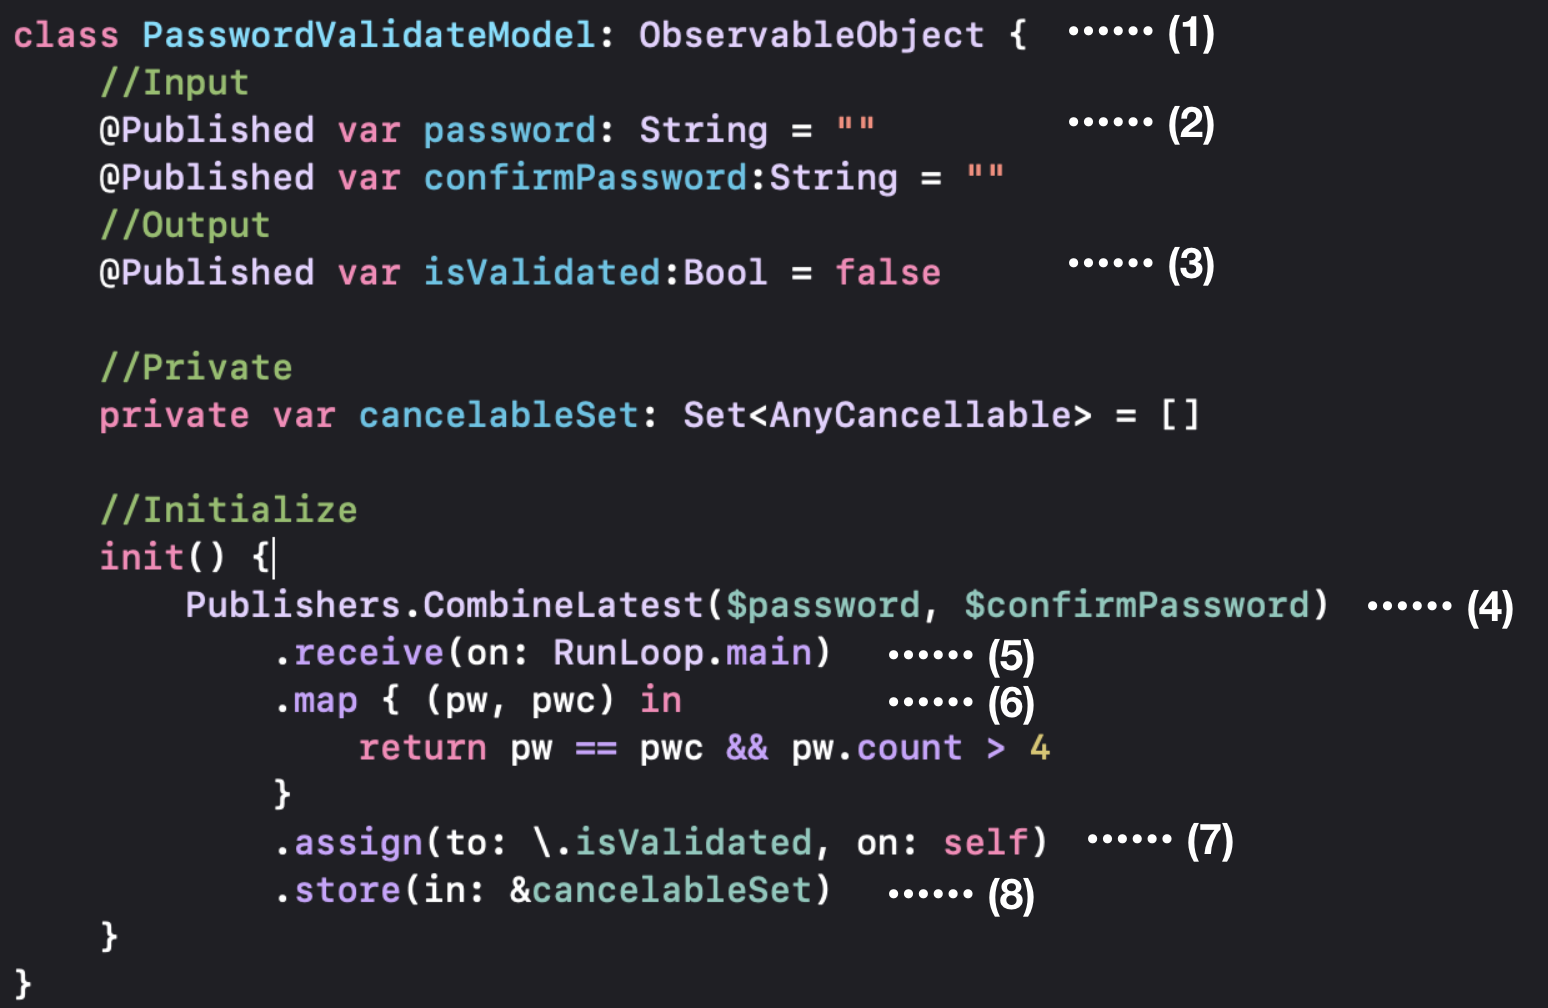
先ずはPublisher, Subscriberなどを管理するモデルクラスを作ります。コードは下記のようになります。
下記でひとつずつ見てみましょう。

- PublisherをUIとバインディングしたいのでObservableObjectをConfirmします。
- UIからの受けデータ(パスワードと確認用パスワード)をPublisherとして宣言します
- UIへのデータ(バリデーションの結果)をPublisherとして宣言します。
- イニシャライザ内でバリデーションのロジックとデータの流れを作ります。まずは、
CombineLatestにて2つのパスワード関連Publisherを一つにまとめます。どちらかがUIで更新されればイベントが起きデータが流れてきます。 - UIと連携するためメインスレッドで実行したいので、その設定。
- Mapにて2つのパスワードデータが5文字以上か?、2つのパスワードが同一か?の条件の結果をBoolで返します。両方とも
TrueであればTrueが返り、それ以外であればFalseが返ります。 - 5)のバリデーションの結果(Bool)を3)で作成したPublisherにアサインします。
- サブスクリクションをSetの配列にアサインします。これにより後ほどサブスクリプションのキャンセルを行うことができます。(今回は使っていない)
UIの作成
下記の手順に沿って実装します。見やすいようにカスタムUIViewを使っていますが、ただのSecureFieldとButtonです。

- 前述で作成したモデルのインスタンスを作成します。バインディングしたいので
@ObservedObjectプロパティラッパーを使います。
2),3)SecureFieldのtextとモデルのパスワードをバインドします。 - ボタンの表示条件にモデルの
isValidatedを設定します。
以上です。
因みに$の場所によって得られる値が変わります。例えば今回の例で言うと、
-
pw.isValidated->isValidatedの値(Bool)。BindingされていないのでRead Only -
pw.$isValidated-> Publisher -
$pw.isValidated-> バインディングされたisValidatedの値(Bool)。Bindingされているので双方向 -
$pw.$isValidated-> バインディングされたPublisher
となるようです。
まとめ
SwiftUIとCombineを使うと、とても簡単に、そしてシンプルにUIとロジックを分けることができます。次回はもう少し複雑なものを作ってみたいと思います。
だれかCombineのビジュアルプログラミングツール作ってくれないかな〜。Operatorとか複雑になっても視覚的にデータ追えるやつ。
コード全文
import SwiftUI
import Combine

// MARK: - Model Class
class PasswordValidateModel: ObservableObject {
    //Input
    @Published var password: String = ""
    @Published var confirmPassword:String = ""
    //Output
    @Published var isValidated:Bool = false

    //Private
    private var cancelableSet: Set<AnyCancellable> = []

    //Initialize
    init() {
        Publishers.CombineLatest($password, $confirmPassword)
            .receive(on: RunLoop.main)
            .map { (pw, pwc) in
                return pw == pwc && pw.count > 4
            }
            .assign(to: \.isValidated, on: self)
            .store(in: &cancelableSet)
    }
}


// MARK: - UI
struct ContentView: View {
    @ObservedObject var pw:PasswordValidateModel = PasswordValidateModel()

    var body: some View {
        ZStack {
            HStack {
                Text("Password")
                    .font(.system(.title, design: .rounded))
                    .fontWeight(.semibold)
                Spacer()
            }.padding(.horizontal).offset(x: 0, y: -180)
            PasswordTextField(value: $pw.password, placeholder: "Password   (A min of 5 chars)")
                .offset(y: -125)
            PasswordTextField(value: $pw.confirmPassword, placeholder: "Confirm password")
                .offset(y: -75)
            if pw.isValidated {
                ConfirmButton()
            }
        }
    }
}

// MARK: - Customized Secure Field
struct PasswordTextField: View {
    @Binding var value:String
    var placeholder:String
    var body: some View {
        VStack{
            HStack{
                Image(systemName: "lock").padding(.trailing,5)
                    .font(.system(size: 20))
                    .padding(.leading)
                SecureField(placeholder, text: $value)
                    .font(.system(size: 20, weight: .semibold, design: .rounded))
            }
            Divider()
                .frame(height: 1)
                .background(Color(red: 240/255, green: 240/255, blue: 240/255))
                .padding(.horizontal)
        }
    }
}

// MARK: - Customized Button
struct ConfirmButton: View {
    var body: some View {
        Button(action: {}) {
            Text("Confirm")
                .fontWeight(.bold)
                .font(.headline)
                .padding(10)
                .background(Color.gray)
                .cornerRadius(40)
                .foregroundColor(.white)
                .padding(5)
                .overlay(RoundedRectangle(cornerRadius: 40)
                .stroke(Color.gray, lineWidth: 3)
)
        }
        .animation(.easeIn(duration: 0.5))
        .transition(.offset(x: 0, y: 300))
    }
}

struct ContentView_Previews: PreviewProvider {
    static var previews: some View {
        ContentView()
    }
}
