こちらで公開されているQ&A botのソリューションアクセラレータ(すぐにユースケースを実現できるサンプルノートブック)を翻訳したのでウォークスルーします。
なお、日本語データセットでも動きました。
オリジナルのアクセラレータ
翻訳版
概要
このソリューションアクセラレータはイントロダクションを含め5つのノートブックから構成されています。
- 00_Intro: 概要説明
- 01_Build_Document_Index: ドキュメントのインデックスの構築
- 02_Assemble_Application: コアアプリケーションの構築
- 03_Evaluation: botの精度評価
- 04_Deploy_Application: アプリケーションのデプロイ
その他に以下のファイルを使用します。
- util/notebook-config: 環境設定
- data/eval_file.tsv: 03_Evaluationで使用する検証用データ
util/notebook-config
ドキュメントを格納するデータベース名を適宜設定します。
config['database_name'] = 'qabot_taka_yayoi' # 適宜変更してください
このソリューションアクセラレータではOpenAI APIを使用するので、APIキーを取得してDatabricksシークレットに格納しておきます。その際のスコープとキーを指定します。
import os

# 実際に設定したシークレットのスコープとキーを指定します
os.environ['OPENAI_API_KEY'] = dbutils.secrets.get("demo-token-takaaki.yayoi", "openai_api_key")
その他、登録するモデル名なども必要に応じて変更してください。変更が必要な部分にはコメントを記載しています。
import mlflow
config['registered_model_name'] = 'databricks_llm_qabot_solution_accelerator_taka' # 適宜変更してください
00_Intro
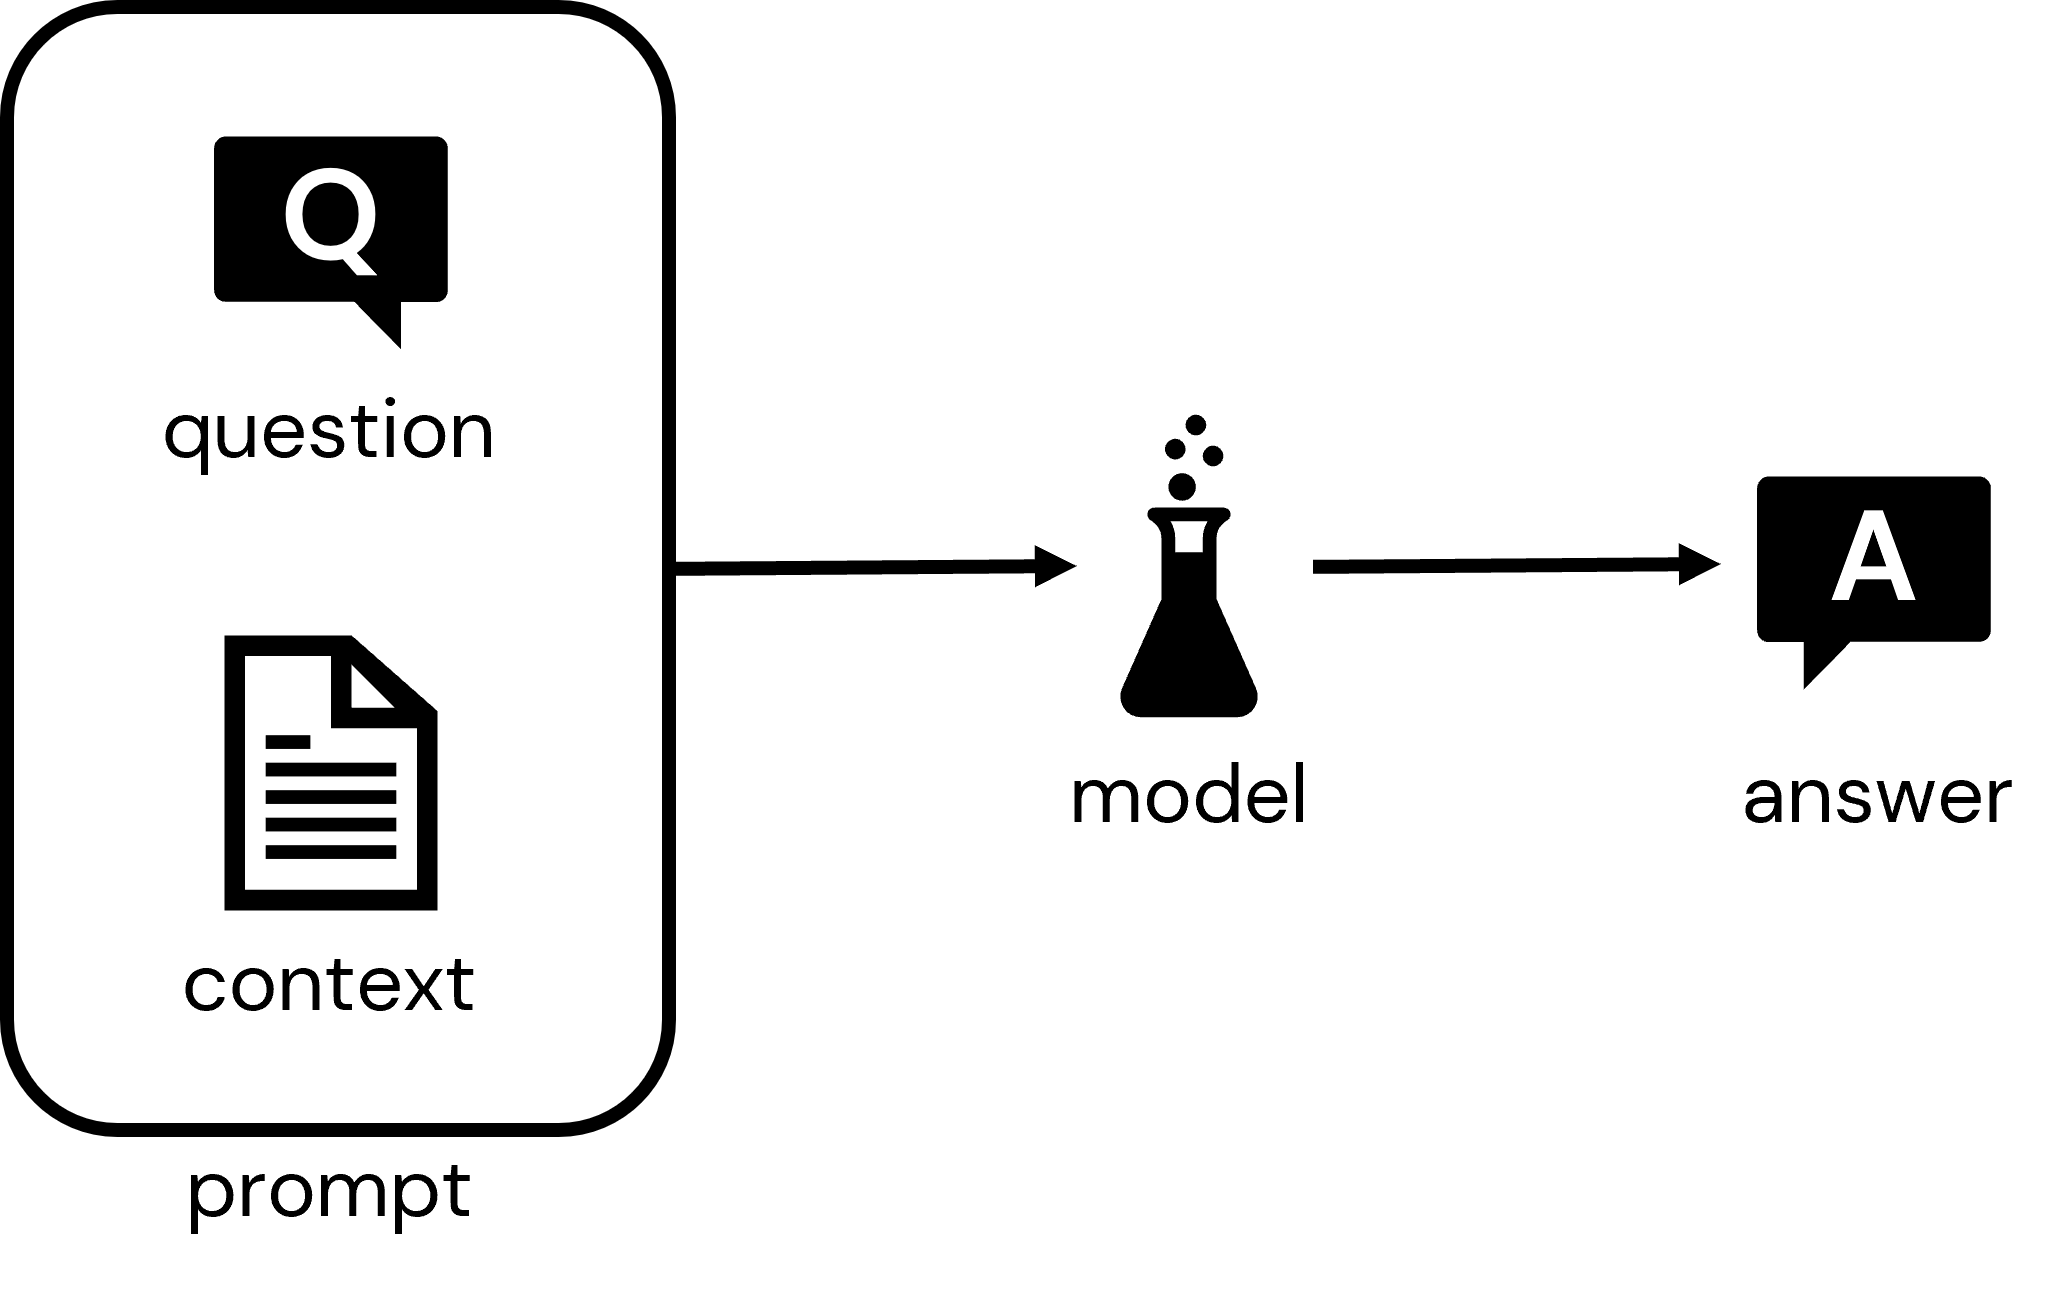
このソリューションアクセラレータのゴールは、特定のドメインや問題領域に特化した質問応答を可能とするインタラクティブなアプリケーションを作成するために、自分のデータと組み合わせてどのように大規模言語モデルを活用できるのかを説明することです。この背後にあるコアなパターンは、モデルに対する質問に回答するのに適切なコンテキストを提供するドキュメントやドキュメントの断片と質問を提供するというものです。そして、モデルは質問とコンテキストの両方を考慮した回答を出力します。
Q&Aチャットbotのようなアプリケーションを構築するには、提供したいドメインに適した一連のドキュメントを必要とします。与えられたユーザーの質問の高速検索を可能とするインデックスが必要となります。そして、プロンプトを生成するために質問とドキュメントを組み合わせ、レスポンスを生成するためにモデルにプロンプトを送信するコアのアプリケーションを構築する必要があります。最後に、さまざまなデプロイメントオプションを可能にするために、インデックスが付与されたドキュメントとコアアプリケーションコンポーネントをマイクロサービスとしてパッケージする必要があります。
以下の3つのノートブックを通じてこれら3つのステップに取り組みます:
- 01: Build Document Index(ドキュメントのインデックスの構築)
- 02: Assemble Application(アプリケーションの構築)
- 03: Deploy Application(アプリケーションのデプロイ)
このアクセラレータを通じて使用するパスを初期化します。
%run "./util/notebook-config"
01_Build_Document_Index
QA botアプリケーションが適切な回答で反応するように、質問に適したドキュメントのコンテンツをモデルに提供する必要があります。botがレスポンスを導き出すためにこれらのドキュメントの情報を活用するというアイデアです。
我々のアプリケーションでは、Databricksドキュメント、Sparkドキュメント、Databricksナレッジベースから一連のドキュメントを抽出しました。Databricksナレッジベースは、FAQに対応し、高品質で詳細なレスポンスがあるオンラインフォーラムです。コンテキストを提供するためにこれらの3つのドキュメントソースを用いることで、我々のbotは深い専門性を持って、この領域において適切な質問に反応することができます。
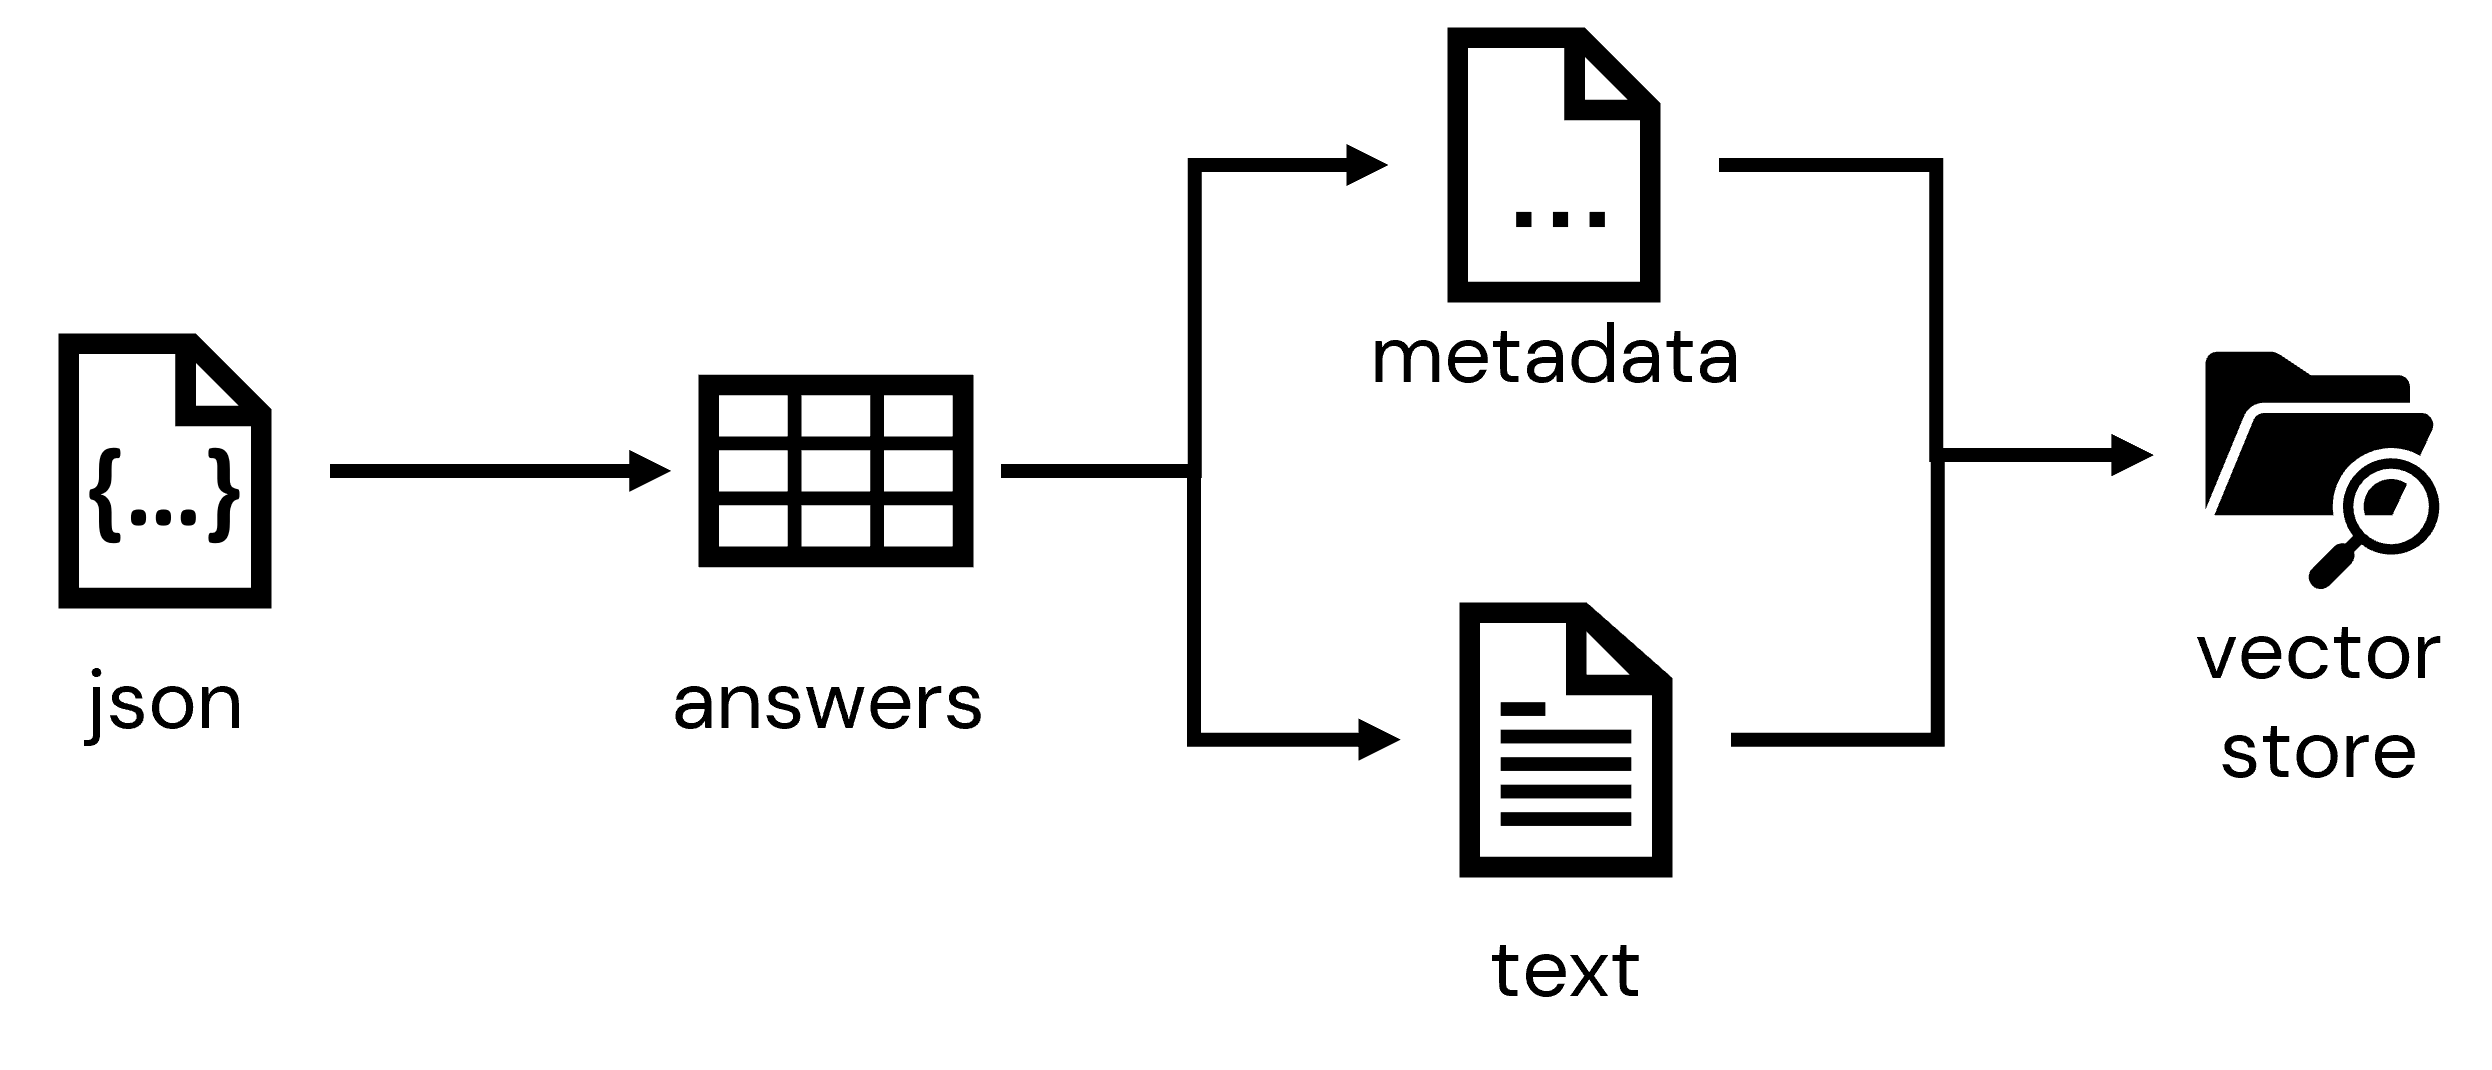
このノートブックでは、これらのドキュメントをロードし、別のプロセスを通じて一連のJSONドキュメントとして抽出し、Databricks環境におけるテーブルに格納します。ドキュメントに関するメタデータを収集し、高速なドキュメント検索や取得を可能にするインデックスを構成するベクトルストアに取り込みます。
Step 1: 生データをテーブルにロード
3つのドキュメントソースのスナップショットは、公開されているクラウドストレージからアクセスできます。最初のステップは、抽出されたドキュメントにアクセスすることです。multiLineオプションを用いてJSONを読み込むように設定されたSpark DataReaderを用いてこれらをテーブルにロードすることができます。
raw = (
  spark
    .read
    .option("multiLine", "true")
    .json(
      f"{config['kb_documents_path']}/source/"
      )
  )

display(raw)

データを永続化します。
# データをテーブルに保存
_ = (
  raw
    .write
    .format('delta')
    .mode('overwrite')
    .option('overwriteSchema','true')
    .saveAsTable('sources')
  )

# テーブルの行数をカウント
print(spark.table('sources').count())
7758

Step 2: インデックスのためのデータを準備
新たにロードしたテーブルでは数多くのフィールドを利用できますが、我々のアプリケーションに適しているフィールドは:
- text - ユーザーの質問に適した情報を含む可能性のあるドキュメントのテキストやナレッジベースの回答
- source - オンラインドキュメントをポイントするURL
raw_inputs = (
  spark
    .table('sources')
    .selectExpr(
      'text',
      'source'
      )
  )

display(raw_inputs)

ドキュメントのインデックスへの変換プロセスには、固定サイズのエンべディングへの変換が含まれます。エンべディングは座標のような一連の数値であり、テキストユニットのコンテンツを要約します。大きなエンべディングは、ドキュメントの比較的詳細な情報をキャプチャすることができますが、送信されるドキュメントが大きいほどエンべディングはコンテンツを汎化します。これは、誰かに段落や章、本全体を固定数の次元に要約することお願いするようなものです。スコープが大きいほど、要約では詳細を削ぎ落とし、テキストのより高次のコンセプトにフォーカスしなくてはなりません。
これに対する一般的な戦略は、エンべディングを生成する際にテキストをチャンク(塊)に分割するというものです。これらのチャンクは意味のある詳細情報を捕捉するように十分大きなものである必要がありますが、汎化を通じてキーとなる要素が洗い流されてしまうほど大きなものである必要はありません。適切なチャンクサイズを決定することはサイエンスというより芸術の領域ではありますが、ここではこのステップで何が起きているのかを説明するために十分小さいチャンクサイズを使用しています:
text_splitter = TokenTextSplitter(chunk_size=100, chunk_overlap=10)
for chunk in text_splitter.split_text(long_text):
  print(chunk, '\n')
チャンク間のオーバーラップを指定していることに注意してください。これによってキーとなるコンセプトを捕捉する単語の分離を避ける助けになります。
このデモではオーバーラップのサイズを非常に小さく設定していますが、オーバーラップのサイズがチャンク間でオーバーラップする単語の正確な数にうまく変換されていないことに気づくかもしれません。これは、単語でコンテンツを直接分割しているのではなく、テキストを構成する単語から導かれるバイトペアのエンコーディングトークンで分割しているためです。バイトペアエンコーディングの詳細はこちらで確認できますが、多くのLLMアルゴリズムでテキストを圧縮するためによく適用されるメカニズムであることに注意してください。
ドキュメント分割のコンセプトを理解したところで、我々のドキュメントをチャンクに分割する関数を記述し、データに適用しましょう。このステップでは、最終的に情報を送信するChat-GPTモデルで指定されている制限に合わせて、チャンクサイズとオーバーラップサイズを大きな値に設定していることに注意してください。これらの値をさらに大きくすることは可能ですが、それぞれのChat-GPTモデルでは現在は固定数の トークン が許可されており、ユーザープロンプト全体と生成されるレスポンスはこのトークンリミットに収まらなくてはいけないことに注意してください。さもないと、エラーが生成されます:
チャンクの設定
chunk_size = 3500
chunk_overlap = 400
入力をチャンクに分割
@fn.udf('array<string>')
def get_chunks(text):

  # トークン化ユーティリティのインスタンスを作成
  text_splitter = TokenTextSplitter(chunk_size=chunk_size, chunk_overlap=chunk_overlap)

  # テキストをチャンクに分割
  return text_splitter.split_text(text)


# テキストをチャンクに分割
chunked_inputs = (
  raw_inputs
    .withColumn('chunks', get_chunks('text')) # テキストをチャンクに分割
    .drop('text')
    .withColumn('num_chunks', fn.expr("size(chunks)"))
    .withColumn('chunk', fn.expr("explode(chunks)"))
    .drop('chunks')
    .withColumnRenamed('chunk','text')
  )

  # 変換データを表示
display(chunked_inputs)
Step 3: ベクトルストアの作成
データをチャンクに分割することで、これらのレコードを検索可能なエンべディングに変換することができます。最初のステップは、コンテンツから変換されるドキュメントに関するメタデータとコンテンツを分割することです:
# 入力をpandasデータフレームに変換
inputs = chunked_inputs.toPandas()

# 検索可能なテキスト要素を抽出
text_inputs = inputs['text'].to_list()

# メタデータの抽出
metadata_inputs = (
  inputs
    .drop(['text','num_chunks'], axis=1)
    .to_dict(orient='records')
  )
次に、データをロードするベクトルストアを初期化します。ベクトルストアに馴染みがない方に説明しますが、これらはテキストをエンべディングとして格納することに特化し、コンテンツの類似度に基づいて高速な検索を可能とする特殊なデータベースです。ここでは、Facebook AI Researchによって開発されたFAISS vector storeを使用します。これは高速、軽量で、我々のシナリオにおいて理想的な特性を持っています。
ベクトルストアの設定で鍵となるのは、ドキュメントとすべての検索可能なテキストの両方をエンべディング(ベクトル)に変換するために使用するエンべディングモデルを用いて設定するということです。どのエンべディングを採用するのかを検討する際、数多くの選択肢があります。人気のモデルには、HuggingFace hubで利用できるモデルのsentence-transformerファミリーや、OpenAI embedding modelsなどがあります:
注意 OpenAIEmbeddingsオブジェクトに必要なOpenAI API APIキーがnoteboo 00で設定され、こちらの手順に従って環境変数で利用できるようになっている必要があります。
ベクトルストアのロード
# エンべディングベクトルを生成するエンべディングモデルの指定
embeddings = OpenAIEmbeddings(model=config['openai_embedding_model'])

# ベクトルストアオブジェクトのインスタンスの作成
vector_store = FAISS.from_texts(
  embedding=embeddings,
  texts=text_inputs,
  metadatas=metadata_inputs
  )
ベクトルストアをストレージに永続化
以降のノートブックでベクトルストアを利用できるようにストレージに永続化します:
vector_store.save_local(folder_path=config['vector_store_path'])
02_Assemble_Application
ドキュメントのインデックスを作成したので、コアアプリケーションのロジックの構築にフォーカスすることができます。このロジックは、ユーザーによる質問に基づいてベクトルストアからドキュメントを取得します。ドキュメントと質問にコンテキストが追加され、レスポンスを生成するためにモデルに送信されるプロンプトを構成するためにそれらを活用します。

このノートブックでは、最初に何が行われているのかを把握するために一度ステップをウォークスルーします。そして、我々の作業をより簡単にカプセル化するためにクラスオブジェクトとしてこのロジックを再度パッケージングします。そして、このアクセラレーターの最後のノートブックで、モデルのデプロイをアシストするMLflowの中にモデルとしてこのオブジェクトを永続化します。
Step 1: 回答生成の探索
まず初めに、どのようにしてユーザーが指定した質問に反応して回答を導き出すのかを探索しましょう。ここでは質問を定義するところからスタートします:
質問の指定
question = "How to register a model on databricks?"
以前のノートブックで構築したベクトルストアを用いて、質問に適したドキュメントのチャンクを取得します:
注意
設定値を取得するための上での呼び出しを通じて、OpenAIEmbeddingsオブジェクトで使用されるOpenAI APIキーが環境に設定されます。
適切なドキュメントの取得
# エンべディングにアクセスするためにベクトルストアをオープン
embeddings = OpenAIEmbeddings(model=config['openai_embedding_model'])
vector_store = FAISS.load_local(embeddings=embeddings, folder_path=config['vector_store_path'])

# ドキュメント取得の設定
n_documents = 5 # 取得するドキュメントの数
retriever = vector_store.as_retriever(search_kwargs={'k': n_documents}) # 取得メカニズムの設定

# 適切なドキュメントの取得
docs = retriever.get_relevant_documents(question)
for doc in docs:
  print(doc,'\n')
これで、モデルに送信されるプロンプトにフォーカスすることができます。このプロンプトには、ユーザーが送信する question と、回答の context を提供すると信じるドキュメントのプレースホルダーが必要です。
プロンプトは複数のプロンプト要素から構成され、prompt templatesを用いて定義されることに注意してください。簡単に言えば、プロンプトテンプレートによって、プロンプトの基本的な構造を定義し、レスポンスをトリガーするために容易に変数データで置き換えることができるようになります。ここで示しているシステムメッセージは、モデルにどのように反応して欲しいのかの指示を当てます。人間によるメッセージテンプレートは、ユーザーが発端となるリクエストに関する詳細情報を提供します。
プロンプトに対するレスポンスを行うモデルに関する詳細とプロンプトは、LLMChain objectにカプセル化されます。このオブジェクトはクエリーの解決とレスポンスの返却に対する基本構造をシンプルに定義します:
レスポンス生成のチェーンを定義
# システムレベルの指示の定義
system_message_prompt = SystemMessagePromptTemplate.from_template(config['system_message_template'])

# 人間駆動の指示の定義
human_message_prompt = HumanMessagePromptTemplate.from_template(config['human_message_template'])

# 単一のプロンプトに指示を統合
chat_prompt = ChatPromptTemplate.from_messages([system_message_prompt, human_message_prompt])

# プロンプトに反応するモデルを定義
llm = ChatOpenAI(model_name=config['openai_chat_model'], temperature=config['temperature'])

# 作業単位(chain)にプロンプトとモデルを統合
qa_chain = LLMChain(
  llm = llm,
  prompt = chat_prompt
  )
実際にレスポンスをトリガーするには、適合性の高いものから低いものにドキュメントをループし、レスポンスを導き出すことを試みます。
次のセルでは、タイムアウトのハンドリングや、モデルからのレスポンスの検証を行なっていないことに注意してください。アプリケーションクラスを構築する際にはこのロジックをもっと堅牢にしますが、ここではコードを読みやすくするためにシンプルにしています:
レスポンスの生成
# 指定されたドキュメントのそれぞれに対して
for doc in docs:

  # ドキュメントテキストの取得
  text = doc.page_content

  # レスポンスの生成
  output = qa_chain.generate([{'context': text, 'question': question}])

  # 結果から回答の取得
  generation = output.generations[0][0]
  answer = generation.text

  # 回答の表示
  if answer is not None:
    print(f"Question: {question}", '\n', f"Answer: {answer}")
    break
Question: How to register a model on databricks?
 Answer: To register a model on Databricks, you can use the MLflow Model Registry, which is a centralized model repository and a UI and set of APIs that enable you to manage the full lifecycle of MLflow Models. Once you have logged an MLflow Model from an experiment or run that is logged with one of the model flavor's `mlflow.<model-flavor>.log_model` methods, you can register the model with the Model Registry. The registered model has a unique name, versions, model lineage, and other metadata. You can work with the model registry using either the Model Registry UI or the Model Registry API.
Step 2: デプロイするモデルの構築
レスポンス生成に関連する基本的なステップを探索したら、デプロイメントを容易にするためにクラスの中にロジックをラップしましょう。我々のクラスは、LLMモデル定義、ベクトルストアの収集器、クラスに対するプロンプトを渡すことでインスタンスを生成します。get_answerメソッドは、質問を送信してレスポンスを取得するための主要なメソッドとして機能します:
QABotクラスの定義
class QABot():


  def __init__(self, llm, retriever, prompt):
    self.llm = llm
    self.retriever = retriever
    self.prompt = prompt
    self.qa_chain = LLMChain(llm = self.llm, prompt=prompt)
    self.abbreviations = { # 置換したい既知の略語
      "DBR": "Databricks Runtime",
      "ML": "Machine Learning",
      "UC": "Unity Catalog",
      "DLT": "Delta Live Table",
      "DBFS": "Databricks File Store",
      "HMS": "Hive Metastore",
      "UDF": "User Defined Function"
      }


  def _is_good_answer(self, answer):

    ''' 回答が妥当かをチェック '''

    result = True # デフォルトのレスポンス

    badanswer_phrases = [ # モデルが回答を生成しなかったことを示すフレーズ
      "no information", "no context", "don't know", "no clear answer", "sorry",
      "no answer", "no mention", "reminder", "context does not provide", "no helpful answer",
      "given context", "no helpful", "no relevant", "no question", "not clear",
      "don't have enough information", " does not have the relevant information", "does not seem to be directly related"
      ]

    if answer is None: # 回答がNoneの場合は不正な回答
      results = False
    else: # badanswer phraseを含んでいる場合は不正な回答
      for phrase in badanswer_phrases:
        if phrase in answer.lower():
          result = False
          break

    return result


  def _get_answer(self, context, question, timeout_sec=60):

    '''' タイムアウトハンドリングありのLLMからの回答取得 '''

    # デフォルトの結果
    result = None

    # 終了時間の定義
    end_time = time.time() + timeout_sec

    # タイムアウトに対するトライ
    while time.time() < end_time:

      # レスポンス取得の試行
      try:
        result =  qa_chain.generate([{'context': context, 'question': question}])
        break # レスポンスが成功したらループをストップ

      # レートリミットのエラーが起きたら...
      except openai.error.RateLimitError as rate_limit_error:
        if time.time() < end_time: # 時間があるのであればsleep
          time.sleep(2)
          continue
        else: # そうでなければ例外を発生
          raise rate_limit_error

      # その他のエラーでも例外を発生
      except Exception as e:
        print(f'LLM QA Chain encountered unexpected error: {e}')
        raise e

    return result


  def get_answer(self, question):
    ''' 指定された質問の回答を取得 '''

    # デフォルトの結果
    result = {'answer':None, 'source':None, 'output_metadata':None}

    # 質問から一般的な略語を削除
    for abbreviation, full_text in self.abbreviations.items():
      pattern = re.compile(fr'\b({abbreviation}|{abbreviation.lower()})\b', re.IGNORECASE)
      question = pattern.sub(f"{abbreviation} ({full_text})", question)

    # 適切なドキュメントの取得
    docs = self.retriever.get_relevant_documents(question)

    # それぞれのドキュメントごとに ...
    for doc in docs:

      # ドキュメントのキー要素を取得
      text = doc.page_content
      source = doc.metadata['source']

      # LLMから回答を取得
      output = self._get_answer(text, question)

      # 結果からアウトプットを取得
      generation = output.generations[0][0]
      answer = generation.text
      output_metadata = output.llm_output

      # no_answer ではない場合には結果を構成
      if self._is_good_answer(answer):
        result['answer'] = answer
        result['source'] = source
        result['output_metadata'] = output_metadata
        break # 良い回答であればループをストップ

    return result
これで、以前インスタンス化したオブジェクトを用いてクラスをテストすることができます:
QABotクラスのテスト
# botオブジェクトのインスタンスを作成
qabot = QABot(llm, retriever, chat_prompt)

# 質問に対するレスポンスの取得
qabot.get_answer(question)
Out[16]: {'answer': "To register a model on Databricks, you can use the MLflow Model Registry, which is a centralized model repository and a UI and set of APIs that enable you to manage the full lifecycle of MLflow Models. Once you have logged an MLflow Model from an experiment or run that is logged with one of the model flavor's `mlflow.<model-flavor>.log_model` methods, you can register the model with the Model Registry. The registered model has a unique name, versions, model lineage, and other metadata. You can work with the model registry using either the Model Registry UI or the Model Registry API.",
 'source': 'https://docs.databricks.com/mlflow/model-registry.html',
 'output_metadata': {'token_usage': {'prompt_tokens': 1309,
   'completion_tokens': 126,
   'total_tokens': 1435},
  'model_name': 'gpt-3.5-turbo'}}
Step 3: MLflowにモデルを永続化
我々のbotクラスが定義、検証されたので、MLflowにこれを永続化します。MLflowはモデルのトラッキングとロギングのためのオープンソースのリポジトリです。Databricksプラットフォームにはデフォルトでデプロイされており、簡単にモデルを記録することができます。
今では、MLflowはOpenAIとLangChainの両方のモデルフレーバーをサポートしていますが、我々のbotアプリケーションではカスタムロジックを記述しているので、より汎用的なpyfuncモデルフレーバーを活用しなくてはなりません。このモデルフレーバーによって、標準的なMLflowのデプロイメントメカニズムを通じてデプロイされた際に、モデルがどのように反応するのかに関して非常に多くのコントロールを行えるように、モデルに対するカスタムラッパーを記述できるようになります。
カスタムMLflowモデルを作成するのに必要なことは、mlflow.pyfunc.PythonModelのタイプのカスタムラッパーを定義することだけです。 __init__ メソッドは、QABotクラスのインスタンスを初期化し、クラス変数に永続化します。そして、 predict メソッドは、レスポンス生成の標準的なインタフェースとして動作します。このメソッドはpandasデータフレームとして入力を受け付けますが、ユーザーから一度に一つの質問を受け取るという知識を用いてロジックを記述することができます:
モデルのMLflowラッパーの定義
class MLflowQABot(mlflow.pyfunc.PythonModel):

  def __init__(self, llm, retriever, chat_prompt):
    self.qabot = QABot(llm, retriever, chat_prompt)

  def predict(self, context, inputs):
    questions = list(inputs['question'])

    # 回答の返却
    return [self.qabot.get_answer(q) for q in questions]
次に、以下のようにモデルのインスタンスを作成し、MLflow registryに記録します:
# mlflowモデルのインスタンスを作成
model = MLflowQABot(llm, retriever, chat_prompt)

# mlflowにモデルを永続化
with mlflow.start_run():
  _ = (
    mlflow.pyfunc.log_model(
      python_model=model,
      extra_pip_requirements=['langchain==0.0.166', 'tiktoken==0.4.0', 'openai==0.27.6', 'faiss-cpu==1.7.4'],
      artifact_path='model',
      registered_model_name=config['registered_model_name']
      )
    )
MLflowが始めてであれば、ロギングが何の役に立つのかと思うかもしれません。このノートブックに関連づけられているエクスペリメントに移動して、log_modelの呼び出しによって記録されたものに対する詳細を確認するために、最新のエクスペリメントをクリックすることができます。エクスペリメントにアクセスするにはDatabricks環境の右側のナビゲーションにあるフラスコアイコンをクリックします。モデルのアーティファクトを展開すると、以前インスタンスを作成したMLflow QABotモデルのpickleを表現するpython_model.pklを確認することができます。これが(後で)本環境あるいは別環境でモデルをロードする際に取得されるモデルとなります:

MLflowのモデルレジストリは、CI/CDワークフローを移動する際に登録されたモデルを管理するメカニズムを提供します。モデルを直接プロダクションのステータスにプッシュ(デモでは構いませんが、現実世界のシナリオでは推奨しません)したいのであれば、以下のようにプログラムから行うことができます:
# mlflowに接続
client = mlflow.MlflowClient()

# 最新モデルバージョンの特定
latest_version = client.get_latest_versions(config['registered_model_name'], stages=['None'])[0].version

# モデルをプロダクションに移行
client.transition_model_version_stage(
    name=config['registered_model_name'],
    version=latest_version,
    stage='Production',
    archive_existing_versions=True
)
次に、レスポンスを確認するために、レジストリからモデルを取得し、いくつかの質問を送信することができます:
# mlflowからモデルを取得
model = mlflow.pyfunc.load_model(f"models:/{config['registered_model_name']}/Production")

# 質問入力の構築
queries = pd.DataFrame({'question':[
  "How to read data with Delta Sharing?",
  "What are Delta Live Tables datasets?",
  "How to set up Unity Catalog?"
]})

# レスポンスの取得
model.predict(queries)
Out[20]: [{'answer': 'To read data with Delta Sharing, you must create a catalog from the share that contains the table. To create a catalog from a share, you can use Data Explorer, the Databricks Unity Catalog (UC) CLI, or SQL commands in a Databricks notebook or the DBSQL query editor. Once you have created a catalog, you can access the data in the tables that you have been granted access to just like any other table in Databricks that you have read-only (SELECT) access to.',
  'source': 'https://docs.databricks.com/data-sharing/read-data-databricks.html',
  'output_metadata': {'token_usage': {'prompt_tokens': 2660,
    'completion_tokens': 103,
    'total_tokens': 2763},
   'model_name': 'gpt-3.5-turbo'}},
 {'answer': 'Delta Live Tables datasets are a feature provided by Databricks to simplify ETL workloads through optimized execution and automated infrastructure deployment and scaling.',
  'source': 'https://docs.databricks.com/delta/index.html',
  'output_metadata': {'token_usage': {'prompt_tokens': 1904,
    'completion_tokens': 28,
    'total_tokens': 1932},
   'model_name': 'gpt-3.5-turbo'}},
 {'answer': 'To set up Unity Catalog, you need to have a Databricks account admin create a metastore for each region in which they operate and assign them to Databricks workspaces in the same region. For a workspace to use Unity Catalog, it must have a Unity Catalog metastore attached. Each metastore is configured with a root storage location in cloud storage. This storage location is used by default for storing data for managed tables.',
  'source': 'https://docs.databricks.com/data-governance/unity-catalog/index.html',
  'output_metadata': {'token_usage': {'prompt_tokens': 2599,
    'completion_tokens': 87,
    'total_tokens': 2686},
   'model_name': 'gpt-3.5-turbo'}}]
03_Evaluation
このノートブックでは、langchainのQAEvalChainと正しいリファレンスとレスポンスを含む評価セットを用いてどのようにQAのパフォーマンスを評価するのかを説明します。モデルのレスポンスと正しいレスポンスを比較するために、試験官としてLLMを活用します。
評価セットのスコアリング
モデルのスコアリングするために、記録されたモデルからPythonの依存関係を取得してインストールします。
MLflowはDBFSのrequirements_pathにモデルの依存関係を含むファイルを書き込みます。そして、ファイルの依存関係をインストールするために %pip を使います。
import mlflow

requirements_path = mlflow.pyfunc.get_model_dependencies(config['model_uri'])
%pip install -r $requirements_path
dbutils.library.restartPython()
質問と、正しいリファレンスとサンプルの回答の両方を含む正しい回答の評価セットを準備しました。サンプルを見てみましょう:
注意
/dataにこちらからダウンロードあるいはコピーしたeval_data.tsvを格納して、適宜パスを変更してください。
eval_dataset = pd.read_csv("/Workspace/Users/takaaki.yayoi@databricks.com/20230525_diy-llm-qa-bot/data/eval_file.tsv", sep='\t').to_dict('records')
#eval_dataset = pd.read_csv(config['eval_dataset_path'], sep='\t').to_dict('records')
eval_dataset[0]
123
eval_dataset = pd.read_csv("/Workspace/Users/takaaki.yayoi@databricks.com/20230525_diy-llm-qa-bot/data/eval_file.tsv", sep='\t').to_dict('records')
#eval_dataset = pd.read_csv(config['eval_dataset_path'], sep='\t').to_dict('records')
eval_dataset[0]
Out[12]: {'question': 'what’s the difference between spark cache and disk cache in databricks?',
 'correct_source': 'https://docs.databricks.com/optimizations/disk-cache.html',
 'answer': 'The main difference between Spark cache and disk cache in Databricks is that Spark cache stores data in memory, while disk cache stores data on local disk storage. Additionally, Spark cache can store the result of any subquery data and data stored in formats other than Parquet, while disk cache works for all Parquet data files (including Delta Lake tables). The disk cache can be read and operated on faster than the Spark cache because it uses efficient decompression algorithms and outputs data in the optimal format for further processing using whole-stage code generation.'}
記録されたモデルによる評価データセットのスコアリング
queries = pd.DataFrame({'question': [r['question'] for r in eval_dataset]})
model = mlflow.pyfunc.load_model(config['model_uri'])
predictions = model.predict(queries)
predictions[0]
Out[13]: {'answer': 'According to the context, the main difference between Spark cache and disk cache in Databricks is that the disk cache contains local copies of remote data and can improve the performance of a wide range of queries, but cannot be used to store results of arbitrary subqueries. On the other hand, the Spark cache can store the result of any subquery data and data stored in formats other than Parquet (such as CSV, JSON, and ORC).',
 'source': 'https://docs.databricks.com/optimizations/disk-cache.html',
 'output_metadata': {'token_usage': {'prompt_tokens': 2371,
   'completion_tokens': 90,
   'total_tokens': 2461},
  'model_name': 'gpt-3.5-turbo'}}
langchainのQAEvalChainは試験官として動作します: それぞれの質問に対して、スコアリングされた回答が正解データと十分類似しているかどうかを比較し、CORRECTかINCORRECTを返却します。
llm = OpenAI(temperature=0)
eval_chain = QAEvalChain.from_llm(llm)
graded_outputs = eval_chain.evaluate(eval_dataset, predictions, question_key="question", prediction_key="answer")
graded_outputs[:5]
Out[14]: [{'text': ' CORRECT'},
 {'text': ' CORRECT'},
 {'text': ' CORRECT'},
 {'text': ' CORRECT'},
 {'text': ' CORRECT'}]
モデルは評価データセットに対してどのくらい正しい回答をするのでしょうか?
results['same_as_answer'].sum() / len(results)
Out[16]: 0.918918918918919
LLMグレーダーによると、我々のQA botは多くの場合で合理的なレスポンスをしているようです。しかし、開発者はレスポンスを読むことで、パフォーマンスを定期的に評価することが依然として重要です。特に長くて複雑な質問の場合には、LLMが微妙なコンセプトの違いを見逃して、偽陰性の評価を行うことははよくあることです。そして、ユーザーが送信する質問のタイプが反映されるように、定期的に評価質問セットをレビューするようにしてください。
04_Deploy_Application
このノートブックでは、以前のノートブックでMLflowに登録したカスタムモデルを、Databricksのモデルサービング(AWS|Azure)にデプロイします。Databricksモデルサービングは、認証されたアプリケーションがREST API経由で登録されたモデルとインタラクションできる、コンテナ化されたデプロイメントオプションを提供します。これによって、MLOpsチームはモデルを簡単にデプロイ、管理し、様々なアプリケーションとこれらのモデルをインテグレーションできるようになります。
デプロイする最新Productionモデルのバージョンを取得
latest_version = mlflow.MlflowClient().get_latest_versions(config['registered_model_name'], stages=['Production'])[0].version
Step 1: モデルサービングエンドポイントのデプロイ
通常、モデルはDatabricksワークスペースのUIかREST APIを用いて、モデル共有エンドポイントにデプロイされます。我々のモデルはセンシティブな環境変数のデプロイメントに依存しているので、現在REST API経由でのみ利用できる比較的新しいモデルサービングの機能を活用する必要あります。
以下でサーブされるモデルの設定を見ると、サーブされるモデルの設定の一部にenv_varsがあることに気づくでしょう。これで、シークレットスコープにキーを格納し、環境変数としてモデルサービングエンドポイントに引き渡すことができます。
served_models = [
    {
      "name": "current",
      "model_name": config['registered_model_name'],
      "model_version": latest_version,
      "workload_size": "Small",
      "scale_to_zero_enabled": "true",
      "env_vars": [{
        "env_var_name": "OPENAI_API_KEY",
        "secret_scope": config['openai_key_secret_scope'],
        "secret_key": config['openai_key_secret_key'],
      }]
    }
]
traffic_config = {"routes": [{"served_model_name": "current", "traffic_percentage": "100"}]}
仕様に合わせてエンドポイントを作成、更新する関数の定義
def endpoint_exists():
  """serving_endpoint_nameの名前のエンドポイントが存在するかどうかをチェック"""
  url = f"https://{serving_host}/api/2.0/serving-endpoints/{config['serving_endpoint_name']}"
  headers = { 'Authorization': f'Bearer {creds.token}' }
  response = requests.get(url, headers=headers)
  return response.status_code == 200

def wait_for_endpoint():
  """デプロイメントの準備ができるまで待ち、エンドポイント設定を返却"""
  headers = { 'Authorization': f'Bearer {creds.token}' }
  endpoint_url = f"https://{serving_host}/api/2.0/serving-endpoints/{config['serving_endpoint_name']}"
  response = requests.request(method='GET', headers=headers, url=endpoint_url)
  while response.json()["state"]["ready"] == "NOT_READY" or response.json()["state"]["config_update"] == "IN_PROGRESS" : # エンドポイントの準備ができていない、あるいは、設定更新中
    print("Waiting 30s for deployment or update to finish")
    time.sleep(30)
    response = requests.request(method='GET', headers=headers, url=endpoint_url)
    response.raise_for_status()
  return response.json()

def create_endpoint():
  """サービングエンドポイントを作成し、準備ができるまで待つ"""
  print(f"Creating new serving endpoint: {config['serving_endpoint_name']}")
  endpoint_url = f'https://{serving_host}/api/2.0/serving-endpoints'
  headers = { 'Authorization': f'Bearer {creds.token}' }
  request_data = {"name": config['serving_endpoint_name'], "config": {"served_models": served_models}}
  json_bytes = json.dumps(request_data).encode('utf-8')
  response = requests.post(endpoint_url, data=json_bytes, headers=headers)
  response.raise_for_status()
  wait_for_endpoint()
  displayHTML(f"""Created the <a href="/#mlflow/endpoints/{config['serving_endpoint_name']}" target="_blank">{config['serving_endpoint_name']}</a> serving endpoint""")

def update_endpoint():
  """サービングエンドポイントを更新し、準備ができるまで待つ"""
  print(f"Updating existing serving endpoint: {config['serving_endpoint_name']}")
  endpoint_url = f"https://{serving_host}/api/2.0/serving-endpoints/{config['serving_endpoint_name']}/config"
  headers = { 'Authorization': f'Bearer {creds.token}' }
  request_data = { "served_models": served_models, "traffic_config": traffic_config }
  json_bytes = json.dumps(request_data).encode('utf-8')
  response = requests.put(endpoint_url, data=json_bytes, headers=headers)
  response.raise_for_status()
  wait_for_endpoint()
  displayHTML(f"""Updated the <a href="/#mlflow/endpoints/{config['serving_endpoint_name']}" target="_blank">{config['serving_endpoint_name']}</a> serving endpoint""")
エンドポイントの作成、更新に定義した関数を使用
# APIが必要とするその他の入力を収集
serving_host = spark.conf.get("spark.databricks.workspaceUrl")
creds = get_databricks_host_creds()

# エンドポイントの作成/更新のスタート
if not endpoint_exists():
  create_endpoint()
else:
  update_endpoint()
しばらく待つとエンドポイントが起動し、URLが表示されます。


Step 2: エンドポイントAPIのテスト
次に、このエンドポイントにクエリーを行う関数をセットアップするために以下のコードを使用します。このコードは、サービングエンドポイントページでアクセスできるQuery EndpointのUIでアクセスするコードから若干変更しています:
エンドポイントにクエリーする関数の定義
import os
import requests
import numpy as np
import pandas as pd
import json

endpoint_url = f"""https://{serving_host}/serving-endpoints/{config['serving_endpoint_name']}/invocations"""


def create_tf_serving_json(data):
    return {
        "inputs": {name: data[name].tolist() for name in data.keys()}
        if isinstance(data, dict)
        else data.tolist()
    }


def score_model(dataset):
    url = endpoint_url
    headers = {
        "Authorization": f"Bearer {creds.token}",
        "Content-Type": "application/json",
    }
    ds_dict = (
        {"dataframe_split": dataset.to_dict(orient="split")}
        if isinstance(dataset, pd.DataFrame)
        else create_tf_serving_json(dataset)
    )
    data_json = json.dumps(ds_dict, allow_nan=True)
    response = requests.request(method="POST", headers=headers, url=url, data=data_json)
    if response.status_code != 200:
        raise Exception(
            f"Request failed with status {response.status_code}, {response.text}"
        )

    return response.json()
これでエンドポイントをテストすることができます:
# 質問入力の構築
queries = pd.DataFrame({'question':[
  "What's the QPS limit for a serverless model serving request?"
]})

score_model(
   queries
    )
Out[15]: {'predictions': [{'answer': 'The default QPS (queries-per-second) limit for a serverless model serving request is 200 QPS per workspace enrolled. However, this limit can be increased up to 3000 QPS per workspace by reaching out to your Databricks support contact.',
   'source': 'https://docs.databricks.com/archive/serverless-inference-preview/serverless-real-time-inference.html',
   'output_metadata': {'token_usage': {'prompt_tokens': 1348,
     'completion_tokens': 53,
     'total_tokens': 1401},
    'model_name': 'gpt-3.5-turbo'}}]}
なお、いくかの制限があります:
- エンドポイントをゼロまでスケールするようにすると、クエリーがない際のbotのコストを削減できます。しかし、長い期間の後の最初のリクエストは、エンドポイントがゼロノードからスケールアップする必要があるため、数分を要します。
- サーバレスモデルサービングリクエストのタイムアウトリミットは60秒です。同じリクエストで3つの質問が送信されると、モデルがタイムアウトすることがあります。
Step 3: Streamlitとの連携
せっかくですので、GUIからエンドポイント上のモデルを呼び出せるようにしてみましょう。Streamlitがインストールされている環境で以下のコードをstreamlit run databricks_qa.pyとして保存して以下を実行します。
streamlit run databricks_qa.py
import streamlit as st
import numpy as np
from PIL import Image
import base64
import io

import os
import requests
import numpy as np
import pandas as pd

import json

st.header('Databricks Q&A bot')
st.write('''
- [カスタマーサービスとサポートにおける大規模言語モデルの革命をドライブする \- Qiita](https://qiita.com/taka_yayoi/items/447ab95af2b8493a04dd)
''')


def create_tf_serving_json(data):
    return {
        "inputs": {name: data[name].tolist() for name in data.keys()}
        if isinstance(data, dict)
        else data.tolist()
    }


def score_model(question):
  # 1. パーソナルアクセストークンを設定してください
  # 今回はデモのため平文で記載していますが、実際に使用する際には環境変数経由で取得する様にしてください。
  token = "<パーソナルアクセストークン>"
  #token = os.environ.get("DATABRICKS_TOKEN")

  # 2. モデルエンドポイントのURLを設定してください
  url = '<エンドポイントのURL>'
  headers = {'Authorization': f'Bearer {token}',
             "Content-Type": "application/json",}

  dataset = pd.DataFrame({'question':[question]})

  ds_dict = (
        {"dataframe_split": dataset.to_dict(orient="split")}
        if isinstance(dataset, pd.DataFrame)
        else create_tf_serving_json(dataset)
    )
  data_json = json.dumps(ds_dict, allow_nan=True)
  response = requests.request(method="POST", headers=headers, url=url, data=data_json)
  if response.status_code != 200:
    raise Exception(
       f"Request failed with status {response.status_code}, {response.text}"
    )

  return response.json()

question = st.text_input("質問")

if question != "":
  response = score_model(question)

  answer = response['predictions'][0]["answer"]
  source = response['predictions'][0]["source"]

  st.write(f"回答: {answer}")
  st.write(f"ソース: [{source}]({source})")
Q&A botアプリの完成です!

ここでは、英語のドキュメントを使用していますが、日本語でもいけそうです。トライしてみます。いやー、ほんとLLMの可能性はすごいですね。そして、LangChainをきちんと勉強しよう。