以前こちらで触ったデモがアップデートされていました。
Mosaic AI Agent FrameworkとAgent Evaluationとの連携が追加されています。
Mosaic AI Agent FrameworkとMosaic AI Agent Evaluationとは
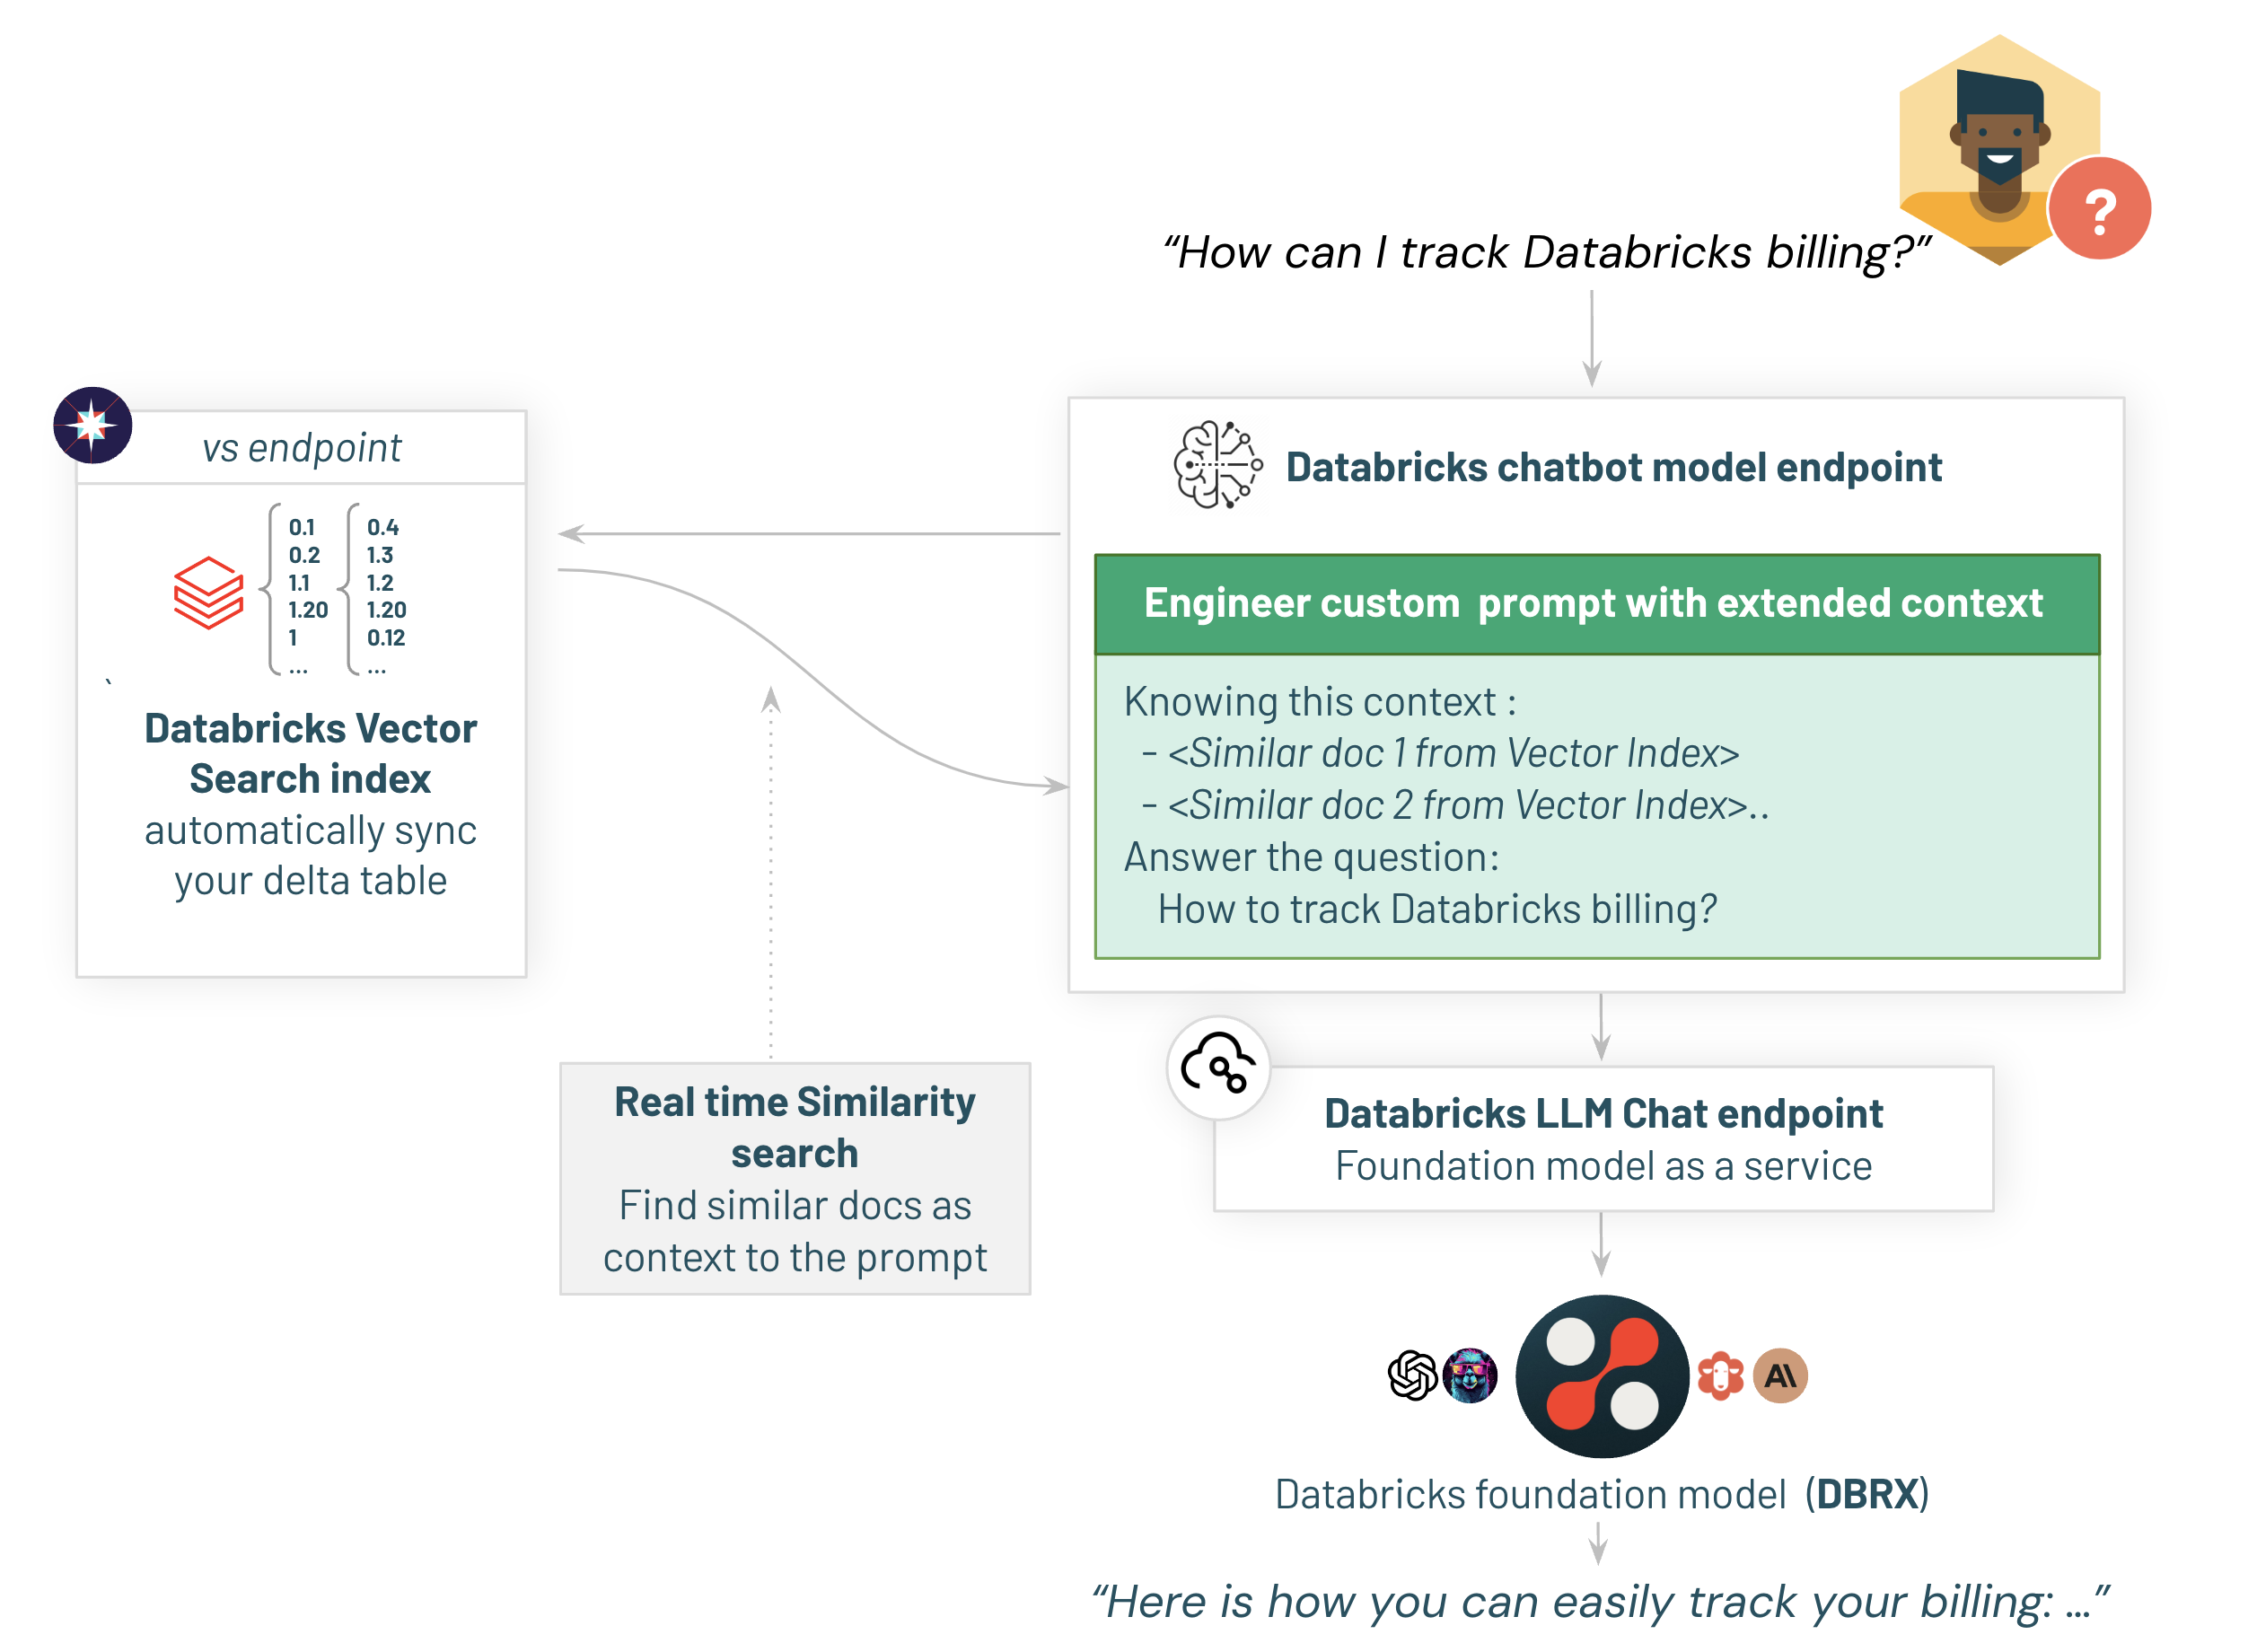
現時点で最も一般的なLLMのユースケースはRAG(Retrieval Augumented Generation)だと言えます。RAGにおいては、ベクトルDBへの検索、検索結果と質問を用いた回答の生成という大きく二つのステップから構成されたチェーンを実行しています。これはある意味エージェントシステムと言えます。より高度なエージェントシステムでは、データベースへの検索やAPIの呼び出しなども含まれることになり、さらに複雑なタスクをこなすことも可能です。

しかし、RAGを含むこのようなエージェントシステムの構築はもちろん、評価も簡単ではありません。POCであれば動いておしまいかもしれませんが、本格運用するのであれば評価は不可欠です。

品質を改善するには、評価のためのメトリクスや仕組み、それらのメトリクスに基づいたシステマティックなアプローチが必要となります。

そのアプローチの一つが、評価ドリブン開発です。

Databricksでの評価ドリブン開発を実現するのが、Mosaic AI Agent Framework +
Mosaic AI Agent Evaluationです。


マニュアルはこちらです。
こちらでもサンプルノートブックを動かしています。
デモノートブックの準備
%pip install dbdemos
import dbdemos
dbdemos.install('llm-rag-chatbot', catalog='users', schema='takaaki_yayoi')
カレントディレクトリにいくつかのノートブックが作成されます。
ここでは、llm-rag-chatbot/01-first-step/01-First-Step-RAG-On-Databricksのノートブックをウォークスルーします。
1/ Mosaic AI Agent FrameworkとAgent Evaluationを用いた初めてのRAGアプリケーションのデプロイ

データからチャットボットまで10分
Ragアプリケーションは、2つの主要な部分に分割されます:
- ボットの回答を改善するために追加のコンテキストを提供し、知識データベースを使用
- 実際のチャットボットアプリケーションとそのレビュー/フィードバックメカニズム
1.1/ RAGのためのデータ準備: 知識ベースをDatabricks Vector Searchに構築してインデックスを作成
まず、知識データベースを準備しましょう。このシンプルな最初のデモでは、既に準備されていてチャンクされたDatabricksドキュメントからのデータを使用します。
%pip install -U --quiet databricks-sdk==0.28.0 databricks-agents mlflow-skinny mlflow mlflow[gateway] databricks-vectorsearch langchain==0.2.1 langchain_core==0.2.5 langchain_community==0.2.4
dbutils.library.restartPython()
%run ../_resources/00-init $reset_all_data=false
Databricksドキュメントのテーブルが作成されます。

%sql
-- データセットはinitノートブックであらかじめ読み込まれています。
SELECT * FROM databricks_documentation

1.2/ ベクター検索エンドポイント

ベクター検索エンドポイントは、インデックスが生存するエンティティです。これらを検索リクエストを処理するための入口点と考えてください。
最初のベクター検索エンドポイントの作成を始めましょう。作成されたら、ベクター検索エンドポイントのUIで表示できます。エンドポイント名をクリックして、そのエンドポイントによって提供されるすべてのインデックスを確認します。
from databricks.vector_search.client import VectorSearchClient
vsc = VectorSearchClient(disable_notice=True)

if not endpoint_exists(vsc, VECTOR_SEARCH_ENDPOINT_NAME):
    vsc.create_endpoint(name=VECTOR_SEARCH_ENDPOINT_NAME, endpoint_type="STANDARD")

wait_for_vs_endpoint_to_be_ready(vsc, VECTOR_SEARCH_ENDPOINT_NAME)
print(f"Endpoint named {VECTOR_SEARCH_ENDPOINT_NAME} is ready.")
Endpoint named dbdemos_vs_endpoint is ready.
1.3/ ベクター検索インデックスの作成
エンドポイントが作成されたら、既存のテーブル上にインデックスを作成するようDatabricksに依頼するだけです。
テキスト列とエンベディング基盤モデル(GTE)を指定するだけで、Databricksが自動的にインデックスを構築して同期します。
これはAPIを使用するか、Unity Catalog Explorerメニュー内の数回のクリックで行うことができます:

# インデックスを作成したいテーブル
source_table_fullname = f"{catalog}.{db}.databricks_documentation"
# インデックスを保存する場所
vs_index_fullname = f"{catalog}.{db}.databricks_documentation_vs_index"

if not index_exists(vsc, VECTOR_SEARCH_ENDPOINT_NAME, vs_index_fullname):
  print(f"エンドポイント {VECTOR_SEARCH_ENDPOINT_NAME} にインデックス {vs_index_fullname} を作成しています...")
  vsc.create_delta_sync_index(
    endpoint_name=VECTOR_SEARCH_ENDPOINT_NAME,
    index_name=vs_index_fullname,
    source_table_name=source_table_fullname,
    pipeline_type="TRIGGERED",
    primary_key="id",
    embedding_source_column='content', # テキストが含まれている列
    embedding_model_endpoint_name='databricks-gte-large-en' # 埋め込みを作成するために使用されるエンドポイント
  )
  # インデックスが準備でき、すべての埋め込みが作成されてインデックスされるのを待ちます
  wait_for_index_to_be_ready(vsc, VECTOR_SEARCH_ENDPOINT_NAME, vs_index_fullname)
else:
  # テーブルに保存された新しいデータでvsコンテンツを更新するために同期をトリガーします
  wait_for_index_to_be_ready(vsc, VECTOR_SEARCH_ENDPOINT_NAME, vs_index_fullname)
  vsc.get_index(VECTOR_SEARCH_ENDPOINT_NAME, vs_index_fullname).sync()

print(f"テーブル {source_table_fullname} にインデックス {vs_index_fullname} が準備できました")
ベクトルサーチインデックスが作成されます。

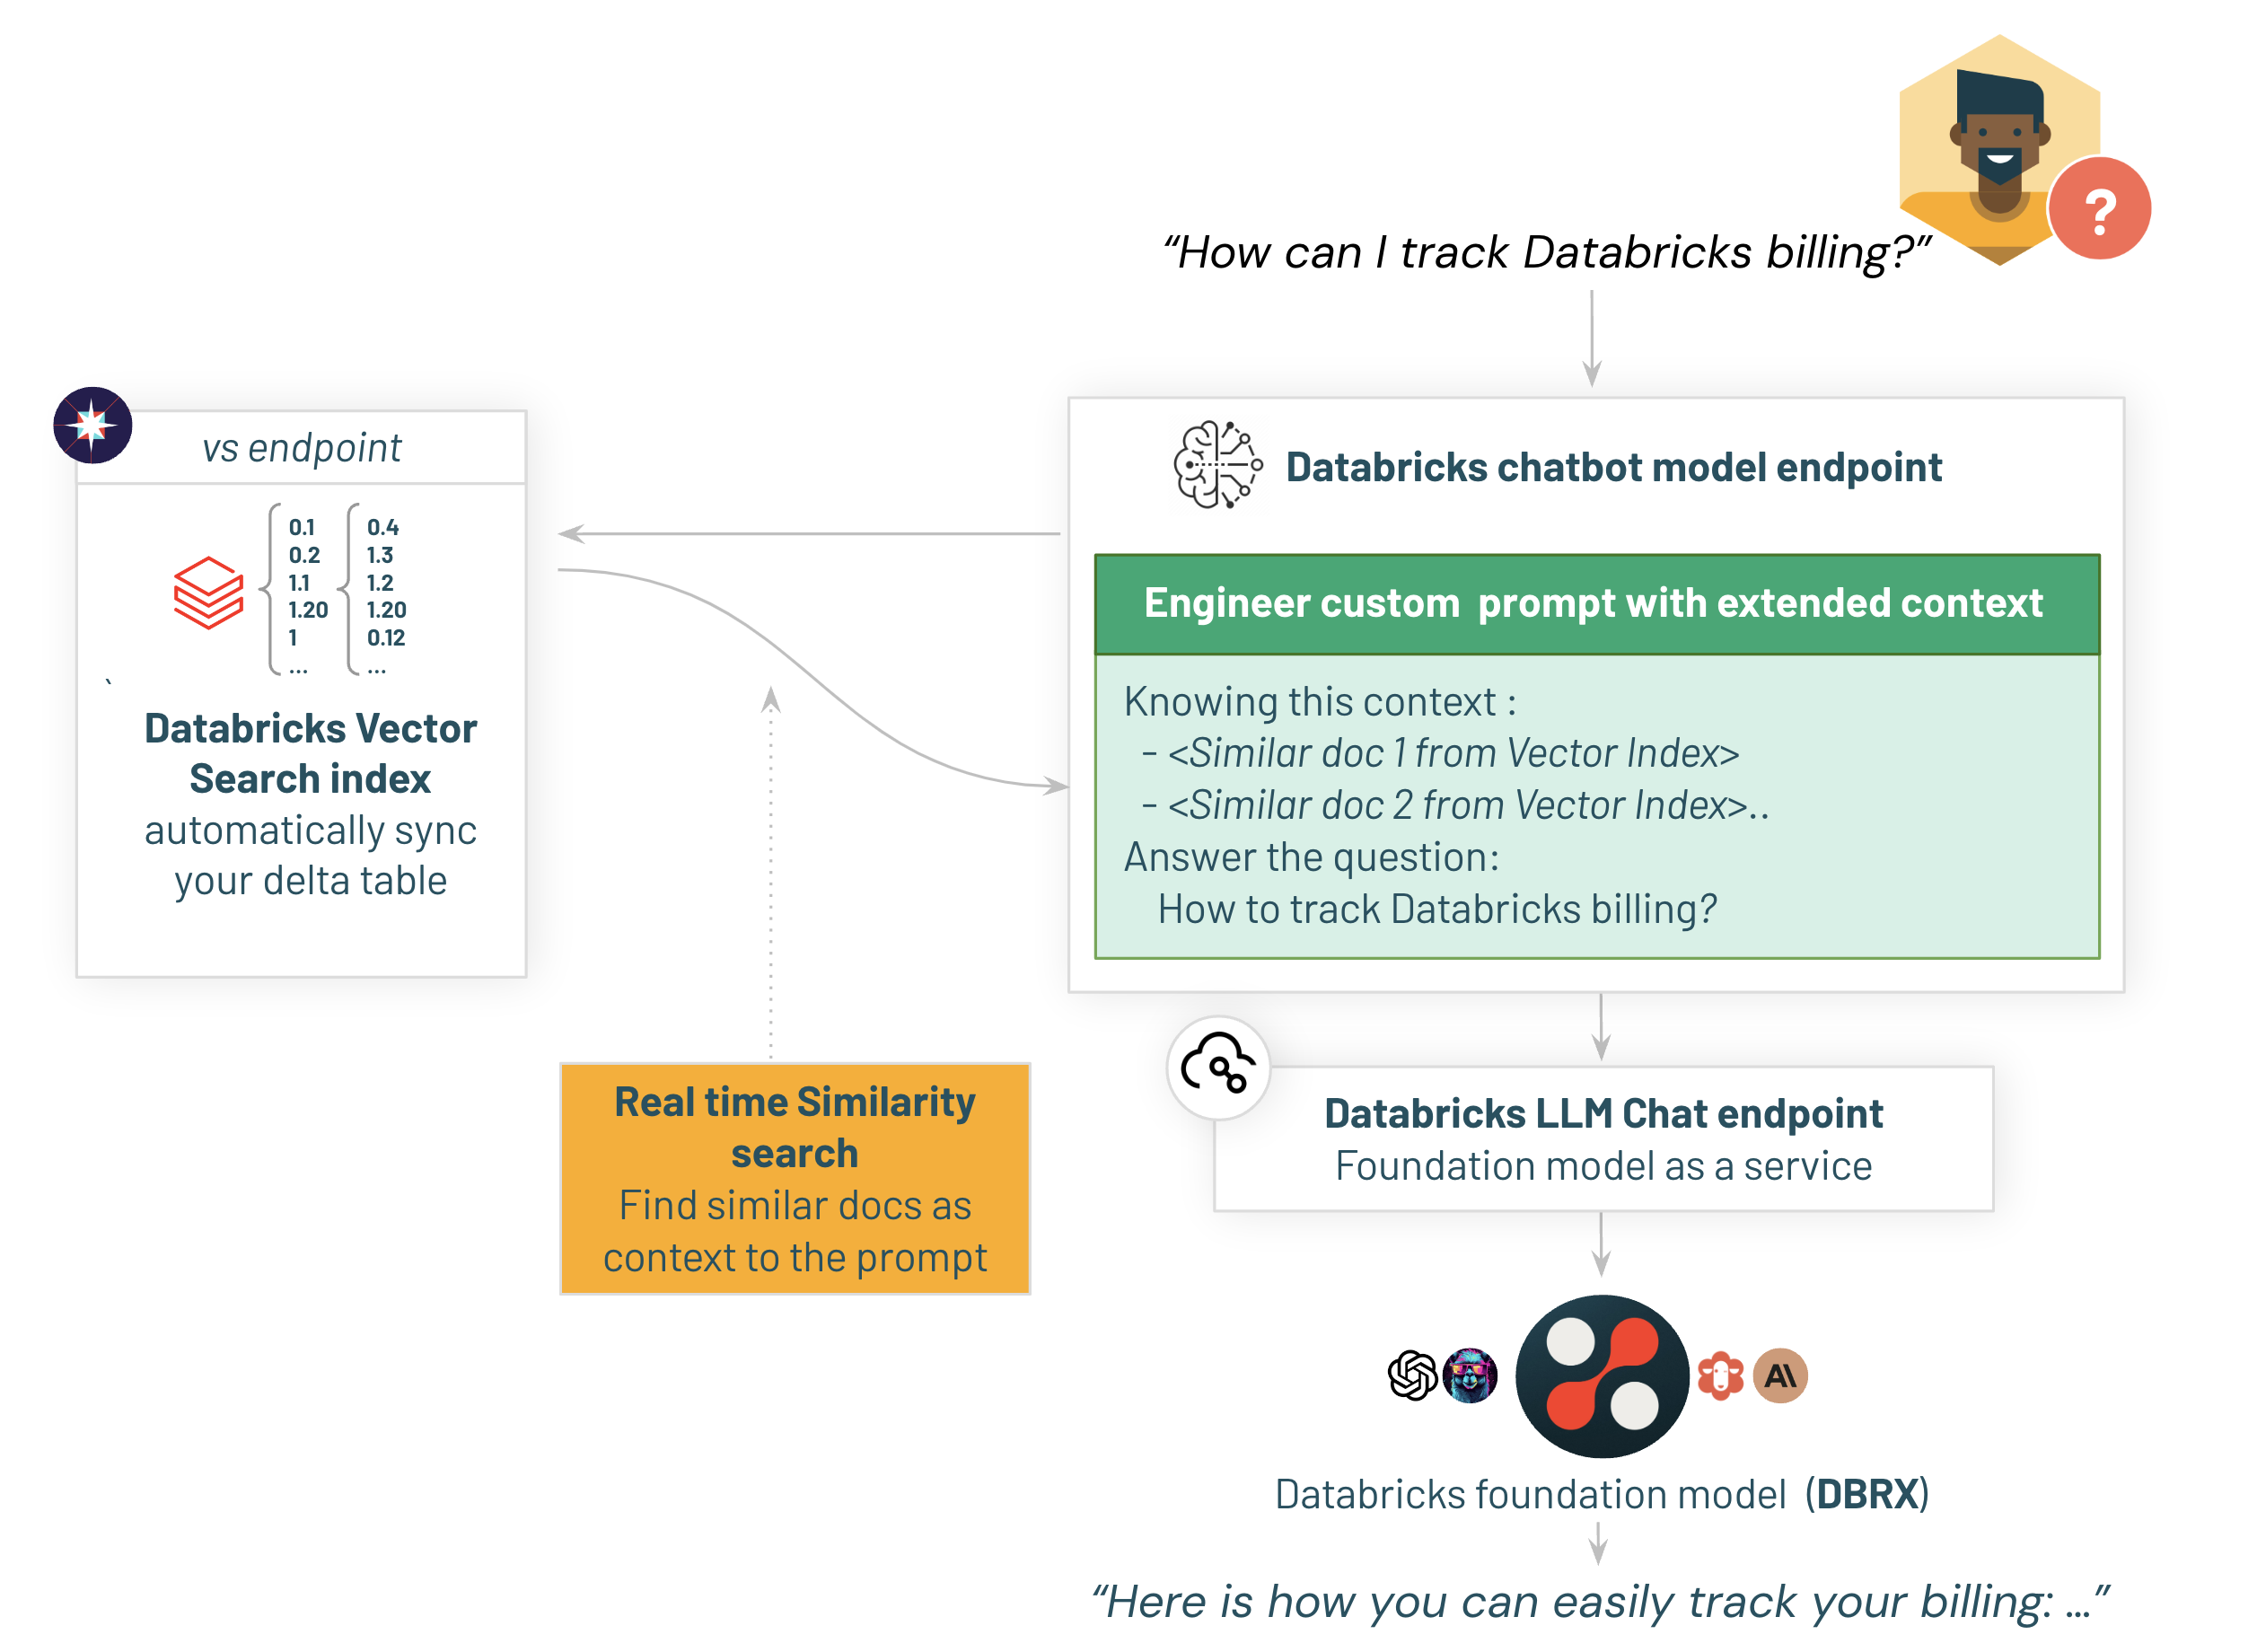
1.4/ 関連コンテンツの検索
これですべての準備が整いました。Databricksは自動的にテーブルの新しいエントリをインデックスと同期します。
データセットのサイズやモデルのサイズによっては、インデックスの作成とエンベディングのインデックス化が開始されるまでに数秒かかる場合があります。
試しに類似コンテンツを検索してみましょう。
注: similarity_search はフィルターパラメータもサポートしています。これは、RAGシステムにセキュリティ層を追加するのに便利です。呼び出しを行う人に基づいて一部の機密コンテンツをフィルタリングできます(例えば、ユーザーの好みに基づいて特定の部門にフィルタリングします)。
question = "How can I track billing usage on my account?"

results = vsc.get_index(VECTOR_SEARCH_ENDPOINT_NAME, vs_index_fullname).similarity_search(
  query_text=question,
  columns=["url", "content"],
  num_results=1)
docs = results.get('result', {}).get('data_array', [])
docs
[['https://docs.databricks.com/en/archive/admin-guide/usage.html',
  'View billable usage (legacy)  \nImportant  \nThis documentation has been retired and might not be updated. The products, services, or technologies mentioned in this content are no longer supported. To view current admin documentation, see Manage your Databricks account.  \nNote  \nThis page is for legacy workspaces. For the E2 version of this page, see View billable usage using the account console. Legacy workspaces will be retired on December 31st, 2023. For more information, see End-of-life for legacy workspaces.  \nThe Usage Overview tab in the Databricks account console lets you:  \nView historical account usage in Databricks Units (DBUs), grouped by workload type (All-Purpose Compute, Jobs Compute, Jobs Compute Light).  \nDownload a CSV file that contains itemized usage details by cluster. If you want to automate delivery of these files to an S3 bucket, see Deliver and access billable usage logs.  \nNote  \nThe downloadable CSV file includes personal data. As always, handle it with care.  \nView your Databricks account ID.  \nView the usage graph\nView the usage graph\nLog into the account console. See Access the account console (legacy).  \nClick the Usage Overview tab.  \nSelect a <month year> to see historical account usage.\n\nDownload usage as a CSV file\nDownload usage as a CSV file\nTo get a CSV file containing detailed usage data, you can either:  \nDownload it from the account console by going to the Usage Overview tab and clicking the Download itemized usage button.  \nDownload it using the billable usage log download API.  \nFor the CSV file schema, see CSV file schema. You can import this file into Databricks for analysis.\n\nDeliver billable usage logs to your own S3 bucket\nDeliver billable usage logs to your own S3 bucket\nYou can configure automatic delivery of billable usage CSV files into an S3 bucket in your AWS account. See Deliver and access billable usage logs.  \nAutomatic log delivery allows you to control sharing of these details with other users. Other users who are authorized for this data do not need to rely on the account owner to regularly navigate to the account console to download a CSV file to share.  \nFor the CSV schema, see CSV file schema.  \nFor information about how to analyze these files using Databricks, see Analyze usage data in Databricks.',
  0.002671212]]
2/ RAGを使用したチャットボットモデルのデプロイ
Databricksを使用してドキュメントを簡単に取り込み、準備し、それに基づいてベクトル検索インデックスをクリックだけでデプロイする方法を見てきました。
ベクトル検索インデックスが準備できたので、次にlangchainアプリケーションをデプロイしましょう。
2.1/ チェーンパラメータの設定
任意のアプリケーションと同様に、RAGチェーンには各環境(例:テスト/本番環境の異なるカタログ)に対するいくつかの設定が必要です。
Databricksはチェーン設定を簡単にします。このオブジェクトを使用して、アプリ内の任意の値を設定し、異なるシステムプロンプトを簡単にテストし、より良いプロンプトで新しいバージョンをデプロイすることができます。
chain_config = {
    "llm_model_serving_endpoint_name": "databricks-dbrx-instruct",  # 使用する基礎モデル
    "vector_search_endpoint_name": VECTOR_SEARCH_ENDPOINT_NAME,  # ベクター検索に使用するエンドポイント
    "vector_search_index": f"{catalog}.{db}.databricks_documentation_vs_index",
    "llm_prompt_template": """You are an assistant that answers questions. Use the following pieces of retrieved context to answer the question. Some pieces of context may be irrelevant, in which case you should not use them to form the answer.\n\nContext:
     {context}""",
}
2.2/ Langchainリトリーバの構築
Langchainリトリーバの構築を始めましょう。
これは以下の責任を持ちます:
- 入力質問の作成(管理されたベクターサーチインデックスが埋め込みを計算します)
- プロンプトを拡張するために類似のドキュメントを見つけるためにベクターサーチインデックスを呼び出す
Databricks Langchainラッパーを使用すると、すべての基本的なロジックとAPI呼び出しを一つのステップで簡単に処理できます。
from databricks.vector_search.client import VectorSearchClient
from langchain_community.vectorstores import DatabricksVectorSearch
from langchain.schema.runnable import RunnableLambda
from langchain_core.output_parsers import StrOutputParser

## MLflow トレーシングを有効にする
mlflow.langchain.autolog()

## チェーンの設定を読み込む
model_config = mlflow.models.ModelConfig(development_config=chain_config)

## ベクター検索インデックスを LangChain のリトリバーに変換
vs_client = VectorSearchClient(disable_notice=True)
vs_index = vs_client.get_index(
    endpoint_name=model_config.get("vector_search_endpoint_name"),
    index_name=model_config.get("vector_search_index"),
)
vector_search_as_retriever = DatabricksVectorSearch(
    vs_index,
    text_column="content",
        columns=["id", "content", "url"],
).as_retriever(search_kwargs={"k": 3})

# リトリバーから返されたドキュメントをプロンプトにフォーマットするメソッド(チャンクからのテキストのみを保持)
def format_context(docs):
    chunk_contents = [f"パッセージ: {d.page_content}\n" for d in docs]
    return "".join(chunk_contents)

# リトリバー チェーンを試してみましょう:
relevant_docs = (vector_search_as_retriever | RunnableLambda(format_context)| StrOutputParser()).invoke('How to create a notebook?')

display_txt_as_html(relevant_docs)
パッセージ: Manage notebooks
You can manage notebooks using the UI, the CLI, and the Workspace API. This article focuses on performing notebook tasks using the UI. For the other methods, see What is the Databricks CLI? and the Workspace API reference.
Create a notebook
Create a notebook
Use the New button in the workspace sidebar
To create a new notebook in your default folder, click New in the sidebar and select Notebook from the menu.
Databricks creates and opens a new, blank notebook in your default folder. The default language is the language you most recently used, and the notebook is automatically attached to the compute resource that you most recently used.
Create a notebook in any folder...
トレースを確認することもできます。


結果から、Databricksが自動的にチェーンの詳細を追跡し、各ステップをデバッグして、取得したドキュメントを確認できることがわかります。
2.3/ Databricks Chatモデルの構築 - Databricks DBRX Instructファウンデーションモデルを使用してDatabricks DBRXにクエリを実行する
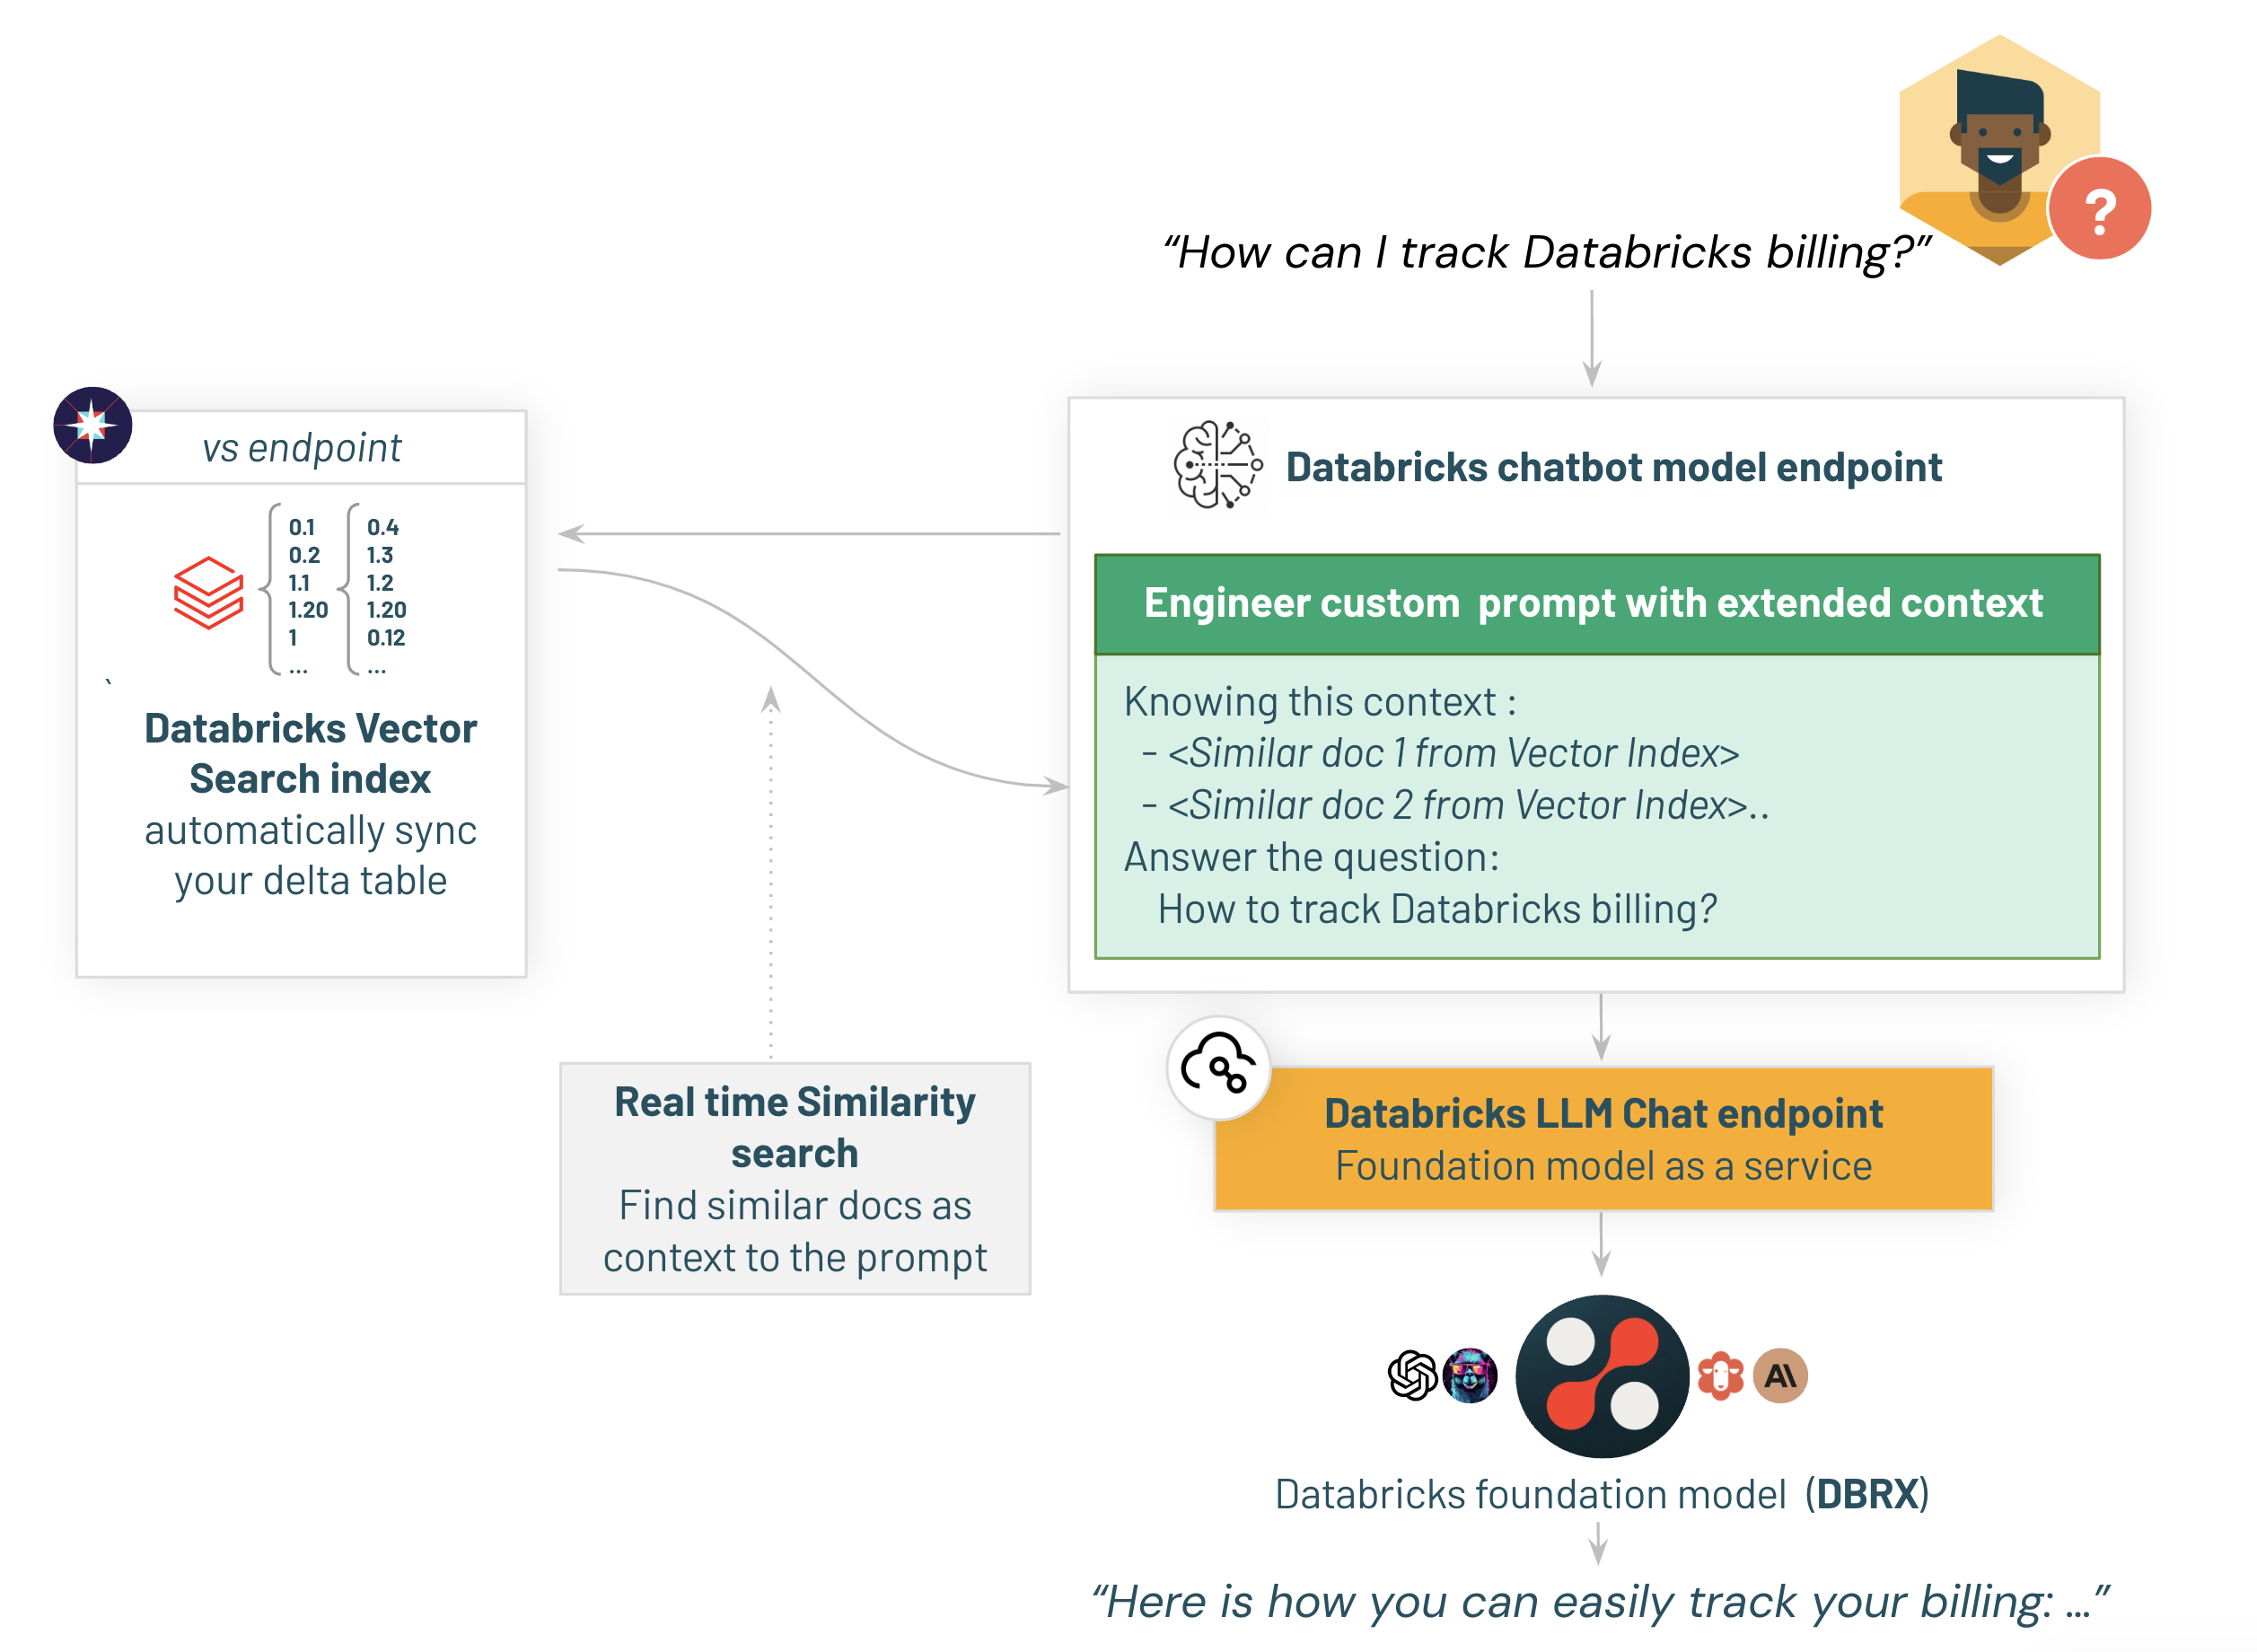
私たちのチャットボットは、Databricks DBRX Instructファウンデーションモデルを使用して回答を提供します。DBRX Instructは、エンタープライズグレードのGenAIアプリケーションを開発するために構築された汎用のLLMであり、以前はクローズドモデルAPIに限定されていた機能を活用することができます。
私たちの測定によると、DBRXはGPT-3.5を上回り、Gemini 1.0 Proと競争力を持っています。それは特にコードモデルとして優れており、CodeLLaMA-70Bのような専門モデルと同等の能力を持っています。
注意: 異なるタイプのエンドポイントやlangchainモデルを使用することもできます:
- Databricks Foundationモデル (私たちが使用するもの)
- あなたのファインチューニングモデル
- 外部モデルプロバイダ(Azure OpenAIなど)
from langchain_core.prompts import ChatPromptTemplate
from langchain_community.chat_models import ChatDatabricks
from operator import itemgetter

prompt = ChatPromptTemplate.from_messages(
    [
        ("system", model_config.get("llm_prompt_template")), # 設定からの指示を含む
        ("user", "{question}") # ユーザーの質問
    ]
)

# 最終プロンプトに答える基礎モデル
model = ChatDatabricks(
    endpoint=model_config.get("llm_model_serving_endpoint_name"),
    extra_params={"temperature": 0.01, "max_tokens": 500}
)

# プロンプトを試してみましょう:
answer = (prompt | model | StrOutputParser()).invoke({'question':'Databricksクラスターを開始する方法は?', 'context': ''})
display_txt_as_html(answer)
To start a Databricks cluster, you can follow these steps:

1. Log in to your Databricks workspace.
2. Click on the "Compute" button on the left-hand side of the screen.
3. Click on the "Create Cluster" button.
4. Fill in the required details such as the cluster name, the Databricks runtime version, and the number of workers.
5. Click on the "Create Cluster" button to create the cluster.

Once the cluster has been created, you can start it by clicking on the "Start" button next to the cluster name. The cluster may take a few minutes to start up, depending on the number of workers and the Databricks runtime version you have selected.
2.4/ 最終的なチェーンを組み合わせて、標準のチャット補完形式をサポートする

リトリーバとモデルを1つのLangchainチェーンに統合しましょう。
私たちは、適切な回答を提供するためにカスタムのlangchainテンプレートを使用します。
チェーンが標準のチャット補完APIの入力スキーマをサポートすることを確認します: {"messages": [{"role": "user", "content": "Retrieval-augmented Generationとは何ですか?"}]}
要件に応じて、異なるテンプレートを試して、アシスタントのトーンとパーソナリティを調整するための時間を取ってください。
この最初のバージョンでは、履歴はサポートせず、最後のメッセージのみを質問として扱います。より完全な例については、詳細なデモを参照してください。
# ユーザーからの最新のメッセージの文字列内容: [{...}] を入力質問として使用するために返す
def extract_user_query_string(chat_messages_array):
    return chat_messages_array[-1]["content"]

# RAGチェーン
chain = (
    {
        "question": itemgetter("messages") | RunnableLambda(extract_user_query_string),
        "context": itemgetter("messages")
        | RunnableLambda(extract_user_query_string)
        | vector_search_as_retriever
        | RunnableLambda(format_context),
    }
    | prompt
    | model
    | StrOutputParser()
)
Databricksはすべてのチェーンを追跡します

下のセルの結果で見ることができるように、Databricksは自動的にチェーン呼び出しを追跡します。
これにより、チェーンのデバッグと改善が非常に簡単になります!
# 試してみましょう:
input_example = {"messages": [ {"role": "user", "content": "What is Retrieval-augmented Generation?"}]}
answer = chain.invoke(input_example)
print(answer)
Retrieval-augmented Generation (RAG) is a generative AI design pattern that involves combining a large language model (LLM) with external knowledge retrieval. RAG is required to connect real-time data to your generative AI applications, improving the accuracy and quality of the application by providing your data as context to the LLM at inference time. The Databricks platform provides an integrated set of tools that support various RAG scenarios, such as unstructured data, structured data, tools & function calling, and agents. RAG applications require a pipeline and a chain component to perform indexing, retrieval, and generation. The indexing pipeline ingests data from a source and indexes it, while the RAG chain takes the user query and retrieves similar data from the index, passing the data and the query to the LLM model. Databricks provides capabilities to help develop RAG applications, including Unity Catalog, notebooks and workflows, Delta tables, vector search, Databricks model serving, MLflow, feature engineering and serving, online tables, Lakehouse Monitoring, and AI Playground.

2.5/ RAGチェーンをWebベースのUIにデプロイして、ステークホルダーからのフィードバックを収集
私たちのチェーンは今、準備ができました!
まず、Rag ChainモデルをMLFlowとUnity Catalogに登録し、次にAgent Frameworkを使用して、スケーラブルで本番環境に対応したModel ServingエンドポイントをバックエンドとするAgent Evaluationステークホルダーレビューアプリケーションにデプロイしましょう。
# MLflowにモデルをログする
with mlflow.start_run(run_name="basic_rag_bot"):
  logged_chain_info = mlflow.langchain.log_model(
          # 注: 従来のMLでは、MLflowはモデルオブジェクトをシリアライズすることで動作します。生成AIでは、シリアライズできないPythonパッケージを含むチェーンがよくあります。ここでは、MLflowの新しいコードベースのログ機能を使用し、チェーンをchainノートブックに保存し、オブジェクトをシリアライズしようとする代わりにこのコードを使用します。
          lc_model=os.path.join(os.getcwd(), 'chain'),  # チェーンコードファイル 例: /path/to/the/chain.py
          model_config=chain_config, # チェーン設定
          artifact_path="chain", # MLflowに必要、チェーンのコード/設定はこのディレクトリに保存されます
          input_example=input_example,
          example_no_conversion=True,  # MLflowにより、input_exampleをチェーンのスキーマとして使用するために必要
      )

MODEL_NAME = "basic_rag_demo"
MODEL_NAME_FQN = f"{catalog}.{db}.{MODEL_NAME}"
# UCに登録
uc_registered_model_info = mlflow.register_model(model_uri=logged_chain_info.model_uri, name=MODEL_NAME_FQN)
RAGチェーンがUnity Catalogに記録されました。

Mosaic AIのエージェント評価レビューアプリケーションを、作成したばかりのモデルを使用してデプロイしましょう!
from databricks import agents
# レビューアプリを有効にし、APIエンドポイントを作成するためにデプロイします
# 注意: ゼロへのスケーリングダウンはチャットアプリに予期しない動作をもたらします。本番環境に適したアプリケーションの場合は、これをfalseに設定してください。
deployment_info = agents.deploy(MODEL_NAME_FQN, model_version=uc_registered_model_info.version, scale_to_zero=True)

instructions_to_reviewer = f"""## テストのための指示事項

皆様からの貴重なご意見は、開発チームにとって非常に重要です。詳細なフィードバックと修正を提供することで、問題を修正し、アプリケーションの全体的な品質を向上させることができます。私たちは、ギャップや改善が必要な領域を特定するために、皆様の専門知識に依存しています。"""

# レビューアプリにユーザー向けの指示を追加します
agents.set_review_instructions(MODEL_NAME_FQN, instructions_to_reviewer)

wait_for_model_serving_endpoint_to_be_ready(deployment_info.endpoint_name)
 Deployment of users.takaaki_yayoi.basic_rag_demo version 1 initiated.  This can take up to 15 minutes and the Review App & Query Endpoint will not work until this deployment finishes.

    View status: https://xxxxx.databricks.com/ml/endpoints/agents_users-takaaki_yayoi-basic_rag_demo
    Review App: https://xxxxx.databricks.com/ml/review/users.takaaki_yayoi.basic_rag_demo/1?o=2556758628403379
RAGチェーンと評価アプリケーションがモデルサービングエンドポイントにデプロイされます。

3/ Mosaic AI Agent Evaluationを使用してRAGアプリケーションを評価する
3.1/ ボットとチャットして、検証データセットを構築しましょう!
チャットボットが稼働しました。Databricksはチャットボットをテストし、その回答にフィードバックを提供できる組み込みのチャットボットアプリケーションを提供しています。
外部のドメインエキスパートにアクセスを簡単に提供し、ボットのテストとレビューを行ってもらうことができます。ドメインエキスパートはDatabricks Workspaceへのアクセスが不要です - SCIMを有効にしている場合、SSOの任意のユーザーに権限を割り当てることができます。
これは、評価データセットを構築または改善するための重要なステップです:ユーザーにボットに質問させ、適切に答えない場合はボットに出力回答を提供させます。
チャットボットは、すべてのステークホルダーの質問とボットの応答を、それぞれに対するMLflowトレースを含めて、LakehouseのDeltaテーブルに自動的にキャプチャします。さらに、Databricksはエンドユーザーからのフィードバックを簡単に追跡できるようにします:チャットボットが良い答えを提供せず、ユーザーがサムダウンをした場合、そのフィードバックはDeltaテーブルに含まれます。
評価データセットが準備できたら、オフライン評価を利用して新しいチャットボットのパフォーマンスを測定し、モデルをファインチューニングすることも可能になります。

上のコマンドの実行結果に表示される、Review Appのリンクから評価アプリケーションにアクセスできます。以下のコマンドでもリンクを表示できます。
print(f"\n\nReview App URL to share with your stakeholders: {deployment_info.review_app_url}")

チャットを行い、レスポンスを評価していきます。


3.2/ モザイクAIエージェント評価専門LLM判定モデルを使用して、ボットの品質を評価しましょう
私たちのボットは現在稼働中です。
RAGアプリケーションのデプロイにおいて、評価は重要な部分です。Databricksは、基礎となる真実が利用できない場合でも、ボットの品質/コスト/レイテンシーを評価するために特別に調整されたLLMモデルを提供することで、このタスクを簡素化します。
モザイクAIエージェント評価は以下を評価します:
- 回答の正確さ - 基礎となる真実が必要
- 幻覚/根拠の有無 - 基礎となる真実は不要
- 回答の関連性 - 基礎となる真実は不要
- 検索の精度 - 基礎となる真実は不要
- (欠如している)有害性 - 基礎となる真実は不要
この例では、モザイクAIエージェント評価レビューアプリインターフェースを使用して、私たちの内部専門家に基づいてキュレーションされた評価セットを使用します。この適切な評価データセットは、Deltaテーブルとして保存されます。
評価アプリからデータセットを収集する方法については、03-advanced-app/03-Offline-Evaluationノートブックを参照してください。
eval_dataset = spark.table("eval_set_databricks_documentation").limit(10).toPandas()
display(eval_dataset)

3.3/ チェーンの評価を実行する
Mosaic AI Agent Evaluation専門のLLMを活用して、モデルのパフォーマンスを評価しましょう(databricks-ragを使用してください):
with mlflow.start_run(run_id=logged_chain_info.run_id):
    # ログされたモデルを評価する
    eval_results = mlflow.evaluate(
        data=eval_dataset,
        model=logged_chain_info.model_uri,
        model_type="databricks-agent",
    )
モデルの評価を確認するために、MLFlowのエクスペリメントを開くことができます。異なるモデルの応答を比較して、さまざまなプロンプトがどのように回答するかを確認できます:
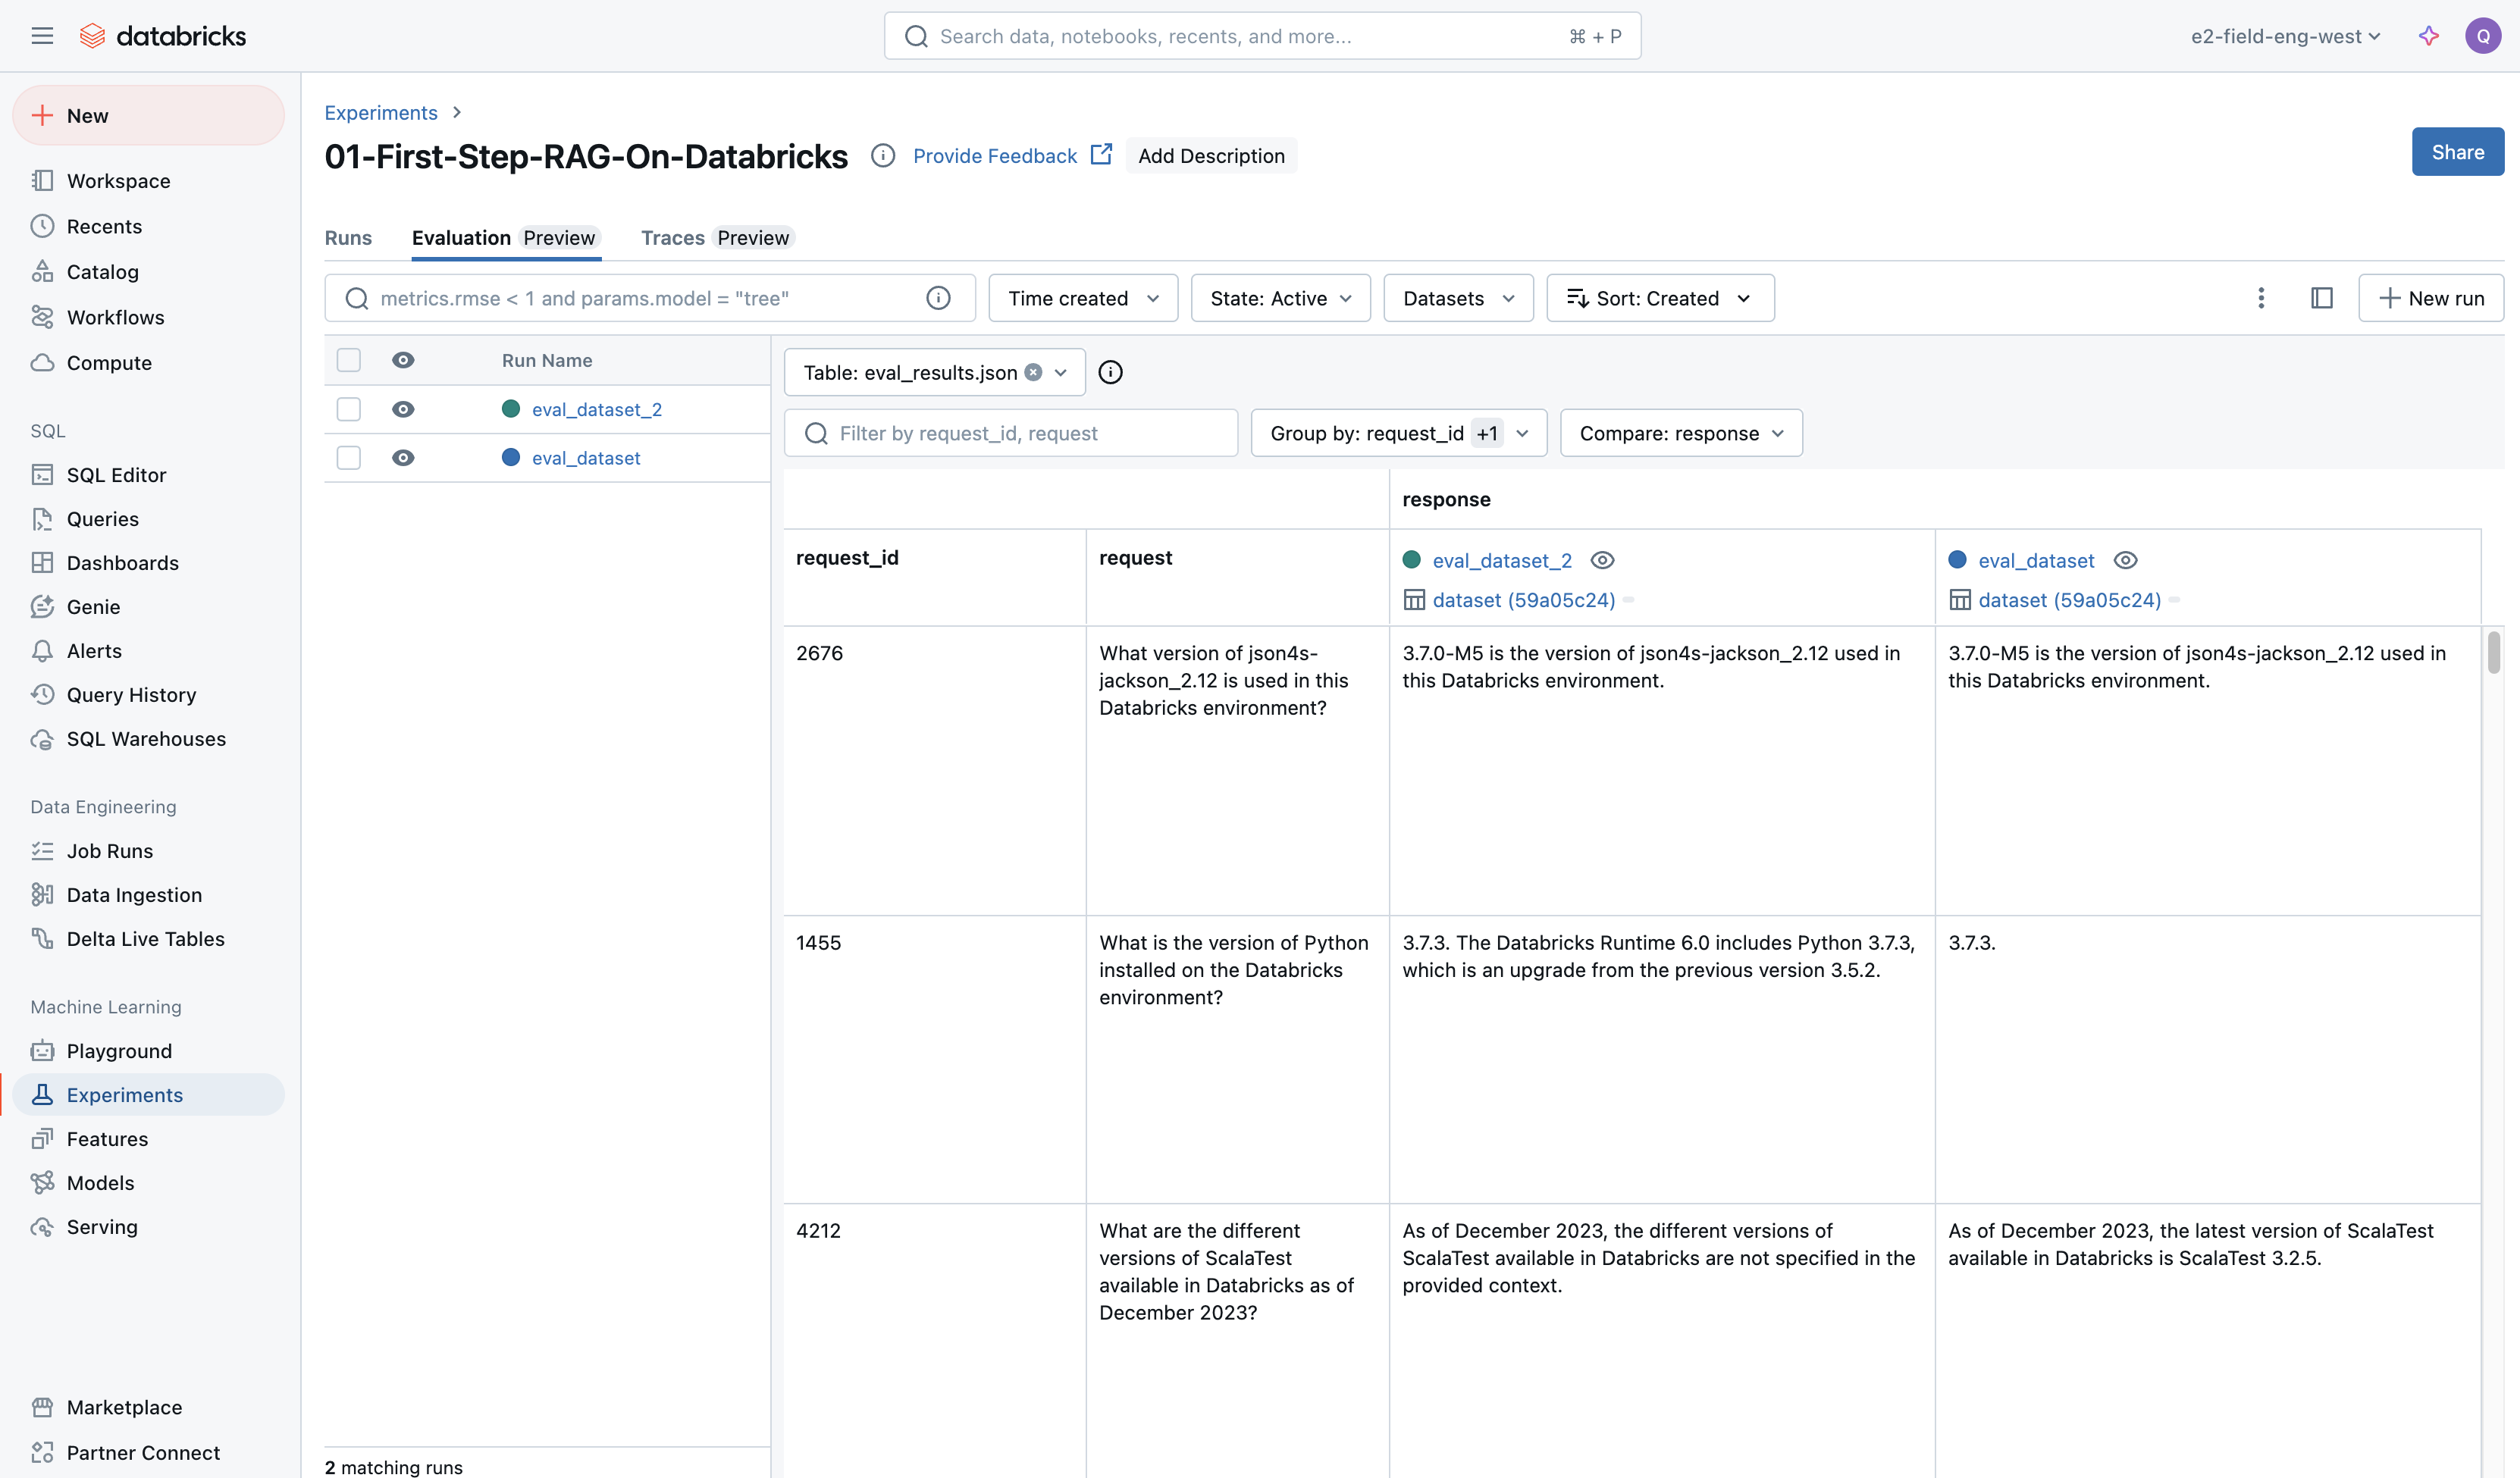
実行結果に評価結果とリンクが表示されます。

リンク先では、評価データセットに対する実際の結果とそれに対するLLMジャッジによる審判結果を確認することができます。


次に: より完全なチェーンの詳細について詳しく調べる
この例は単純なデモでした。次の一連のノートブックでは、ドキュメントの準備と分割方法について詳しく説明し、より本格的なチェーンを扱います。
また、エンドユーザーにアシスタントを展開するための、初めてのDatabricksアプリケーションを展開する方法も見ていきます!
02-simple-app/01-Data-Preparation-and-Indexノートブックを開いてください!