こちらの記事にあるように、今週発表されたMLflowの新機能であるMLflow Pipelinesがもう試せるということだったので、早速動かしてみました。
こちらのリポジトリにサンプルが格納されています。
MLflow Pipelinesとは
以下は私の理解です。
- MLflow自体、機械学習モデル本体、ハイパーパラメータ、メトリクスを記録することができ、モデルの再現性確保、可搬性の確保に役立つものです。
- しかし、機械学習モデルはモデル単体で役立つのではなく、トレーニングにおけるデータ取り込み、特徴量エンジニアリング、モデルデプロイ、推論の実施と一連のパイプラインを経ていくことで価値を生み出します。
- このパイプライン、問題のタイプにもよりますが定型化できる部分が多い(回帰問題なら、データ取り込み、データ分割、データ変換、トレーニング、評価、デプロイなど)のですが、これまでは毎回ファイルやノートブックでパイプラインの処理を記述(あるいは既存のものを流用)していました。
- パイプラインが定型化できるのであれば、これをテンプレートとして提供するとともに、パイプライン自体もMLflowでトラッキング、再活用できるようにすればいいのでは?という考えのもと生み出されたのがMLflow Pipelinesです。
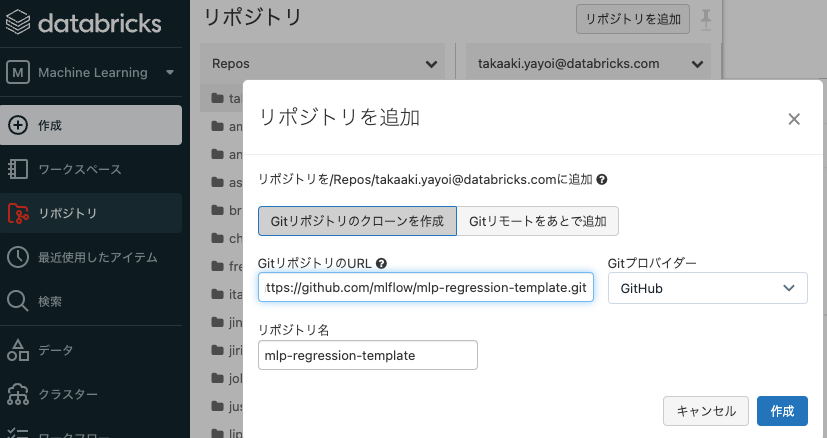
リポジトリのクローン
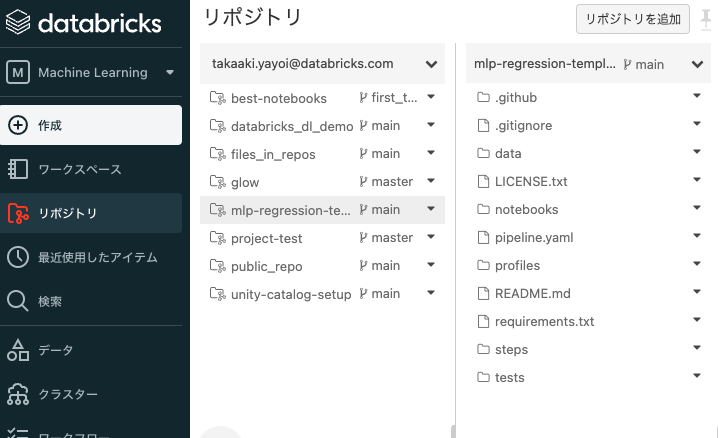
ローカルでも実行できるとのことですが、ここではDatabricksのReposを使って、ワークスペース上にクローンします。
これで全てクローンされました。
ノートブックの実行
notebooks/databricksを開きます。実行にはDatabricksランタイム11.0以降が動作しているクラスターが必要なので、クラスターを作成して起動しておき、ノートブックをアタッチします。

ライブラリのインストール
以下を実行して、MLflow Pipelinesと依存ライブラリをインストールします。依存ライブラリは上のステップでリポジトリをクローンした際に含まれているrequirements.txtを使用します。
%pip install mlflow[pipelines]
%pip install -r ../requirements.txt
クライアントの作成
以下を実行することで、プロファイルdatabricksを用いてMLflow Pipelinesクライアントを作成します。
from mlflow.pipelines import Pipeline

p = Pipeline(profile="databricks")
現時点では回帰問題のパイプラインのみが提供されています。今後増えていくことになるのでしょう。

なお、プロファイルはprofilesにYAMLで格納されています。いろいろなパラメーターを指定できます。
# [Recommended] Uncomment fields below to set an MLflow experiment to track the pipeline execution.
# If unset, a default experiment based on runtime context will be created.
# experiment:
  # name: "/Shared/sklearn_regression_experiment"

# Use a section of the TLC Trip Record Dataset for model development
# (https://www1.nyc.gov/site/tlc/about/tlc-trip-record-data.page)
INGEST_DATA_LOCATION: dbfs:/databricks-datasets/nyctaxi-with-zipcodes/subsampled
# Specify the format of the dataset
INGEST_DATA_FORMAT: spark_sql
# Override the default train / validation / test dataset split ratios
SPLIT_RATIOS: [0.75, 0.125, 0.125]
パイプラインの実装はルートのpipeline.yamlに記述されています。
# `pipeline.yaml` is the main configuration file for an MLflow Pipeline.
# Required pipeline parameters should be defined in this file with either concrete values or
# variables such as {{ INGEST_DATA_LOCATION }}.

# Variables must be dereferenced in a profile YAML file, located under `profiles/`.
# See `profiles/local.yaml` for example usage. One may switch among profiles quickly by
# providing a profile name such as `local` in the Pipeline object constructor:
# `p = Pipeline(profile="local")`
#
# NOTE: YAML does not support tabs for indentation. Please use spaces and ensure that all YAML
# files are properly formatted.

template: "regression/v1"
# Specifies the dataset to use for model development
data:
  # Dataset locations on the local filesystem are supported, as well as HTTP(S) URLs and
  # any other remote locations resolvable by MLflow, such as those listed in
  # https://mlflow.org/docs/latest/tracking.html#artifact-stores
  location: {{INGEST_DATA_LOCATION}}
  # Beyond `parquet` datasets, the `spark_sql` and `delta` formats are also natively supported for
  # use with Spark
  format: {{INGEST_DATA_FORMAT|default('parquet')}}
  # Datasets with other formats, including `csv`, can be used by implementing and
  # specifying a `custom_loader_method`
  custom_loader_method: steps.ingest.load_file_as_dataframe
  # If the `spark_sql` `format` is specified, the `sql` entry is used to specify a SparkSQL
  # statement that identifies the dataset to use
  sql: SELECT * FROM delta.`{{INGEST_DATA_LOCATION}}`
  # If the `delta` `format` is specified, you can also configure the Delta table `version` to read
  # or the `timestamp` at which to read data
  # version: 2
  # timestamp: 2022-06-01T00:00:00.000Z
# Specifies the name of the column containing targets / labels for model training and evaluation
target_col: "fare_amount"
steps:
  split:
    # Train/validation/test split ratios
    split_ratios: {{SPLIT_RATIOS|default([0.75, 0.125, 0.125])}}
    # Specifies the method to use to perform additional processing and cleaning on split datasets
    post_split_method: steps.split.process_splits
  transform:
    # Specifies the method that defines the data transformations to apply during model inference
    transformer_method: steps.transform.transformer_fn
  train:
    # Specifies the method that defines the estimator type and parameters to use for model training
    estimator_method: steps.train.estimator_fn
  evaluate:
    # Sets performance thresholds that a trained model must meet in order to be eligible for
    # registration to the MLflow Model Registry
    validation_criteria:
      - metric: root_mean_squared_error
        threshold: 10
      - metric: mean_absolute_error
        threshold: 50
      - metric: weighted_mean_squared_error
        threshold: 20
  register:
    # Specifies the name of the Registered Model to use when registering a trained model to
    # the MLflow Model Registry
    model_name: "taxi_fare_regressor"
    # Indicates whether or not a model that fails to meet performance thresholds should still
    # be registered to the MLflow Model Registry
    allow_non_validated_model: true
metrics:
  # Defines custom performance metrics to compute during model training and evaluation
  custom:
    - name: weighted_mean_squared_error
      # Specifies the name of the function in `steps/custom_metrics.py` to use to compute the metric
      function: weighted_mean_squared_error
      greater_is_better: False
  # Sets the primary metric to use to evaluate model performance. This primary metric is used
  # to sort MLflow Runs corresponding to the pipeline in the MLflow Tracking UI
  primary: "root_mean_squared_error"
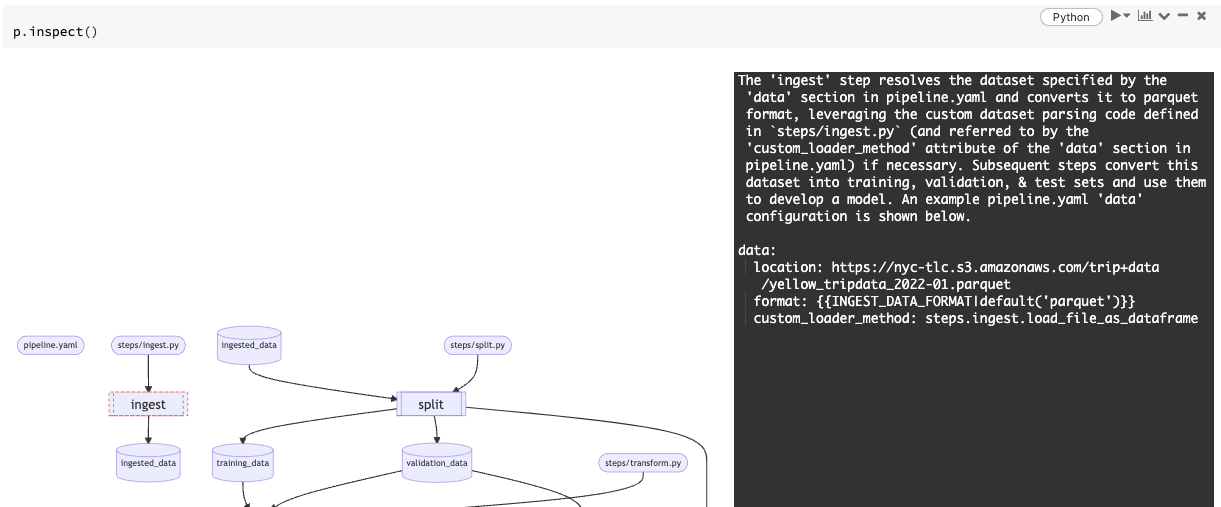
パイプラインの確認
inspectでパイプラインを確認することができます。
p.inspect()
パイプラインのグラフ構造が表示されます。

ステップ(縦二重線の四角)をクリックすると詳細情報が表示されます。
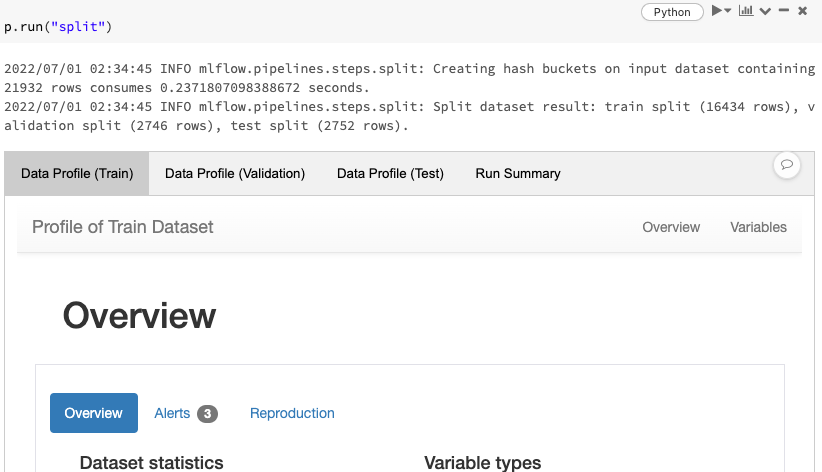
パイプラインの実行
runでパイプラインを実行します。引数にステップ名を指定することで特定のステップを実行できます。引数無しの場合はパイプライン全体が実行されます。
以下を実行することで、データを取り込みます。
p.run("ingest")
実行結果には「カード」というものが表示され、処理結果をインタラクティブに確認することができます。

以降同じようにステップを順に実行していきます。
p.run("split")
p.run("transform")
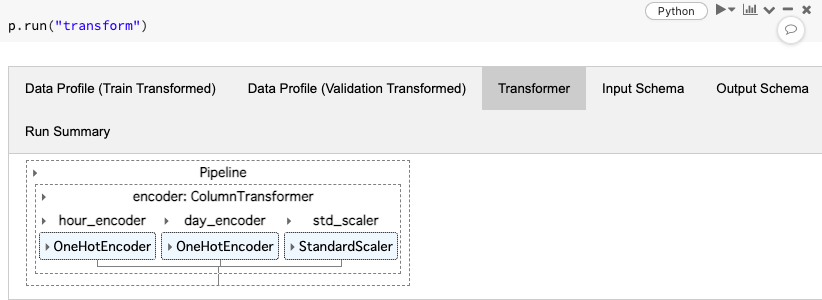
トレーニングを行うと、当たり前ですがMLflowにトラッキングされます。
p.run("train")

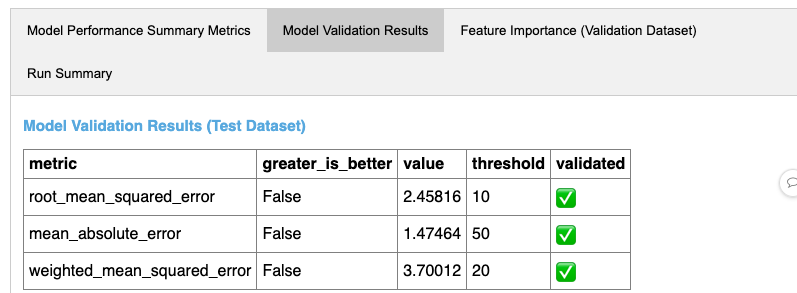
p.run("evaluate")
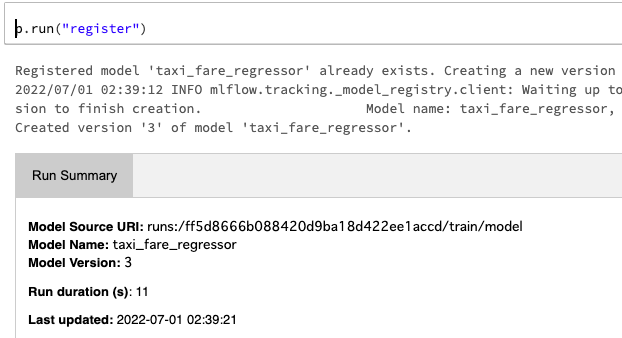
最後にモデルレジストリにモデルを登録します。
p.run("register")
inspectで各ステップを調査することもできます
p.inspect("train")
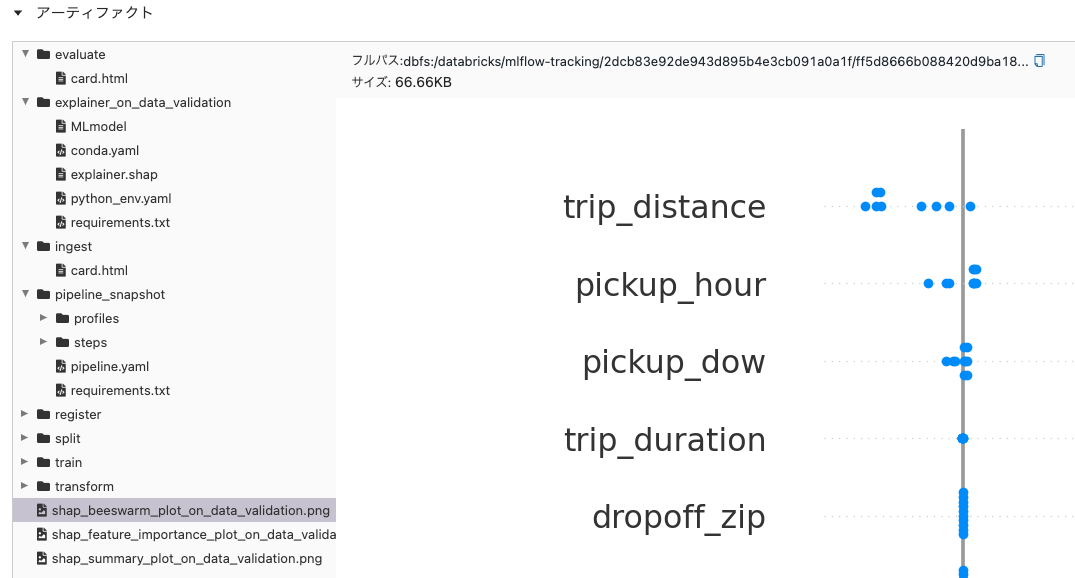
パイプラインのトラッキング
個人的にすごいと思ったのはこちらです。これまではモデルにまつわる情報がトラッキングされていたのですが、Pipelinesを使うことでモデルを作り、利用するMLパイプラインをまるっとトラッキングできるようになります。
機械学習モデルがどのように構築されたのか、どのように使われるのかなど、モデルの「文脈」をこれまで以上に捕捉できるようになり、機械学習モデルを本格運用に持っていく際にも、既存のパイプラインをほぼほぼそのままに移行できるようになるMLflow Pipelines、機械学習のビジネスへの本格運用をさらに支援するテクノロジーだと思いました。