はじめに
Chainerで作った機械学習モデルをPyTorchに書き換える記事を書く予定でしたが、ここ最近忙しくてまだ出来ていません。とりあえずPyTorchに書き換える予定のChainerで書いたfashion mnistを使ったオートエンコーダモデルについて紹介したいと思います。
Chainer→PyTorchに書き換えるプログラムについて
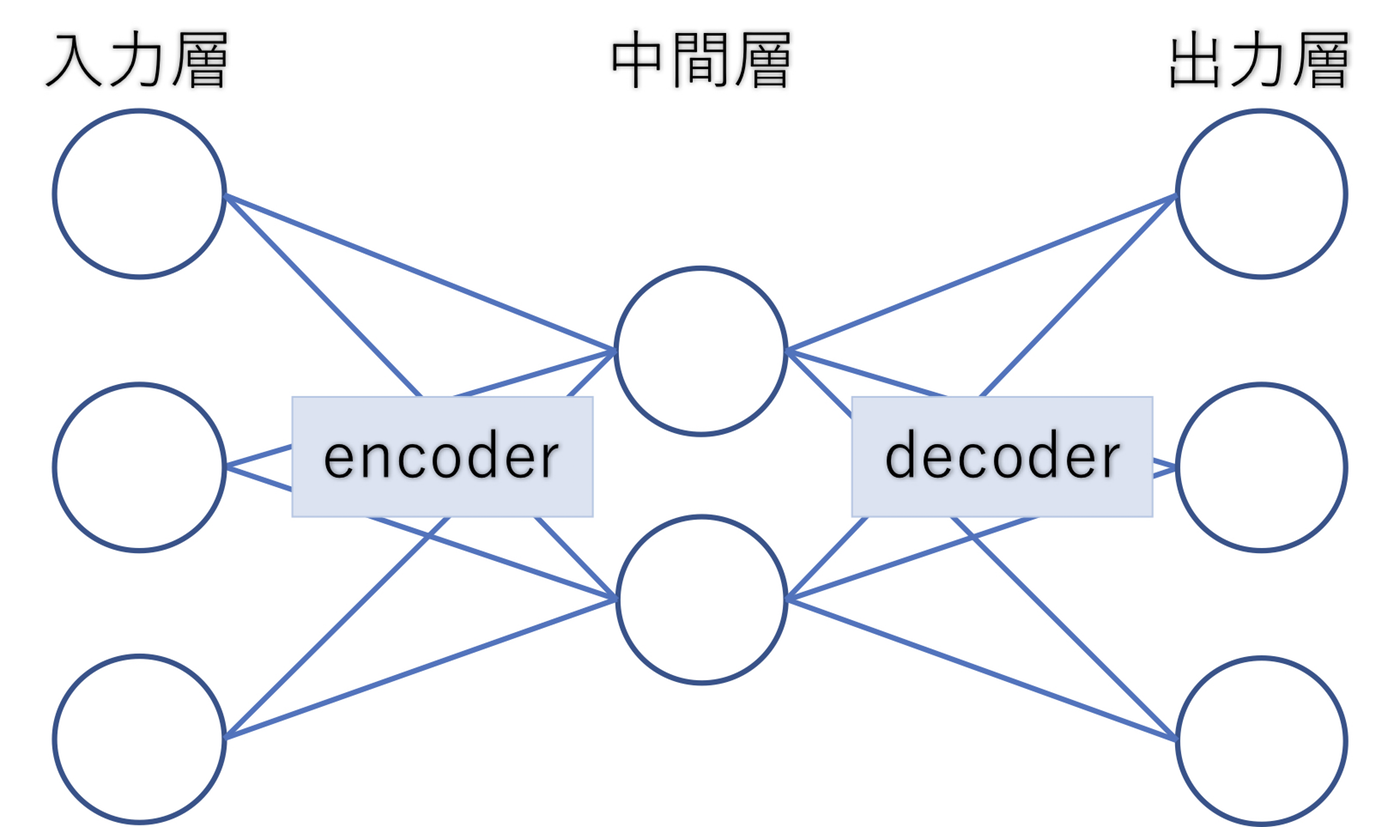
今回PyTorchに書き換える機械学習モデルは、全結合のオートエンコーダです。
一般的なオートエンコーダ(Autoencoder)は、中間層に「入力のデータ量より少ない次元数」のニューロンを用意したモデルです。
中間層は入力層よりも小さいことから、入力した特徴量より少ない特徴量でも数字を識別することが出来ることが分かります。
例えば、mnistの28×28の784次元の手書き文字データを入力として中間層を64次元、出力層を784次元とした場合、もしこれが正しく人間でも判断できる手書き文字に復元された場合は中間層の64次元では「手書き文字の本質的な構造(特徴)」を機械学習モデルが発見したことになります。この本質的な構造は人工知能が見つけたものであり、我々人間にも理解できる情報とは限りません。
手書き数字のデータセットmnistのオートエンコーダじゃ面白くないと思い、以前にfashion mnistで入力層784、中間層256、出力層784でオートエンコーダを作ったので、これをChainerからPyTorchに書き換えていきたいと思います。
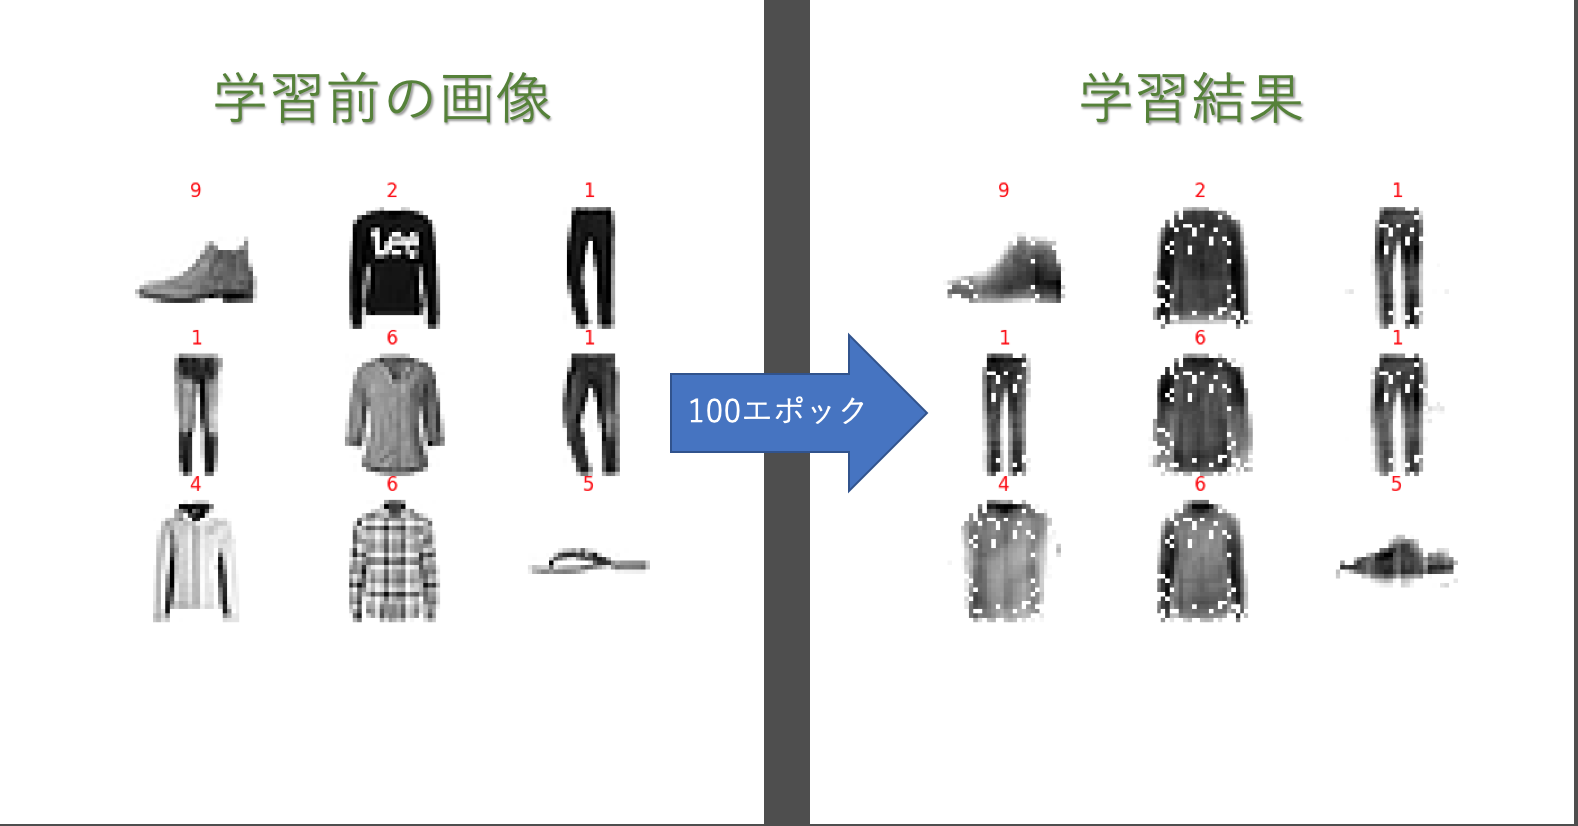
以下画像は、上記で説明した学習モデルで100エポック学習した結果です。
で、実際のchainerのソースコードです。過去に作ったのでソースコードの汚さはご容赦ください!
ソースベタ張りですいません
import chainer
import chainer.functions as F
import chainer.links as L
from chainer import training
from chainer.training import extensions
from chainer.datasets import tuple_dataset

import cv2
import sys

import matplotlib.pyplot as plt
from matplotlib import cm
import numpy as np
import argparse

from keras.datasets import fashion_mnist
import os

class Autoencoder(chainer.Chain):
    def __init__(self):
        super(Autoencoder, self).__init__(
            encoder = L.Linear(784, 256),
            decoder = L.Linear(256, 784))

    def __call__(self, x, hidden=False):
        h = F.relu(self.encoder(x))
        if hidden:
            return h
        else:
            return F.relu(self.decoder(h))

class make_dir(object):
    def __init__(self,folder_path):
        if not os.path.isdir(folder_path):
            os.makedirs(folder_path)

class show_img_data(object):
    def __init__(self, file_path, plot_idx, shape_size):
        self.out_file = file_path
        self.plot_idx = plot_idx
        self.shape_size = shape_size

    def make_data_nonmodel(self, data, idx, num):
        data_list = []
        for i in range(0 , num):
            data_list.append((data[i], idx[i]))

        return data_list

    def make_data_usemodel(self, in_data, idx, num, model):
        data_list = []
        for i in range(0 , num):
            print(idx[i])
            pred_data = model.predictor(np.array([in_data[i]]).astype(np.float32)).data
            data_list.append((pred_data, idx[i]))

        return data_list

    def plot_mnist_data(self,data,epoch):
        for index, (data, label) in enumerate(data):
            plt.subplot(self.plot_idx, self.plot_idx, index + 1)
            plt.axis('off')
            plt.imshow(data.reshape(self.shape_size, self.shape_size), cmap=cm.gray_r, interpolation='nearest')
            n = int(label)
            plt.title(n, color='red')

        make_dir(self.out_file)
        plt.savefig("./{0}/size_{1}_epoch_{2}.png".format(self.out_file, self.shape_size, epoch))
        # plt.show()

class Makedataset(chainer.dataset.DatasetMixin):
    def __init__(self, inputdata, outputdata):
        self._input = inputdata
        self._output = outputdata

    def __len__(self):
        return len(self._input)

    def get_example(self, i):
        return (self._input[i], self._output[i])

def training_data(args, x_train, y_train, x_test, y_test):
    PLOT_NUMS = 3
    #plot_input = show_img_data(args.out,3,28)
    #p_data = plot_input.make_data_nonmodel(plot_data, plot_idx, 9)
    #plot_input.plot_mnist_data(p_data, 0)

    # 学習データの作成
    # train_in = [cv2.resize(img, dsize=(14,14)) for img in x_train]
    # test_data = [cv2.resize(img, dsize=(14,14)) for img in plot_data]
    #x_train = [np.ravel(i) for i in x_train]
    #x_test = [np.ravel(i) for i in x_test]

    x_train = [i for i in x_train]
    x_test = [i for i in x_test]

    train_in_data = np.array([np.ravel(data) for data in x_train])
    test_in_data = np.array([np.ravel(data) for data in x_test])

    plot_data = test_in_data[0:PLOT_NUMS**2]
    plot_idx = y_test[0:PLOT_NUMS**2]

    train_dataset = Makedataset(train_in_data, train_in_data)
    test_dataset = Makedataset(test_in_data, test_in_data)

    train_iter = chainer.iterators.SerialIterator(train_dataset, args.batchsize ,True ,True)
    test_iter = chainer.iterators.SerialIterator(test_dataset, len(test_dataset), False, False)

    model = L.Classifier(Autoencoder(), lossfun=F.mean_squared_error)
    model.compute_accuracy = False
    optimizer = chainer.optimizers.Adam(0.01)
    optimizer.setup(model)

    updater = training.StandardUpdater(train_iter, optimizer, device=-1)
    trainer = training.Trainer(updater, (args.epoch, 'epoch'), out="result")
    trainer.extend(extensions.LogReport())
    trainer.extend(extensions.PrintReport( ['epoch', 'main/loss']))
    trainer.extend(extensions.ProgressBar())

    trainer.run()
    #model.to_cpu()

    plot_out = show_img_data(args.out,PLOT_NUMS,28)
    outp_data = plot_out.make_data_usemodel(plot_data, plot_idx, PLOT_NUMS**2 , model)
    plot_out.plot_mnist_data(outp_data, 100)


def main():
    ap = argparse.ArgumentParser(formatter_class=argparse.ArgumentDefaultsHelpFormatter)
    ap.add_argument("--batchsize", "-b", type=int, default=128, help="Batchsize")
    ap.add_argument("--epoch", "-e", type=int, default=100, help="Number of epochs")
    ap.add_argument("--out", "-o", type=str, default="results", help="Output directory name")
    ap.add_argument("--gpu", "-g", type=int, default=-1, help="GPU ID")
    ap.add_argument("--lr", "-l", type=float, default=0.01, help="Learning rate of SGD")

    args = ap.parse_args()
    (x_train, y_train), (x_test, y_test) = fashion_mnist.load_data()

    x_train = x_train.astype('float32') # int型をfloat32型に変換
    x_test = x_test.astype('float32') # int型をfloat32型に変換
    t_train = y_train.astype('int32') # 一応int型に
    t_test = y_test.astype('int32') # 一応int型に
    x_train /= 255 # [0-255]の値を[0.0-1.0]に変換
    x_test /= 255 # [0-255]の値を[0.0-1.0]に変換

    training_data(args, x_train, y_train, x_test, y_test)

if __name__ == "__main__":
    main()
chainerソース部分
chainer.dataset.DatasetMixin
chainerでは独自のデータセットを作成するクラスに対してchainer.dataset.DatasetMixinを継承させることによって、学習させるためのデータセットを作ることが可能です。
class Makedataset(chainer.dataset.DatasetMixin):
    def __init__(self, inputdata, outputdata):
        self._input = inputdata
        self._output = outputdata

    def __len__(self):
        return len(self._input)

    def get_example(self, i):
        return (self._input[i], self._output[i])
chainer.iterators.SerialIterator
chaineのIteratorクラスは、データセットの説明変数と目的変数を束ねたミニバッチ作成や、データ順序のシャッフルを行ってくれるます。
train_iter = chainer.iterators.SerialIterator(train_dataset, args.batchsize ,True ,True)
test_iter = chainer.iterators.SerialIterator(test_dataset, len(test_dataset), False, False)
ネットワークの定義
chainerで作った入力層728、中間層256、出力層728のネットワークもPyTorchに書き換えていきます。
class Autoencoder(chainer.Chain):
    def __init__(self):
        super(Autoencoder, self).__init__(
            encoder = L.Linear(784, 256),
            decoder = L.Linear(256, 784))

    def __call__(self, x, hidden=False):
        h = F.relu(self.encoder(x))
        if hidden:
            return h
        else:
            return F.relu(self.decoder(h))
L.Classifierでモデルの定義
L.Classifier(Autoencoder(), lossfun=F.mean_squared_error)
chainerではL.Classifierを使ってモデルの定義と損失関数を定義しています。
# モデルの定義
model = Autoencoder()

# Loss関数の指定
criterion = nn.CrossEntropyLoss()
optimizersの定義
optimizer = chainer.optimizers.Adam(0.01)
optimizer.setup(model)
chainerでは上記のようにOptimizer(学習勾配法)とlearning rateは上記のように定義することが出来ます。
chainer.training.StandardUpdater
chainerではOptimizerを使って、実際にパラメータを更新する処理を行う際にUpdater(アップデーター)を使うことができます。
updater = training.StandardUpdater(train_iter, optimizer, device=-1)
trainer = training.Trainer(updater, (args.epoch, 'epoch'), out="result")
モデルの実行
最後にtrainer.extendで学習のロス関数をプログレスバーとして表示させたり、学習の各エポックごとの損失関数をグラフとして出力することが出来ます。
そして、trainer.run()でモデルの実行が出来ます。
trainer.extend(extensions.LogReport())
trainer.extend(extensions.PrintReport( ['epoch', 'main/loss']))
trainer.extend(extensions.ProgressBar())

trainer.run()
最後に
週末中にPyTorchに置き換えを予定しているのでお待ちください。(型の定義の違いで苦戦してます。
以下は、置き換え途中でのメモです。本当に途中記事を投稿して申し訳ない。。。。
PyTorchについて
Chainerの開発元であるPreferred Networksでは、研究開発に使用するフレームワークをPyTorchへ順次移行するという発表がありました。
【元記事】
お仕事で書いてるChainerのソースを今後使い続けるわけにもいかないないので、とりあえず過去に作ったChainerのソースをPyTorchに移行して行きたいと思います。
ChainerからPyTorchに移行する際に公式の対応表のドキュメントがあるので、それを見ながら移行していきたいと思います。
【対応表】
PyTorchをインストール
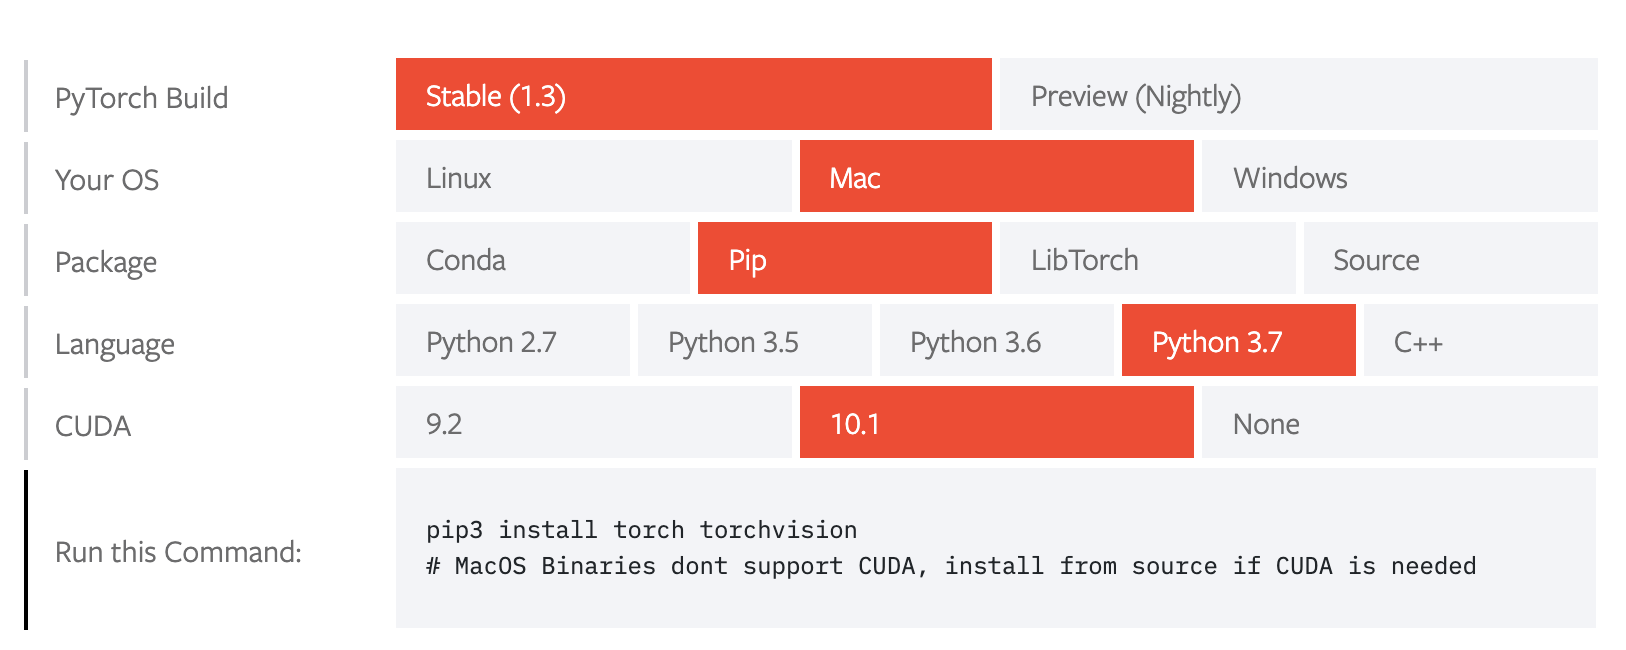
PyTorchの公式サイトに指示に従ってPyTorchをインストールしてください。
私の環境ではPipでライブラリ管理していたので、以下コマンドでインストールしました。
pip3 install torch torchvision


