Ateam Brides Inc. Advent Calendar 2021の1日目は
株式会社エイチームブライズ エンジニア
新卒2年目になった@takaHALが担当します!
これはなに?
- ServerSide GTMをApp Engineに手動デプロイする
- 今回やること
- GA4をServerSide GTMで接続検証をする
- 次回の記事
サクッとドキュメント見ながらやったので基本デプロイ操作はCloudShellです
Dockerイメージが公開されているのでApp Engineじゃなくてもお好きな環境にデプロイできます。
利用するもの
- GCP
- CloudShell
- App Engine
- Google Tag Manager
ServerSide GTMのいいこと
- パフォーマンスの向上
- ウェブサイトまたはアプリの測定タグが少なくなるため、クライアントサイドで実行するコードが減少します。- セキュリティの強化
-
お客様が管理するサーバーサイド環境でデータを収集し配布することで、訪問者データの保護が強化されます。データは Google Cloud インスタンスへ送信された後、他のタグによって処理され、転送されます。
-
サーバーのドメインをサイトのサブドメインにできる
-
ITP対応ができる
- 1stParty Cookieでサーバー側で動作するため
-
ITP対応ができる
-
FaceBook Conversion APIなどのタグテンプレートが利用できる
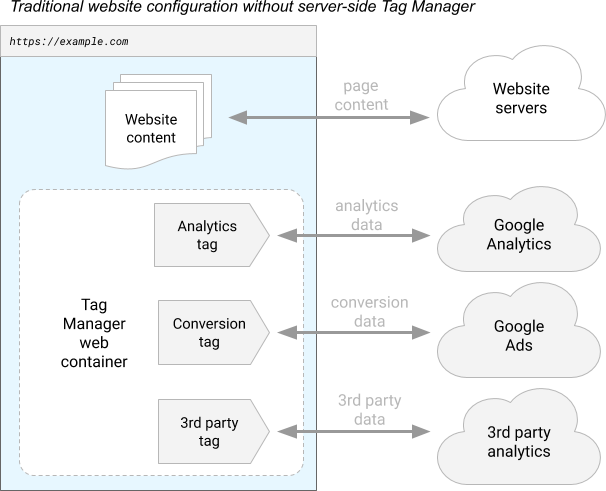
Google タグ マネージャーのウェブコンテナを使用してパフォーマンスを計測するサイト
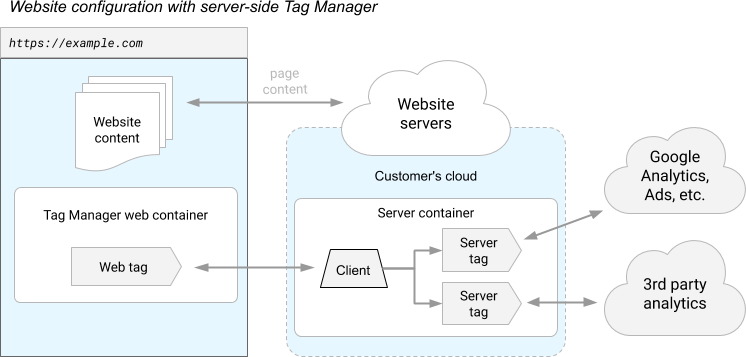
サーバー コンテナを使用するタグ構成の例
GTMの設定とServerSide GTMのデプロイ
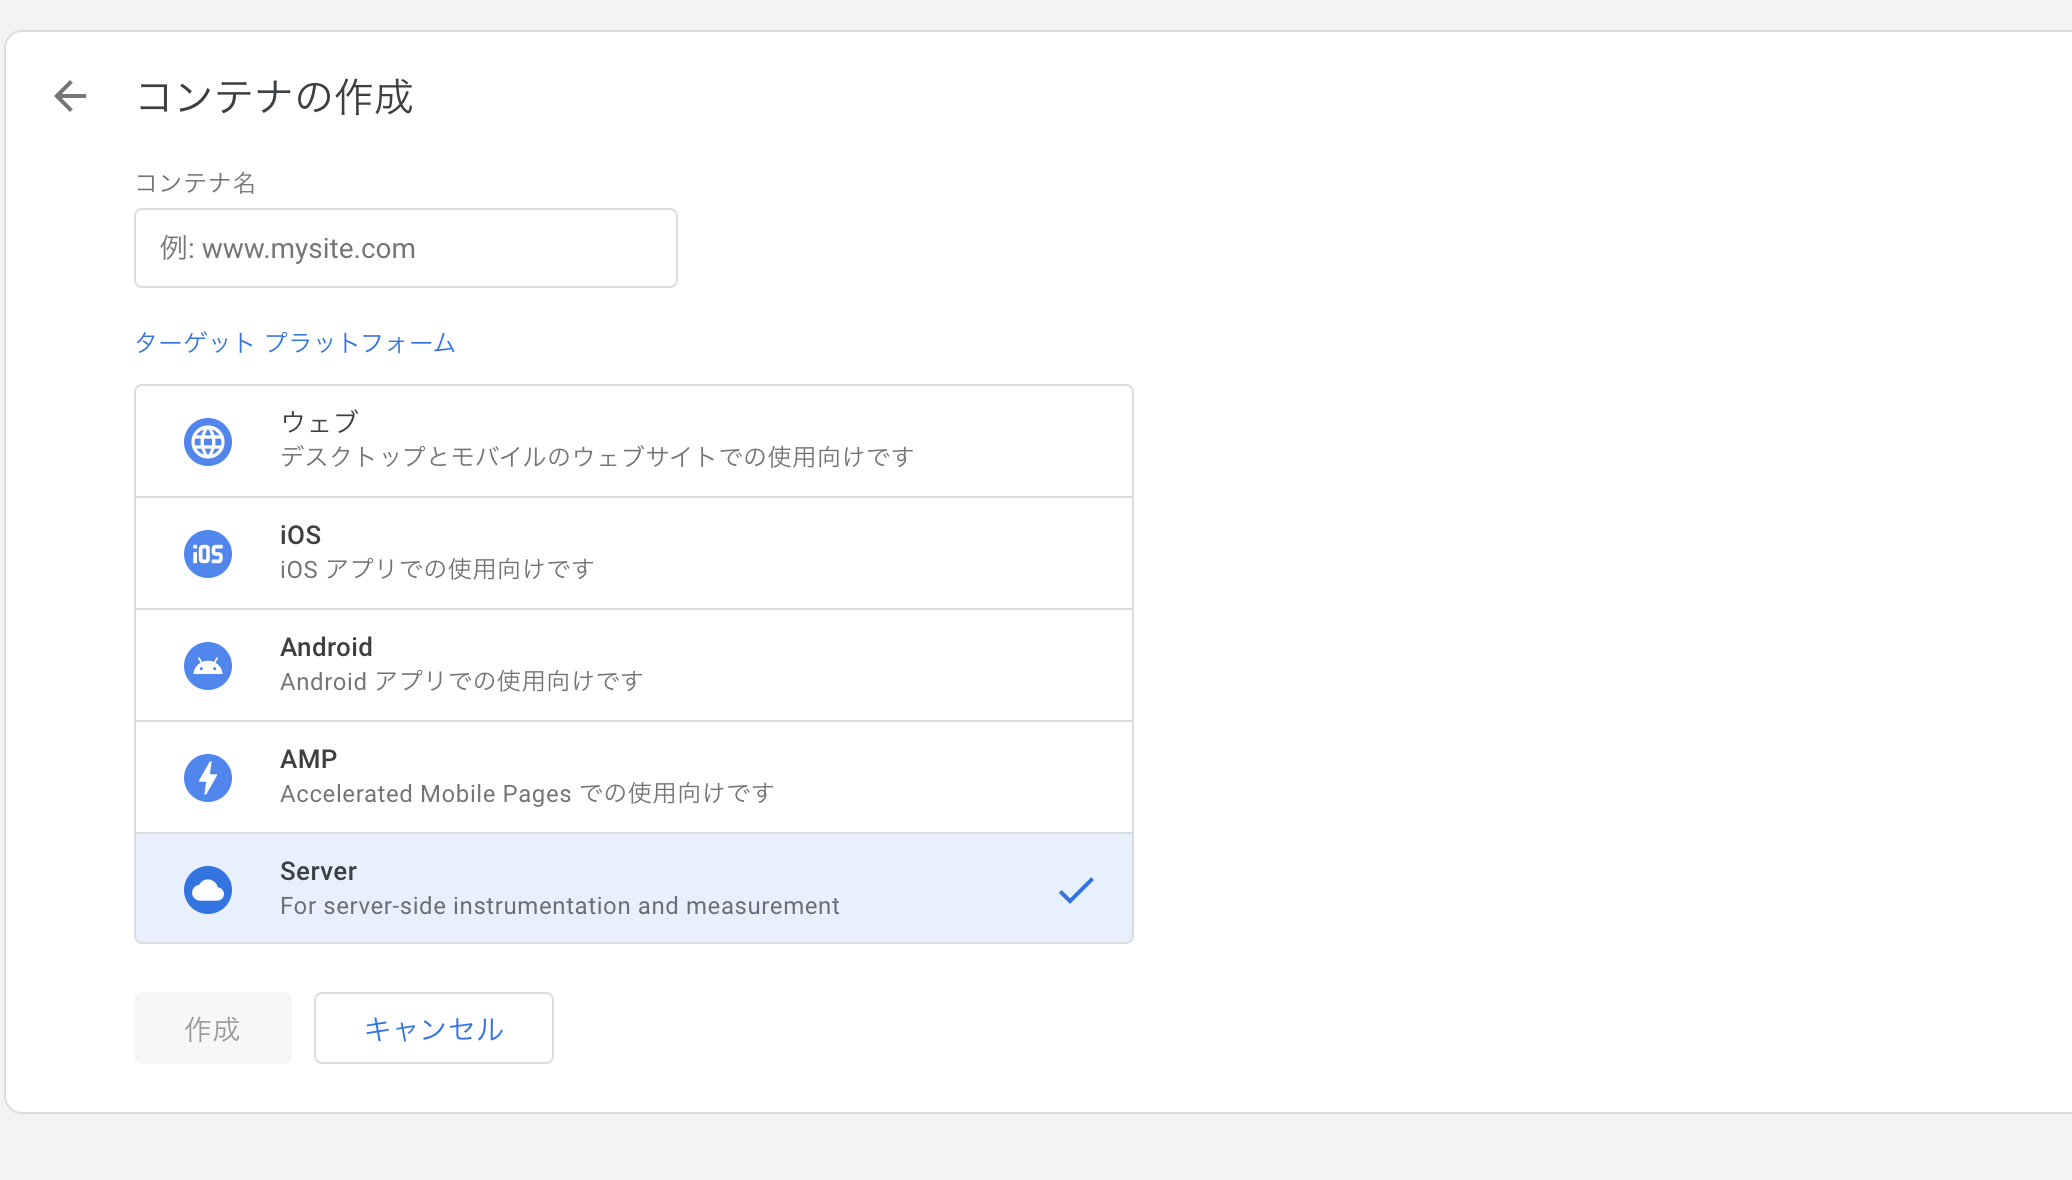
1.GTMでコンテナを作成する
作成する時にServerを選択
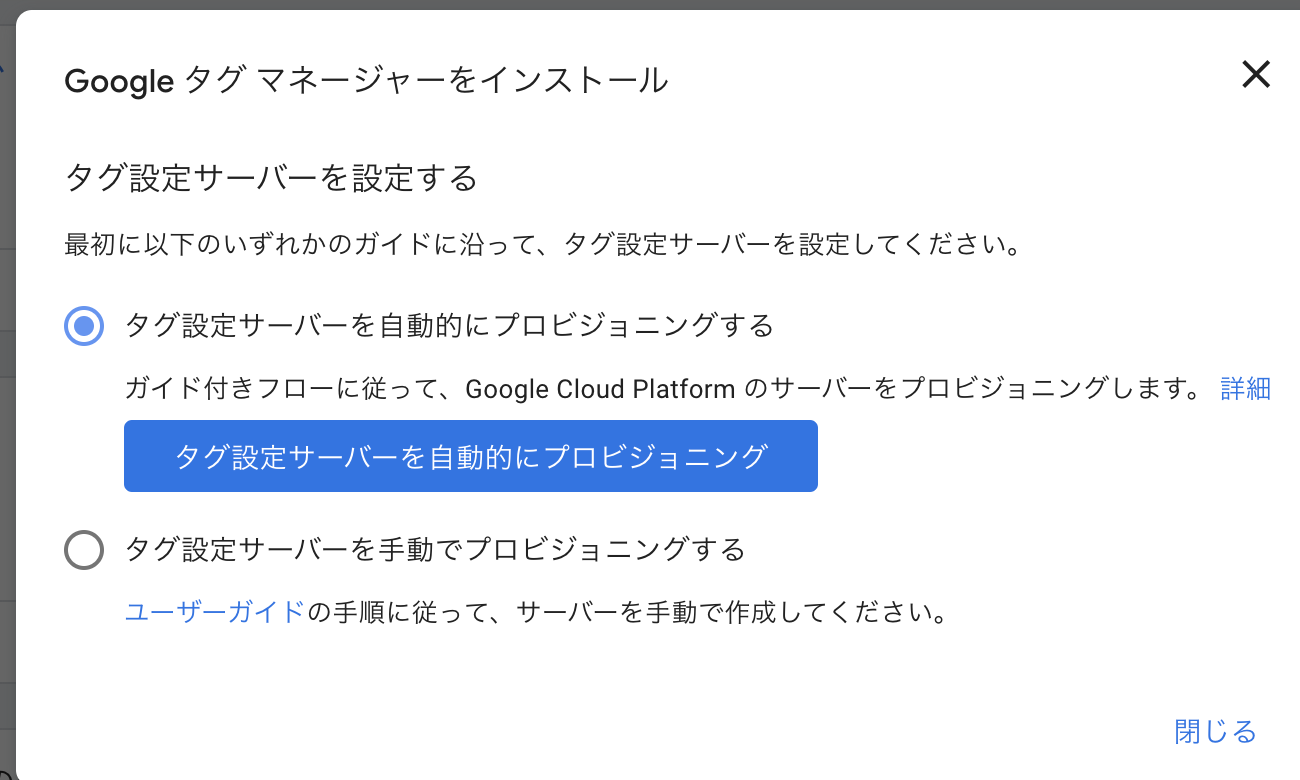
2.タグマネージャーをインストールする
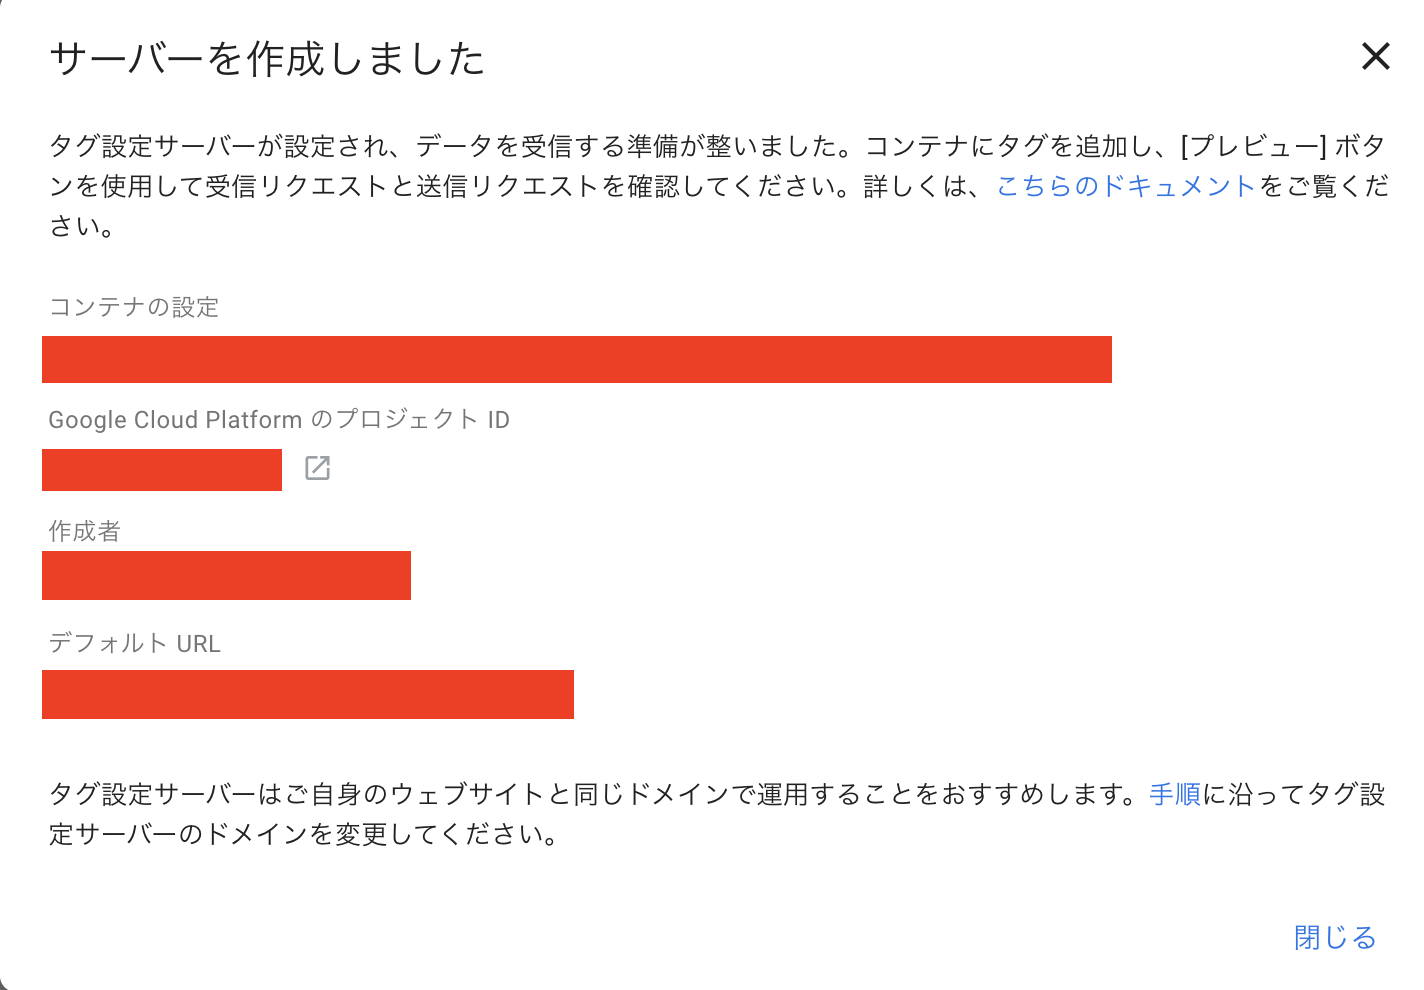
コンテナを作成すると以下のような画面がでる。
自動設定の場合はプロジェクトがGCPに新規作成されus-centralのリージョンでスタンダード環境のGAEにデプロイされます
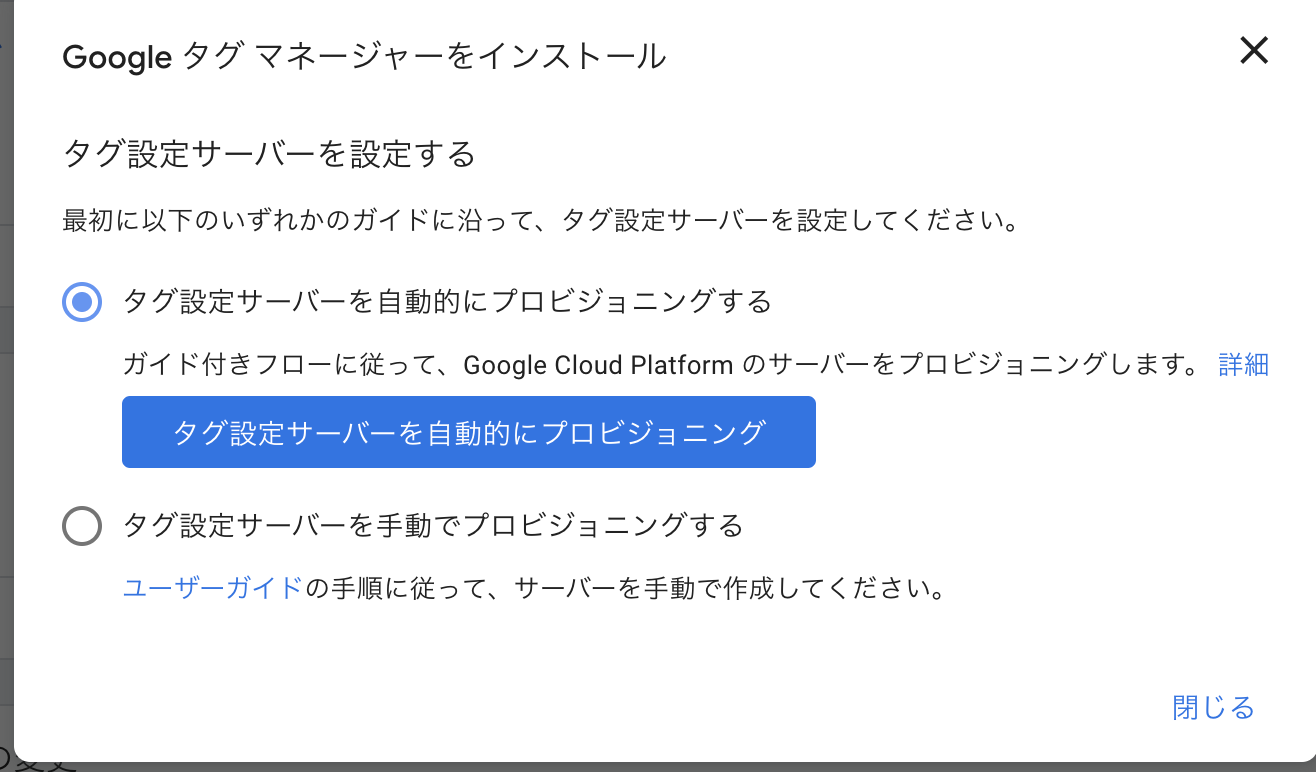
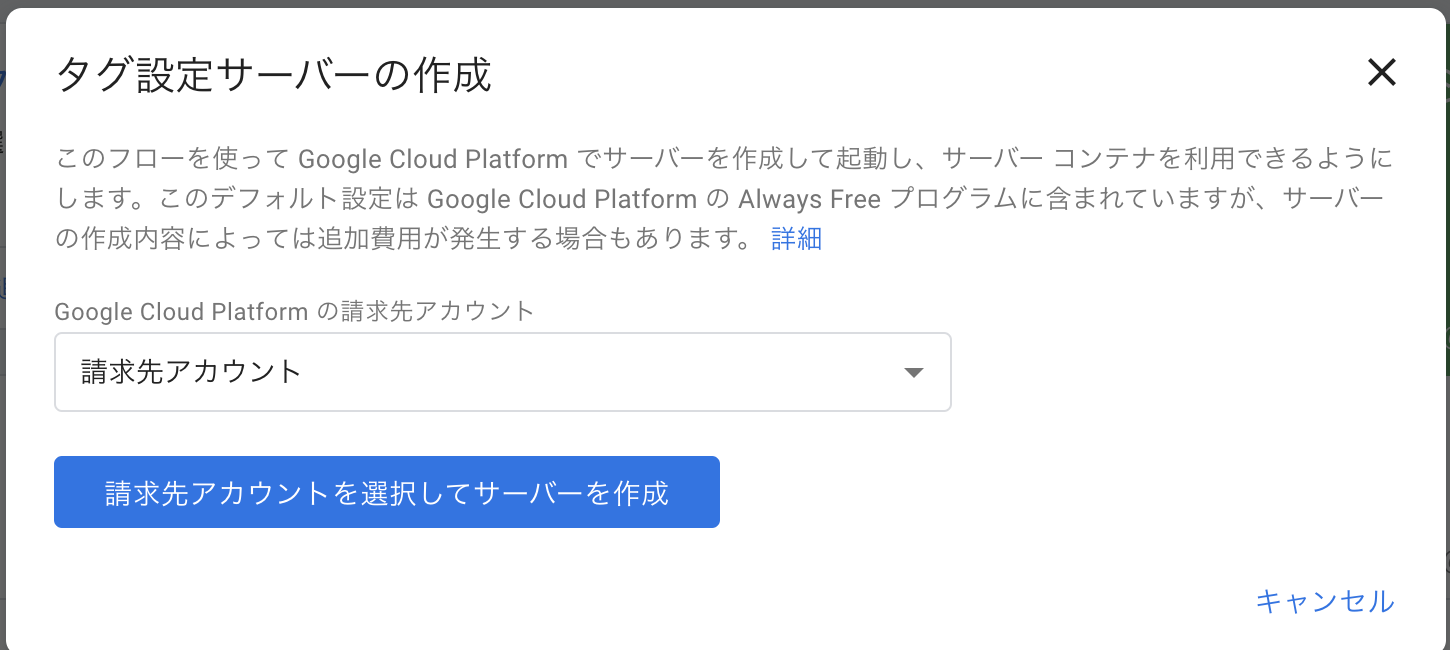
自動設定を選択した場合はこれで終わりですが。フレキシブル環境にしたいとかリージョンを変えたい場合が存在すると思うので手動もやっていきます。
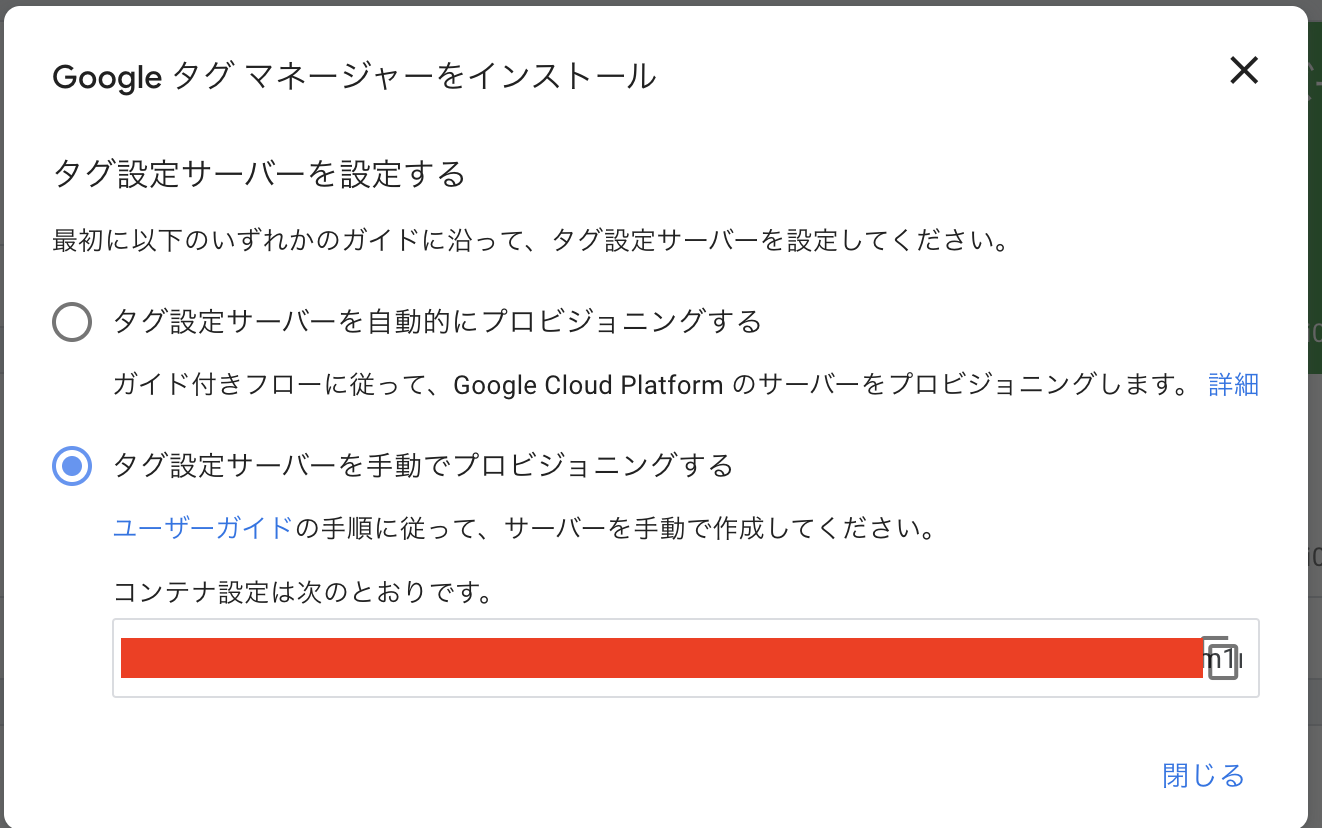
手動の場合は赤の部分が必要になるのでメモしておきましょう
3.CloudShellからGAEにデプロイする
自動作成の場合はコンテナIDでGCPのプロジェクトが作成されるので
同じようにコンテナIDでGCPのプロジェクト作っておくのがお勧めです
CloudShellをGCPのコンソールで開きます
gcloud config set project <PROJECT_ID>
以下のコマンドを実行しスクリプトに従います。
bash -c "$(curl -fsSL https://googletagmanager.com/static/serverjs/setup.sh)"
- Container Config (Required):
$ bash -c "$(curl -fsSL https://googletagmanager.com/static/serverjs/setup.sh)"
Please input the following information to set up your tagging server. For more
information about the configuration, input '?'. To use the recommended setting
or your current setting, leave blank.
Container Config (Required):
ここはGTM上に表示されているさきほどコピーしたコンテナ設定文字列を使用します。
コピーし忘れた場合はコンテナの設定から再度確認できます

- Policy Script URL (Optional):
Policy Script URL (Optional):
ある場合は入力、任意項目なので今回はそのままエンターします
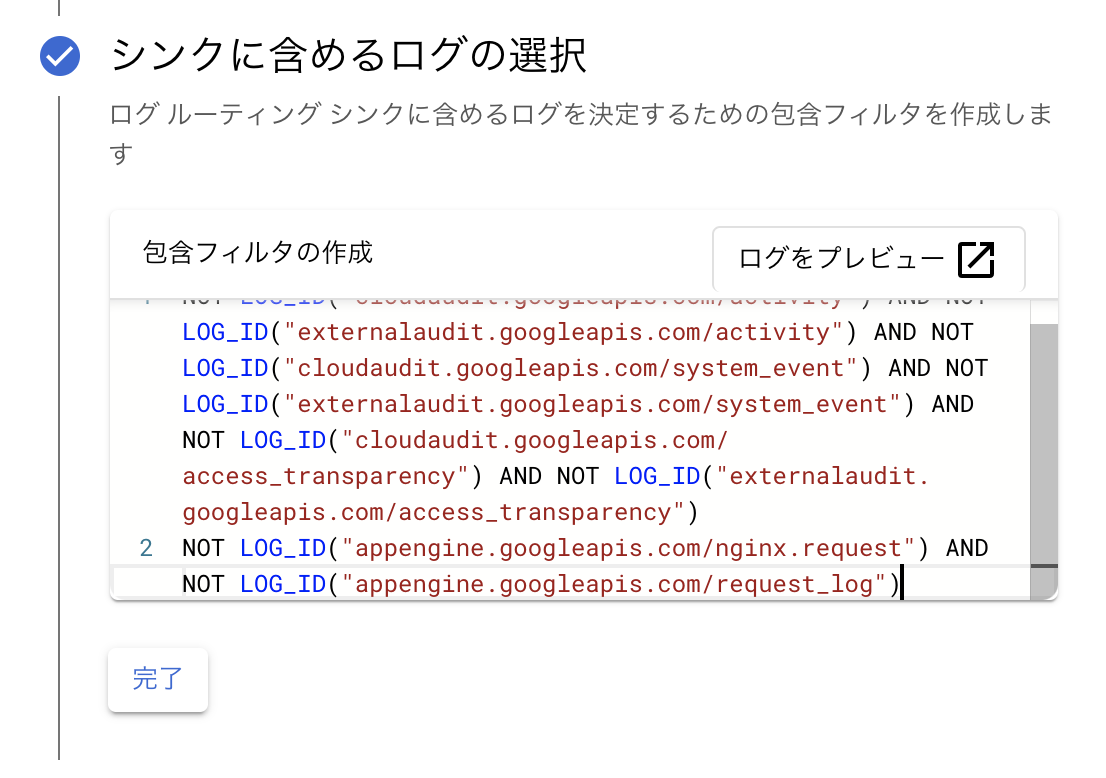
- Request Logging (Current: on):
Request Logging (Current: on):
GAEでリクエストのロギングのオンオフが選べます。
offで無効
ログルーターのデフォルトシンクに含めるログの選択に以下が追加されます
NOT LOG_ID("appengine.googleapis.com/nginx.request") AND NOT LOG_ID("appengine.googleapis.com/request_log")
- Deployment Type (testing/production):
Deployment Type (testing/production):
初回作成の場合は以下のような挙動になります
- `testing`を入力すると
    - スタンダード環境でデプロイ

- `production`を入力すると
    - フレキシブル環境でデプロイ
今回は本番運用ではないのでスタンダード環境にデプロイします。
testingのスタンダードで作業していきますが
productionのフレキシブル環境でデプロイしたときの追加で聞かれる質問とymlも貼っておきます
Deployment Type production にした場合の追加設定とyml
- Please choose the region where you want your App Engine application located:
デプロイしたいリージョンを選ぶ
Please choose the region where you want your App Engine application located:

 [1] asia-east1    (supports standard and flexible)
 [2] asia-east2    (supports standard and flexible and search_api)
 [3] asia-northeast1 (supports standard and flexible and search_api)
 [4] asia-northeast2 (supports standard and flexible and search_api)
 [5] asia-northeast3 (supports standard and flexible and search_api)
 [6] asia-south1   (supports standard and flexible and search_api)
 [7] asia-southeast1 (supports standard and flexible)
 [8] asia-southeast2 (supports standard and flexible and search_api)
 [9] australia-southeast1 (supports standard and flexible and search_api)
 [10] europe-central2 (supports standard and flexible)
 [11] europe-west   (supports standard and flexible and search_api)
 [12] europe-west2  (supports standard and flexible and search_api)
 [13] europe-west3  (supports standard and flexible and search_api)
 [14] europe-west6  (supports standard and flexible and search_api)
 [15] northamerica-northeast1 (supports standard and flexible and search_api)
 [16] southamerica-east1 (supports standard and flexible and search_api)
 [17] us-central    (supports standard and flexible and search_api)
 [18] us-east1      (supports standard and flexible and search_api)
 [19] us-east4      (supports standard and flexible and search_api)
 [20] us-west1      (supports standard and flexible)
 [21] us-west2      (supports standard and flexible and search_api)
 [22] us-west3      (supports standard and flexible and search_api)
 [23] us-west4      (supports standard and flexible and search_api)
 [24] cancel
Please enter your numeric choice:
あとは基本的に確認なので問題なければyで入力すればデプロイされます。
完成したapp.yamlの内容
service: default
runtime: nodejs12
instance_class: F1
automatic_scaling:
  max_instances: 1
env_variables:
  CONTAINER_CONFIG: GTMで表示されているコンテナ設定の文字列
  INCLUDE_DEBUG_SERVER: true
  POLICY_SCRIPT_URL: ''
  NODE_OPTIONS: --max-http-header-size=16384
handlers:
- url: /.*
  secure: always
  script: auto
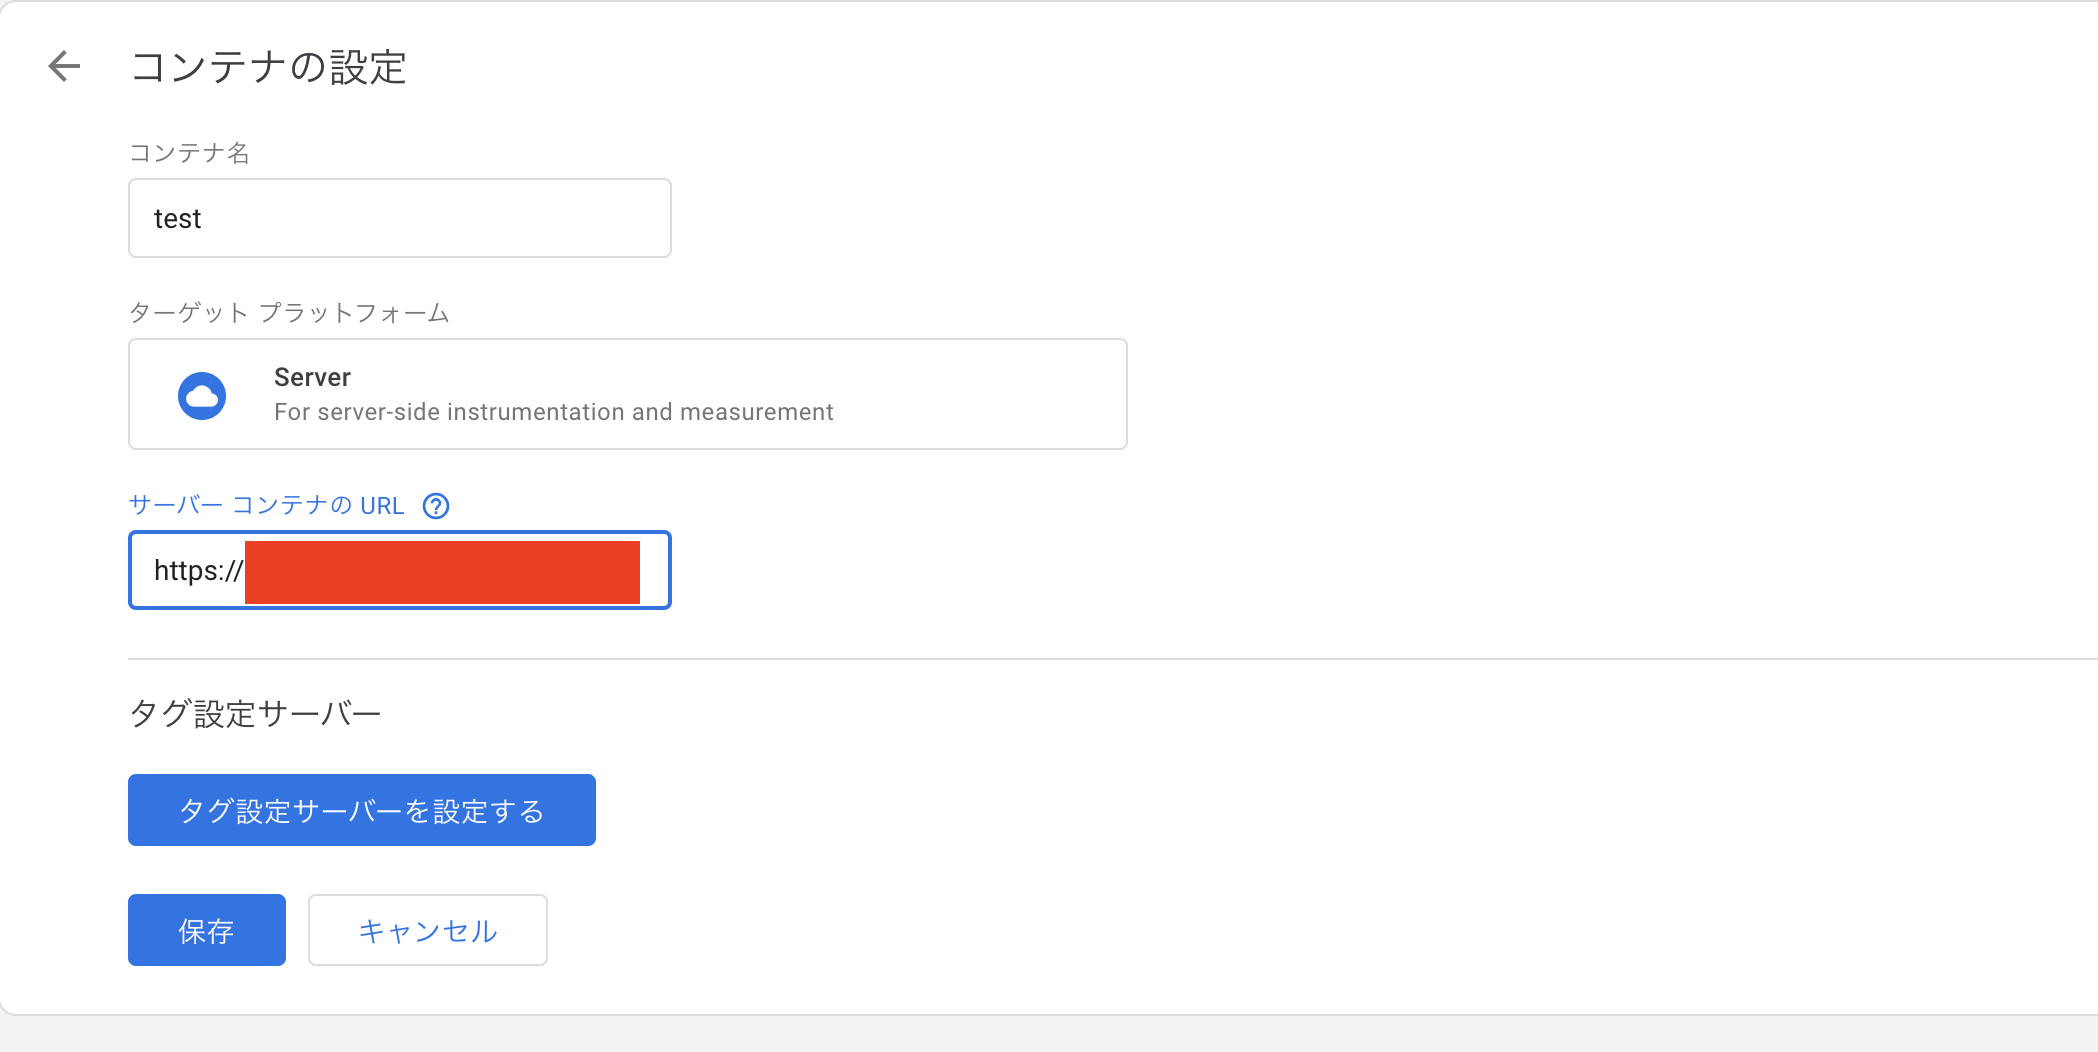
4.GTMにデプロイしたサーバーのURLを設定
Cloud Shellで以下のコマンドを入力するとデプロイしたサーバーのURLが入手できるので設定する
gcloud app browse
ここで一緒にコンテナ名をドメイン名にしておくと管理しやすくていいと思います
5.動作確認
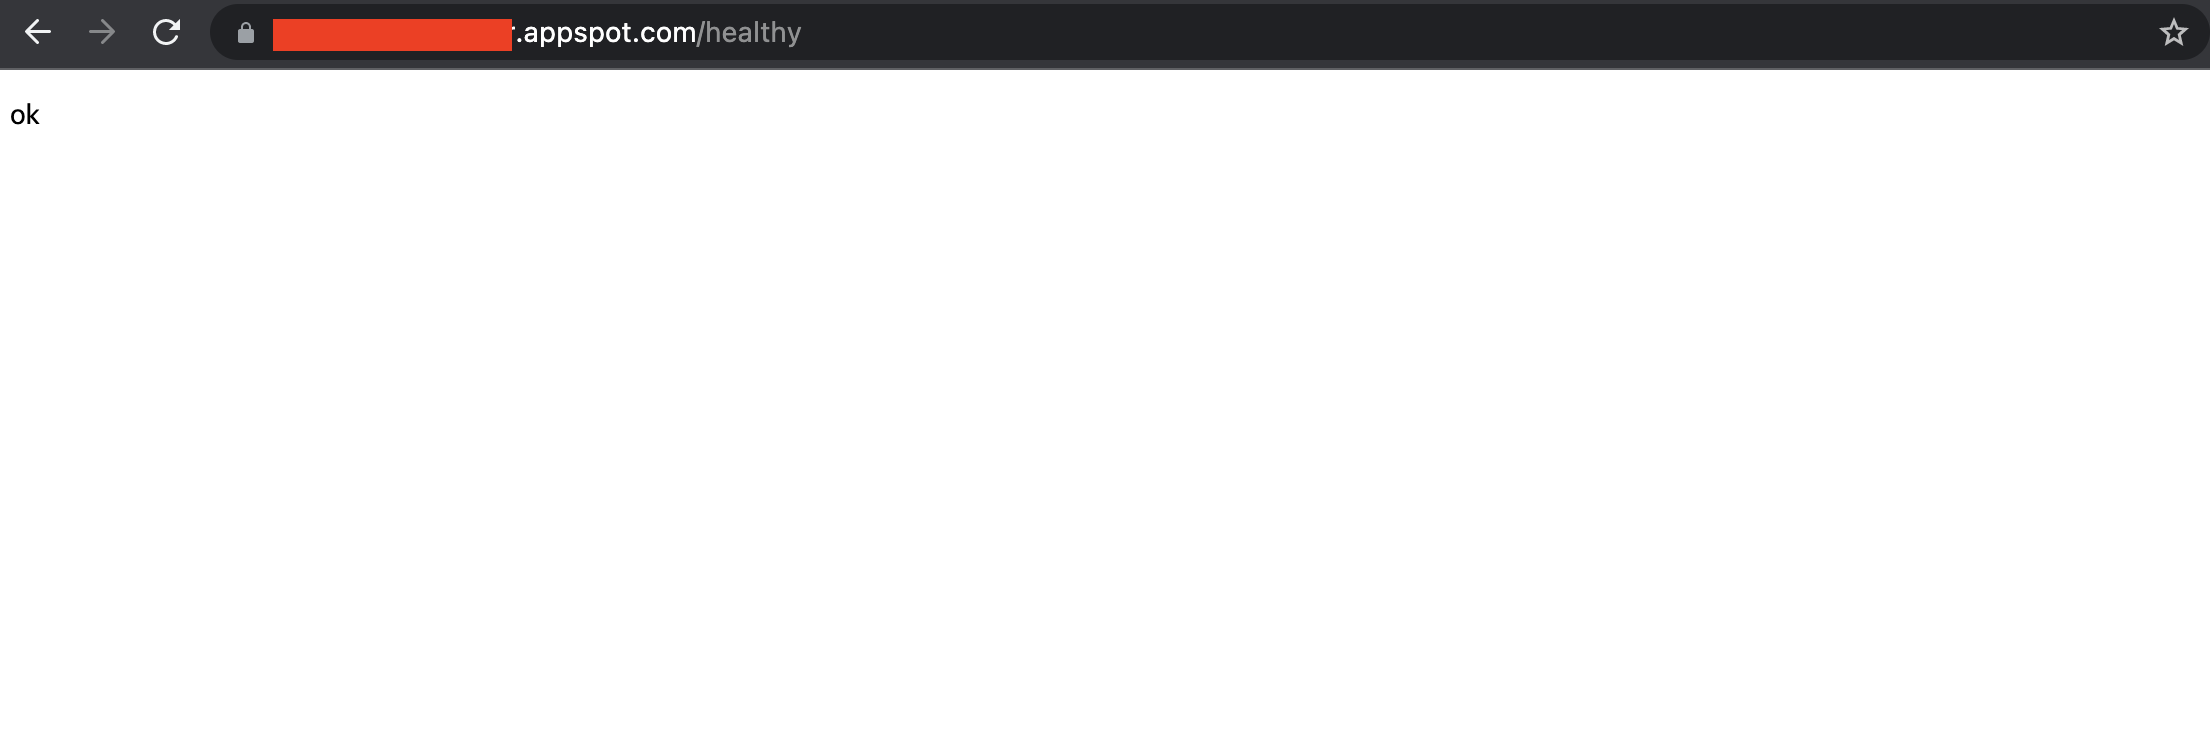
-
/healthyをパスにつけて確認
以下のコマンドで取得できるURLに/healthy をつけてアクセスします
gcloud app browse
OKという文字が返ってこればOKです
- GTMのプレビューで確認
プレビューを押して以下のような画面が出ればOK
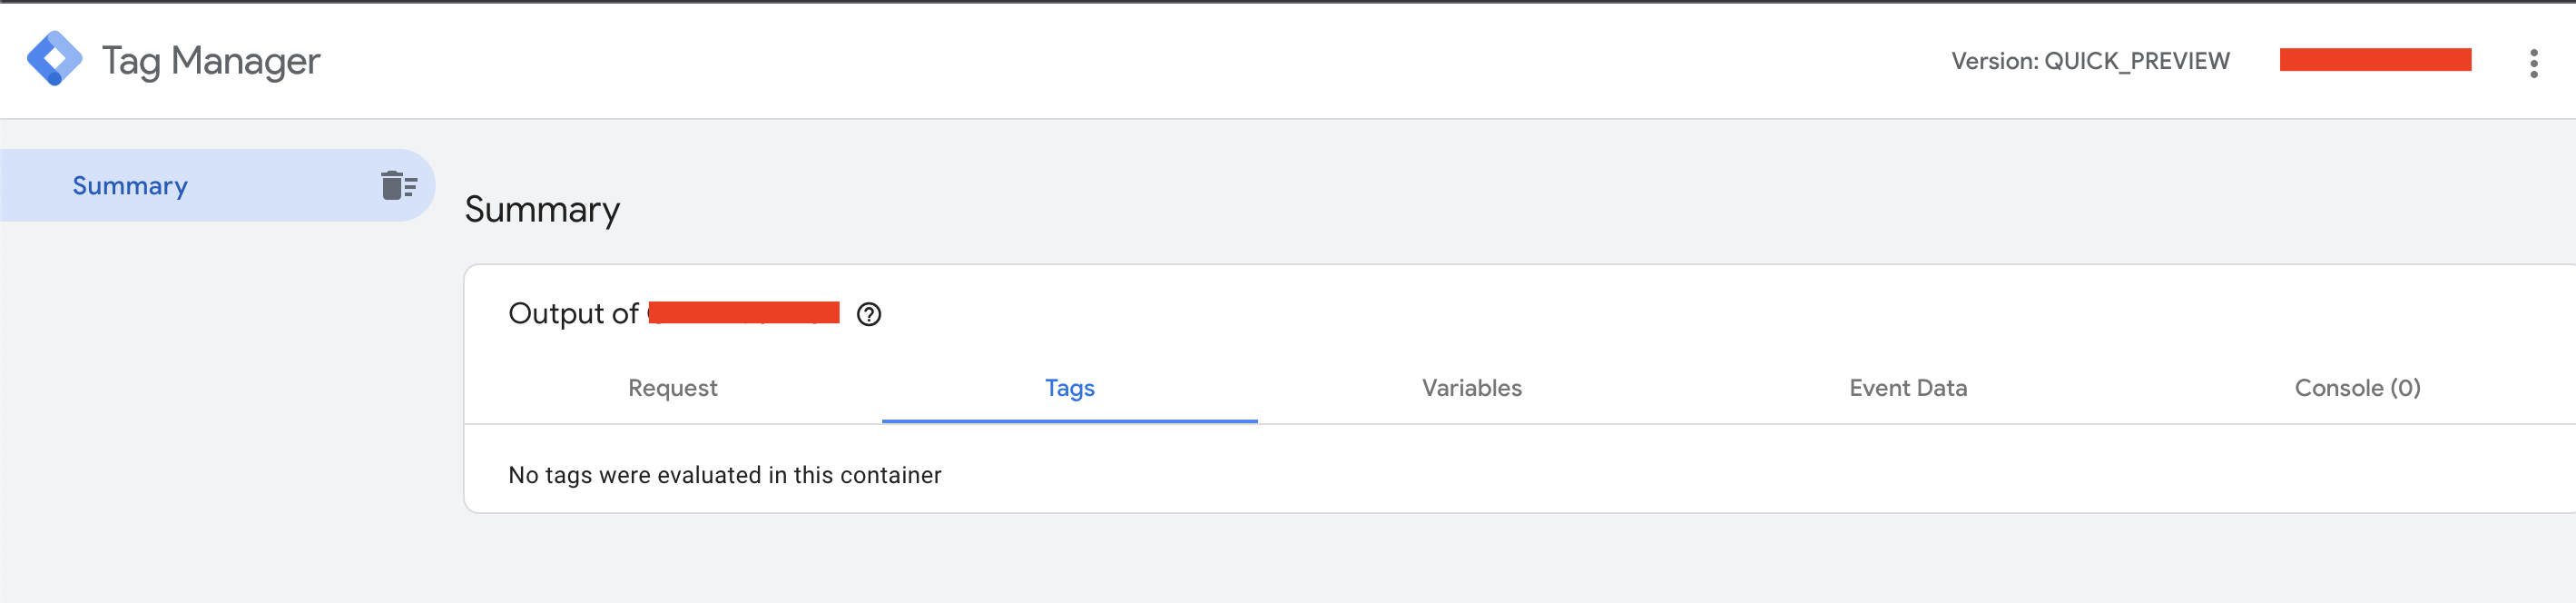
タグの設定は通常通りGTMでプレビューの画面とかはデプロイしたServerSide GTMの画面になるので見た目上の差分はそのくらいですね
デプロイしたソースコードを変更して構成変更したい場合(CloudShell)
GAEからデプロイしたソースを確認し、作成した app.yamlに張り付けて更新
$ mkdir serverside-tagging
$ curl -O https://storage.googleapis.com/serverside-tagging/gtm-cloud-image.zip
$ unzip gtm-cloud-image.zip -d serverside-tagging
$ cd serverside-tagging
# app.yamlを作成
$ touch app.yaml
$ gcloud app deploy
デプロイしたものの構成は変えないけど新しいバージョンを作成したい場合(CloudShell)
リージョン以外が再度対話式で更新できます。
bash -c "$(curl -fsSL https://googletagmanager.com/static/serverjs/setup.sh)"
自動作成の場合
- 自動的にプロビジョニングを選択
- 請求先アカウントの選択
- 作成
GTMのコンテナIDの名前でGCPプロジェクトが作成されます
自動は非常に楽でいいのですがリージョンが選べないので今後に期待ですね
Deployment Type production にした場合の追加設定とyml
productionと回答した場合は以下のようなAutoscalingに関することを設定できます。
ここのデフォルトの内容は
本番環境では、サーバー 1 台あたり毎月約 40 ドルかかります。各サーバーは、1 個の vCPU、0.5 GB のメモリ、10 GB のディスクを備えたフレキシブル環境の App Engine インスタンスです。サーバーが停止した場合のデータ損失リスクを軽減するため、少なくとも 3 台のサーバーを実行することをおすすめします。ただし、実行するサーバーの数は状況に応じて増減できます。3~6 台のサーバーを自動スケーリングすることで 1 秒あたり 50~200 件のリクエストを処理できますが、実際のパフォーマンスは、タグの数とその処理内容によって異なります。
推奨される台数になってますね
Deployment Type (Current: testing): production
Autoscaling (Recommended: on):
Minimum Number of Servers (Recommended: 3):
Maximum Number of Servers (Recommended: 6):
CPU Target Utilization (Recommended: 0.6):
service: default
runtime: nodejs
env: flex
resources:
  cpu: 1
  memory_gb: 0.5
  disk_size_gb: 10
readiness_check:
  path: '/healthz'
  failure_threshold: 3
  check_interval_sec: 10
liveness_check:
  path: '/healthz'
  failure_threshold: 10
  check_interval_sec: 10
env_variables:
  CONTAINER_CONFIG: GTMで表示されているコンテナ設定の文字列
  POLICY_SCRIPT_URL: ''
  NODE_OPTIONS: --max-http-header-size=16384
automatic_scaling:
  min_num_instances: 3
  max_num_instances: 6
  cpu_utilization:
    target_utilization: 0.6
参考にさせてもらったサイトリスト
まとめ
今回は対応してませんがデプロイしてるやつにカスタムドメインを設定することができます。
これで運用しているサイトのサブドメインにできますね
デプロイ自体も簡単で、イメージも公開されているのでGAEじゃなくともデプロイできるのがいい感じです。
カスタムドメインによりITP対策が現段階ではできるのと、さらにサーバーサイド側で処理をするためユーザーにもいい体験をしてもらえます Core Web Vitals対策にもなりますね!!
次回はデプロイしたものを使ってGA4と接続してみようと思います
次回
ServerSide GTMをGAEにデプロイしてGA4の接続の検証もしてみる 〜GA4接続編〜
Ateam Brides Inc. Advent Calendar 2021の2日目は、@mkinがお送りします!!どんなネタを用意してくるのか楽しみです!!