はじめに
「この記事を見ればgulpで良い感じにSassをCSSにコンパイルできる!」という記事です。
以前gulp超入門という記事を執筆しましたが、環境構築を行い、SassをCSSにコンパイルするだけの基本的な内容でした。
こちらの記事でもう少し詳しく解説しています。
参考になったらぜひLGTMをお願いします!
事前準備
環境構築の方法については、以前gulp超入門という記事を執筆していますので、そちらを参考にしてください。
環境構築はこちらの記事を元にできているものとして進めていきます。
ディレクトリ構成は下記の通りです。src配下が開発環境でdist配下にコンパイルしたCSSが吐き出されます。
プロジェクト名
 ├ dist
 │  └ css
 │     └ app.min.css
 ├ node_modules
 ├ src
 │  └ sass
 │     └ app.scss
 ├ package.json
 └ gulpfile.js
使用するプラグインです。
| プラグイン | バージョン |
|---|---|
| Node.js | 12.14.1 |
| npm | 6.13.4 |
| gulp | 4.0.2 |
| gulp-sass | 4.1.0 |
| gulp-plumber | 1.2.1 |
| gulp-notify | 3.2.0 |
| gulp-sourcemaps | 2.6.5 |
| gulp-autoprefixer | 7.0.1 |
| gulp-group-css-media-queries | 1.2.2 |
| gulp-clean-css | 4.3.0 |
| gulp-rename | 2.0.0 |
| gulp-mode | 1.0.2 |
プラグインをインストール
先ほど紹介したプラグインをインストールします。
$ npm install --save-dev gulp-sass gulp-plumber gulp-notify gulp-sourcemaps gulp-autoprefixer gulp-group-css-media-queries gulp-clean-css gulp-rename gulp-mode
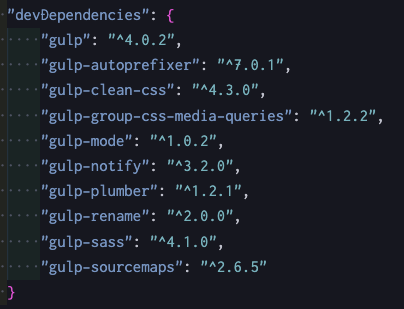
インストールが完了するとpackage.jsonにプラグインが追加されます。

package.jsonのscriptsに記述
package.jsonのscriptsにコードを追加します。
今回は開発用と納品用でコマンド実行時の処理を分けています。
(処理自体はgulpfile.jsに後ほど記述します)
"scripts": {
    "dev": "npx gulp",
    "build": "npx gulp --production"
}
gulpfile.jsに記述
gulpfile.jsにタスクを登録していきます。
var gulp = require("gulp");
var sass = require("gulp-sass");
const plumber = require("gulp-plumber");
const sourcemaps = require("gulp-sourcemaps");
const autoprefixer = require("gulp-autoprefixer");
const gcmq = require("gulp-group-css-media-queries");
const cleanCSS = require("gulp-clean-css");
const rename = require("gulp-rename");
const notify = require("gulp-notify");
const mode = require("gulp-mode")({
    modes: ["production", "development"],
    default: "development",
    verbose: false,
});

var paths = {
    srcDir: "./src",
    dstDir: "./dist",
};

// SassをCSSにコンパイルしてdistに吐き出す
// タスクの名前
function sassCompile() {
    return (
        gulp
            // 参照するSassファイルのパスを記述する
            .src(paths.srcDir + "/sass/**/*.{scss,sass}")
            // 強制停止を防止、デスクトップにエラーを通知する
            .pipe(plumber(notify.onError("Error: <%= error.message %>")))
            // ソースマップを初期化
            .pipe(sourcemaps.init())
            // Sassをコンパイルする
            .pipe(sass({ outputStyle: "expanded" }))
            .on("error", sass.logError)
            // プレフィックスを自動で付けてくれる
            .pipe(
                autoprefixer({
                    cascade: false,
                })
            )
            // ソースマップの作成
            .pipe(sourcemaps.write())
            // メディアクエリごとにコードを整えてくれる
            .pipe(gcmq())
            // productionモード(buildコマンド)の時のみCSSをMinify化
            // コメントアウトも削除してくれる
            .pipe(mode.production(cleanCSS()))
            // ファイル名を変更する
            .pipe(
                rename({
                    extname: ".min.css",
                })
            )
            // コンパイルしたファイルを吐き出すパスを記述する
            .pipe(gulp.dest(paths.dstDir + "/css"))
    );
}

// src配下のファイルに変更があれば自動でコンパイルしてくれる
function watchFile(done) {
    gulp.watch(paths.srcDir + "/sass/**/*.{scss,sass}", sassCompile);
    done();
}

// タスクの実行!
exports.default = gulp.series(sassCompile, watchFile);
タスクの実行
あとはタスクを実行するだけです。
npm run buildコマンドを叩くとCSSファイルがMinifyされ、ソースマップが削除されます。
実際にコマンドを叩いて違いを見比べてください。
開発用コマンド
$ npm run dev
本番用コマンド
$ npm run build
各プラグインの概要(おまけ)
使用したプライグインの説明を簡単にしておきたいと思います。(順不同)
gulp-sass Sassファイルをコンパイルしてくれる
gulp-plumber エラーが原因でタスクが強制停止することを防止してくれる
gulp-notify デスクトップ通知をしてくれる
gulp-sourcemaps コンパイルする前のSassを保持した状態にしてくれる
gulp-autoprefixer ベンダープレフィックスを自動で付けてくれる
gulp-group-css-media-queries 別々の場所に書かれた同じ内容のメディアクエリをまとめてくれる
gulp-mode 開発モードと本番モードを切り替えてくれる
gulp-rename ディレクトリ構造を保ったままリネームしてくれる
最後に
最後までご覧いただきありがとうございました。
案件などによってアレンジして使っていただければ幸いです。
「参考になったよ!」という方は、ぜひLGTMをお願いします!!