Github & VSCodeのインストール
Gitを使うまで
1, GitHubのアカウントを作成
2, GitHubのインストール
ダウンロードから任意のOSを選択し、64-bit Git for Windows Setupを選択(基本的には)
3, インストール後、Git Bashというアプリが使えるようになる
以下のようにして初期設定を行う
git config --global user.name "あなたの名前"
git config --global user.email "あなたのメールアドレス"
VSCodeを使うまで
1, VSCodeをインストール
Windowsの場合[Windows」のボタンをクリック
2, ダウンロードしたインストーラー(VSCodeUserSetup-x64-xxx.exe)をダブルクリックして起動
Git関連の拡張機能をインストールしておこう
VSCodeを起動し、左の「拡張機能」アイコンをクリック
検索バーに「Git」と入力し、「GitLens」などの拡張機能をインストール
拡張機能がインストールされると、VSCode内でGitの履歴管理やコミット操作が簡単にできる
VSCodeのターミナルからgit cloneを行う
VSCodeのターミナルを開く

git clone コマンドを使ってGitのURLをクローン

git clone https://github.com/username/repository.git
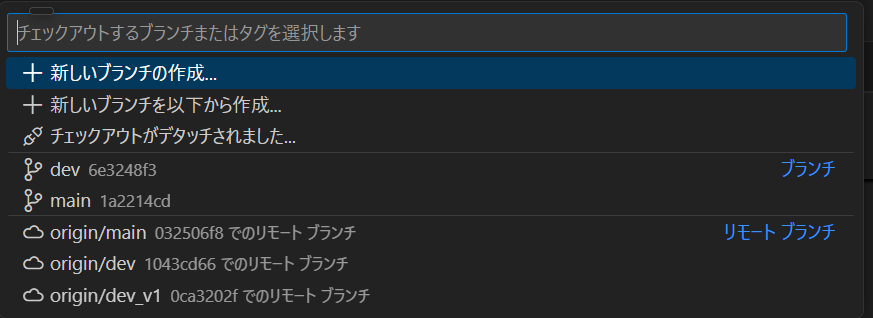
Gitの任意のブランチを選択して作業を進める
ソース管理を選択

左下にあるmain(今回はdevになっている)を選択し、編集したいブランチ、リモートブランチに移動
リモートブランチはPC上に保存されていないGitのクラウド上のもの

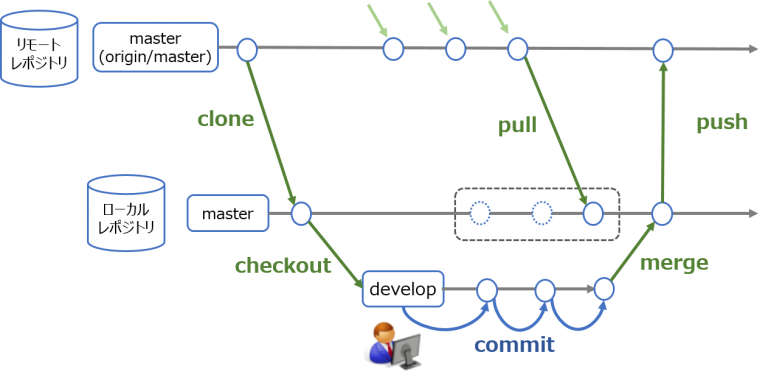
gitブランチとは
Gitにおけるブランチは、プロジェクトの独立した開発ラインを管理するための機能である
ブランチを使うことで、メインのコード(通常はmainまたはmasterブランチ)の内容を変更することなく、新しい機能の開発や修正を行うことができる
「コミット(セーブポイント)の分岐を作る」機能で、その分岐を「ブランチ」と呼んでいる
この図ではmasterをもとにしたdevelopブランチを作成している
Gitで始めるバージョン管理