はじめに
初心者が初めてXcodeでUITestingを導入した際の備忘録です。
個人で開発している分にはなかなか導入することも少ないかと思いますが、初めてテストを導入してみようという方などに参考になればと思います。
簡単なサンプルアプリケーションをこちらに用意しました。このサンプルアプリケーションも交えつつ書き進めていきます。
環境
Xcode7.2
1. プロジェクトにUITestsターゲットを追加
- 新しいプロジェクトにUITestを含める場合
- 既存のプロジェクトにUITestを加える場合
新しいプロジェクトにUITestを含める場合
新規プロジェクトを作成し、「Choose options for your new project:」の画面で**Include UI Tests にチェックを入れます**。
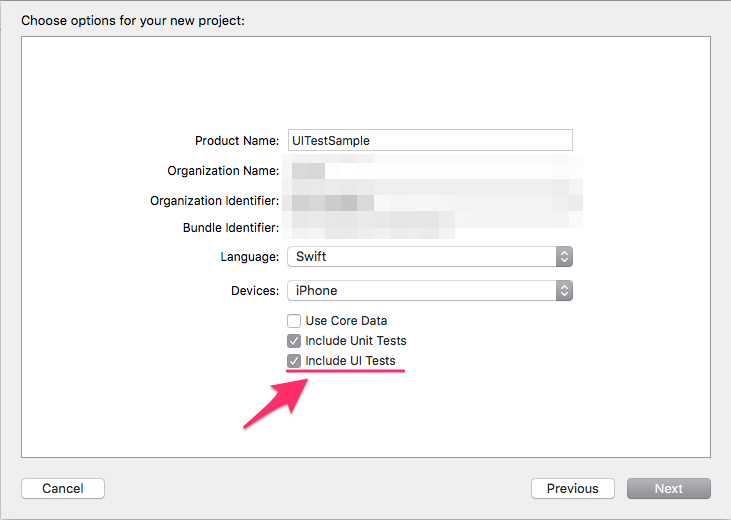
この状態でプロジェクトを作成するとUITestのターゲットができるので、準備完了です。
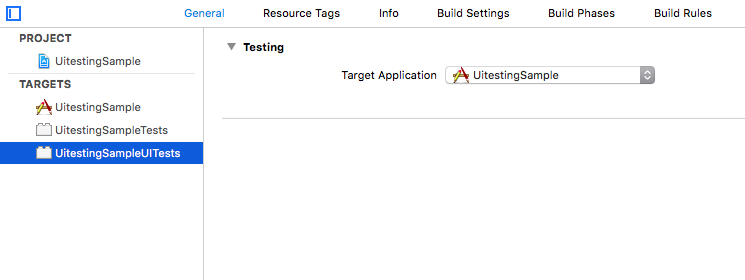
既存のプロジェクトにUITestを加える場合
「File」→「New」→「Target...」を選択
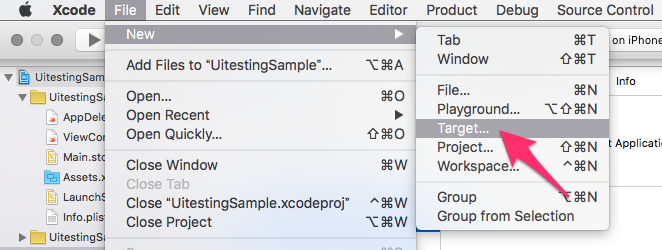
「iOS」→「Test」→「iOS UI Testing Bundle」を選択して「Next」
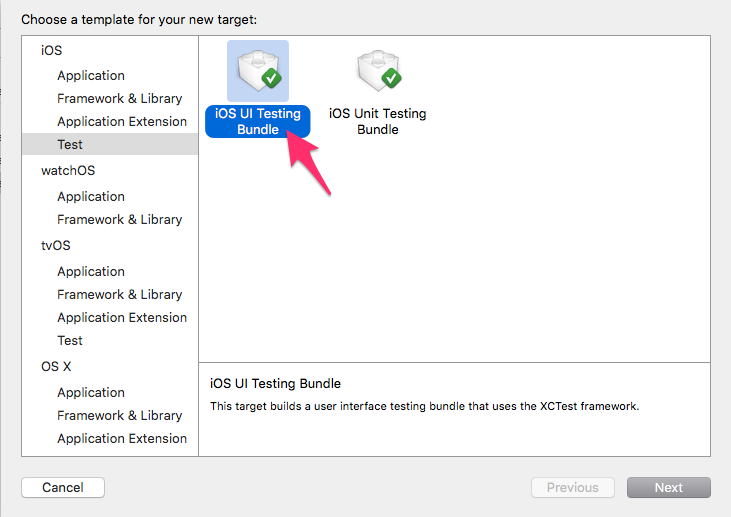
「Finish」をクリックすると、UITestを含めた状態で新規プロジェクトを作成した時と同じようにUITestのターゲットができます。

2. アプリケーションコードを作成
新規でプロジェクトを作成した場合はアプリケーションを作成しましょう。
既存のプロジェクトでアプリケーションができている場合は特に問題ないです。
サンプルアプリケーションでは単に掛け算をするだけのアプリケーションを作成しました。
3. UITestを書く
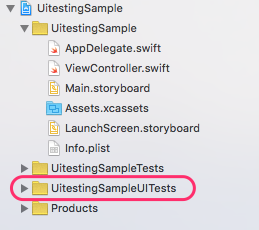
先ほど作成したUITestターゲットの中に「[ProductName].swift」というファイルがあるかと思います。
※[ProductName]はターゲット作成時につけた名前。新規プロジェクトから自動的に作られた場合は[ProjectName]UITests.swiftとなっている。
import XCTest

class UITestSample2UITests: XCTestCase {

    override func setUp() {
        super.setUp()

        // Put setup code here. This method is called before the invocation of each test method in the class.

        // In UI tests it is usually best to stop immediately when a failure occurs.
        continueAfterFailure = false
        // UI tests must launch the application that they test. Doing this in setup will make sure it happens for each test method.
        XCUIApplication().launch()

        // In UI tests it’s important to set the initial state - such as interface orientation - required for your tests before they run. The setUp method is a good place to do this.
    }

    override func tearDown() {
        // Put teardown code here. This method is called after the invocation of each test method in the class.
        super.tearDown()
    }

    func testExample() {
        // Use recording to get started writing UI tests.
        // Use XCTAssert and related functions to verify your tests produce the correct results.
    }

}
この中にテストコードを書いていきます。
テストのメソッドは初めから書いてあるtestExampleのように先頭にtestとつけます。
(func testMyLabelExists()みたいな)
ここからはサンプルアプリケーションを用いて説明していきます。
サンプルアプリケーションについて
サンプルアプリケーションは、
左辺のテキストフィールドと右辺のテキストフィールドに数値を入力して「=」ボタンをタップすると、「=」ボタンの右側のラベルに掛け算の答えが表示されるという内容になっています。
また、仕様として以下を満たしています。
- アプリ起動時にテキストフィールド及びラベルに初期値は入っていない
- 左辺または右辺のテキストフィールドに数値が入力されていないと「=」ボタンが押せない
※サンプルアプリケーションは簡単に作成したものなので、内容・仕様などはかなり適当です。ご容赦ください ![]()
テストの作成
では、このアプリケーションで次のような手順でテストをしてみます。
- アプリ起動時
- 「=」ボタンがdisableかどうか
- 左辺に「12」を入力
- 「=」ボタンがdisableかどうか
- 右辺に「4」を入力
- 「=」ボタンがenableかどうか
- 「=」ボタンをタップ
- 答えが表示されるラベルに「48.0」と表示されているかどうか
これらを実際に書いたのが以下のコードになります。(testExample部分)
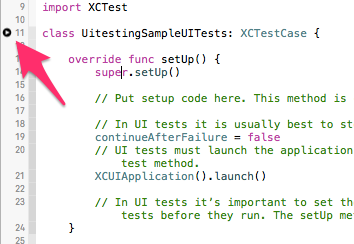
import XCTest
class UitestingSampleUITests: XCTestCase {
override func setUp() {
super.setUp()
// Put setup code here. This method is called before the invocation of each test method in the class.
// In UI tests it is usually best to stop immediately when a failure occurs.
continueAfterFailure = false
// UI tests must launch the application that they test. Doing this in setup will make sure it happens for each test method.
XCUIApplication().launch()
// In UI tests it’s important to set the initial state - such as interface orientation - required for your tests before they run. The setUp method is a good place to do this.
}
override func tearDown() {
// Put teardown code here. This method is called after the invocation of each test method in the class.
super.tearDown()
}
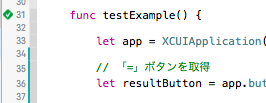
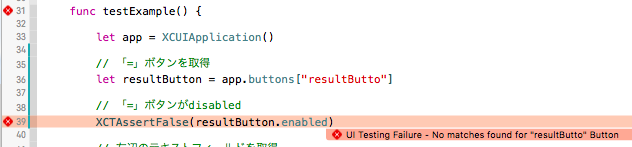
func testExample() {
let app = XCUIApplication()
// 「=」ボタンを取得
let resultButton = app.buttons["resultButton"]
// 「=」ボタンがdisabled
XCTAssertFalse(resultButton.enabled)
// 左辺のテキストフィールドを取得
let leftValueTextField = app.textFields["leftValueTextField"]
// 左辺のテキストフィールドをタップしてフォーカスを当てる
leftValueTextField.tap()
// 12と入力
leftValueTextField.typeText("12")
// 「=」ボタンがdisabled
XCTAssertFalse(resultButton.enabled)
// 右辺のテキストフィールドを取得
let rightValueTextField = app.textFields["rightValueTextField"]
// 右辺のテキストフィールドをタップしてフォーカスを当てる
rightValueTextField.tap()
// 4と入力
rightValueTextField.typeText("4")
// 「=」ボタンがenabled
XCTAssertTrue(resultButton.enabled)
// 「=」ボタンをタップ
app.buttons["resultButton"].tap()
let resultLabel = app.staticTexts["resultLabel"]
// 結果を表示するラベルのテキストが「48.0」になっていれば成功
XCTAssertEqual(resultLabel.label, "48.0")
}
}
オブジェクトの取得方法
テストコードを書く時に、画面上のボタンやテキストフィールドを取得してそのオブジェクトをコードからタップしたりテキスト入力したりします。
まず、その際のオブジェクトの取得について簡単に説明します。
オブジェクトの取得方法はいくつかあるかと思いますが、今回はオブジェクトにaccessibility identifierを設定し、そのidentifierを指定して取得しています。
例) app.buttons["resultButton"]のresultButtonが設定したidentifier
accessibility identifierの設定方法
コードから設定する場合は
resultButton.accessibilityIdentifier = "resultButton"
というふうに書きます。
Interface Builderから設定する場合は
identity inspectorのAccessibilityから設定できます。
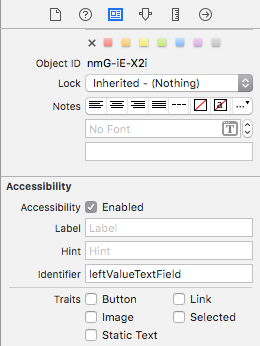
サンプルアプリケーションでは全てIBから設定しています。
また、オブジェクトによってXCUIElementQuery(app.buttonsのbuttons部分)が違うので、いくつかになりますが簡単に紹介します。
- UIButton                 : buttons
- UITextField              : textFields
- UITextField(secure text) : secureTextFields
- UILable                  : staticTexts
つまり、サンプルアプリケーションのapp.buttons["resultButton"]は、
accessibility identifierがresultButtonであるUIButtonを指していることになります。
Assertの挿入
次に、実際にテストで検証する部分を記入していきましょう。
サンプルでは、XCTAssertTrue(resultButton.enabled)やXCTAssertEqual(resultLabel.label, "48.0")といった部分ですね。
いくつか検証のパターンを紹介します。
- オブジェクトが存在するかどうか
XCTAssert(someElement.exists)
- labelのテキストが想定したものになっているか
XCTAssertEquals(myLabel.label, "想定の文字")
- ボタンが押せるか
XCTAssertTrue(myButton.enabled)
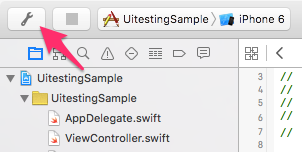
4. テストの実行
テストコードが書けたらテストを実行しましょう。
テストを実行するには、
- XcodeのRunボタンをTestボタンに変更して実行(もしくは[cmd+U]で実行)するか、
- テストクラス・テストメソッドの左側にある再生マークをクリックして実行させることができます。
1の場合
2の場合
1の場合は、UnitTestも含めて全てのテストが実行されますが、2の場合はクラス単位やメソッド単位で実行することができます。
5. テスト結果の確認
テストが通れば、再生マークのところが緑色に、通らなければ赤色になります。
通らなかった時はエラー箇所を教えてくれるので、修正して再度テストをしてみましょう。
XcodeのReport Navigatorからテスト詳細な結果を見ることもできます。

さいごに
以上でざっくりになりますが、導入方法を書いていきました。
不備などあればご指摘いただければ幸いです。
また、より詳しい内容やもっと良い記事もあるので、下記に紹介させていただきます。
参考
https://developer.apple.com/videos/play/wwdc2015-406/
http://masilotti.com/xctest-documentation/
http://dev.classmethod.jp/smartphone/iphone/xcode-7-ui-testing/
https://github.com/joemasilotti/UI-Testing-Cheat-Sheet
http://masilotti.com/ui-testing-cheat-sheet/