はじめに
MQTTとはIoTデバイスでよく使用される軽量なデータ配信プロトコルです。
IoTCoreを経由することでDBへの格納やトリガーにも利用できます。
今回は勉強がてらに、温度/湿度データをAWSIoTCoreを経由してTimestreamに格納することをゴールにします。
Timestreamの設定

Database/Tableの作成
先に格納先のDBとtableを作成しておきます。

DB:esp32_test_database
table:esp32_test_table
AWS IoT Coreの設定

Things(モノ)を登録
デバイスを登録します。IoTCoreではThings(モノ)と表現します。
サイドメニューよりThingsを選択して新規登録します。

デバイス名を入力
今回はESP32_SAMPLEというデバイス名にします。

一番上の新しい証明書を自動生成を選択

Policyの作成
ポリシー名はESP32_Policyとして、ここでは送受信の権限を設定することができます。
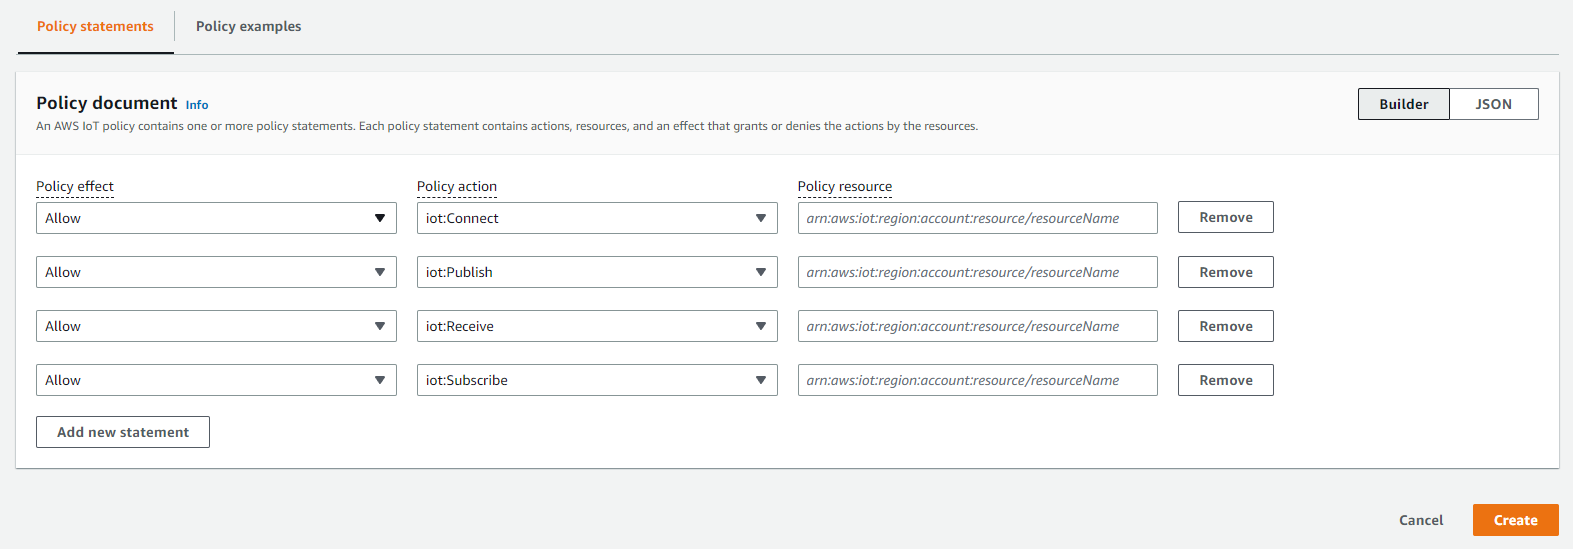
iot:Connect
iot:Publish
iot:Receive
iot:Subscribe
Policy resourceは全て「*」 にします。
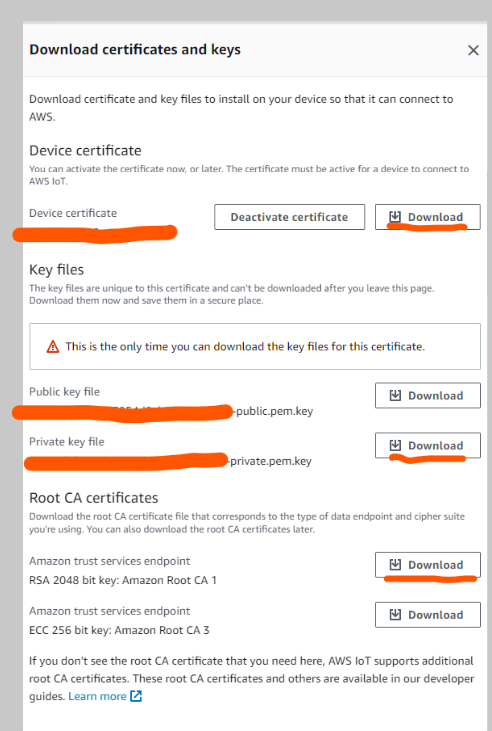
証明書とキーをダウンロードする
ポリシーまで作成すると証明書のダウンロード画面がでてきますので、Public key,Private key,Root CA1 certificateをダウンロードしておきましょう。
Rule(ルール)の設定
ルールを設定します。今回は予め設定したテーブルへデータを格納します。
Message Routing→Rules
SQL Statementがトピック名になります。
SQL Statement: SELECT*FROM "esp32/pub"
Action: "Timestream table"
DB:"esp32_test_database"
table:"esp32_test_table"
Dimensions name: "deviced"
Dimensions value: "my-esp32"
Timestamp: "${timestamp()}"

パラメータの例

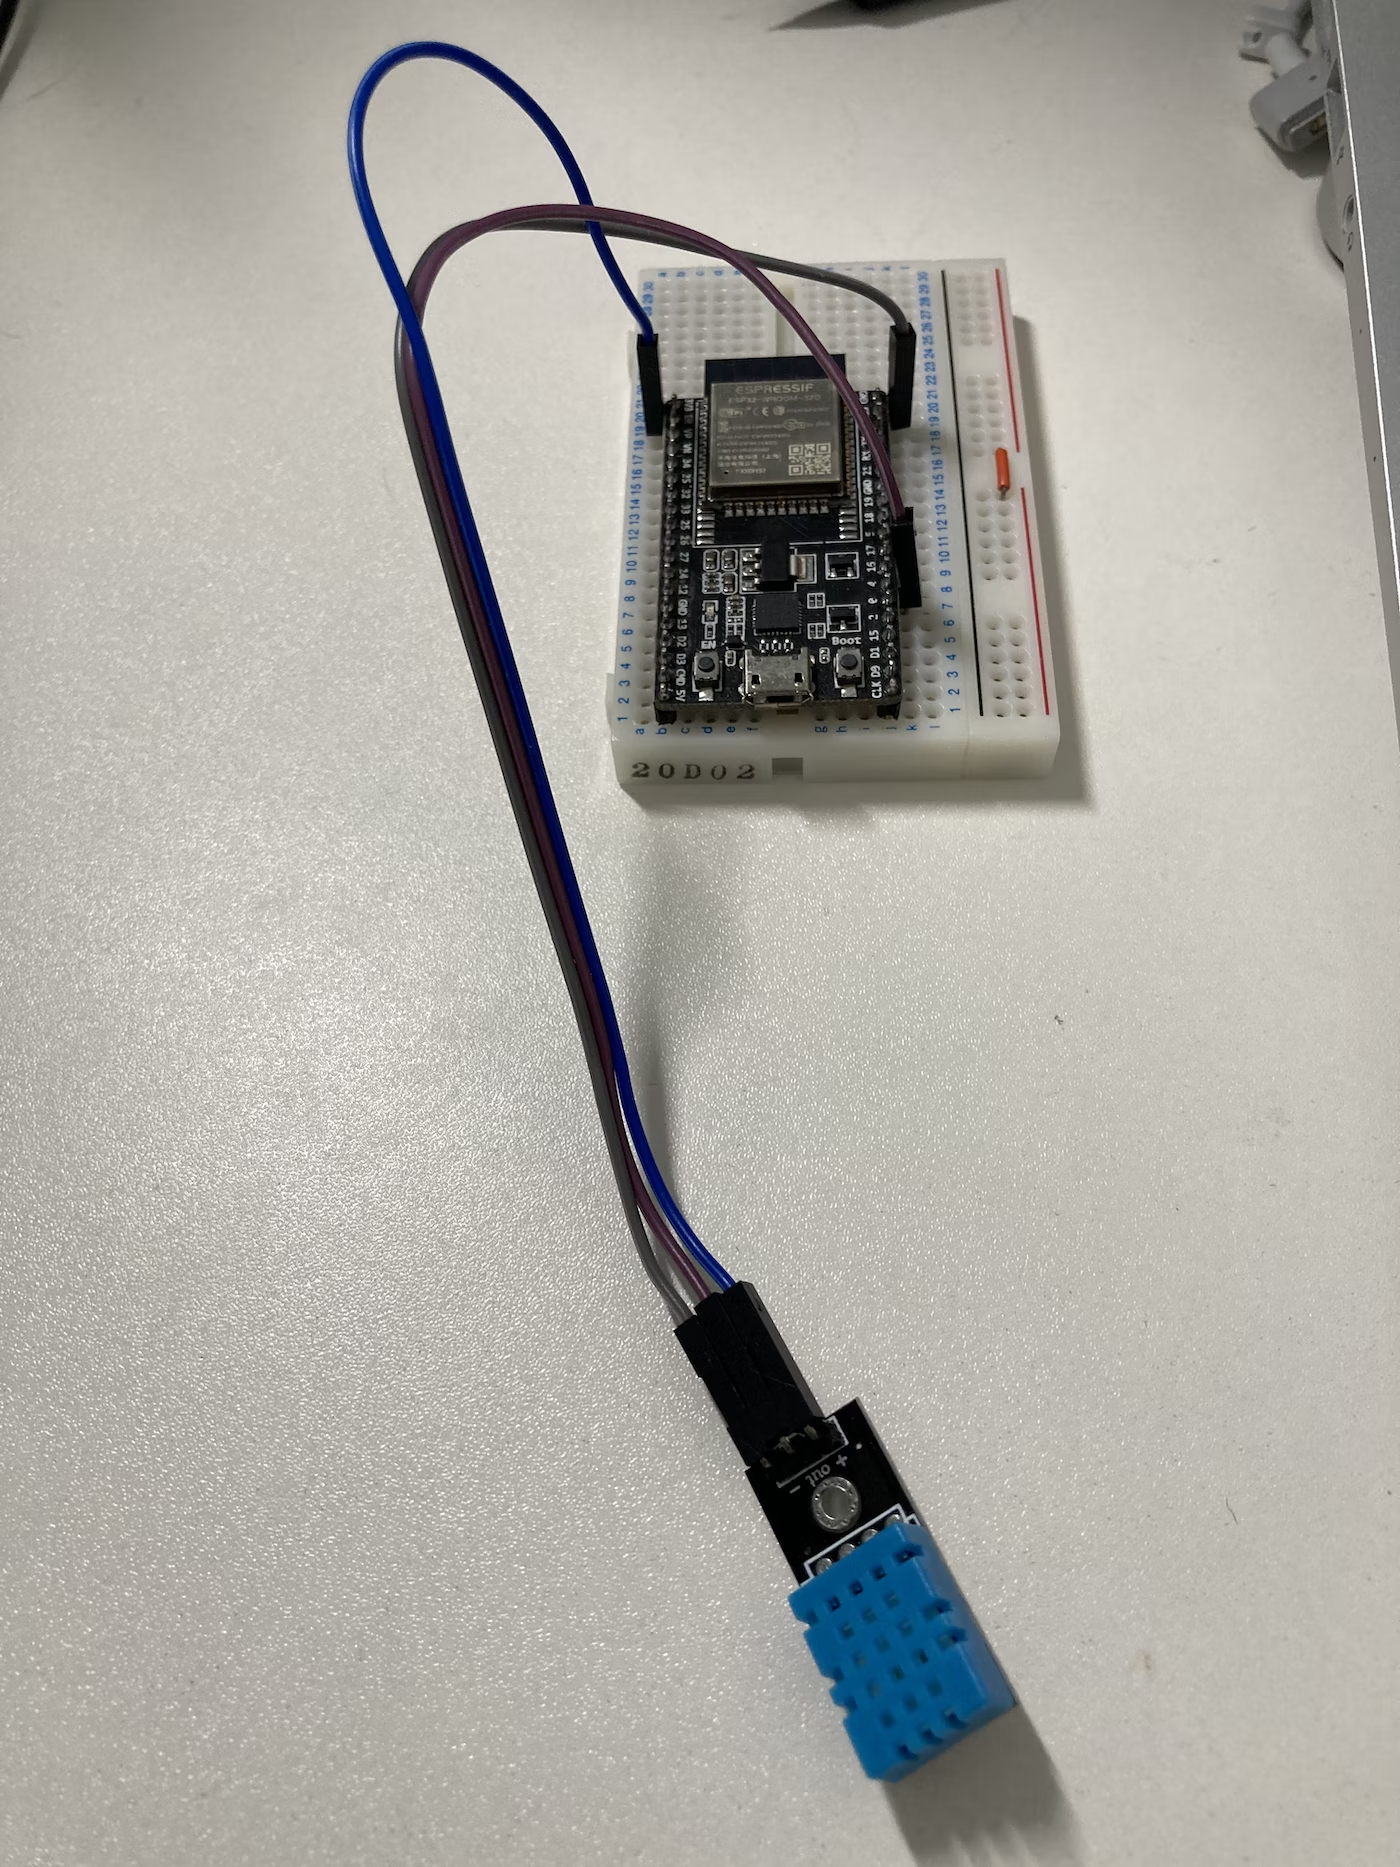
ESP32側の設定
結線図
温度・湿度測定:DHT11
Vcc,GND,GPIO(4)をそれぞれ接続します。
ソースコード
認証ファイルの記述
Keyの記述
ダウンロードした証明書3点からkeyをコピペします。
- Public key.key
- Private key.key
- Root CA1 certificate.pem
エンドポイント
Settings内のEndpointをコピーして
下記行を変更します。

const char AWS_IOT_ENDPOINT[] = "XXXXXXXXXXXX.amazonaws.com"; //change this
#include <pgmspace.h>

#define SECRET
#define THINGNAME "ESP32_DHT11"                         //change this

const char WIFI_SSID[] = "WIFI_SSID";               //change this
const char WIFI_PASSWORD[] = "WIFI_PASSWORD";           //change this
const char AWS_IOT_ENDPOINT[] = "XXXXXXXXXXXX.amazonaws.com";       //change this

// Amazon Root CA 1
static const char AWS_CERT_CA[] PROGMEM = R"EOF(
-----BEGIN CERTIFICATE-----
hogehogehogehogehogehogehogehogehogehogehogehogehogehoge
hogehogehogehogehogehogehogehogehogehogehogehogehogehoge
hogehogehogehogehogehogehogehogehogehogehogehogehogehoge
hogehogehogehogehogehogehogehogehogehogehogehogehogehoge
hogehogehogehogehogehogehogehogehogehogehogehogehogehoge
-----END CERTIFICATE-----
)EOF";

// Device Certificate                                               //change this
static const char AWS_CERT_CRT[] PROGMEM = R"KEY(
-----BEGIN CERTIFICATE-----
hogehogehogehogehogehogehogehogehogehogehogehogehogehoge
hogehogehogehogehogehogehogehogehogehogehogehogehogehoge
hogehogehogehogehogehogehogehogehogehogehogehogehogehoge
hogehogehogehogehogehogehogehogehogehogehogehogehogehoge
hogehogehogehogehogehogehogehogehogehogehogehogehogehoge
-----END CERTIFICATE-----

)KEY";

// Device Private Key                                               //change this
static const char AWS_CERT_PRIVATE[] PROGMEM = R"KEY(
-----BEGIN RSA PRIVATE KEY-----
hogehogehogehogehogehogehogehogehogehogehogehogehogehoge
hogehogehogehogehogehogehogehogehogehogehogehogehogehoge
hogehogehogehogehogehogehogehogehogehogehogehogehogehoge
hogehogehogehogehogehogehogehogehogehogehogehogehogehoge
hogehogehogehogehogehogehogehogehogehogehogehogehogehoge
-----END RSA PRIVATE KEY-----

)KEY";
メインコード
下記ライブラリはダウンロードして下さい。
- PubSubClient
- ArduinoJson
- WiFiClient
#include "secrets.h"
#include <WiFiClientSecure.h>
#include <PubSubClient.h>
#include <ArduinoJson.h>
#include "WiFi.h"

#include "DHT.h"
#define DHTPIN 4     // Digital pin connected to the DHT sensor
#define DHTTYPE DHT11   // DHT 11

#define AWS_IOT_PUBLISH_TOPIC   "esp32/pub"
#define AWS_IOT_SUBSCRIBE_TOPIC "esp32/sub"

float h;
float t;

DHT dht(DHTPIN, DHTTYPE);

WiFiClientSecure net = WiFiClientSecure();
PubSubClient client(net);

void connectAWS()
{
  WiFi.mode(WIFI_STA);
  WiFi.begin(WIFI_SSID, WIFI_PASSWORD);

  Serial.println("Connecting to Wi-Fi");

  while (WiFi.status() != WL_CONNECTED)
  {
    delay(500);
    Serial.print(".");
  }

  // Configure WiFiClientSecure to use the AWS IoT device credentials
  net.setCACert(AWS_CERT_CA);
  net.setCertificate(AWS_CERT_CRT);
  net.setPrivateKey(AWS_CERT_PRIVATE);

  // Connect to the MQTT broker on the AWS endpoint we defined earlier
  client.setServer(AWS_IOT_ENDPOINT, 8883);

  // Create a message handler
  client.setCallback(messageHandler);

  Serial.println("Connecting to AWS IOT");

  while (!client.connect(THINGNAME))
  {
    Serial.print(".");
    delay(100);
  }

  if (!client.connected())
  {
    Serial.println("AWS IoT Timeout!");
    return;
  }

  // Subscribe to a topic
  client.subscribe(AWS_IOT_SUBSCRIBE_TOPIC);

  Serial.println("AWS IoT Connected!");
}

//publish
void publishMessage()
{
  StaticJsonDocument<200> doc;
  doc["humidity"] = h;
  doc["temperature"] = t;
  char jsonBuffer[512];
  serializeJson(doc, jsonBuffer); // print to client
  // Debug JSON in SerialConsole
  Serial.println(jsonBuffer);
//  client.publish(AWS_IOT_PUBLISH_TOPIC, jsonBuffer);
  client.publish("esp32/pub", jsonBuffer);

}

void messageHandler(char* topic, byte* payload, unsigned int length)
{
  Serial.print("incoming: ");
  Serial.println(topic);

  StaticJsonDocument<200> doc;
  deserializeJson(doc, payload);
  const char* message = doc["message"];
  Serial.println(message);
}

void setup()
{
  Serial.begin(115200);
  connectAWS();
  dht.begin();
}

void loop()
{
  h = dht.readHumidity();
  t = dht.readTemperature();


  if (isnan(h) || isnan(t) )  // Check if any reads failed and exit early (to try again).
  {
    Serial.println(F("Failed to read from DHT sensor!"));
    return;
  }

//  Serial.print(F("Humidity: "));
//  Serial.print(h);
//  Serial.print(F("%  Temperature: "));
//  Serial.print(t);
//  Serial.println(F("°C "));

  publishMessage();
  client.loop();
  delay(5000);
}
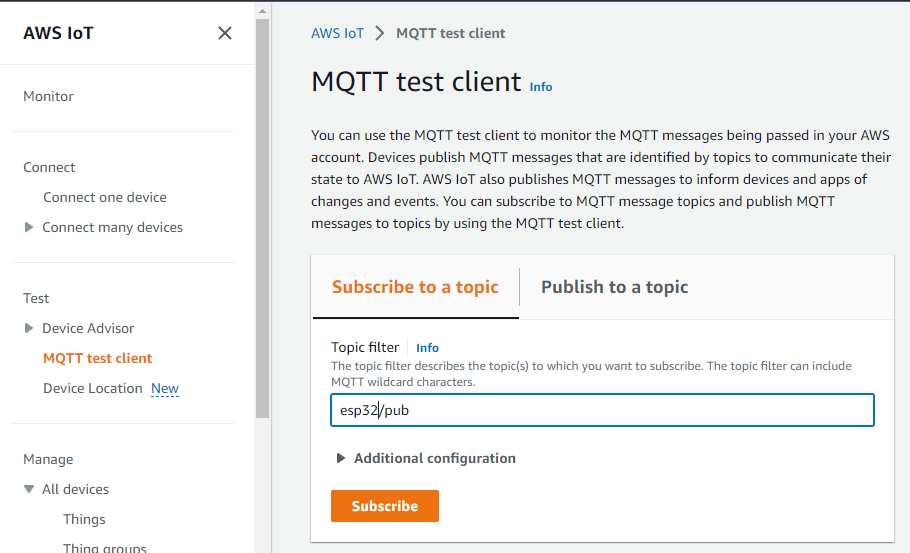
接続してみよう
MQTT test clientでの確認
Test→MQTT test clientで通信が成功している場合情報を受信できます。
レスポンス
{
"humidity": "XX",
"temperature": "XX"
}
queryでの確認
Timestream→Query editorにて確認することができます。
SQL文のサンプル
SELECT * FROM "esp32_test_database"."esp32_test_table" ORDER BY time DESC LIMIT 10

(Tips)ワイルドカードによる設定
トピック名にワイルドカードを設定できます。それによりデバイスIDなどをPub時に合わせて送信することができます。
トピック名を変更する
トピック名に「+」 を入れる
esp32/+/pub
ディメンションを変更
Dimensions name: "deviceID"
Dimensions value: "${topic(2)}"
topicの2番目の位置にデバイスIDを入れる という設定になります。