こんにちは。
今回は、前回作成した簡単なWebアプリに送信元で人の顔を検知して、マスキング処理を行った。
また顔認識については、ブラウザ(JavaScript)で動作するTensorflow.jsを利用する。
前回作成したWebアプリについては、下記記事を参照のこと。
目次
- 今回のやること
- システム構成図
- 環境
- コード
- 結果
今回のやること
・送信元で顔を検知して、マスキング処理を行った映像を送信する
・RaspberryPiでのリソース検証

今回のユースケースとしては、行政機関が観光地などの状況をHPでリアルタイムで配信するといったことが挙げられる。送信元で人の顔を検知してモザイク処理を施した映像を送ることでプライバシーへの対策は少なからず向上すると思われる。
※今回は、簡単に顔認識された座標にCanvas APIで黒く塗りつぶした映像を送信している。
エッジ側(送信元)で何らかの処理を行うメリットとしては、一般的に下記が挙げられると思う。
- プライバシー対策:個人情報等の観点から、データをマスクして送信することが可能
- コスト対策:全てのデータを送らず、処理をしてからサーバに送ることによる通信量の削減
- 信頼性:サーバを介さないで行うため、サーバ障害などの影響を受けない
- 低レイテンシ:通信が発生しないため、通信によるロスがない
また、組み込みで行わずフロントでAI処理を行うことで、特に環境構築が必要なく、ブラウザの環境があれば利用できるメリットがある。
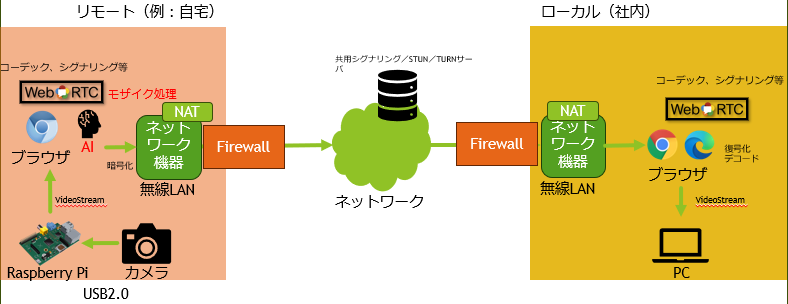
システム構成図
環境
-
ローカルPC
- Windows10
- Microsoft edge(ブラウザ)
-
RaspberryPi 4B
- bullseye(OS)
- Chronium(ブラウザ)
-
Webアプリ
- Vue3(Webフレームワーク)
- SkyWay SDK
- Bulma (CSSフレームワーク)
-
AI
- tensorflow-models/face-detection 1.0.2
- tensorflow/tfjs 4.10.0
-
デプロイ環境
- GAE(Google App Engine)
デプロイ環境
- GCP(GAE)
コード
認証APIについては、前回の記事を参照のこと。
-
app.vueを作成して、下記を記述。
app.vue<script setup lang="js"> import { ref, onMounted } from "vue" import * as tf from "@tensorflow/tfjs" import * as faceDetection from "@tensorflow-models/face-detection" import { nowInSec, SkyWayAuthToken, SkyWayContext, SkyWayRoom, SkyWayStreamFactory, uuidV4, LocalVideoStream } from '@skyway-sdk/room'; import axios from 'axios'; let peerConnection = null let localStream = null const localVideo = ref(null) const canvas = ref(null) let detector = null const children = [] const authToken = async() => { return axios.get('ここにSkyWay Auth Tokenを取得するAPIのパスを入力',{ }).then((Response) => Response.data) } // モデルのインポート onMounted(async () => { const model = faceDetection.SupportedModels.MediaPipeFaceDetector const detectorConfig = { runtime: "tfjs", maxFaces: 5 // 顔認識する最大数 } detector = await faceDetection.createDetector(model, detectorConfig) console.log(detector) }) const onStartVideo = async () => { const constraints = { video: true } const stream = await navigator.mediaDevices.getUserMedia(constraints) localVideo.value.srcObject = stream const canvasStream = canvas.value.captureStream(30) localStream = canvasStream predict() } const onStopVideo = () => { pauseVideo(localVideo.value) stopLocalStream(localStream) } const stopLocalStream = (stream) => { let tracks = stream.getTracks() if (!tracks) { console.warn('NO tracks') return } for (let track of tracks) { track.stop() } } const pauseVideo = (element) => { element.pause() if ('srcObject' in element) { element.srcObject = null } else { if (element.src && (element.src !== '') ) { window.URL.revokeObjectURL(element.src) } element.src = '' } } const predict = async () => { try { if (!localVideo.value.srcObject) return const faces = await detector.estimateFaces(localVideo.value) console.log(faces) const ctx = canvas.value.getContext("2d") ctx.drawImage(localVideo.value, 0, 0, canvas.value.width, canvas.value.height) console.log(ctx) for (let n = 0; n < faces.length; n++) { const face = faces[n] const box = face.box ctx.fillRect(box.xMin, box.yMin, box.width, box.height) } } catch (e) { console.error(e) } window.requestAnimationFrame(predict) } const myVideo = ref(null) const myAudio = ref(null) const remoteVideoArea = ref("") const remoteAudioArea = ref(null) const myId = ref('') const roomName = ref('') // 即時実行のasyncで関数全体を囲むと、非同期処理awaitが使用可能 const join = async () => { // CameraのLocalStreamを作成する const videoStream = await SkyWayStreamFactory.createCameraVideoStream(); // publishできるようにLocalStream型へ変更 const [videoTrack] = localStream.getVideoTracks(); const streamCanvas = new LocalVideoStream(videoTrack); // roomNameが空の時は以降の処理は行わない if (roomName.value == '') return // SDK認証のSkyWay Auth Tokenの取得 const token = await authToken() // Roomに入室する(roomを作成する) const context = await SkyWayContext.Create(token) const room = await SkyWayRoom.FindOrCreate(context, { type: 'p2p', name: roomName.value, }) // roomに入る const me = await room.join() myId.value = me.id room.onMemberJoined.add((e) => { console.log(e) }) // 顔を検知してマスキングを施した映像を公開する await me.publish(streamCanvas) // 他のユーザーがいた・入室してきた時の処理 const subscribeAndAttach = async (publication) => { if (publication.publisher.id === me.id) return; const { stream } = await me.subscribe(publication.id); // DOMに直接videoとaudioのelementを追加する let newMedia; switch (stream.track.kind) { case 'video': newMedia = document.createElement('video') newMedia.height = 640 newMedia.width = 480 newMedia.playsInline = true newMedia.autoplay = true stream.attach(newMedia) remoteVideoArea.value.appendChild(newMedia) break default: return } } room.publications.forEach(subscribeAndAttach) room.onStreamPublished.add((e) => subscribeAndAttach(e.publication)) } </script> <template> <div class="table-center"> <p>〇サンプルについて</p> <h3>こちらは、WebRTCの技術を用いて、端末間でのP2P通信を行うサンプルです。<br>データ送信時に人の顔を検知して、マスキング処理を行った映像を送信します。</h3><br> <p>〇サンプル利用方法</p> <ol> <li>通信する端末双方または、ローカル上でウィンドウを2つ(タブでなく)立ち上げて、WebRTCデモページを開く。<br>( 以下の手順は両ページ同様に行うこと)</li> <li>Startボタンを押下すると、ポップアップが表示(最初のみ)されるので許可する</li> <li>「ローカルカメラの映像」「ローカルカメラの映像(マスキング処理)」の部分に映像が表示されることを確認</li> <li>Room nameと記述されたテキストボックスに任意の名前(両ページで共通のRoom名を入力すること)を入力して、Joinボタンをクリック</li> <li>「リモートカメラの映像」にリモートカメラの映像が表示されていることを確認</li> </ol> </div> <section class="has-text-centered"> <div class="block"> <div class="container is-max-desktop"> <div class="has-text-centered"> <button class="button is-centered is-primary" @click="onStartVideo">Start</button> <button class="button is-centered is-danger" @click="onStopVideo">Stop</button> </div> </div> </div> <div class="block"> <div class="container is-max-desktop"> <div class="block"> <div class="label">ローカルカメラの映像</div> <video id="localVideo" ref="localVideo" class="video" width="640" height="480" autoplay></video> </div> <div class="block"> <div class="label">ローカルカメラの映像(マスキング処理)</div> <div class="mosaic"> <canvas ref="canvas" width="640" height="480" class="canvas"></canvas> </div> </div> </div> </div> </section> <div class="has-text-centered"> <div>ID: <span>{{ myId }}</span></div> <div class="room-name"> Room Name: <div v-if="!myId"> <input v-model="roomName" type="text" /> <button @click="join">Join</button> </div> <div v-else>{{roomName}}</div> </div> <p>リモートカメラの映像</p> <div ref="remoteVideoArea" class="remote-videos" width="640" height="480"/> </div> </template> <style> video { background: gray; } canvas { background: gray; } .table-center{ display: table; margin: 0 auto; } .table-center p{ font-weight: bold; } .table-center ol{ background: #d3e6ff; } .mosaic { position: relative; height: 0; overflow: hidden; padding-top: 56.25%; max-width: 640px; max-height: 480px; margin: 10px auto; .canvas { background: silver; position: absolute; top: 0; left: 0; width: 100%; height: 100%; max-width: 640px; max-height: 480px; } } </style> -
ビルド
$ npm run build -
デプロイ
app.yamlをプロジェクトのルートディレクトリに作成して、下記内容を記述する。app.yamlruntime: php55 handlers: - url: / static_files: dist/index.html upload: dist/index.html - url: /(.*) static_files: dist/\1 upload: dist/(.*)GAEに、gcloudコマンドを利用して、デプロイする。
$ gcloud app deploy
結果
- 送信元(RaspberryPi)で顔を検知して、マスキング処理を行った映像を送信する
無事、送信元で顔を検知して、マスキング処理を行った映像を送信することができた。
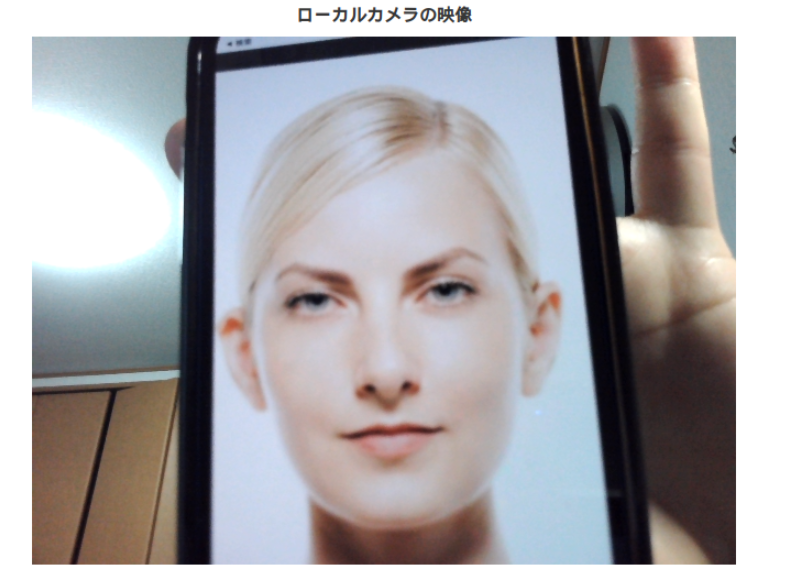
【送信元の映像】
【受信元の映像】
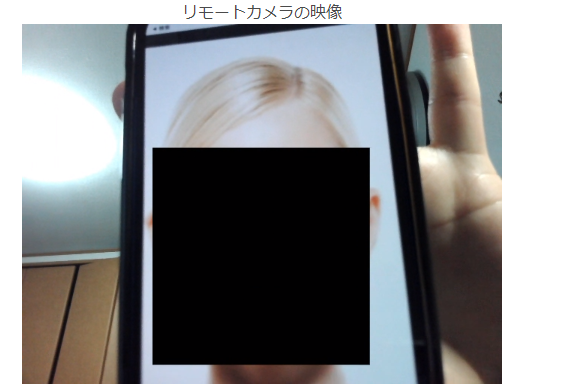
上記のように、送信元で人の顔を検知して、マスキング処理されたえいが送られてくる。
- RaspberryPiでのリソース検証
下記コマンドを実行した際のリソース状況をスクショした。
$ htop
①デプロイしたWebアプリのページを開く

②ローカルストリームの取得

③WebRTC通信の実行(ローカルネットワーク内)

④マスキング処理(AIで画像検知)の実施

⑤WebRTC通信におけるマスキング処理(AIで画像検知)を行った映像の配信

メモリ使用量の変化が100MB以内で収まっている。
今回使用したモデルをフロントで動作させた場合のリソースへの影響は特になさそうである。